
Introduction
- Educational kit for science, technology, engineering, and mathematics
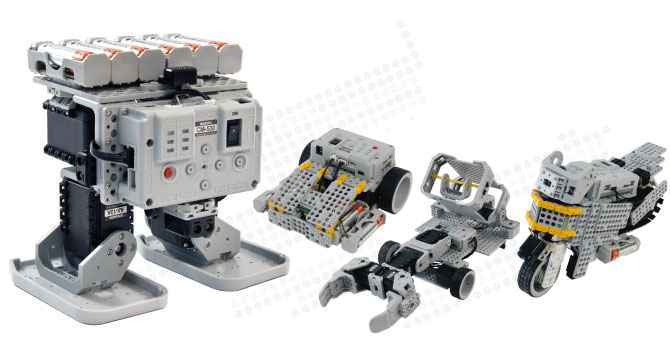
- Curricula of 16 sample robots with a total of 48 different types of lessons.
- Robots optimized for competition with high-speed DYNAMIXEL and IR array.
- Robot kits aimed at solving problems creatively.
Getting Started
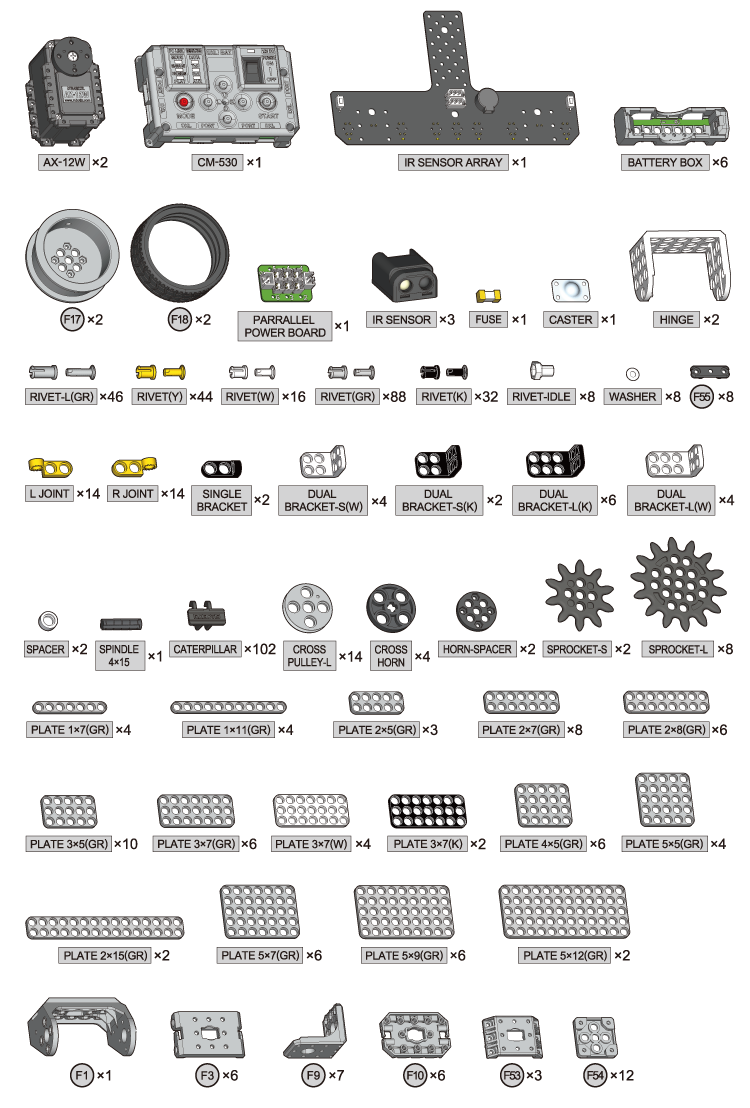
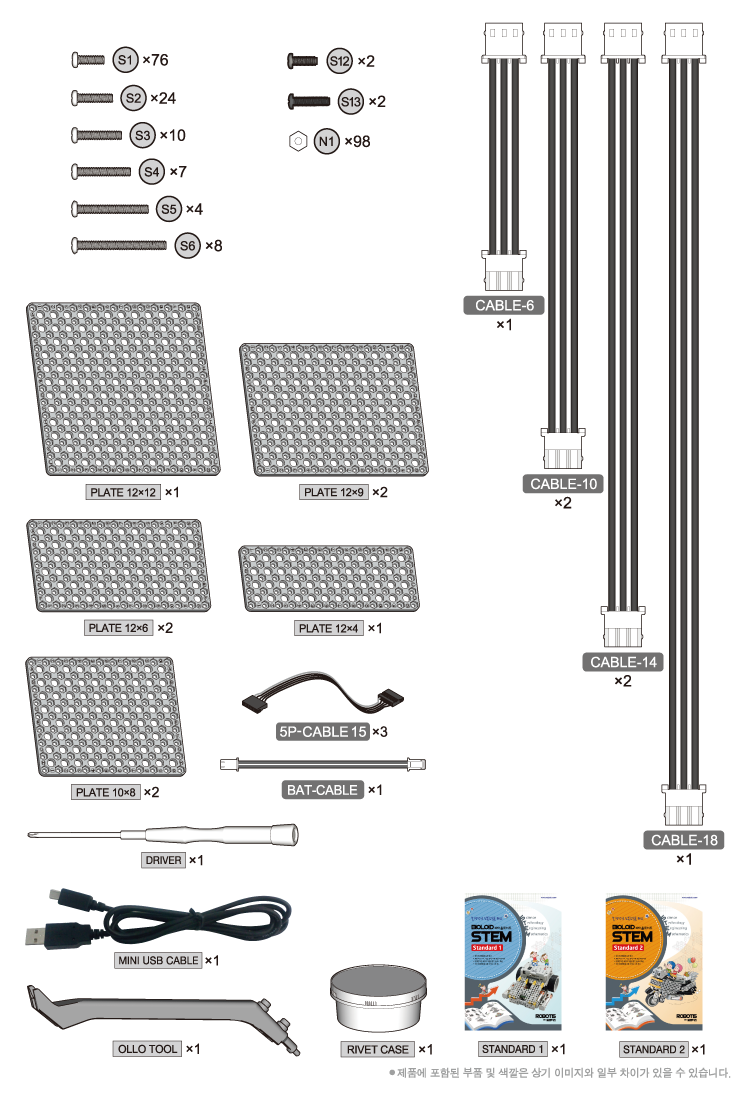
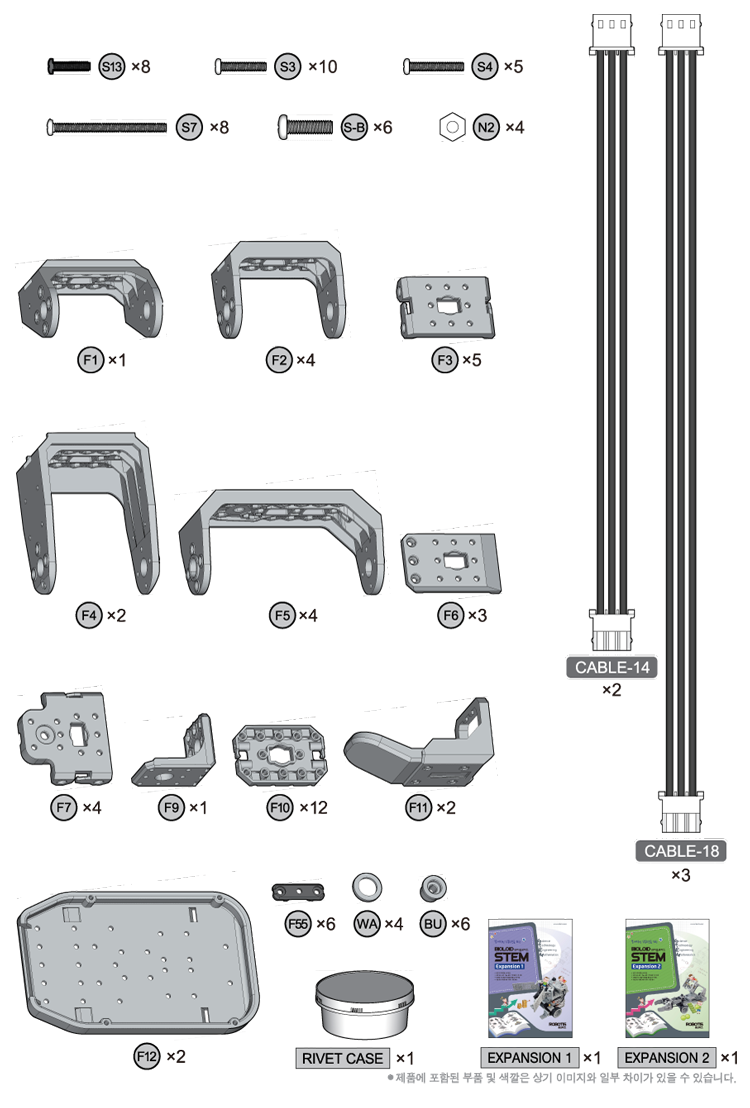
Standard Part List
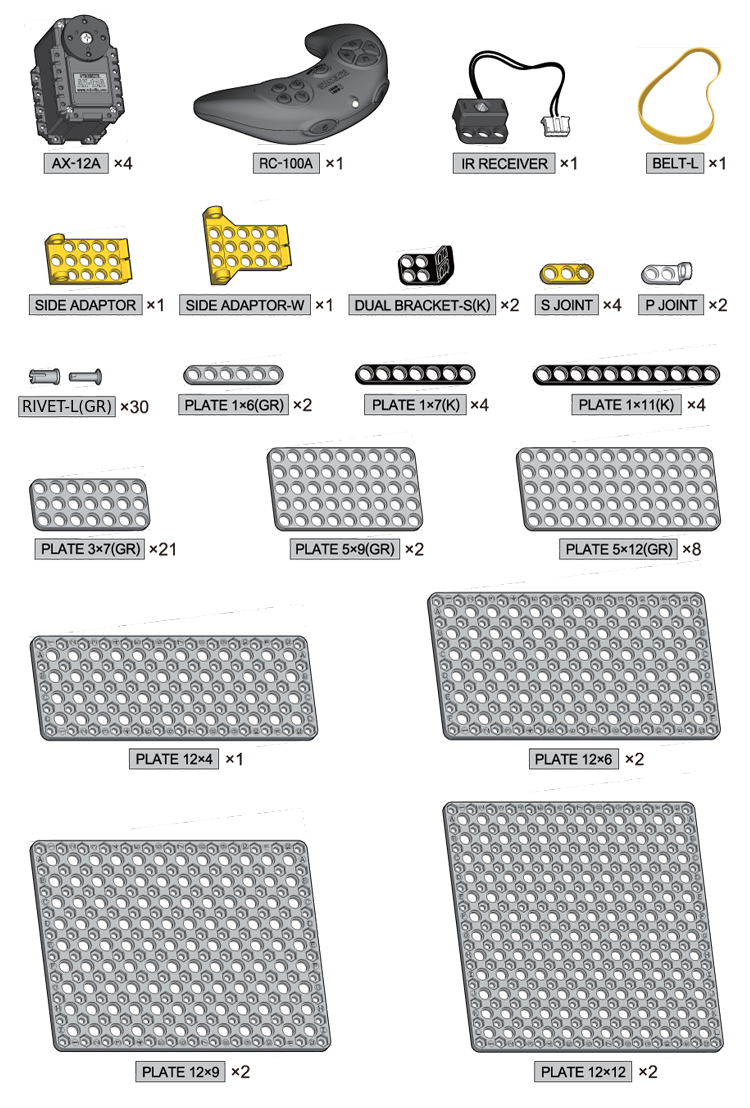
Expansion Part List
Operating
Download the Program
You can find task codes and motion files for other actions on the Standard, Expansion page.
How to download Task Code to controller
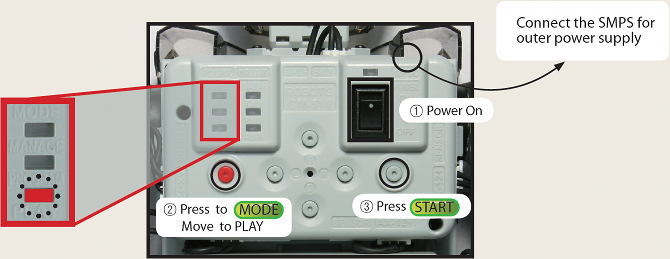
Turning the Robot on
- Turn the power switch on and the LED will start blinking.
- Use the MODE button to move the LED to “PLAY”. (The LED will move each time you press the MODE button)
- Press the START button. (Check whether the LED on “PLAY” is blinking)
- If the LED does not turn on, check the power cable/connection.
- If there are no problems with cable, recharge your battery. (Please refer to Charging for more information)
The power does not turn on.
- Is the battery properly connected?
- Is the battery fully charged?
- Is the battery fuse intact?
- Please refer Fuse Replacement for information on how to replace the fuse.
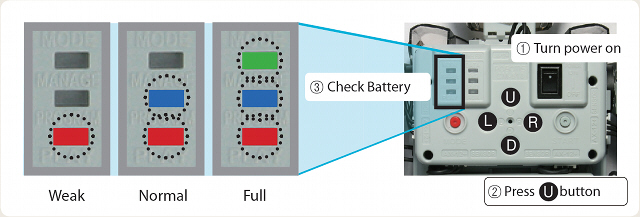
I want to check how much battery I have left.
Turn the CM-530 on and press the U button. The LED will turn on to show how much battery you have left as seen in the figure below.
The robot makes a continuous warning sound while moving.
- The alarm indicates that the robot is low on batteries. Immediately recharge your battery(Refer to Charge).
- If you do not replace the battery right away, the robot may turn off without warning and fall, which can cause severe damage.
Assembly Check
- In Assembly Check mode you can verify whether your robot has been properly assembled. Compare the initial position of the motors.
- To run Assembly Check mode select ‘Manage’, hold the ‘D’ button followed by ‘START’.
Keep holding until melody finished playing.
- Select the motor with either ‘U’ or ‘D’ buttons. The selected motor with turn its LED on and position itself into its initial position.
‘U’ ups ID order while ‘D’ downs ID order.
- Compare the ID against the assembly check guide.
If the motor is not detected by the controller then it will beep.
- Compare whether the motor “froze” or it goes to its initial position.
Although the LED may be on the motor may be loose; check its wiring.
- Check the port for the IR array.
The IR array connected to its pre-assigned will blink when detecting an object.
- To run Assembly Check mode select ‘Manage’, hold the ‘D’ button followed by ‘START’.
Battery Charge
You may obtain Lithium polymer batteries from www.robotis-shop-en.com.
If the robot alarm sounds off during operations then recharge the battery.
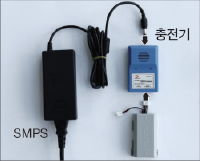
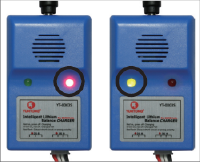
During charging the charger’s red LED turns on. When complete the green LED turns on.
-
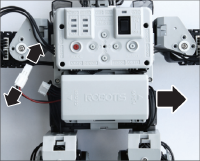
Take the battery out
-
Connect the charger
-
Charge
Charging(Red LED), Complete(Green LED)
-
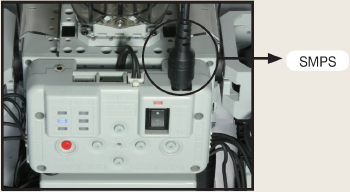
You can connect the robot to an external power source through SMPS.
-
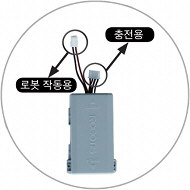
The battery is equipped with a connector to charge the battery and another to move the robot
Charging Time and Battery Life/Operating
Charging Time
- When fully discharged : 1~1.5 hour
- Leaving the battery fully discharged for too long may reduce its lifespan drastically.
- Time to charge the battery depends on the status of the battery(If the charging time or battery life becomes too short, you may need to replace your battery).
Caution
- Do NOT keep the battery connected with a robot or a charger.
- If you will not use the battery for a long time from now on, please keep it HALF-CHARGED.
- Do NOT put the battery with an environment with high temperature or humidity.
Download
中文用户 (DREAM, STEM, MINI等产品) 请参考中文手册.
下载示例文件
Standard Examples
| Robot | Description |
|---|---|
1. Sequence Racer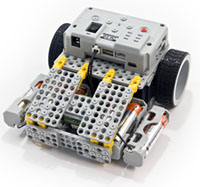 |
Download Basic Phase Download Application Phase Download Practical Phase Download Video DYNAMIXEL SettingAX-12W ID[1, 2]: Wheel Mode AlgorithmControl the robot’s moving direction with the controller’s directional buttons. Operation Guideif you press the forward ‘U’, turn left ‘L’, turn right ‘R’, and reverse ‘D’ sequentially pressing ‘START’ the robot will move in the order the directional buttons were pressed. |
2. Bug Fighter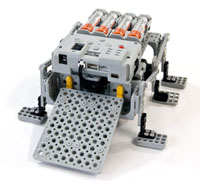 |
Download Basic Phase Download Application Phase Download Practical Phase Download Video DYNAMIXEL SettingAX-12W ID[1, 2]: Wheel Mode AlgorithmRobot follows the black line by following said line. Operation GuideThe robot remains inbounds and push others out if found in the same area. |
3. Tumbler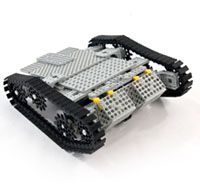 |
Download Basic Phase Download Application Phase Download Practical Phase Download Video DYNAMIXEL SettingAX-12W ID[1, 2]: Wheel Mode AlgorithmThe IR sensors detect obstacles and control the robot’s direction. Operation GuideThe robot can go over large or small obstacles; with large obstacles it can change directions or react accordingly if flipped over. |
4. Line Follower |
Download Basic Phase Download Application Phase Download Practical Phase Download Video DYNAMIXEL SettingAX-12W ID[1, 2]: Wheel Mode AlgorithmThe robot can move on a determined in a criss-cross grid. Operation GuideThe robot can move forward, reverse, turn left or right along its determined path via its IR array. |
5. Digital Piano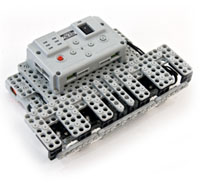 |
Download Basic Phase Download Application Phase Download Practical Phase Download Video AlgorithmPlays a different tune based IR sensor reading. Operation GuideThe robot can output a musical note from the active sensors from the IR array. |
6. Motorcycle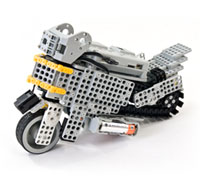 |
Download Basic Phase Download Application Phase Download Practical Phase Download Video DYNAMIXEL SettingAX-12W ID[1]: Wheel Mode, AX-12W ID[2]: Joint Mode AlgorithmControl action by following the black line and avoiding obstacles Operation GuideFollows the line while avoiding obstacles by steering itself away from such obstacle. |
7. Avoider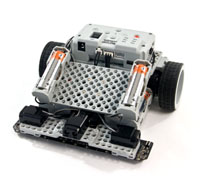 |
Download Basic Phase Download Application Phase Download Practical Phase Download Video DYNAMIXEL SettingAX-12W ID[1, 2]: Wheel Mode Algorithmmaintains distance by its right sensor. Operation GuideThe robot can escape a maze by using its left, right and center IR sensors. |
Expansion Examples
| Robot | Description |
|---|---|
8. Scribbler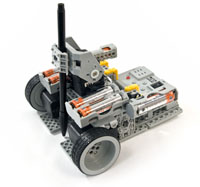 |
Download Basic Phase Download Application Phase Download Practical Phase Download Video DYNAMIXEL SettingAX-12W ID[1]: Wheel Mode, AX-12A ID[3, 4]: Wheel Mode AlgorithmRobot follows the order of sequentially inputted commands. Operation GuideWrite ‘가’ and ‘어’ when augmented with a pen. |
9. Transporter |
Download Basic Phase Download Application Phase Download Practical Phase Download Video DYNAMIXEL SettingAX-12W ID[1, 2]: Wheel Mode, AX-12A ID[3 ~ 5]: Joint Mode AlgorithmThe robot follows a pre-determined path and completes a mission. Operation GuideObstacles at certain locations the robot moves them at 2 specific locations from start the robot follows a determined path until finishing. |
10. Probe Car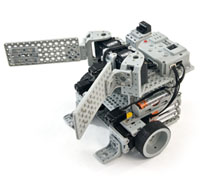 |
Download Basic Phase Download Application Phase Download Practical Phase Download Video DYNAMIXEL SettingAX-12W ID[1, 2]: Wheel Mode, AX-12A ID[3, 4]: Joint Mode AlgorithmWhile following a path if the robot encounters an obstacle it will move it. Operation GuideIf the robot detects obstacles over boxes via its IR sensors it moves them to specified locations. |
11. Beetle Gripper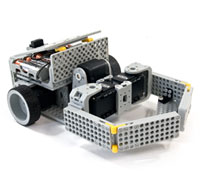 |
Download Basic Phase Download Application Phase Download Practical Phase Download Video DYNAMIXEL SettingAX-12W ID[1, 2]: Wheel Mode, AX-12A ID[3 ~ 5]: Joint Mode AlgorithmClamp robot follows button input Operation GuideThe remote control can control forward, reverse, left and right turns, left and right pivots, grab, lift and lower objects. |
12. Robot Arm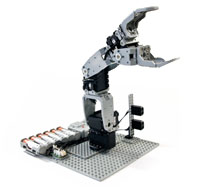 |
Download Basic Phase Download Application Phase Download Practical Phase Download Video DYNAMIXEL SettingAX-12A ID[3 ~ 6]: Joint Mode AlgorithmDetects a cup with the IR sensors and move it to a specified location. Operation GuideAn example robot that moves 2 small cups and 2 big cups to the designated position regardless of the order of dection. |
13. Walking Droid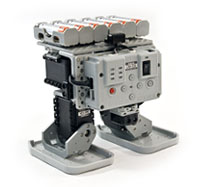 |
Download Basic Phase Download Application Phase Download Practical Phase Download Motion File Download Video DYNAMIXEL SettingAX-12A ID[3 ~ 6]: Joint Mode AlgorithmRobot detects obstacles and avoids it with its IR sensors. Operation GuideThe robot moves forwards and turns left; it shifts to the right if the left sensors detects an obstacle; shifts to the left if the right sensor detects an obstacle; reverses if the center sensor detects an obstacle. |
14. Hexapod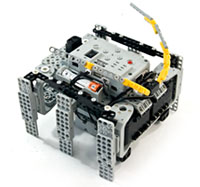 |
Download Basic Phase Download Application Phase Download Practical Phase Download Motion File Download Video DYNAMIXEL SettingAX-12A ID[3 ~ 5]: Joint Mode AlgorithmRobot detects obstacles and avoids it with its IR sensors. Operation GuideThe robot shifts to the right if the left sensors detects an obstacle; shifts to the left if the right sensor detects an obstacle; it speeds up when the upper sensor detects a hand. |
15. Greeting Penguin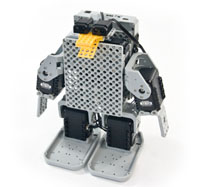 |
Download Basic Phase Download Application Phase Download Practical Phase Download Motion File Download Video DYNAMIXEL SettingAX-12W ID[1, 2]: Joint Mode, AX-12A ID[3 ~ 6]: Joint Mode AlgorithmRobot remembers the order of input commands and performs in the same input order. Operation GuideRobot remembers lifting of left and right arms and clapping and repeats the motions in the same order. |
16. Cannon Shooter |
Download Basic Phase Download Application Phase Download Practical Phase Download Video DYNAMIXEL SettingAX-12W ID[1, 2]: Wheel Mode, AX-12A ID[3 ~ 6]: Joint Mode AlgorithmSlingshot robot follows input commands for clamping and launching. Operation GuideThe remote control can control forward, reverse, left and right turns, left and right pivots, grab, lift and lower objects. |
References
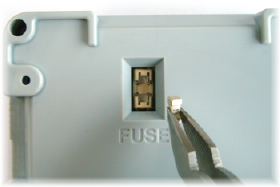
Replacing Fuse
The fuse in the CM-510/CM-530 prevents it from overloading,which can damage the circuit.
If the CM-510/CM-530 does not turn on with the battery but turns on when connected to the SMPS, replace your fuse.
※ The size of the fuse is shown below. Use a 125V/5A~10A fuse.
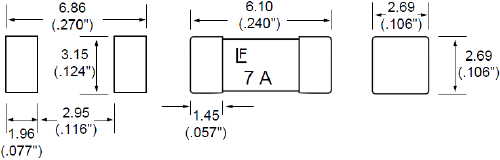
※ How to replace the fuse
-
Find the fuse on the back of the CM-510/CM-530.
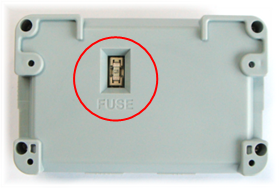
-
Use a pincette to replace the fuse with a new one.
DYNAMIXEL Management
DYNAMIXEL used as robot actuators possess many functions. This section explains how to change the dynamixel’s settings.
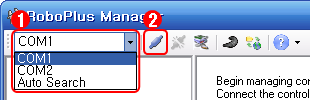
Changing the ID
- Select the port the controller is connected to.
-
Click “Connect”.
- A list of connected dynamixels is shown on the left. Click on the dynamixel you wish to change the ID of.
- Click on the ID row in the Control Table.
-
Click on the ID List combo box to see a list of possible ID’s. Select the ID, then click Apply.
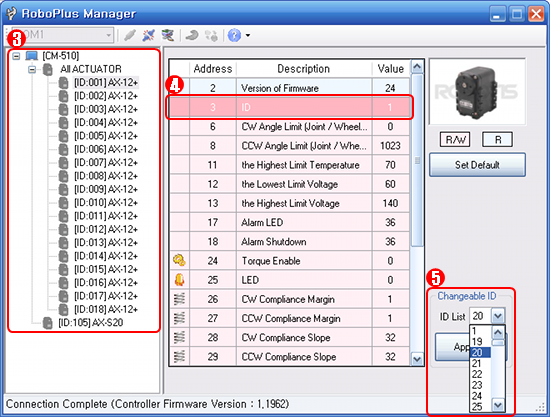
- To use in RoboPlus Motion and RoboPlus Task, the ID must be within the following ranges.
- The DYNAMIXEL’s ID must be between 0 and 25.
- The ID for AX-S1 should be set between 100 and 109.
Changing the Movement Mode
The dynamixel can operate in 2 different modes.
- Wheel Mode : Rotates 360 degrees like a regular motor.
- Joint Mode : Moves at a set angle with normal servo motors.
The mode can be changed using RoboPlus Manager. Once the mode is set, it will be maintained, even when turned off.
- Select the port the controller is connected to.
-
Click “Connect”.

- A list of connected DYNAMIXEL is shown on the left. Click on the DYNAMIXEL you wish to change the mode of. Then, click on the CW/CCW Angle Limit line in the Control Table.
-
To set to Wheel Mode, change the CW/CCW Angle Limit value to “0.” Or, simply click on the “Wheel Mode” button.
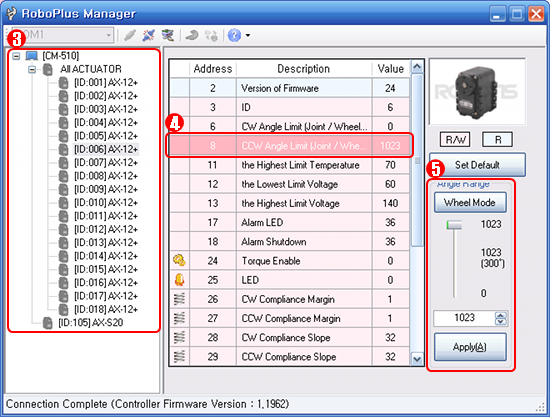
- To set to Joint Mode again, set the CW/CCW Angle Limit value to any number other than “0”. The initial values for Joint Mode are “0” for CW Angle Limit, and “1023” for CCW Angle Limit.
Troubleshooting
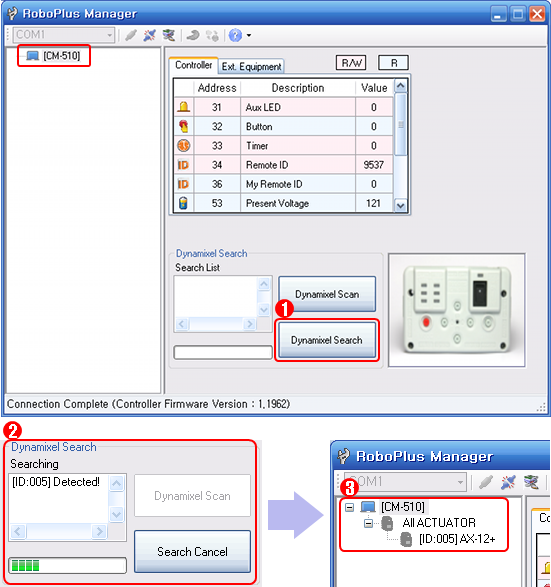
If you cannot find the dynamixel you are looking for using RoboPlus Manager, try the following :
- Connect just 1 DYNAMIXEL and check if there are any duplicate IDs. If you see a DYNAMIXEL on the left even though only 1 DYNAMIXEL is connected, there is a high probability of a duplicate ID. Change the ID immediately.
- If you are unable to find any DYNAMIXEL as in the image below, click on “DYNAMIXEL Search”. If the communication speed is not set to 1Mbps, the “DYNAMIXEL Search” function automatically resets the controller’s communication speed to 1Mbps to enable it to be recognized.
If the problem persists, your dynamixel may need repair. Please contact the service department of the company you purchased from.
ZIGBee Wireless Control
ZIGBee
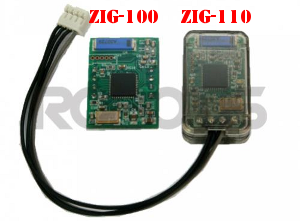
ZIG-100/110 uses ZIGBee for wireless communication. ZIGBee, like Bluetooth, is the communication technology commonly used in Personal Area Network (PAN). The communication quality of ZIGBee is better than that of IR, so it allows many users to control their robots without interferences.
CAUTION : Please note that not all products include a zigbee module and may need to be purchased separately.
Controller & ZIGBee
OLLO and Bioloid both use the RC-100, which uses IR communication method. To upgrade to the Zigbee communication method, you must purchase the ZIG-110 set separately. The ZIG-110 set includes one Zig-100 module, which is attached to the RC-100, and one Zig-110 module which is attached to the Controller.
NOTE : The modules in a single Zigbee set have been preconfigured to communicate with each other. Therefore, a module from one set may not work with a module from another set. Please be careful not to mix them up.
| ZIG-100 installed in RC-100 | ZIG-110 installed in CM-100 |
|---|---|
 |
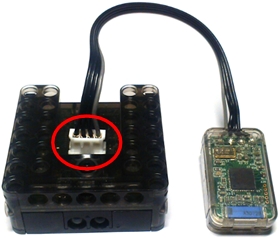 |
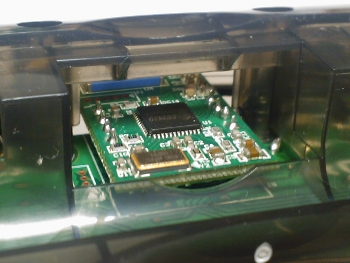
| ZIG-110 installed in CM-510 | ZIG-100 installed in CM-5 |
|---|---|
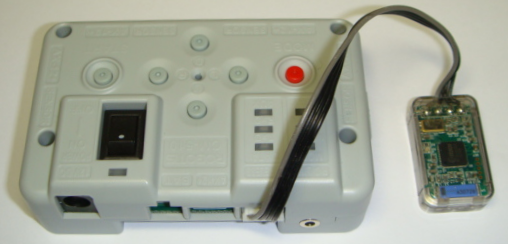 |
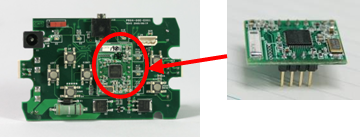 |