Introduction
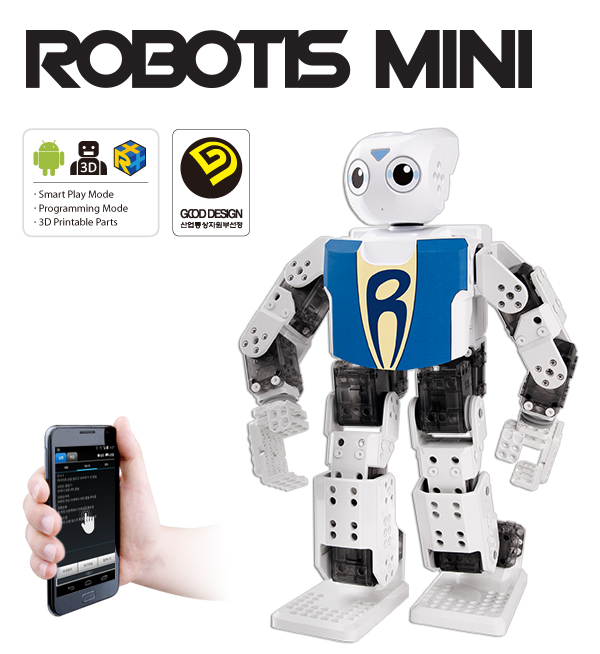
- Awarded the “Good Design”
- Compatible with the 6mm grid OLLO
ROBOTIS DREAMframes - Applies the small DYNAMIXEL XL-320 for various motion functions
- Offers the ROBOTIS-MINI exclusive App (Touch, Gesture, Voice Recognition, Messenger)
- Supports various functions for the user’s convenience (battery percentage, offset setting, etc)
- Supports R+ Task and R+ Motion
- Capable to expand with additional devices such as Color Sensor, LED Module, etc
Precaution
Please be aware of your own safety as you assemble. ROBOTIS CO., LTD is not responsible for the result of any accidents caused by the user’s negligence.
Safety Precautions
- Read through manual carefully before assembly.
- Do not use any other tools other than those provided in this kit. (no knives, cutters, drills, etc)
- Keep a safe distance from the robot during its activation.
- Be careful not to get fingers stuck between the robot joints.
- Do not store or operate the robot under direct sunlight.
- This project is not water proof. Do not use near water.
- Do not use near heat or fire.
- Do not disassemble or modify the parts.
- Keep all parts out of reach of small children.
- Do not drop or use sharp objects with the parts.
- Do not connect or let the li-ion battery come in contact with hair pins, clips, or any metal objects.
- Do not bend, twist, or modify the metal part of the li-ion battery.
- Do not place the li-ion battery in the microwave or solder any parts.
- Do not soak or place the li-ion battery in or near water.
Assembly Precautions
- Use only the designated screw driver in the kit(Size : M2)
- Do not use excessive force on nuts, bolts, or robotics parts.
- Avoid activating the robot on desks/tables to avoid from falling.
- Damages caused from falling are not covered under warranty.
- The gears in DYNAMIXEL XL-320 are subject to wear. Prolonged use, improper modification, excessive force, and damages will increase the gear backlash.
Precautions During Use
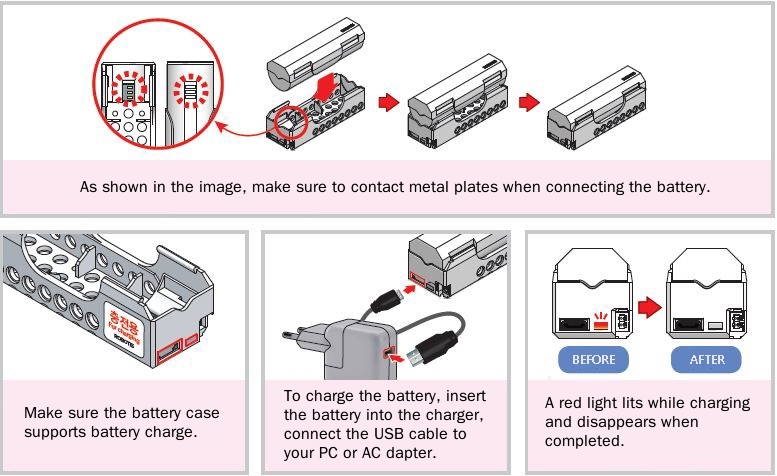
Charging the Li-ion battery
- Insert the li-ion battery in the charger case with the USB connector.
- The battery is shipped as uncharged. Please fully charge the battery before the first time use.
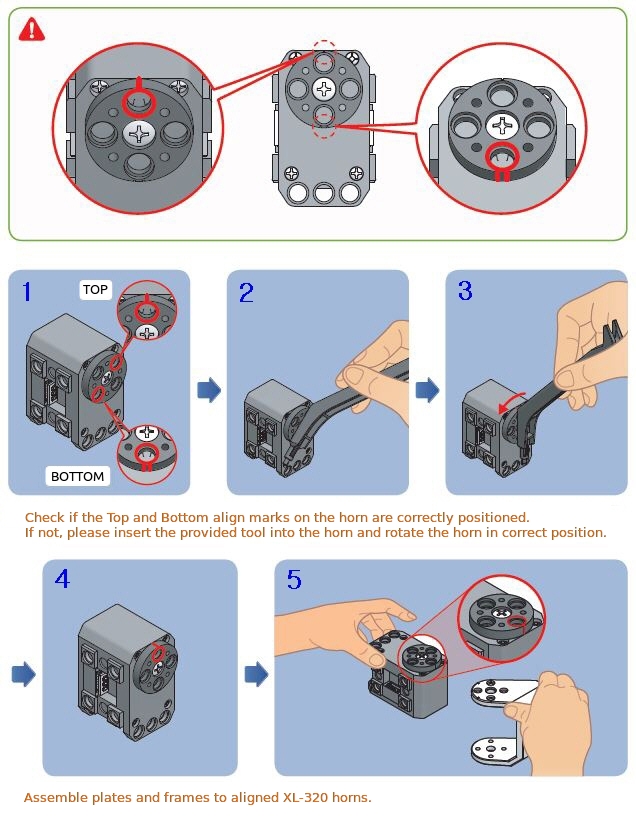
Frame Assembly for DYNAMIXEL XL-320
There are two different marks on the horn. Top marked and the bottom marked Before assembly, make sure the marks are in their proper position.
How to use the Rivet Tool
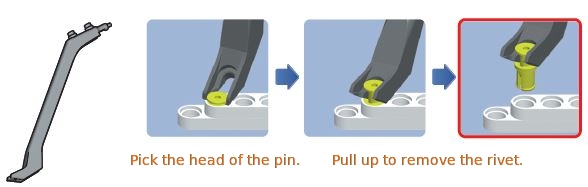
The Rivet is a simple tool to assemble plates.
The Rivet is made up of a pair of pin and pinhole.
In order to remove the rivet pick the pin head with the tool and pull it up.
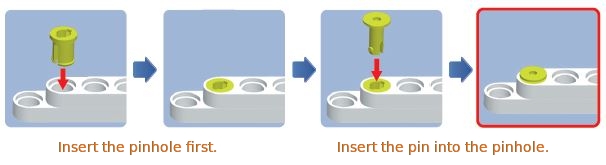
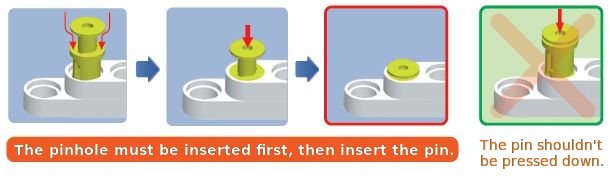
In order to reuse the removed rivet, pinhole should fit into the hole first then pin should be inserted.
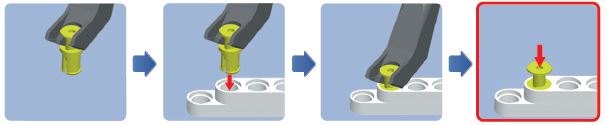
Try using provided tool when re-inserting the removed rivet.
Hold the rivet with the tool and insert the pinhole into the plate hole.
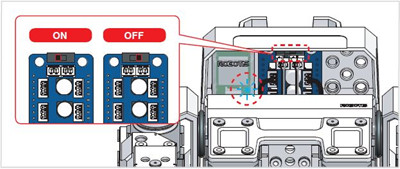
Checking the li-ion battery voltage
The controller checks the battery voltage when the power is turned on.
| Status | Movement |
|---|---|
| Good | All LEDs blink in RED 1 time |
| Low Battery | All LEDs blink in RED 5 times |
NOTE : The controller acquires voltage from a specific DYNAMIXEL(ID 3) so ID 3 should be connected properly.
WARNING : Please immediately turn off the power and contact ROBOTIS when you encounter any of the following symptoms.
- When you see smoke from the product.
- When the LED on DYNAMIXEL XL-320 does not blink during the
Actuator Test. - When the robot has been exposed to water or any debris has gone into the parts.
- When you feel odd smell from the product.
- When the robot is damaged.
Getting Started
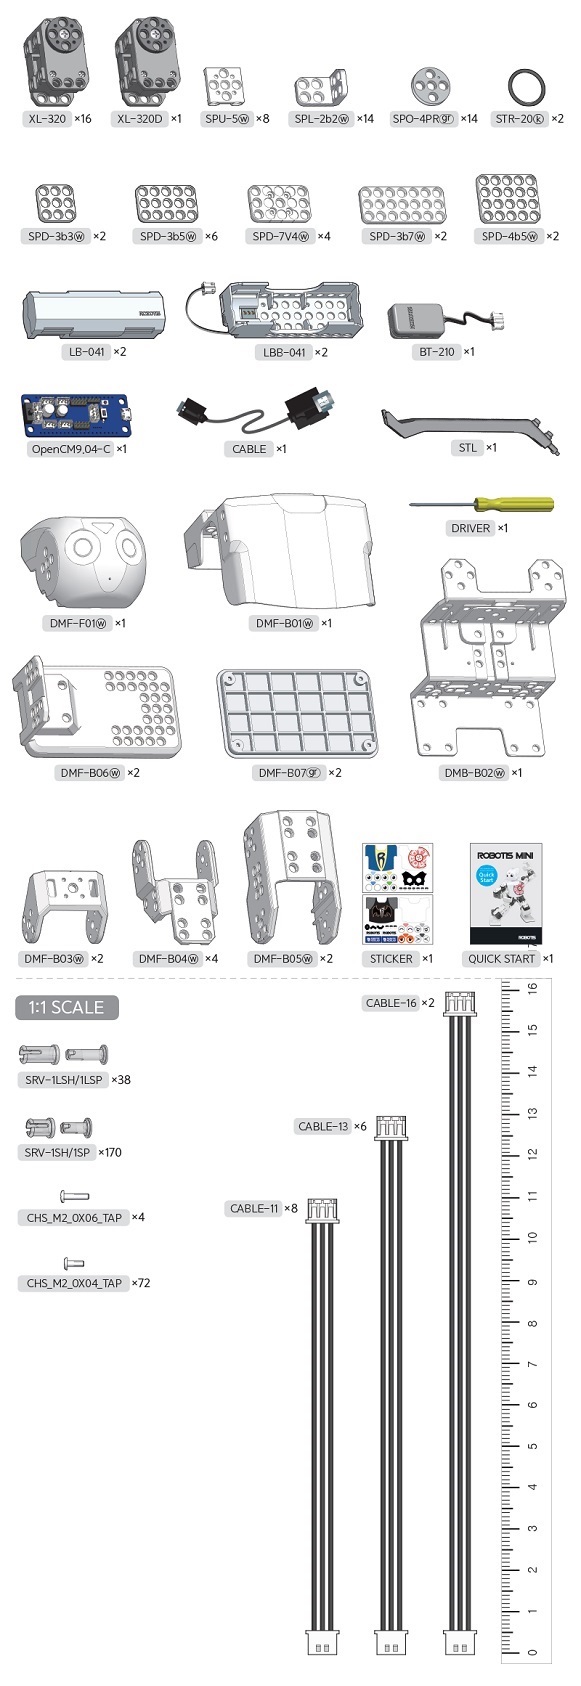
Part List
Preparation
ROBOTIS MINI App
ROBOTIS MINI App for smart device supports various operations. Please refer to Operating MINI section for installing and operating the app.
Connect to MINI
Bluetooth device must be installed in your computer to connect to ROBOTIS MINI. If you do not have it installed, you must purchase a Bluetooth dongle. If you already have a Bluetooth device, use the method below to register ROBOTIS MINI’s Bluetooth (BT-210) to your computer(The instruction below is based on Windows 7/8/8.1).
For Windows 7 / 8 / 8.1
For Windows 8/8.1, to open the Control Panel click on the right side of the charm bar then click Setting.
- Connect the Bluetooth (BT-210) to your robot and turn the power on.
-
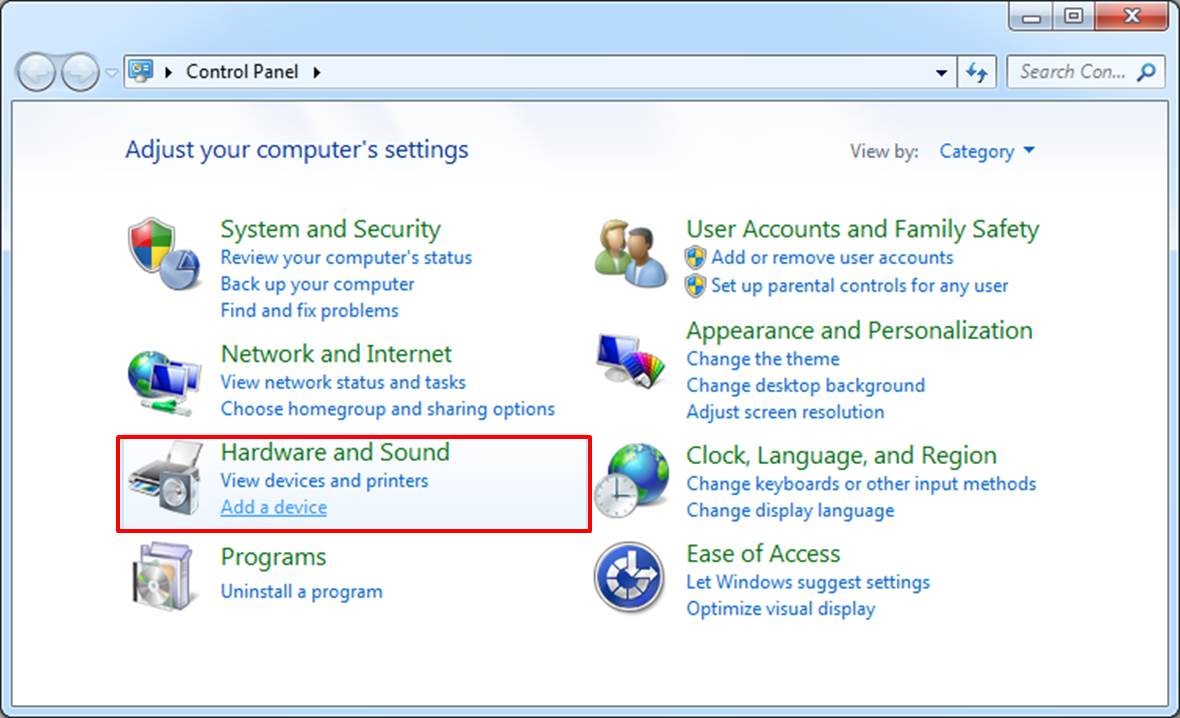
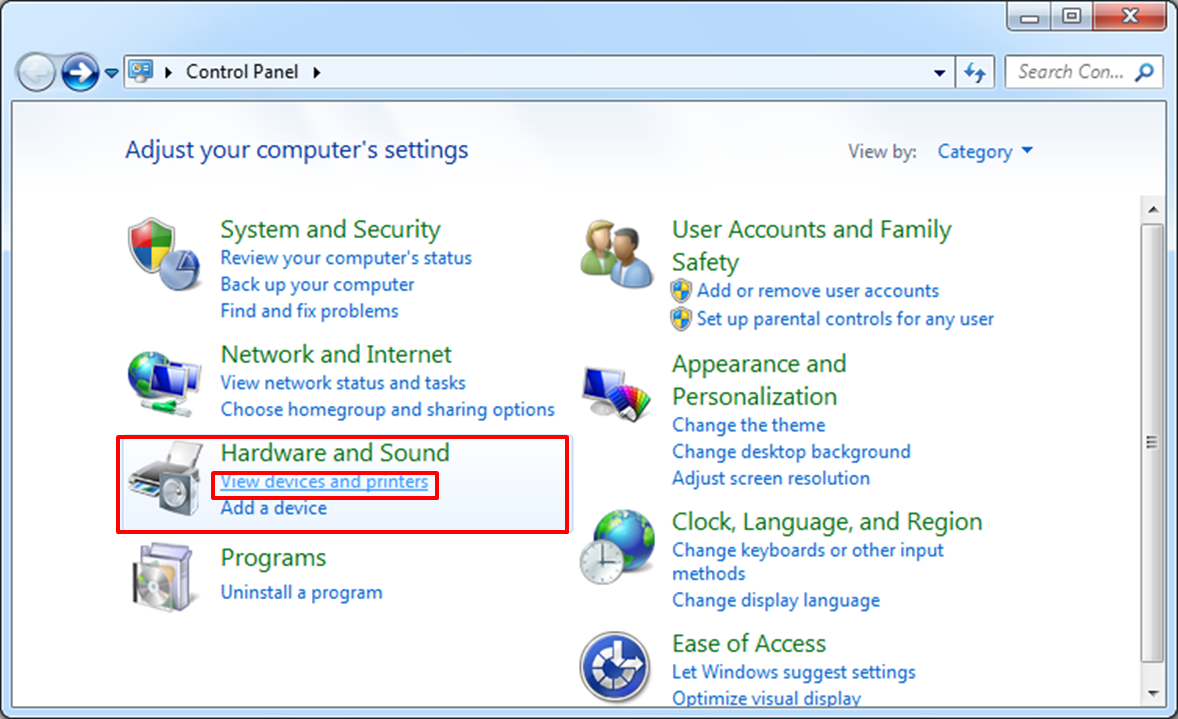
Select ‘Control Panel’ > ‘Hardware and Sound’ > ‘Add a device’ on your computer
-
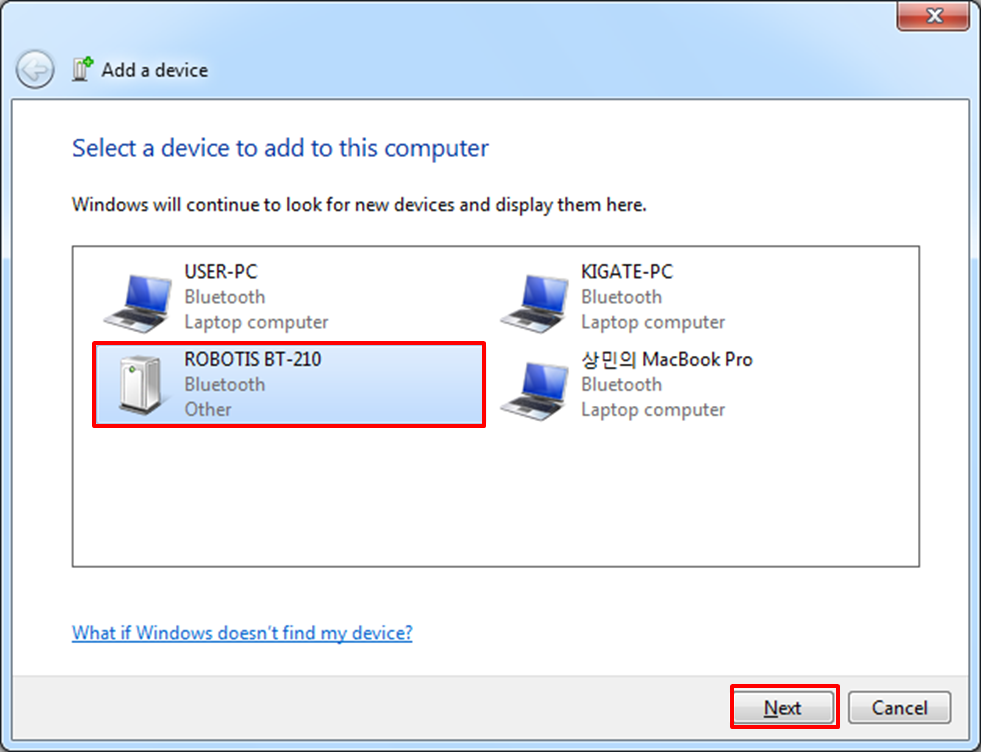
Select ‘ROBOTIS BT-210’ from your list and click ‘Next.’
-
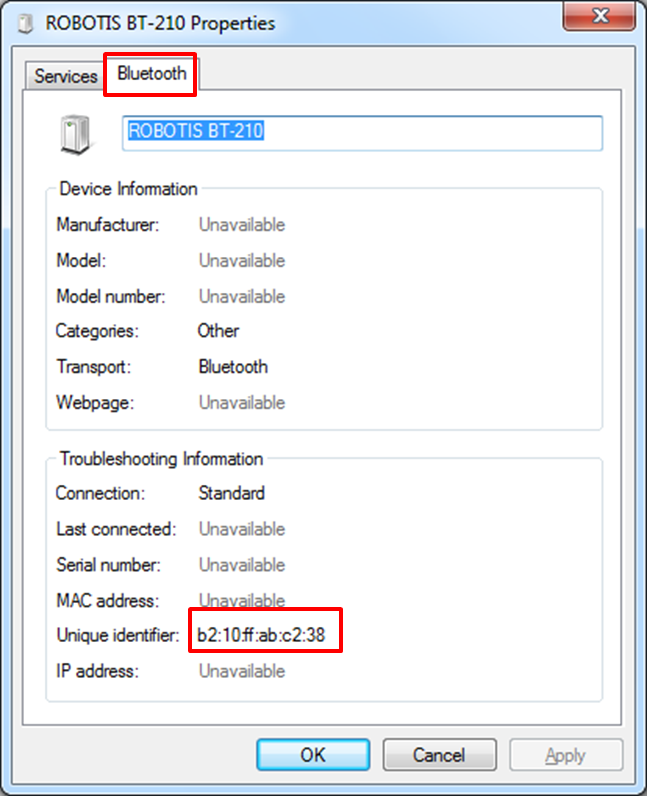
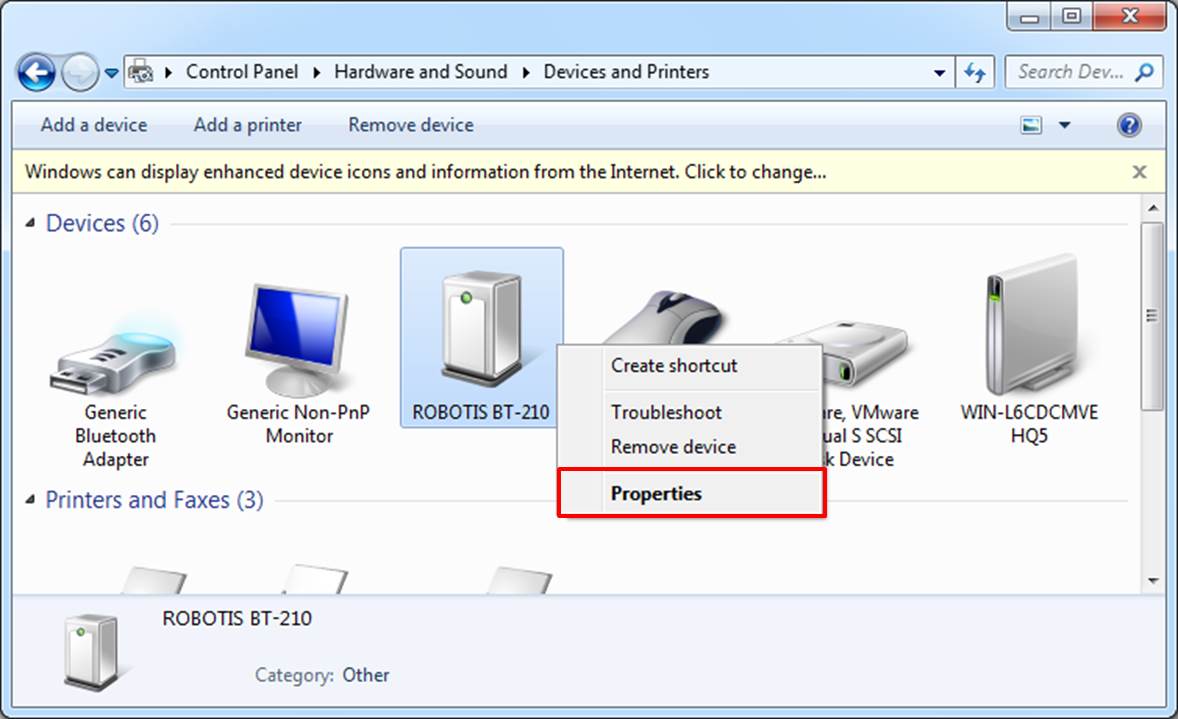
When there is more than one device, check the ‘Properties’ of the device by clicking on the right side of your mouse. Make sure the Unique Identifier number of your Bluetooth under the ‘Bluetooth’ tab is the same number you wish to use.
-
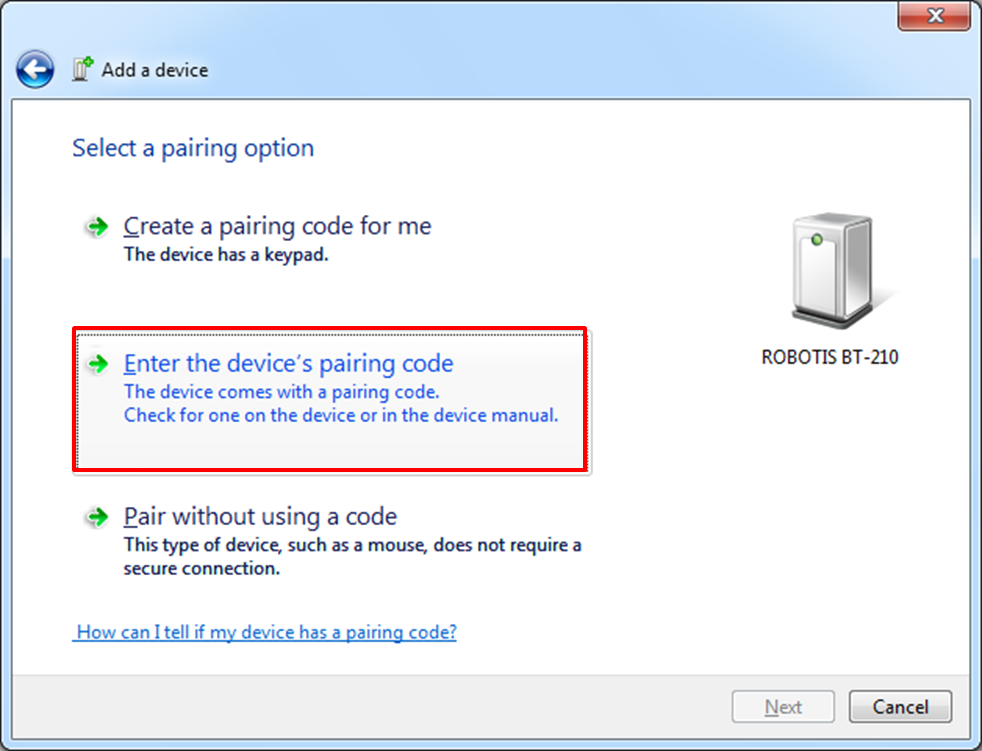
Select ‘Enter the device’s pairing code’ from the Connection Option.
-
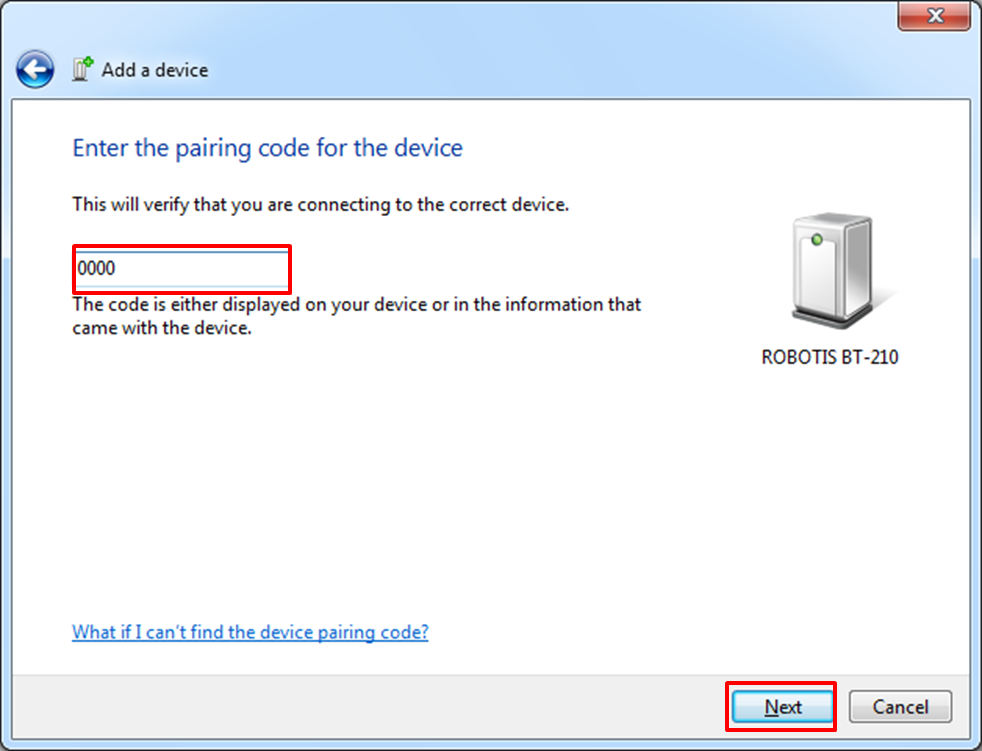
Input ‘0000’ then click ‘Next.’
-
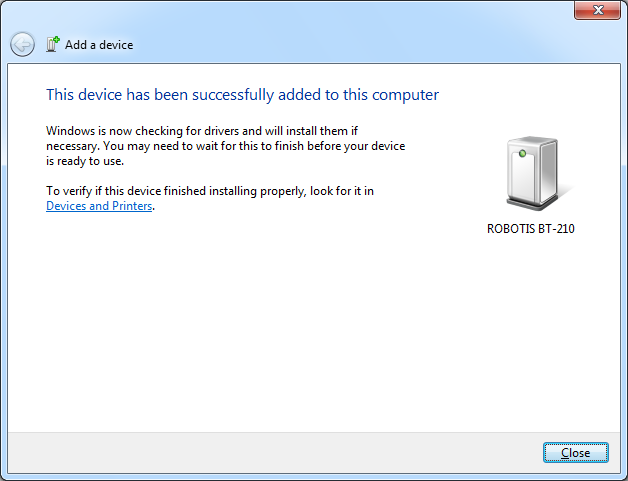
Device has been successfully added.
Check Connection
-
Select ‘Control Panel’ > ‘Hardware and Sound’ > ‘View devices and printers’ on your computer.
-
Select ‘Properties’ by right clicking on the BT-210 that you just added.
-
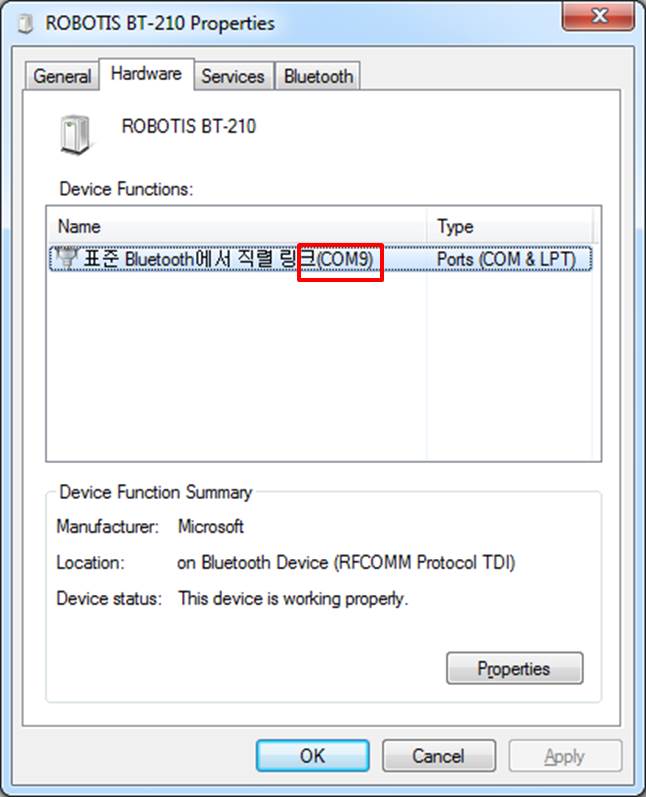
Check the COM port under the ‘Hardware’ tab.
For Windows 10
-
Open Windows Setting menu and select
Devices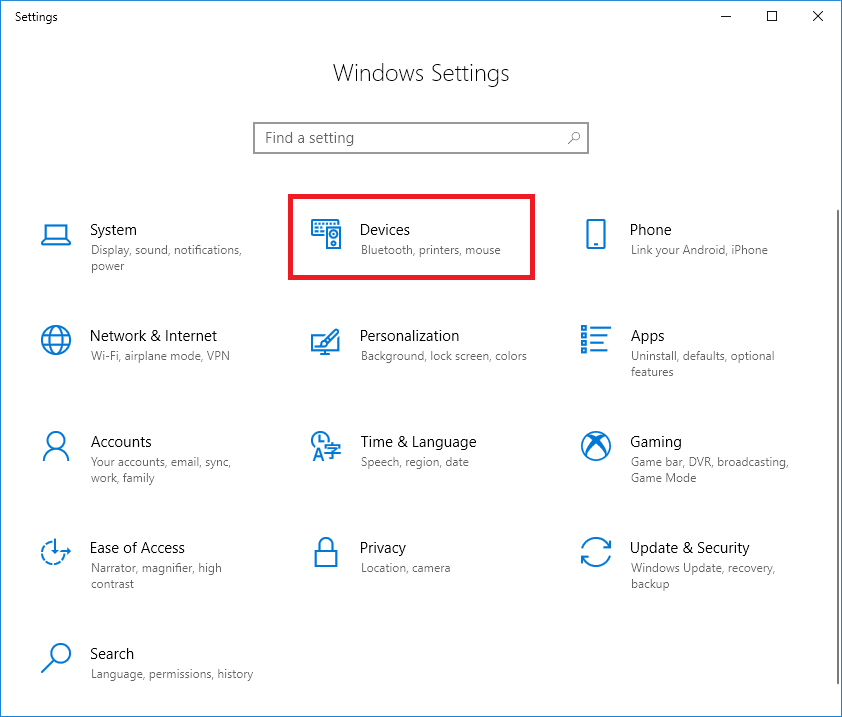
-
Select the
Bluetooth & other devicestab on the left column and clickAdd Bluetooth or other devicebutton on the right column.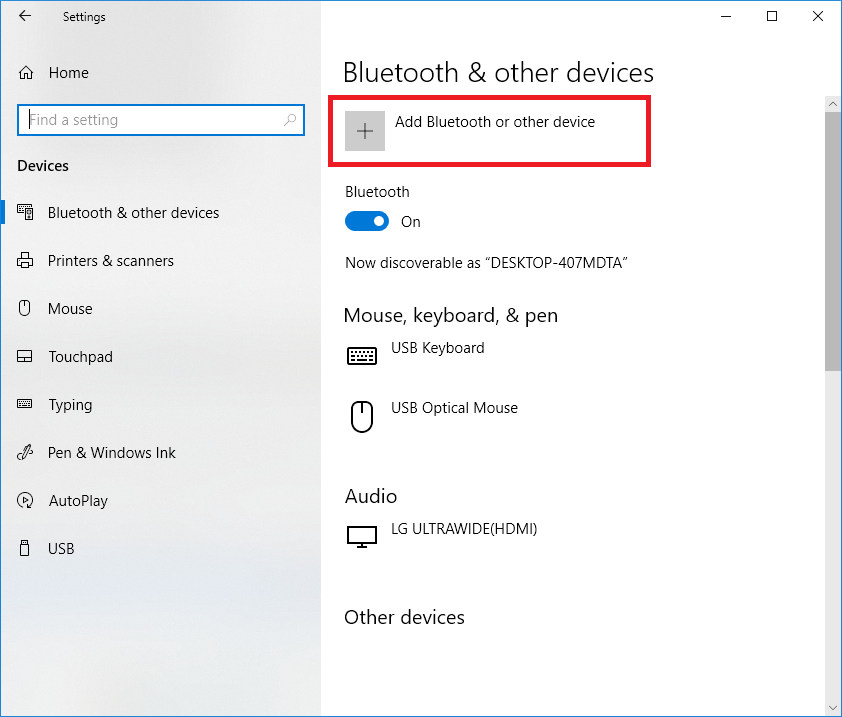
-
In the popped up window, select
Bluetooth.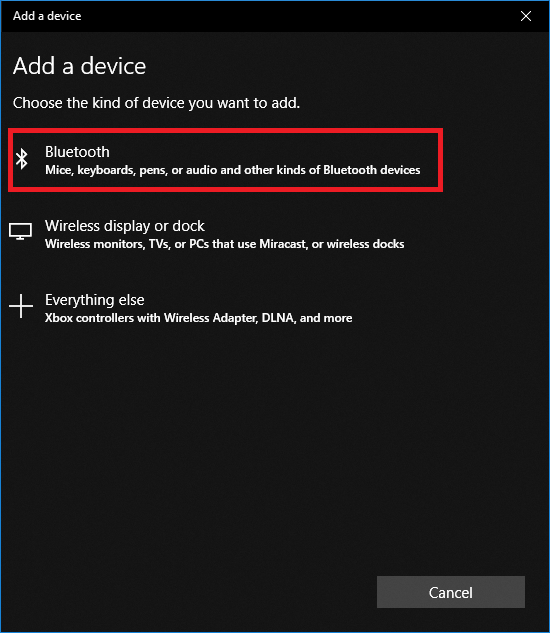
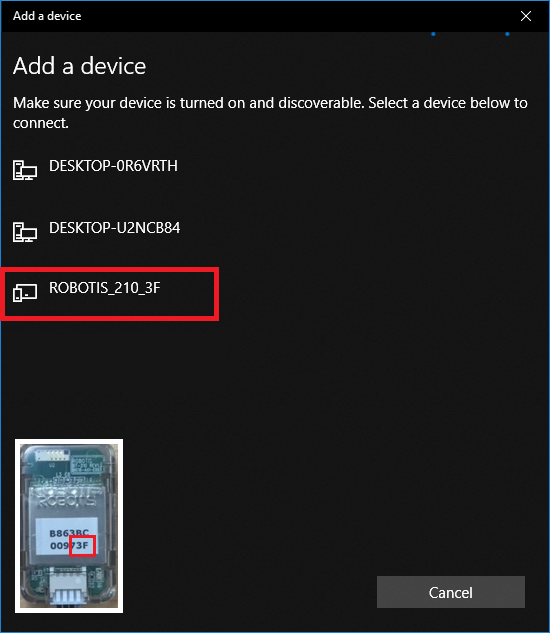
-
Search for the Bluetooth module. The last two characters in the device name should be matching to the last two characters of the Bluetooth module ID.
-
Enter the default PIN
0000and click the Connect button.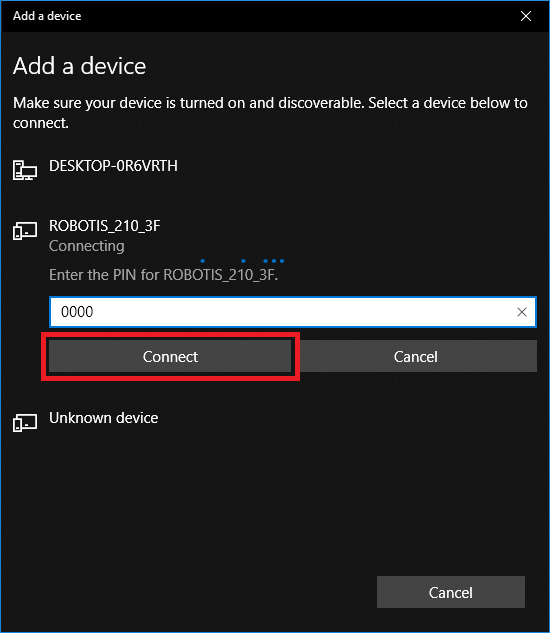
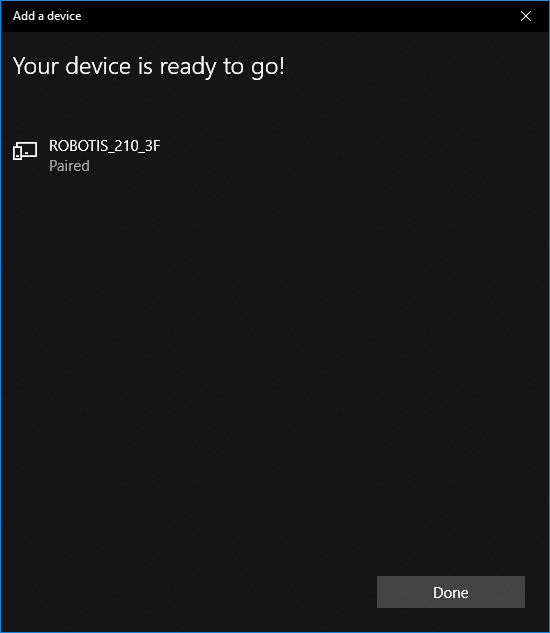
-
If BT-210 Bluetooth module is successfully paired, below message will appear.
Operating MINI
App Install
Introduction & Installation
ROBOTIS-MINI uses a smart device to operate various motions.
System Requirements
- OS : Android2.3.3 (Gingerbread) or above
- Hardware : 1.2GHz Dual Core or above, RAM 1GB or above
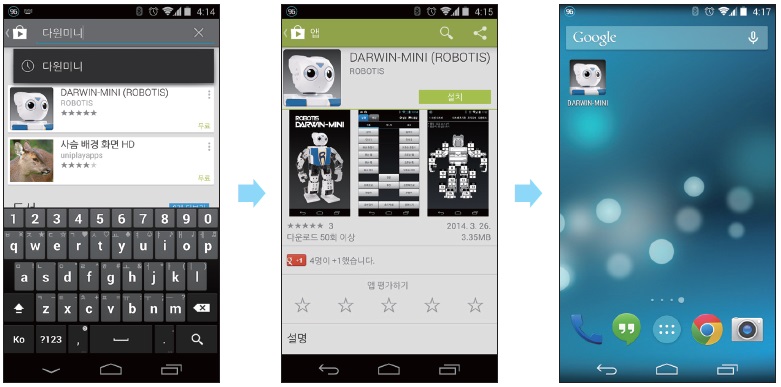
Open the Play Store or App Store on the smart device. (Play Store is for Android Market App)
Search for ROBOTIS MINI or ROBOTIS and select MINI, then click to install. An authorization request message may appear.
In order to use ROBOTIS MINI on ios (for iPhone/iPad), BT-410 is required for a bluetooth comunication between a smart device and the ROBOTIS MINI.
Installing ROBOTIS MINI for ios
Bluetooth Connection
When the controller is turned on and the LED of the Bluetooth (BT-210) blinks, the robot and Bluetooth are successfully connected.
Connecting the robot with the app using Bluetooth
Execute the ROBOTIS-MINI app.
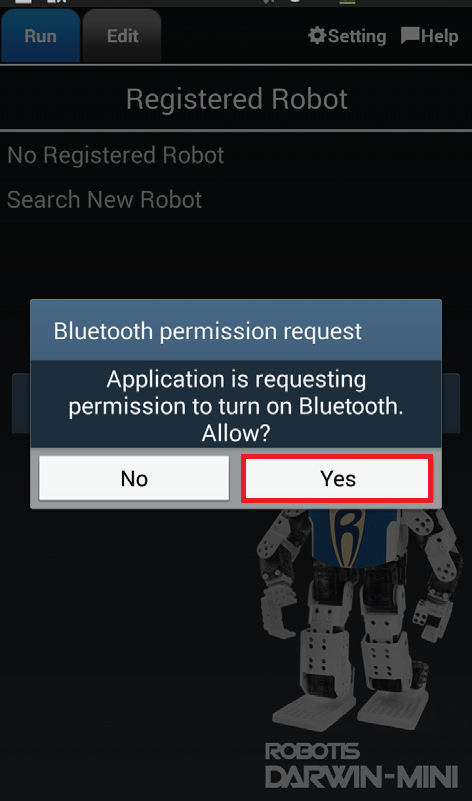
- Turn the robot on and run the ROBOTIS-MINI app on the smart device.
- If the Bluetooth option on smart device is turned off, a message to request a permission will appear. Select
Yesto enable the Bluetooth.
CAUTION : If the smart device is configured as a Client, it will skip to the operation screen directly instead of the registering screen.
Please refer to the App Setting section for Server/Client settings.
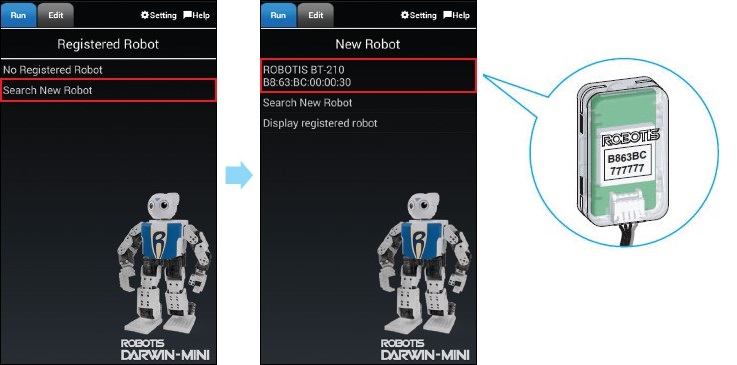
Check the Bluetooth (BT-210) connection
- From the list of
Registered Robotlook for the Bluetooth ID number connected to your robot. This number can be found on the top face of the Bluetooth module as shown in the image below. - If the ID does not exists, select
Search New Robotto register the new Bluetooth module.
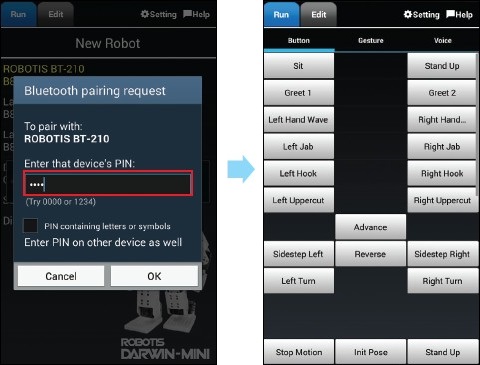
Enter Bluetooth PIN number
- You need to enter the PIN information to pair your smart device with the Bluetooth module. The default PIN number is
0000. - Enter
0000and selectOKto connect the robot. The image on the left will appear.
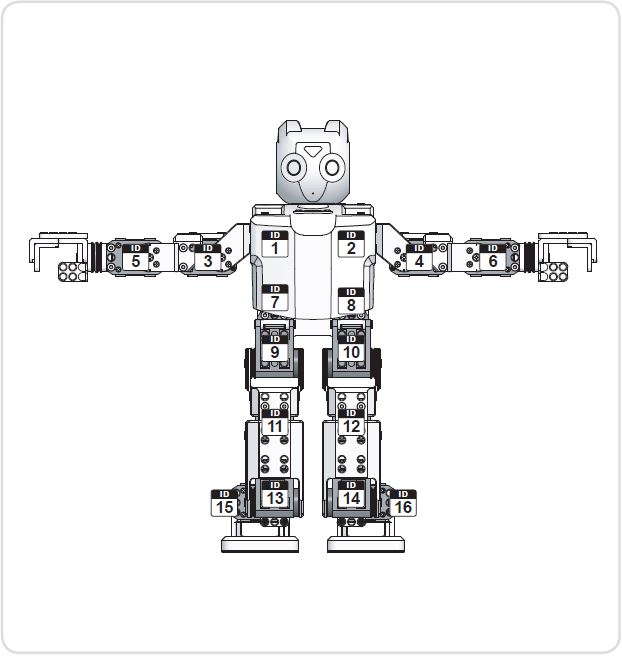
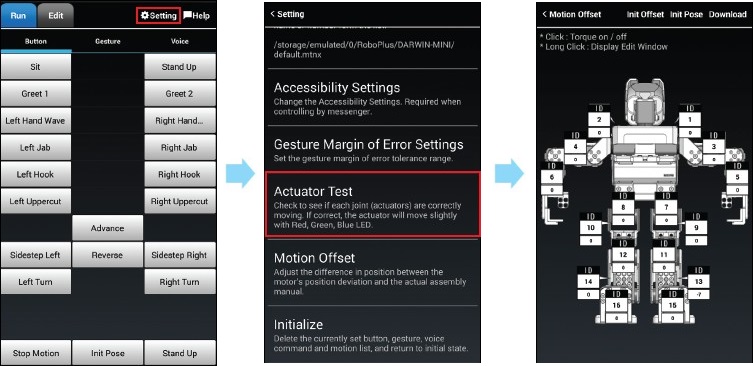
Assembly Check using the App
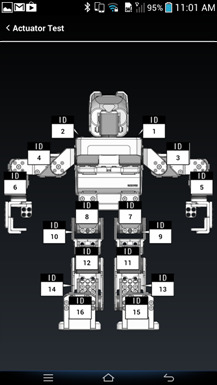
Select Setting option, then use Actuator Test feature to check the assembly. Once your smart device and ROBOTIS MINI are connected, the image of ROBOTIS MINI on the right will appear.
Tap on each ID while Bluetooth is connected. If there is no problems in the assembly, the DYNAMIXEL LED will blink in red, green, then blue.
If you tap on an ID but the wrong DYNAMIXEL LED lights up in the actual robot, there is an assembly problem. In this case, change the ID, or reassemble the joint by switching with the correct DYNAMIXEL.
Operation
NOTE : The ROBOTIS-MINI app uses smart device’s functions such as the button, gesture (sensor), voice recognition, and messenger to play motions.
- Button : Use the buttons on your screen to operate the ROBOTIS-MINI.
- Gesture : Move the smart device to make particular gestures of the ROBOTIS-MINI.
- Voice Recognition : Use the voice recognition feature of the ROBOTIS-MINI to respond to your voice.
- Messenger : Use another smart device to control the ROBOTIS-MINI. It can be connected to another smart device and send commands by a text message.
- Remote Controller : Displays a virtual remote controller on the screen for easier controlling for fighting games and soccer games.
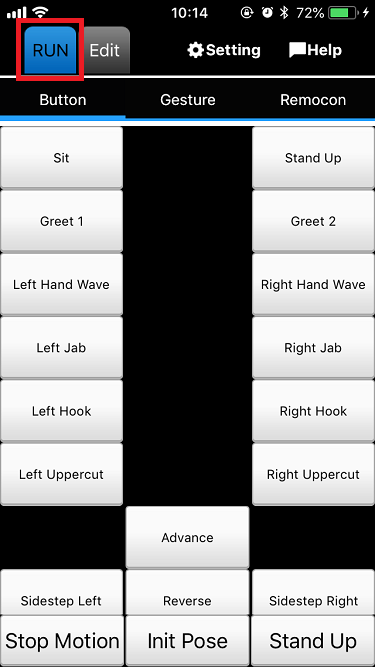
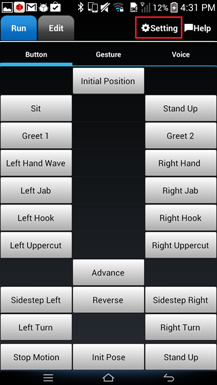
Stop Motion, Initial Position, and Stand Up are 3 basic buttons on the Run tab.
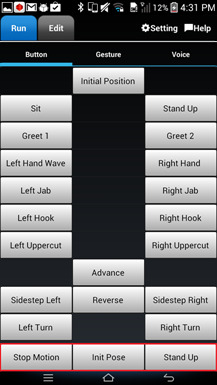

Below are the functions of each button.
Stop Motion: This button calls on the Motion #0. If this button is pressed during a motion, ROBOTIS-MINI stops after playing current motion unit.Initial Pose: This button calls on the Motion #1, which is the initial position command. If Motion #1 is modified, it will play the modified motion in Motion #1.Stand Up: This button calls on the Motion #2, which is the stand up command. If Motion #2 has been modified, it will run on the modified command.
NOTE : When the robot is playing a motion, all other motions except the Stop Motion will be ignored.
TIP : You can create (or edit) the motion button using the follow Motion Index Number.
- Motion Index Number number 0 only plays a current Motion Unit.
- Motion Index Number number -1 stops a current Motion Unit in Motion and plays an Exit Motion Unit.
- More information on Key-Frame, Motion Unit and Motion is available at Motion Data
Control with Buttons
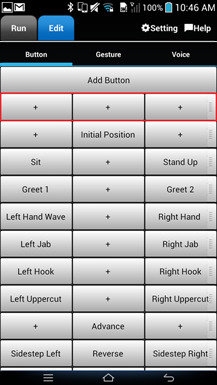
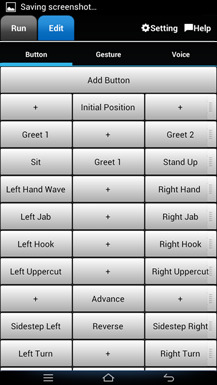
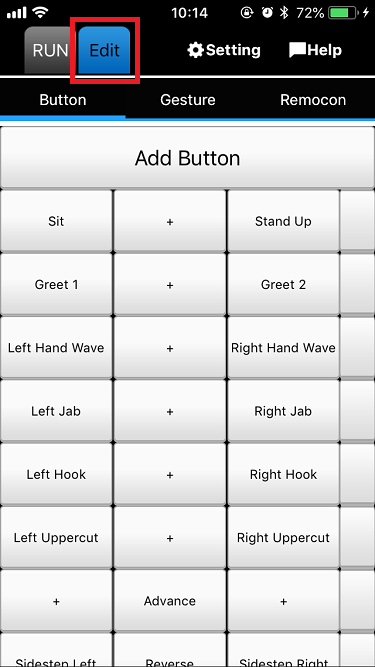
In order to Add/Edit/Delete/Arrange buttons, use the Edit tab.
-
Edit Button Row
-
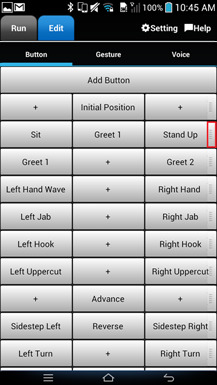
Add a button row : Press the
Add Buttonbutton in theEdittab to add a new line at the top row.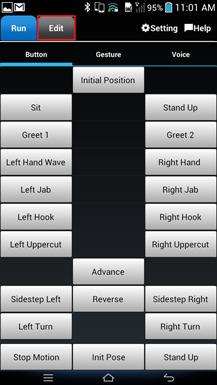

-
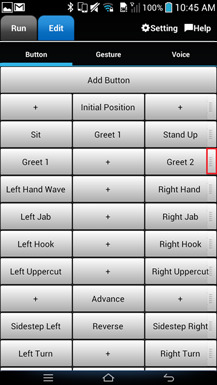
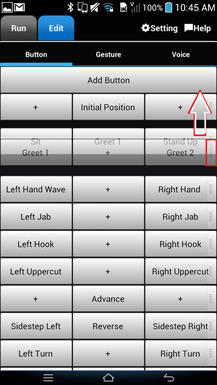
Change button row order : Touch the right side of the row then drag up or down to move the row.
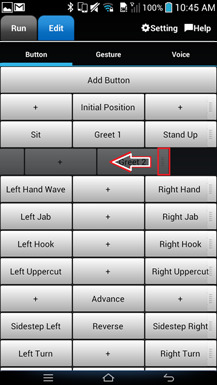
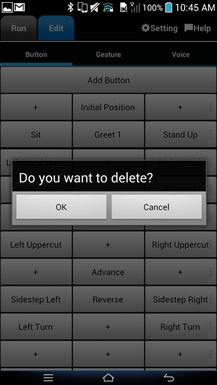
-
Delete button row : Touch the right side of the row then slide to the left to delete the row.
-
-
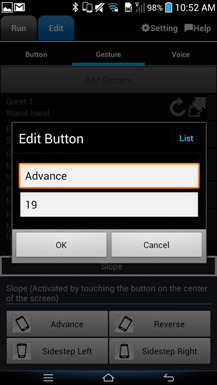
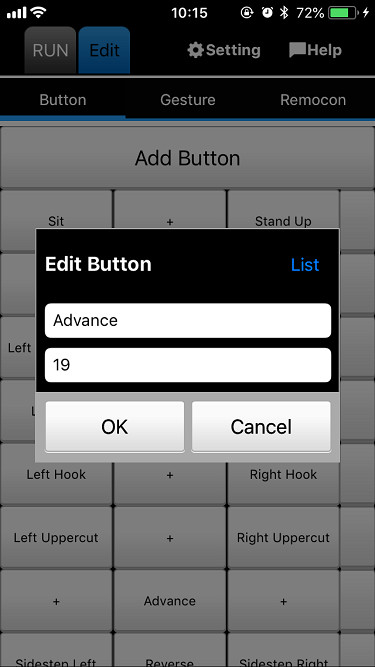
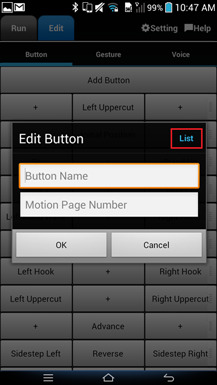
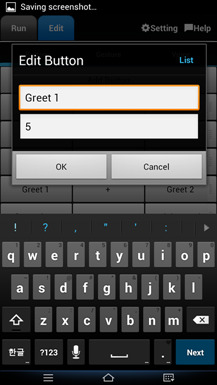
Edit Button
-
Edit Button : Touch
+to add a new button. Touch other existing command buttons to edit.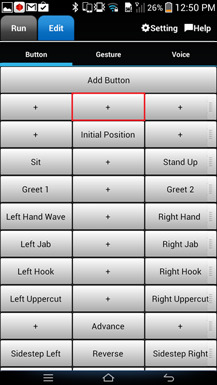
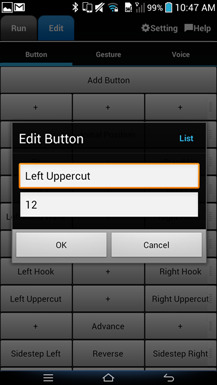
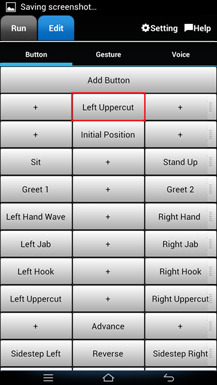
- The Motion Page Number is the number of the designated motions downloaded on the robot.
- If a Motion Page Number is not designated, the button name will be shown in light gray.
- If both Button Name and Motion Page Number are blank, the button will not appear on the
Runtab.
-
-
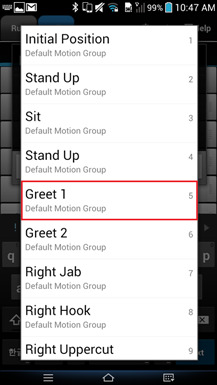
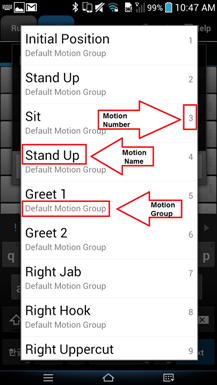
Use the motion file setting to input motion call numbers
If you define the motion file in theMotion File Settingin the app setting, you can load motion lists with theListin the top right corner of the button editing screen.Select desired motion from the list to automatically fill up the Button Name and Motion Page Number.


Control with Gestures
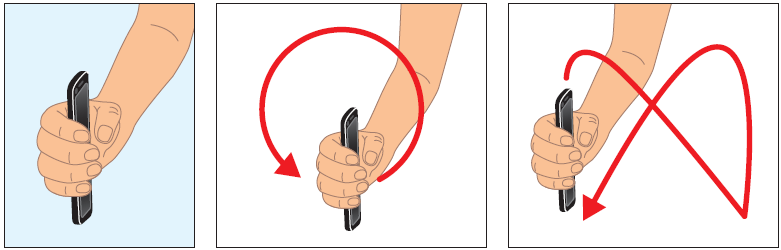
The Gesture tab uses the acceleration sensor of the smart device to command the robot to do certain motions. For example, if the user draws an O or X when holding the smart device, the robot will either walk or sit down based on the assigned motion. This works when the smart device is held straight up 90 degrees to the ground.
-
Move the robot by holding your smart device and making a gesture.
- While touching the center of the screen, tilt the smart device to operate the robot.
- Basic buttons beneath the Slope option can also be used to operate the robot.
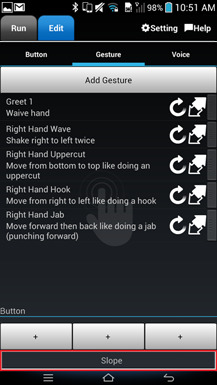
Touch the
Slopebutton at the bottom of the screen to check motions designated by tilting the smart device.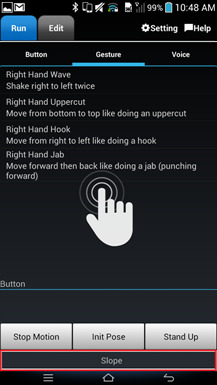
Touch the
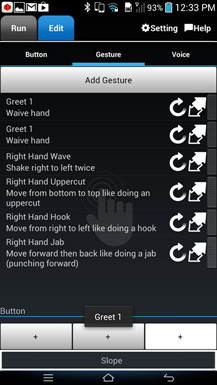
Editbutton to add, edit, or delete gestures. Training the gesture will increase the recognition accuracy. Also, the basic gestures forSlopecan be edited. - Register Gestures
- Touch
Add Gesturebutton to add gestures. - Enter the gesture name, motion page number and description.
- Touch
Readybutton and move the smart device at a steady speed.

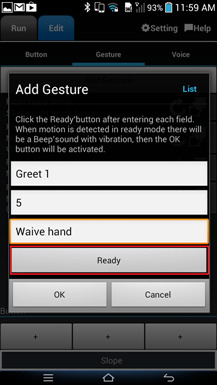
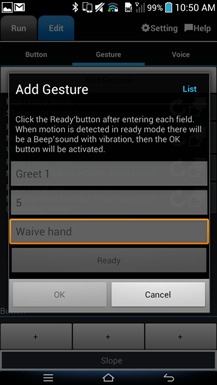
- When the gesture is done there will be a beep sound along with a short vibration and a message saying Gesture xxx learned will appear.

-
Touch
OKto add the gesture.If you do not hear the “Beep” sound, please check the media volume.
When adding gestures, if you have already set the motion project file, the
Listbutton will appear for easy access to add motions.
- Touch
- Edit Gesture
- To edit a gesture touch the
Editbutton. - Use the same method when adding gestures to edit and finalize by touching
OK
- To edit a gesture touch the
- Delete Gesture
- Touch the right side of the line then slide to the left to delete.
- Edit Button
- Touch the command you want to edit.
- Maximum 3 buttons(1 row) can be added in the Button section of the bottom of the screen.
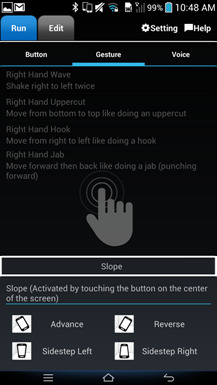
- Edit Slope
- Touch
Slopeat the bottom to edit screen. - 4 pre-defined directions can be used in the Slope section.
- Touch the direction button to edit the name and motion page number.
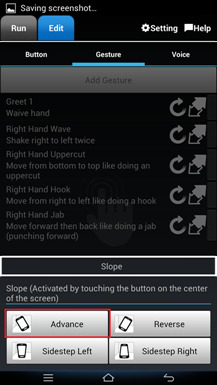
The pre-defined directions are defined by the smart device in the right hand as shown below.

- Touch
-
What is the Gesture Training?
Use the gesture training feature to increase the recognition accuracy of registered gestures.
- Touch
Trainfor the gesture you would like to train. - Touch
Readyand make a bigger gesture or tilt the smart device and/or make different gestures. - When the gesture is done there will be a beep sound along with a short vibration and a message saying Gesture xxx learned will appear.
- Repeat above steps to train the motion.
- Touch
Operate with Voice Recognition
NOTE : ROBOTIS-MINI uses Google’s voice recognition.
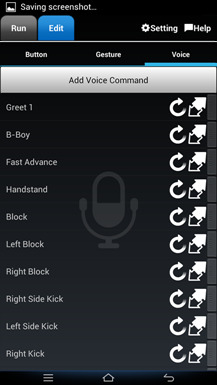
Touch the microphone icon in the center of screen then speak(input) the command. To use this function, you must have an internet connected smart device.
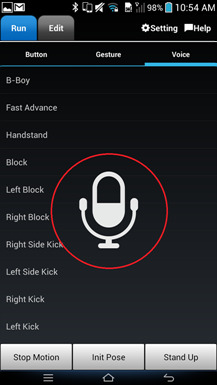
Touch the ‘Edit’ button to add, edit, or delete any voice command.
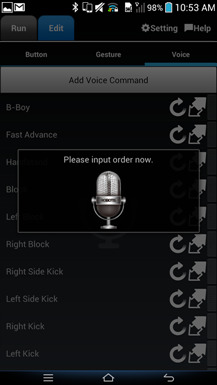
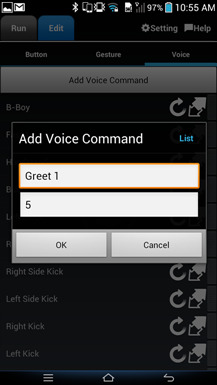
- Add Voice Command
- Touch the ‘Add Voice Command’ to add a command.
- After deciding the command and motion number, touch the ‘Okay’ button.

- Edit Voice Command
- Select the voice command of the gesture to edit and touch “Edit
- Delete Voice Command
- Touch the right side of the line then drag left to delete.
-
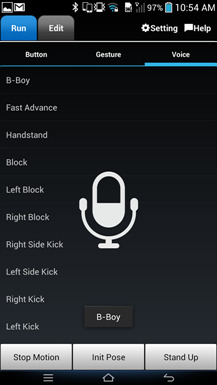
Voice Recognition Training Function?
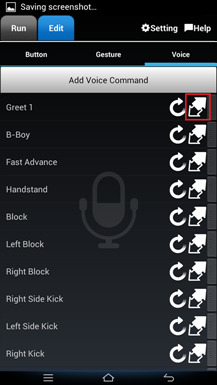
Use the registered voice command to increase the chances of getting the right command by training it using the icon marked below.
- Select the voice command to ‘Train.’
- Say the word after touching the MIC icon on your screen.
- When the voice is recognized, the word most similar will appear.
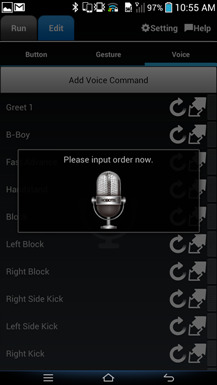
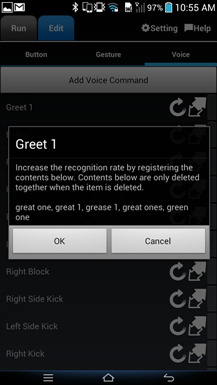
- Touch the ‘Okay’ button to register the most similar word to the relevant voice command.
CAUTION : To delete a command added during the training, delete the voice command first and then re-register.
Voice Recognition Test To check whether the registered voice command is recognized properly, use the MIC icon under the ‘Edit’ tab to test the word. This does not operate the robot.
Operate with Messenger
Your robot can be controlled using the various Messengers in your smart device. [Does not work on all Messengers.] To receive commands via Messenger, you must have internet access to your smart device.
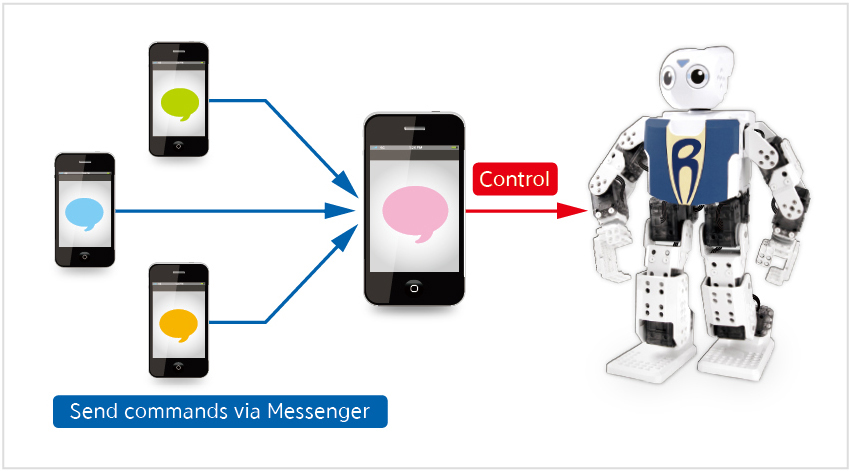
Messenger, uses the notification bar of your smart device to check whether the command corresponds to the message then runs the command if it is the same. Messenger uses the registered voice commands.
CAUTION : Your Accessibility Setting for the ROBOTIS-MINI App must be enabled(Please refer to the ROBOTIS-MINI App Accessibility Setting). If your exact message is not displayed in the notification bar, you may not have access to your robot via Messenger.
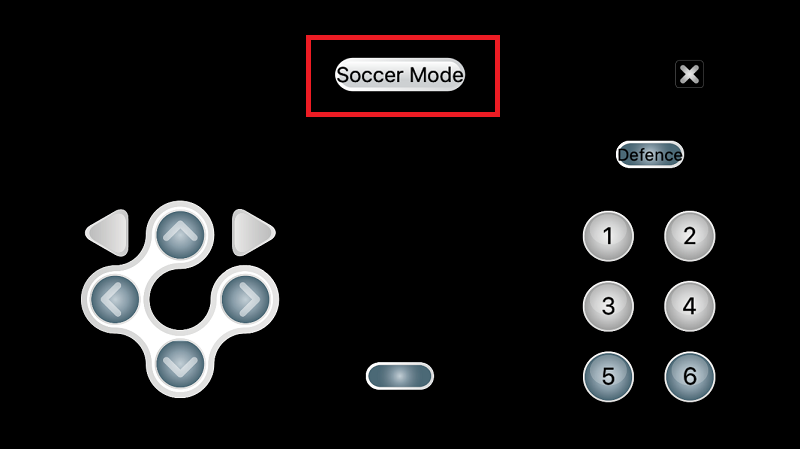
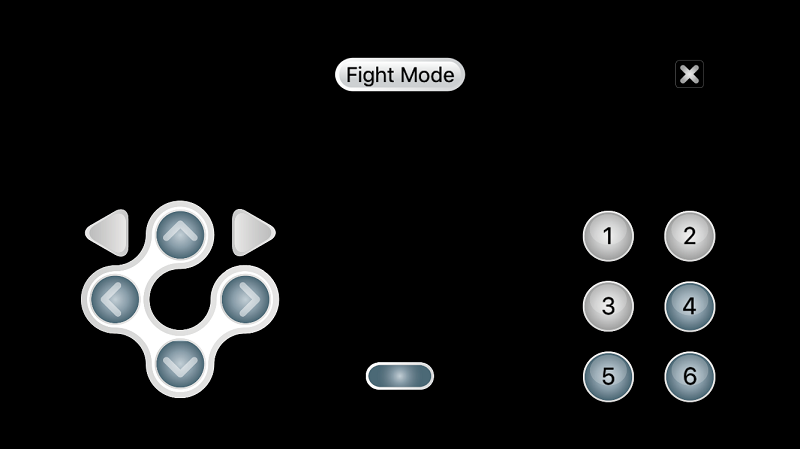
Operate with Remocon
- Use the buttons displayed in the figure below to control ROBOTIS-MINI.
- The buttons on the left are used for movement and will activate the same pre-set motions in both modes.
- The numbered buttons on the right [1~6] activate different motions in Soccer Mode (offense/defense) and different motions in Fight Mode. Over both modes, a total of 18 motions can be assigned to the buttons. When a motion is not assigned to a button, the button will be blue.
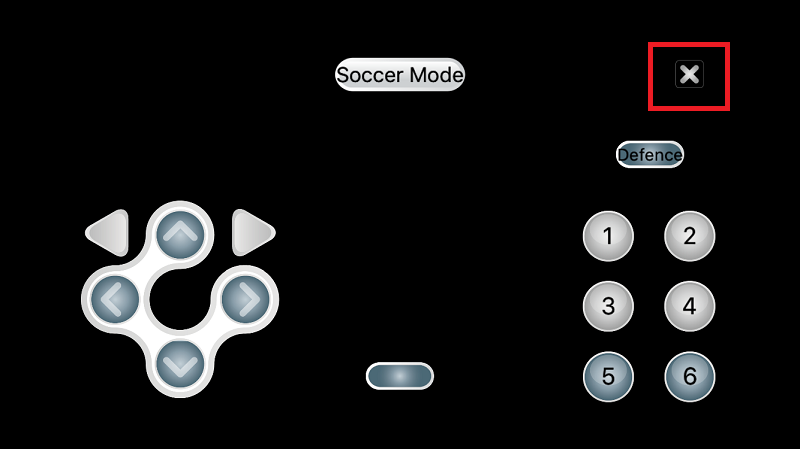
- Switch between Soccer Mode or Fight Mode by tapping the button in the red rectangle in the figure below.
- Soccer Mode
- 2 available modes : Defense and Offense
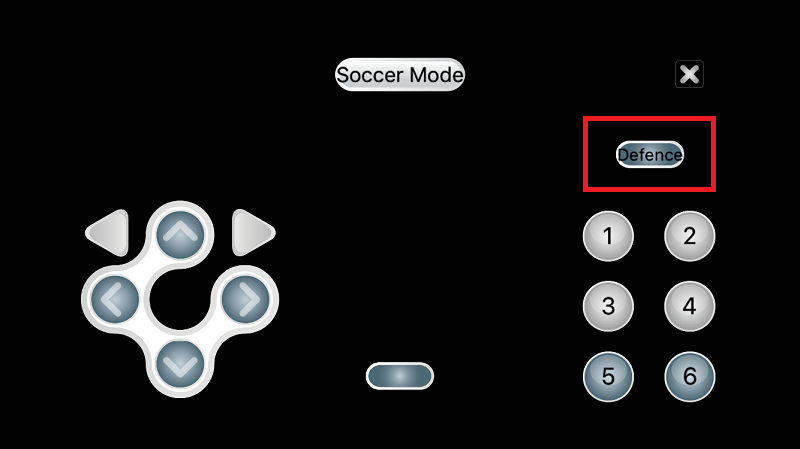
- Default buttons motions for Offense are Left Block (1), Right Block (2), Block 1 (3), Block 2(4); for Defense, the default motion buttons are Left Kick, Right Kick, Left Side Kick, and Right Side Kick.
- Fight Mode
- The default button settings for Fight Mode are Left Attack(1), Right Attack(2), Front Attack(3).
- Exit
- Click on the “X” icon in the upper right hand corner to close the remocon screen.
- Run & Edit
- To control your ROBOTIS-MINI, click on the Run tab then, click on the numbered buttons
-
To edit robot motions, click the Edit tab. Then click on a specific motion to edit it.
App Setting
The ‘Setting’ is located on the top right corner of your device and below are the explanations for the menus.
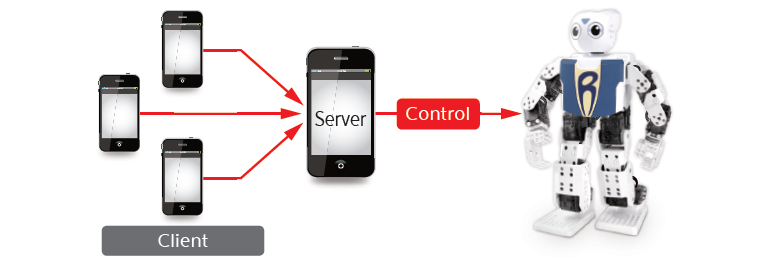
Server/Client Setting
This setting is for controlling one ROBOTIS-MINI with many smart devices. One smart device will be set as Server to connect directly with the ROBOTIS-MINI, and the other smart devices will be set as Client to send commands to the Server. The Server will receive the commands sent from the Clients, then send the commands to ROBOTIS-MINI to make it perform a motion.
By using the server/client setting, the user can hold one smart device in each hand to control the ROBOTIS-MINI. The left hand device may perform gestures for left motions, and the right hand device may perform gestures for right motions.
This function cannot be used under mobile network connection (3G/4G/LTE). The smart devices that are set under server and client setting must be connected in the same network.
1) They can be connected to the same router, or 2) One device may have its Wi-Fi hotspot function turned on, with the other devices connected to this hotspot
-
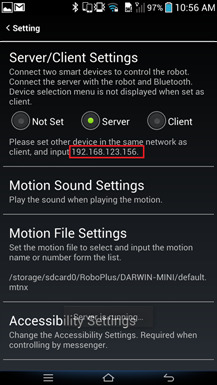
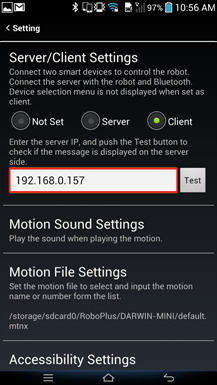
Server/Client Setting
Only the smart device set as Server will be connected to the ROBOTIS-MINI via Bluetooth, so the smart devices set as Client will not show the registered robot list when the App is run.
- The IP Address of the smart device will be shown when Server is selected.
- Input this address into the Client smart devices and select the Test button.
-
If set correctly, the Server smart device will show the message ‘Test’ when the Client performs the test.
How to set your portable Wi-Fi hotspot : The setting method and images can be different from those illustrated below.
-
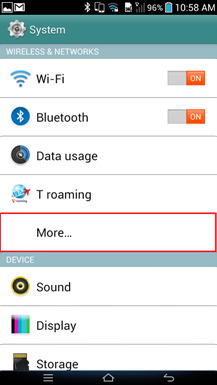
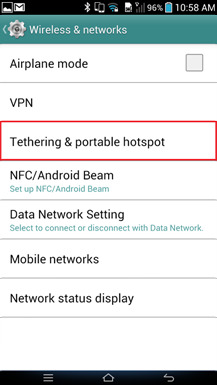
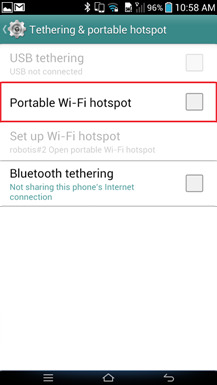
Go into the following setting menu in your smart device; System – Wireless & networks – Tethering & portable hotspot – and check ‘Portable Wi-Fi hotspot’.
-
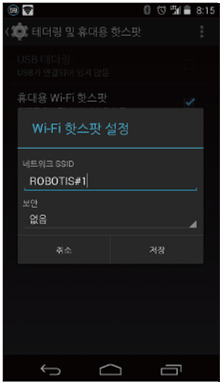
You can change the name of the smart device to be displayed on the other devices under the ‘Set up Wi-Fi hotspot’ setting.
When using this function, all Server and Client devices will connect to the internet (data communication) using the Server device (set as the hotspot), so please take caution of your data package usage.
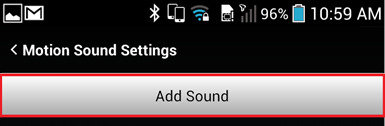
Motion Sound Setting
Users can add a sound file to be played when a certain motion number is performed. With this function, users can play a music on the smart device while performing dance motions.
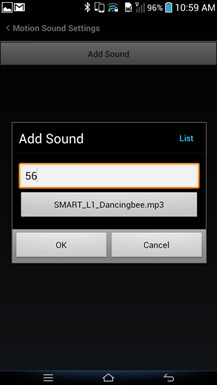
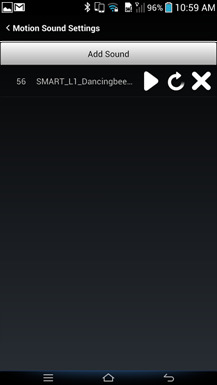
Select ‘Add sound’ to input the specific motion number and register the sound file to be played. Registered sound files can be played, edited, or deleted from the sound list.
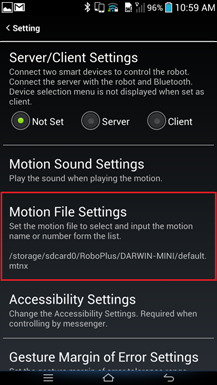
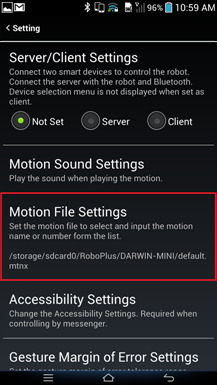
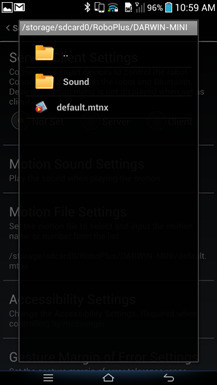
Motion File Setting
‘Motion page number’ is the numbers that are given to the motions in the motion group. Users can save time on checking each motion page number by registering the motion files in the ‘Motion file setting’.
Once a motion file is registered, the ‘list’ button will be shown on the ‘add command’ window. Select the ‘list’ button to show the list of motion pages in the motion file. Select one of the motion pages shown, then its motion name and motion page number will be automatically inputted on the screen.
The default value is set to the basic motion file provided with the ROBOTIS-MINI.

Once a motion file is registered, the ‘list’ button will be shown on the ‘add command’ window. Select the ‘list’ button to show the list of motion pages in the motion file. Select one of the motion pages shown, then its motion name and motion page number will be automatically inputted on the screen.
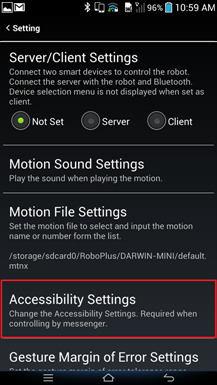
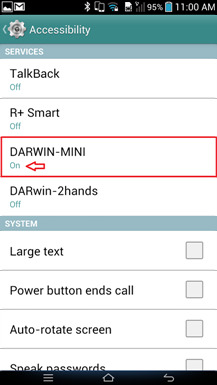
Accessibility Setting
Accessibility Setting is required to use the ‘Messenger’ function of the ROBOTIS-MINI App. The App must be able to access the message received through the messenger to verify that it is a correct command registered in the command list.
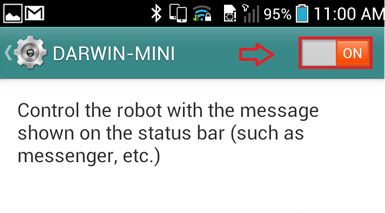
Once this function is activated, the ROBOTIS-MINI App can access the received messages that show up on the smart device’s notification bar.
So, if this function is deactivated, the ROBOTIS-MINI App won’t be able to access and read the commands sent via messenger, so the robot will not be able to carry out the command.
Unlike the Server/Client setting, this function uses the messenger as a media of sending the command, so the smart device (not connected to the ROBOTIS-MINI) sending the message to the main smart device (connected to the ROBOTIS-MINI) doesn’t have to be connected in the same network.
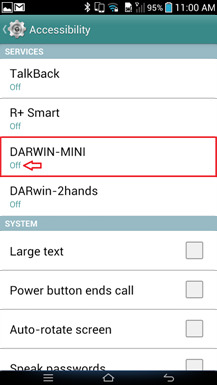
The user must activate the ‘ROBOTIS-MINI’ on the accessibility setting list to activate this function.
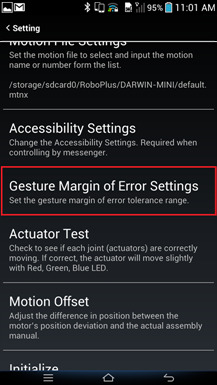
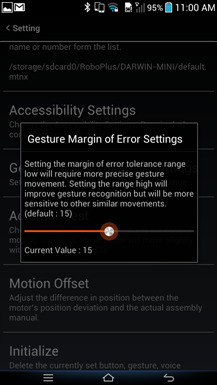
Gesture Margin of Error Setting
This setting is used to adjust the gesture recognition rate when using the Gesture function. Setting the margin of error tolerance range low will require more precise gesture movement. Setting the range high will improve gesture recognition but will be more sensitive to other similar movements.
Please refer to ‘Operating ROBOTIS-MINI’ for more information on the Gesture function.
Actuator Test
Touch ‘Setting” then “Actuator Test’ to check your assembly. Once your smart device and ROBOTIS-MINI are connected, the image of ROBOTIS-MINI on the far right will appear. Tap on each of the ID, and if the Bluetooth is connected and there is no problems in the actuators, the joint’s LED will blink in red, green, then blue.
If you tap an ID but the wrong joint lights up on the actual robot, there is an assembly problem. In this case, change the ID, or reassemble the joint into the correct position.
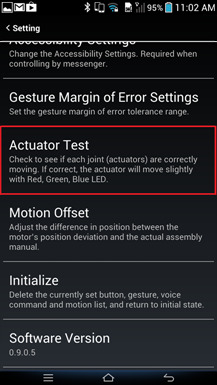
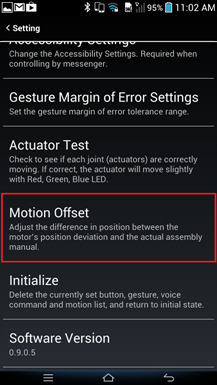
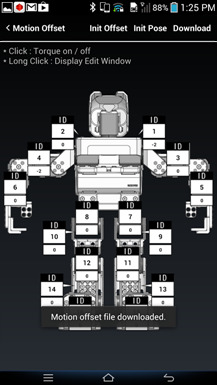
Motion Offset
Offset refers to the difference of standard value. Even when assembling the same type of robots, minor deviations exist between each of their respective motors, resulting in the final posture to be slightly different between them. Adjusting the motion offset value will compensate the deviated amount to perform motions more accurately.
-
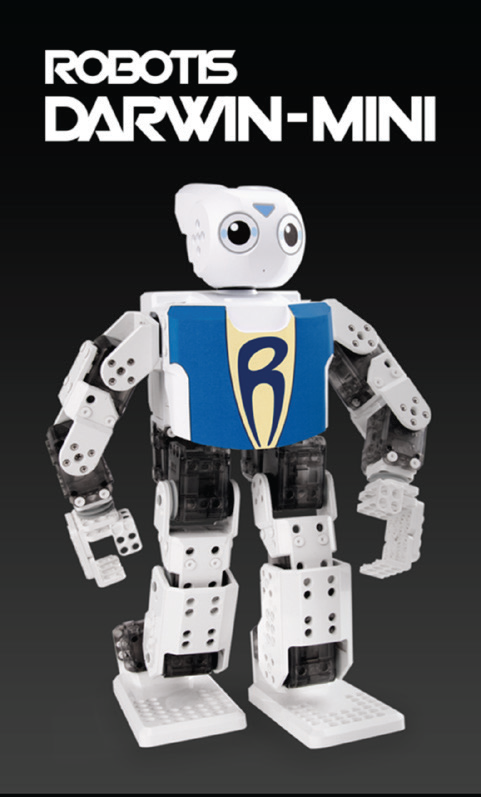
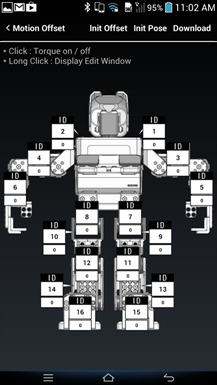
ROBOTIS-MINI Initial Position Going into the ‘Motion Offset’ menu will read the saved offset value in the ROBOTIS-MINI, and ROBOTIS-MINI will move into its initial pose (with the offset applied). The initial pose of ROBOTIS-MINI looks like the image below.

If a joint’s position is not as shown on the image and is crooked, use the torque ON/OFF function of the joint to adjust the joint into its correct initial position.
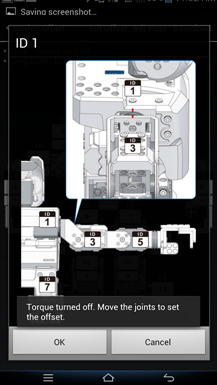
CAUTION : Please hold up the ROBOTIS-MINI to accurately check the position of the joints.Checking the position with the ROBOTIS-MINI on the ground may cause its legs or waist joints to alter.
Touch an ID to turn the respective joint’s torque OFF, and you will be able to physically move the joint. The image shown on the screen shows how the correct standard position of the joint should be.
Refer to the image to move the joint to its correct position, and select ‘Okay’ to turn the torque back ON. The app will read the adjusted value of the position to calculate and show the offset value on the screen.
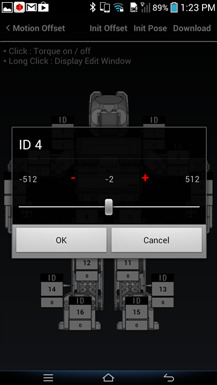
If it is difficult to position the joint into an accurate position, touch (hold) the ID number long to go into a precise setting mode from the smart device. This way, users will be able to precisely adjust the joint position using the slide bar displayed on the screen.
- Touching the ‘offset reset’ button on the top will return all offset value to ‘0’.
- Touching the ‘initial position’ will delete all offset value in adjustment, and return the initial position to the offset value that was saved in the ROBOTIS-MINI.
Applying the changed offset to the ROBOTIS-MINI requires downloading. Touch the download button on the top right to download the value to the ROBOTIS-MINI controller.
Initialize
This functions returns the settings for the Button/Gesture/Voice to it’s default setting.
Programming
RoboPlus Task
A Task is a set of motions to perform a certain actions. RoboPlus refers to the source code that specifies tasks to be executed by the robot as Task Code’. The robot moves according to your task codes. RoboPlus Task is a software to make writing these task codes easier.
RoboPlus Task Download and Usage
RoboPlus(R+) Task can be downloaded from the ROBOTIS website under Support à Download. Please refer to the RoboPlus Task for detailed on how to use the program.
Task programming example
Below is a program example for ROBOTIS MINI. This program is a master and slave program where the left arm makes the same motions as the right arm.
The example file can be downloaded at Download Section
Download Task Code
The composed task code must be downloaded to the DARWIN-MINI. Downloading will save the task code to the controller.
- The PC must be connected to the controller. Please refer to the section above on connecting the ROBOTIS MINI with the PC via Bluetooth.
-
Check the port ROBOTIS MINI is connected on.
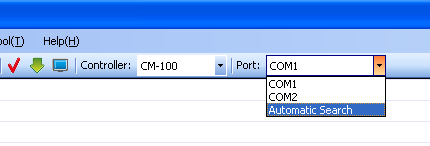
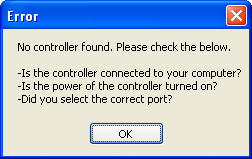
If you don’t know the port, select ‘Auto Search’. If RoboPlus can’t find the controller, the following message will show up on the screen. In this case, follow the instructions on the screen.
-
Select the Download icon (shortcut key F6).

If there is an error in the program, make sure to find and to fix the error. (Please refer to the rule check error message at the end of your program.)
-
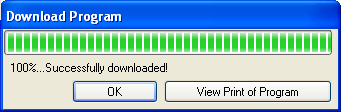
Download in progress.
If downloading fails, please try again from the beginning.
- Turning the ROBOTIS MINI controller OFF then ON will automatically run the task code downloaded on the controller. Check whether the robot operates in the way it was downloaded in.
RoboPlus Motion
Motion data is a set of motor position and speed data, which is required to make the robot move in a certain way. The robot requires the motion file to move, so the correct file must be downloaded to the robot to perform the correct action. RoboPlus MOTION is used to program various motions.
The Task Code composed in RoboPlus Task is a program. Motion file, on the other hand, is a data. Task codes decide how the robot moves, and making the moves to be carried out requires motion data. Roboplus Motion is the program that helps to easily make the robot motion data.
How to download and use RoboPlus Motion
The RoboPlus Motion program can be downloaded from the ROBOTIS homepage. Further instructions on how to use it can be found on the e-Manual.
DARWIN-MINI basic motion file
The basic ROBOTIS MINI motion file can be also downloaded on the e-Manual page.
The example file can be downloaded at Download Section
Try editing the sample file referring to the RoboPlus Motion instructions on e-Manual.
Download Motion File
Download the edited motion file to the robot to use it in the ROBOTIS MINI App or task code. Like the task code, the motion data needs to be downloaded to the controller once.
- The PC must be connected the controller. Please refer to the section above on connecting the DARWIN-MINI with the PC via Bluetooth.
-
Click ‘connect’ on the bottom left.

-
Select the port to connect on, and click connect.
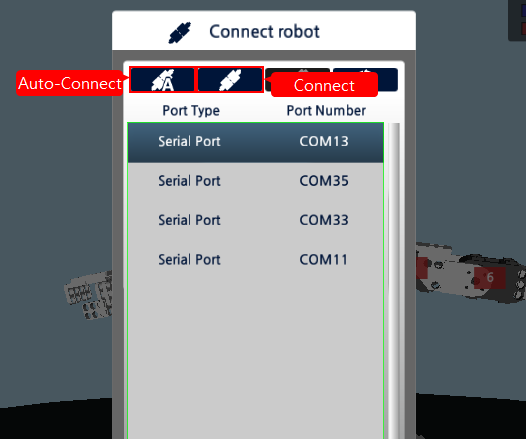
If you don’t know the port, select ‘Auto Search’.
-
If connection is successful, the port number and connection speed will be displayed on the bottom left.

-
Move to the motion download tab on the top to download the motion data, select the motion group to download, and click the download button.
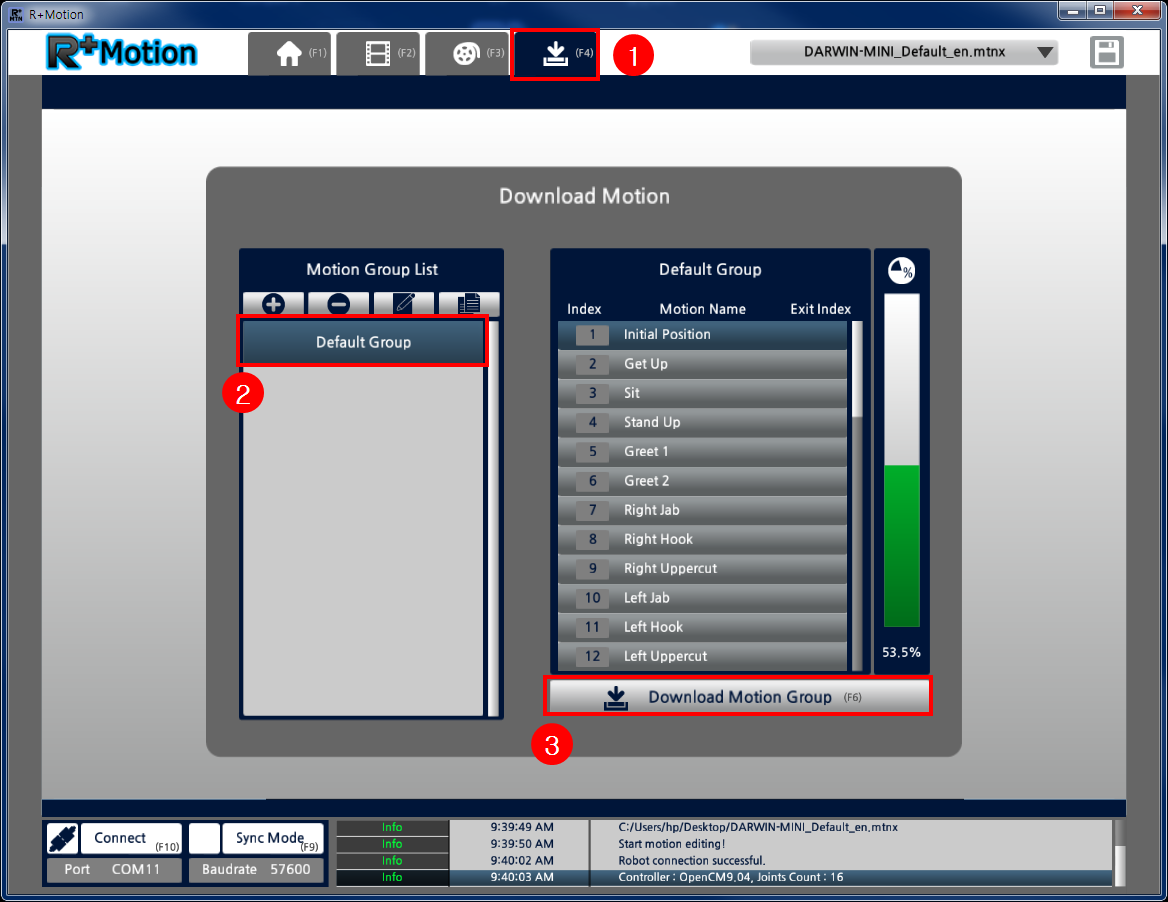
-
Download progress will be shown, and the ‘Download Success’ message will be shown on the bottom log window.

- Now, check with the ROBOTIS MINI App or task code to see if the edited motion performs the way it should.
Customize
Adding Peripheral Devices
The controller OpenCM9.04-C Type used in ROBOTIS MINI has four ports to connect 5P devices.
- Accessories
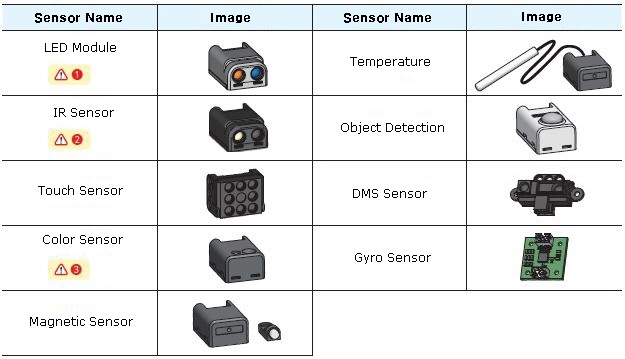
※ Please refer to our online shop to purchase the sensors above. GO TO ROBOTIS SHOP
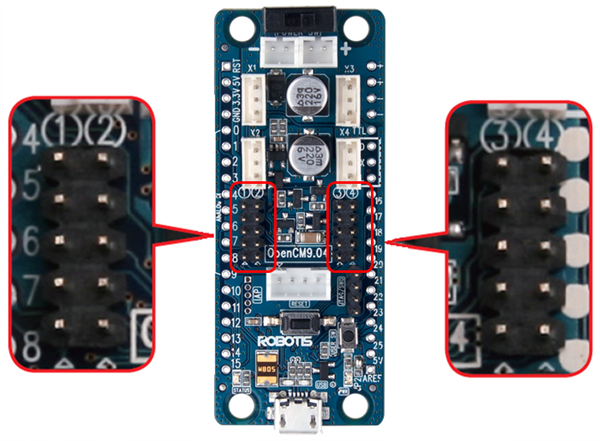
Port number for each port is written in white.
CAUTION :
LED Module : Use ports 2 and 3(LED will not light up when using ports 3 and 4)
IR Sensor : Use ports 1 and 4
Color Sensor : Use ports 2 and 3
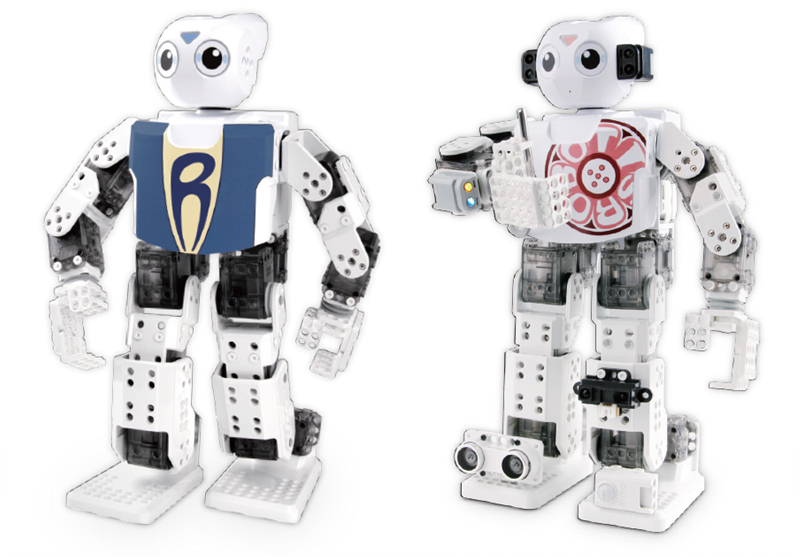
Images of ROBOTIS-MINI with different devices assembled.

Customize Appearance
The stickers come with your package but if you want to re-reprint them, please refer to the link below. You can also draw your own design. Sticker file can be downloaded at Download Section
Download
- Download Example Task Code and Motion File
- Download Sticker Design
- Download STL File for 3D Printer
- Download STP Design File
- Download Assembly Guide
References
Firmware Update
Please follow the procedure below to recover or update the ROBOTIS MINI’s controller (OpenCM9.04C) firmware.
-
Separate the ROBOTIS MINI’s chest with the body to disassemble the controller.
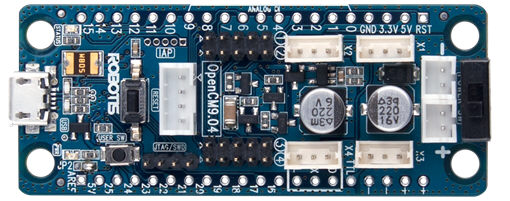
-
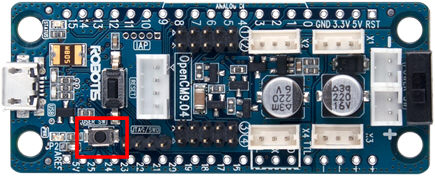
With the power off, push the user button (marked red below).
-
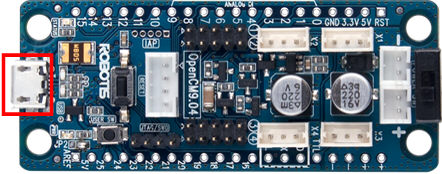
Keep holding the user button, then connect the OpenCM9.04C with the PC with the mini USB cable (marked red below).
-
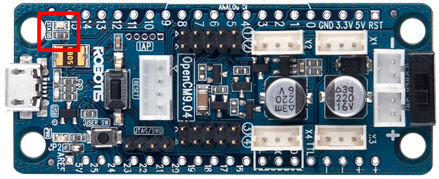
When a green light shows up on the LED marked below, let go of the user button.
-
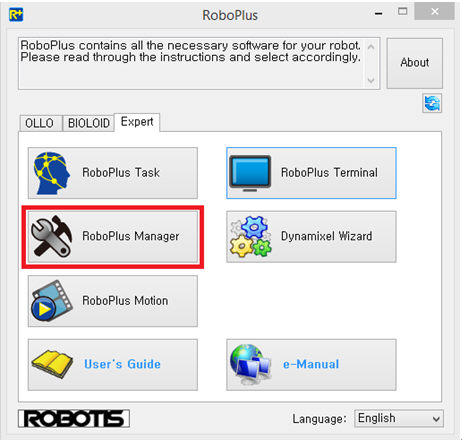
Run RoboPlus. If the version is low, an automatic update will be run through the internet. If the automatic update doesn’t run, please download the latest version from the ROBOTIS website’s Download site.
-
Run R+ Manager (ver. 1.0.32.0 or higher).
-
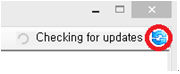
Click the button on the top right to update RoboPlus to the latest version.
-
If any updates were made, close R+ Manager and open the program again.
-
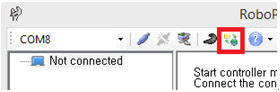
Click the controller firmware management button on the top.
-
Click [Next].
-
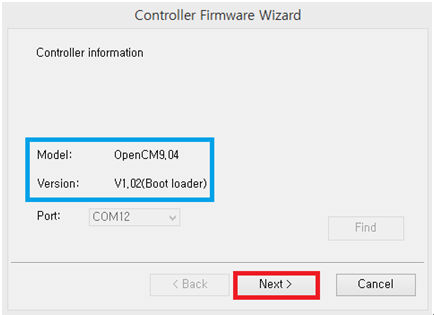
Select the port the OpenCM9.04C is connected on and click search.

-
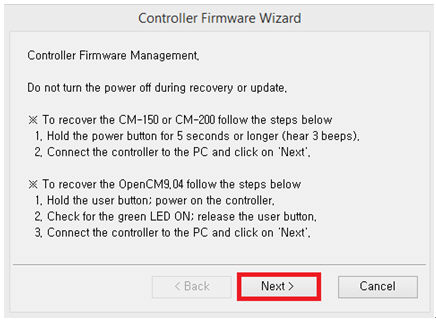
When the controller is found, click [Next].
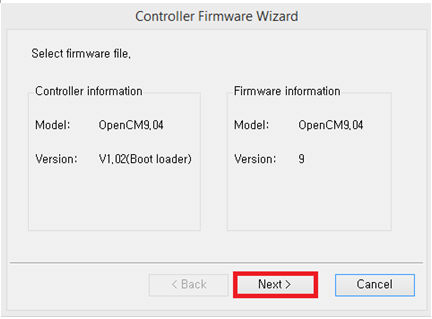
-
Click [Next].
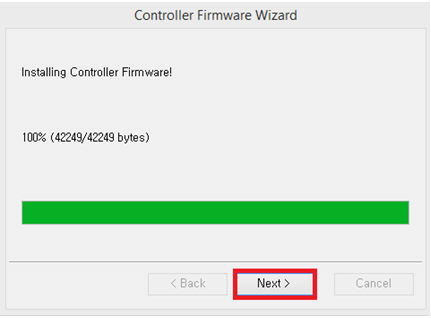
-
Click [Next].
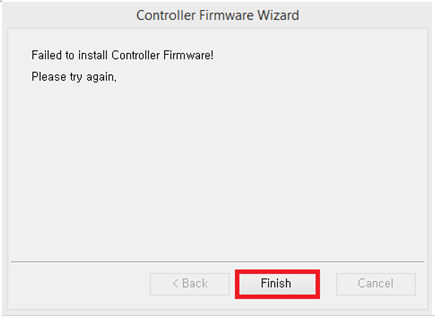
-
Click [Finish].
ID Map