Introduction
DYNAMIXEL Shield for Arduino MKR Series(hereafter referred to as “DYNAMIXEL Shield MKR”) is compatible with MKR series form factor Arduino boards such as MKR ZERO, MKR1000 WIFI, MKR WiFi 1010, and Portenta H7.
Arduino libraries(DYNAMIXEL2Arduino, DYNAMIXEL Shield) for DYNAMIXEL Shield MKR is provided to accelerate the development process using DYNAMIXEL on Arduino.
Please refer to DYNAMIXEL Shield Libraries section for available APIs.
WARNING
- This product does not contain Arduino MKR Board. Arduino Board should be purchased separately.
- One of three DYNAMIXEL headers is assembled on the shield for DYNAMIXEL X series (More headers for AX/MX/X series are included).
- Please solder included headers and parts when necessary.
- Some Arduino MKR shields may not fully compatible with DYNAMIXEL Shield MKR due to the pin confliction. Please refer to each product datasheet before using with DYNAMIXEL Shield MKR.
Quick Start Guide
Please use the recommended voltage source for the DYNAMIXEL.
Specifications
| Item | Details |
|---|---|
| VIN(DXL) Voltage1 | 3.5 ~ 24 [V] |
| Operating Temperature | -10 ~ +80 [°C] |
| Connectors2 | JST(S3B-EH), Molex(5268-03A) Battery Connector3(SMW250-02) Terminal Block(DG350-3.5-02P-14) |
| Physical Connection | TTL Multidrop Bus (5V Level) |
| Cables |  DC Jack Harness (Type A, O.D: 5.5 [mm], I.D: 2.5 [mm]) Convertible cable for XL-320 |
| Dimensions | 65 x 25 [mm] |
| Weight | 11 [g] |
1 ROBOTIS SMPS 12V 5A PS-10 is recommended as a power supply for 12V DYNAMIXEL.
2 Only one JST connector is assembled by default. Please solder included connectors when necessary.
3 The battery connector is compatible with ROBOTIS batteries LB-010 or LB-020.
![]()
DANGER
(Ignoring these warnings may cause serious injury or death)
- Never place items containing water, flammables/open flames, or solvents near the product.
- Never place fingers, arms, toes, and other body parts near product during operation.
- Cease operation and remove power from the product if the product begins to emit strange odors, noises, or smoke.
- Keep product out of reach of children.
- Check input polarity before installing or energizing wiring or cables.
![]()
CAUTION
(Ignoring these warnings may cause mild injury or damage to the product)
- Always comply with the product’s offical operating environment specifications including input voltage, current, and operating temperature.
- Do not insert blades or other sharp objects during product operation.
![]()
ATTENTION
(Ignoring these warnings may cause minor injury or damage to the product)
- Do not disassemble or modify the product.
- Do not drop the product or apply strong impacts.
- Do not connect or disconnect DYNAMIXEL cables while power is being supplied.
Supported DYNAMIXEL
DYNAMIXEL Shield MKR only supports TTL based DYNAMIXEL lineups.
Part Lists
The following parts are included in the package.
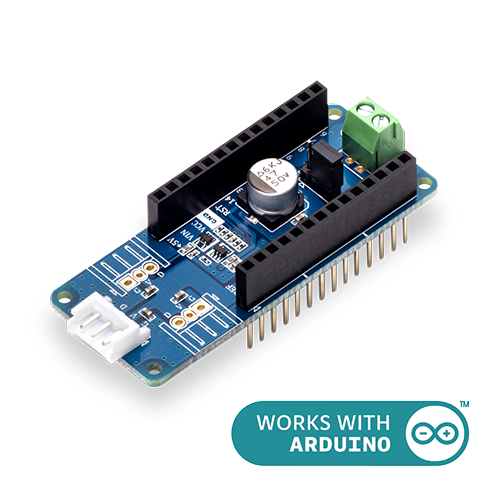
- DYNAMIXEL Shield MKR (1)
- JST Header(S3B-EH) (2)
- Molex Header(5268-03A) (2)
- Terminal Block(DG350-3.5-02P-14) (1)
- DC Jack Harness (1)
- Battery Connector(SMW250-02) (1)
- XL-320 Convertible cable (1)
Layout
DYNAMIXEL Shield MKR Schematics can be downloaded in the link below.
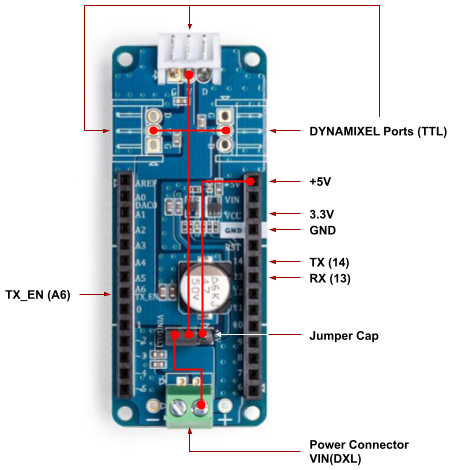
The DYNAMIXEL Shield MKR header pinout is based on the Aruduino MKR boards.
| Item | Description |
|---|---|
| DYNAMIXEL TTL Port | TTL DYNAMIXEL supported |
| VIN(DXL) | External power input for DYNAMIXEL only. Cannot provide power to the ARduino MKR boards |
| +5V1 | 5V from Arduino MKR boards to supply power to DYNAMIXEL |
| Jumper Cap | Power Source Selection between VIN(DXL) and +5V |
1 Please be aware that Arduino MKR boards may limit the 5V power source for USB hardware protection.
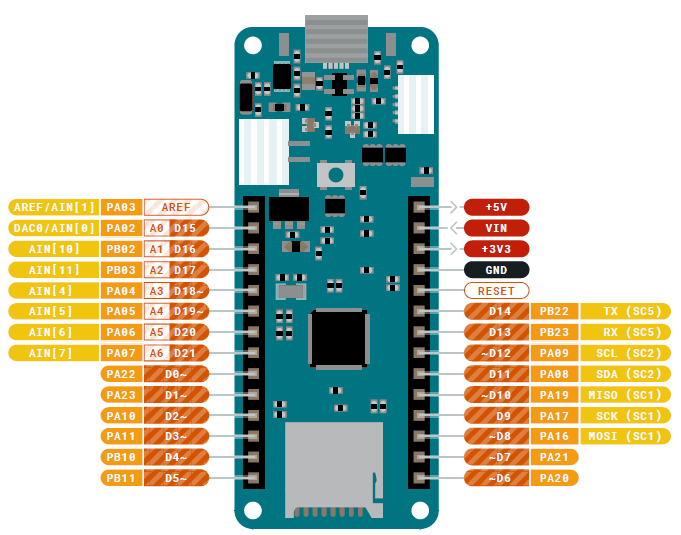
Arduino MKR board pinout example. Please refer to each product in Arduino Products for more details.
| Pin No. | Pin Name | Description |
|---|---|---|
| 13 | RX | Hardware serial port to receive data from DYNAMIXEL |
| 14 | TX | Hardware serial port to transmit data to DYNAMIXEL |
| 21(A6) | TX_EN | Flow control of DYNAMIXEL data BUS - HIGH : Transmit - LOW : Receive |
How to Connect
DYNAMIXEL Shield MKR can be mounted on or below the Arduino MKR boards.
Please check the compatibility when using multiple shields with a single Arduino MKR board.
Arduino MKR boards cannot be powered using the VIN(DXL) power source.
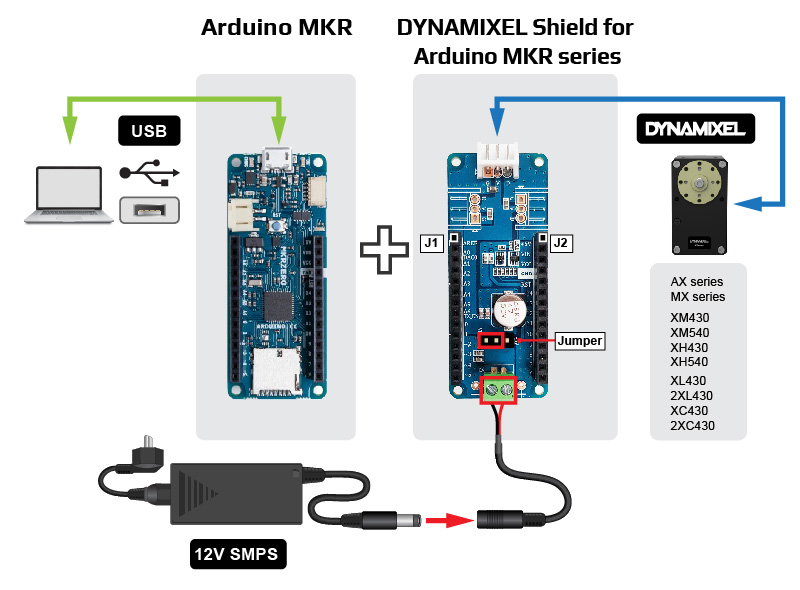
12V DYNAMIXEL X Series
This connection is recommended for most X series DYNAMIXEL with 12V operating voltage (except XL-320, XL330).
The USB connection from PC supplies power and serial communication to the MKR board to upload the Arduino sketch, while 12V SMPS supplies power to connceted DYNAMIXEL.
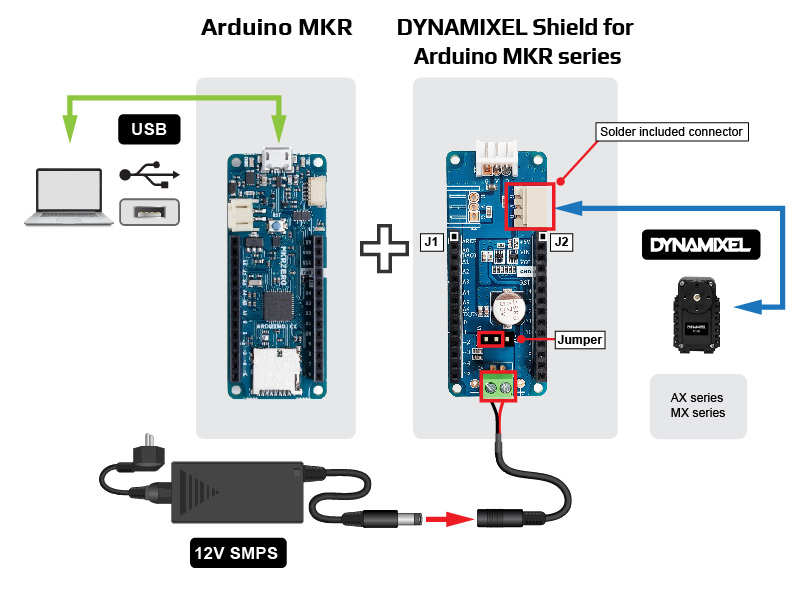
AX / MX Series DYNAMIXEL
AX and MX series use different type of Molex connector.
In order to use the original AX or MX series cable, solder the included molex connector to empty DYNAMIXEL port.
Or else, use the Robot Cable-X3P convertible.
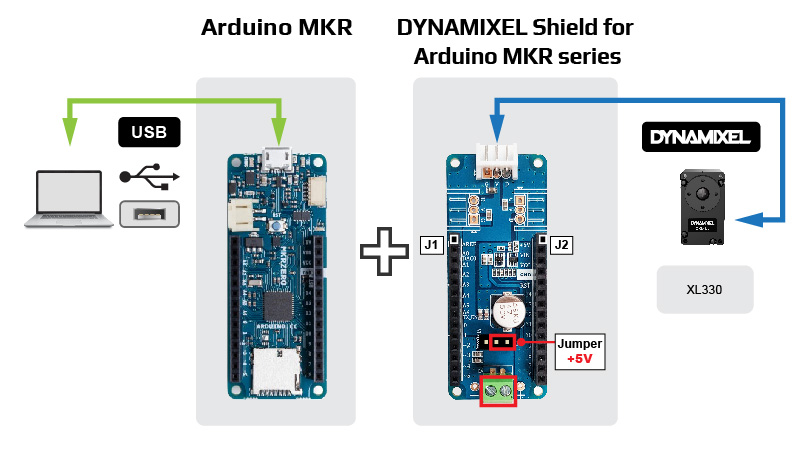
XL330 using USB power
XL330 can run off of the 5V USB power due to its low operating voltage.
Set the power jumper to +5V side to use 5V power from the Arduino MKR board.
Please be aware that Arduino MKR boards may limit the 5V power source for USB hardware protection.
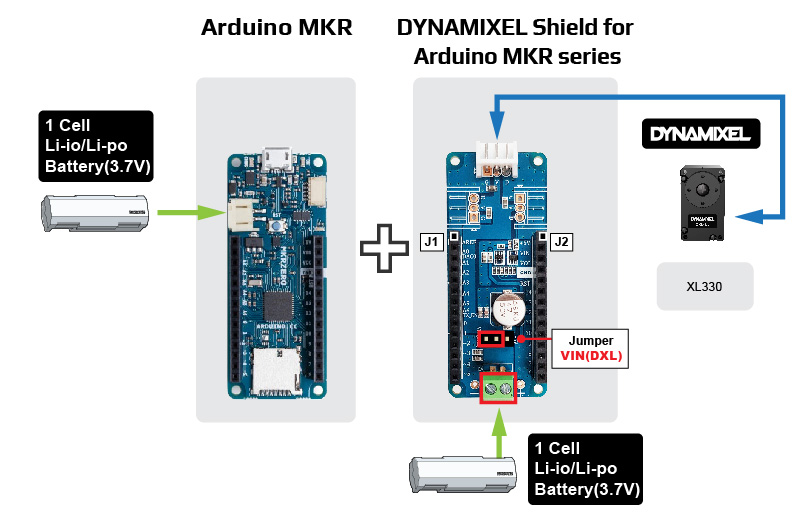
After uploading the program, 1 cell Lithium battery(3.7V) can be used to power the Arduino MKR board and XL330.
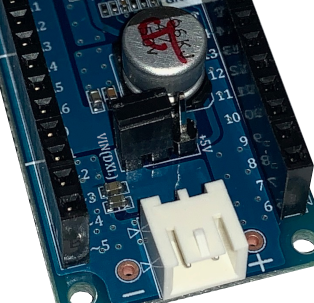
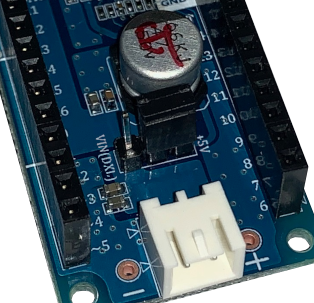
Power Select Jumper
| Use VIN(DXL) from external power source(SMPS) | Use +5V from Arduino MKR |
|---|---|
 |
 |
When using VIN(DXL) from external power source, please be aware of the polarity of terminal block. Additional power source for Arduino MKR board will be required. |
When using +5V from Arduino MKR, be aware that some Arduino MKR board has a built in fuse that prevents excessive use of 5V power. Please refer to each Arduino MKR board specification. |
When supplying power to DYNAMIXEL Shield MKR, take extra care for the polarity of the cable.
DYNAMIXEL Shield Libraries
- DYNAMIXEL2Arduino Library : GitHub Repository
- DYNAMIXEL Shield Library : GitHub Repository
Features
- Compatible to Arduino MKR and Portenta H7 boards
- Support both DYNAMIXEL Protocol 1.0 and 2.0
- By default, 16 DYNAMIXEL can be detected with DYNAMIXEL Arduino libraries(config.h)
- Support SynWrite function
- DYNAMIXEL Shield library(v0.1.0 or above) requires DYNAMIXEL2Arduino library
Install Library
NOTE
Make sure to install the Arduino SAMD Boards manager from Arduino IDE boards manager in order to program Arduino MKR boards.
There are three ways to add libraries to the Arduino IDE.
- Using the Library Manager
- Importing a .zip Library
- Manual installation
Each way is described in detail in the Arduino Official Guide, so please refer to it if necessary.
Below is an example of using the Library Manager from Arduino IDE.
Search for dynamixel shield from the Library Manager and install the latest version.
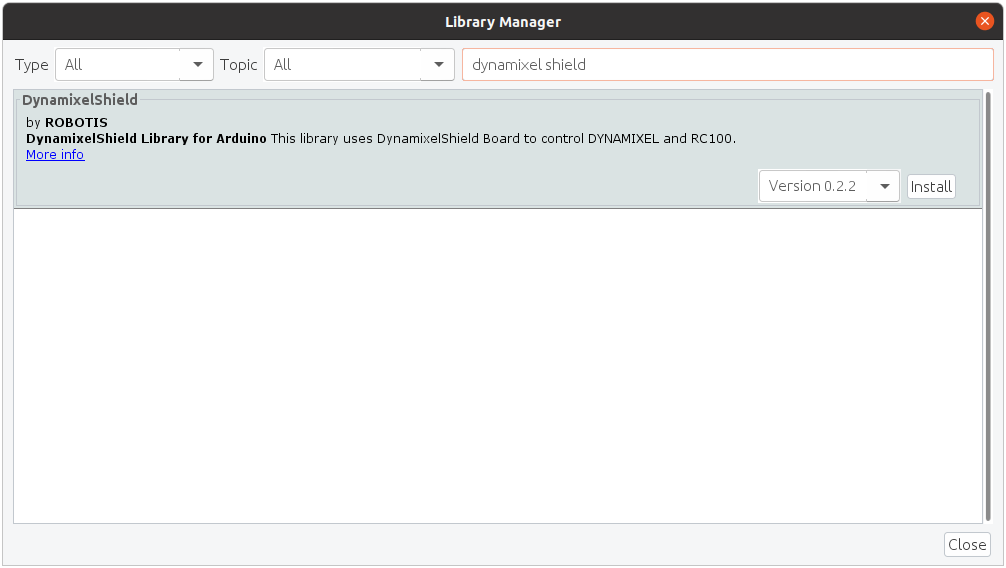
Click Install all to install the dependent library Dynamixel2Arduino.
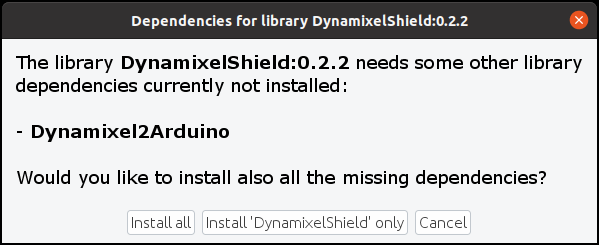
If you have successfully installed both libraries, you’ll be able to find several examples of DynamixelShield in the examples.
Library API
DYNAMIXELShield(v0.1.0 or above)
WARNING : In order to use DYNAMIXEL Shield library(v0.1.0 or above), DYNAMIXEL2Arduino library must be installed.
Dynamixel2Arduino Class
- begin()
- getPortBaud()
- ping()
- scan()
- getModelNumber()
- setID()
- setProtocol()
- setBaudrate()
- torqueOn()
- torqueOff()
- ledOn()
- ledOff()
- setOperatingMode()
- setGoalPosition()
- getPresentPosition()
- setGoalVelocity()
- getPresentVelocity()
- setGoalPWM()
- getPresentPWM()
- setGoalCurrent()
- getPresentCurrent()
- readControlTableItem()
- writeControlTableItem()
Master Class
Dynamixel2Arduino class inherits below public functions from the Master class.
RobotisRemoteController Class
The Remote Controller class can be used with the Arduino MKR boards by enabling SoftwareSerial feature.
- begin()
- availableData()
- readData()
- availableEvent()
- readEvent()
- flushRx()
- available()
- read()
- peek()
- flush()
- write()
Examples
CAN2DYNAMIXEL
CAN2DYNAMIXEL converts CAN based DYNAMIXEL Protocol into DYNAMIXEL Protocol 2.0.
CAN shield board with MCP2515 is required and 107-Arduino-MCP2515 library can be installed via Library Manager of Arduino IDE.
Download Examples
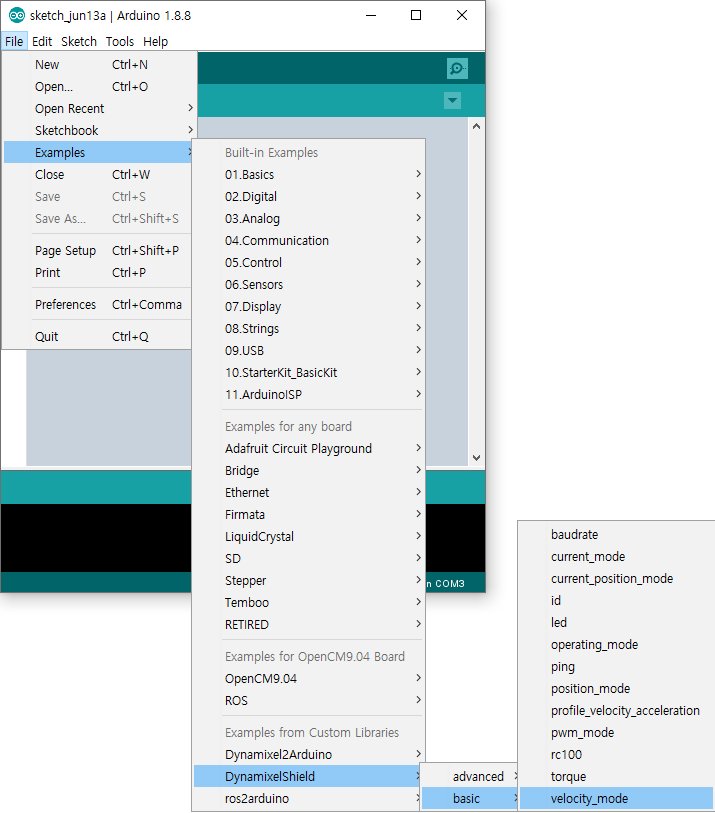
The example is included in the DYNAMIXEL Shield library and can be found at File > Examples > DynamixelShield > advanced > can2dynamixel from Arduino IDE.
Tested Environment
- DYNAMIXEL
- TTL supported X series (except XL-320)
- ID = 1, Baudrate = 1000000bps, Protocol 2.0
- Controller
- Arduino MKR WAN 1300
- DYNAMIXEL Shield for Arduino MKR
- MKR CAN Shield
- CAN Interface
- IXXAT USB-to-CAN V2
- CAN Library
- 107-Arduino-MCP2515
- Software
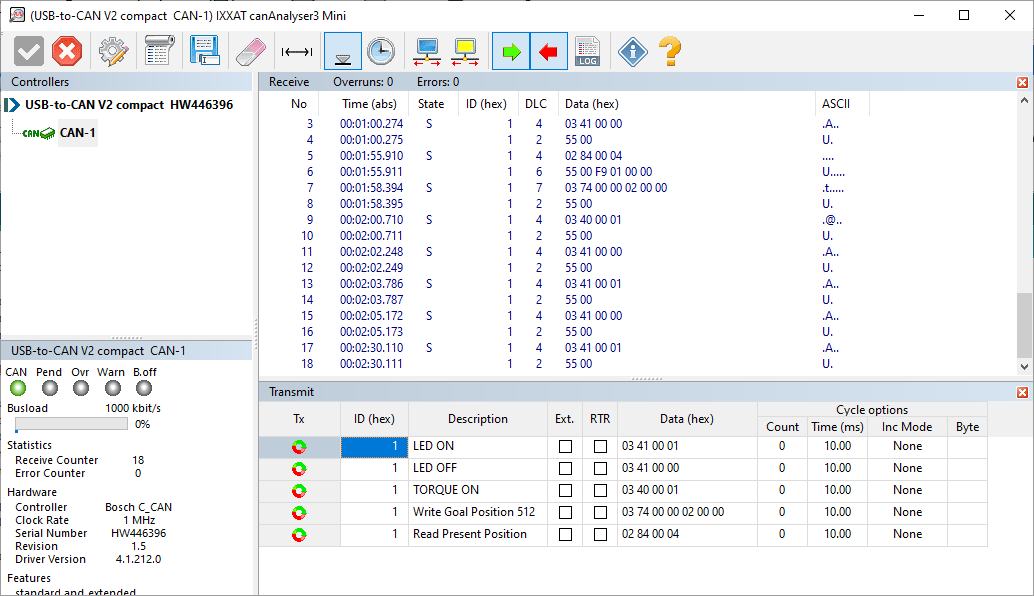
- IXXAT canAnalyser3 Mini
- Bitrate = 1000CiA (1000 kbit/s)
- Arduino IDE
- DYNAMIXEL Shield library
WARNING
- This example uses 1,000,000 bps. Please configure the Baudrate of DYNAMIXEL accordingly.
- Do not use a Baudrate higher than 1,000,000 bps as it may cause unstable data transmission.
Connection Diagram

Additional Information
The CAN Standard Protocol 2.0 used in this example is shown as below.
| 1 Bit | 11 Bit | 1 Bit | 1 Bit | 1 Bit | 4 Bit | 8 Byte | 2 Byte | 2 Bit | 7 Bit | 3 Bit |
|---|---|---|---|---|---|---|---|---|---|---|
| SOF | ID | RTR | IDE | r0 | DLC | Data | CRC | ACK | EOF | IFS |
- ID : DYNAMIXEL ID
- DLC : Size of Data
- Data : Instruction(1 Byte) + Parameters(0 ~ 7 Byte)
NOTE : CAN2DYNAMIXEL does not support Sync or Bulk instructions due to the limited length of Data field.
The Transmit section of IXXAT canAnalyser3 Mini software requires ID (hex) and Data (hex) while other fields are automatically generated as shown below.
RCPWM2DYNAMIXEL
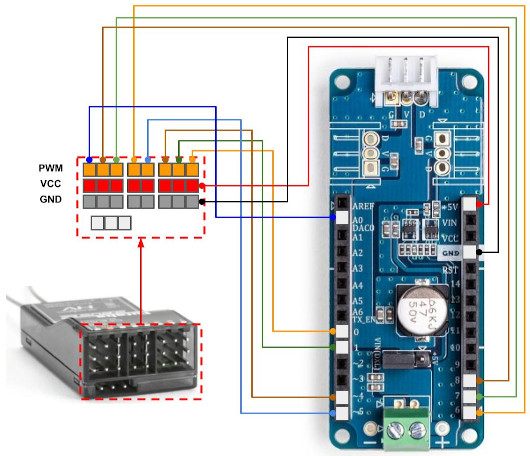
RCPWM2DYNAMIXEL is the example to control DYNAMIXEL using RC controller.
The RC signal sent from the RC controller is translated into PWM signal by the RC receiver, then converted into DYNAMIXEL Protocol 2.0 by the Arduino MKR board.
The example provides a couple safety features such as Soft Start that prevents sudden movement of DYNAMIXEL when the RC receiver is powered, and Fail Safe that returns DYNAMIXEL to certain position when the power of the RC receiver is cut off.
Download Examples
The example is included in the DYNAMIXEL Shield library and can be found from File > Examples > DynamixelShield > advanced > rc_pwm2dynamixel
Tested Environment
- DYNAMIXEL
- TTL supported X series (except XL-320)
- ID = 1 ~ 7, Baudrate = 1000000bps, Protocol 2.0
- Controller
- Arduino MKR Zero
- DYNAMIXEL Shield for Arduino MKR
- Futaba T10J controller
- RC Interface
- Futaba R3008SB receiver
- Software
- Arduino IDE
- DYNAMIXEL Shield library
NOTE: The maximum number of DYNAMIXEL depends on the number of channel supported by the RC receiver and the Arduino controller.
WARNING: The default baudrate of DYNAMIXEL X series is set to 57600 bps, and the example uses 1000000 bps.
Please match the baudrate of DYNAMIXEL and the examplel code.
Connection Diagram
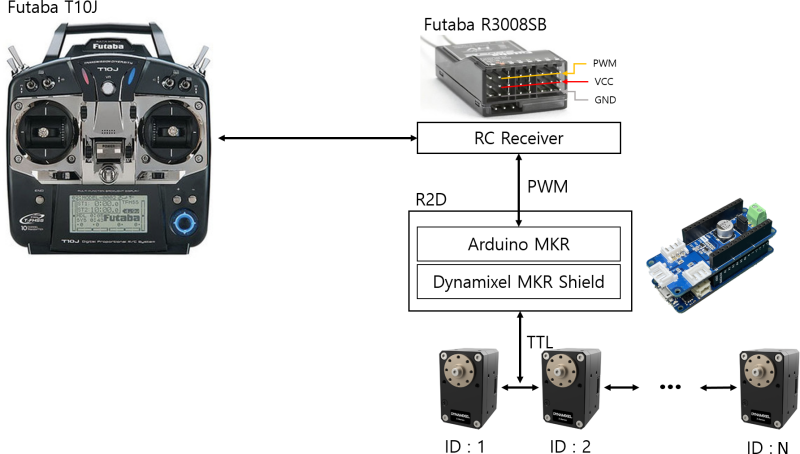
Wiring
The RC receiver and the DYNAMIXEL Shield MKR can be connected as below.