
Introduction
R+ Scratch allows ROBOTIS Controllers to connect to Scratch and program robots in the Scratch environment.
Program Layout
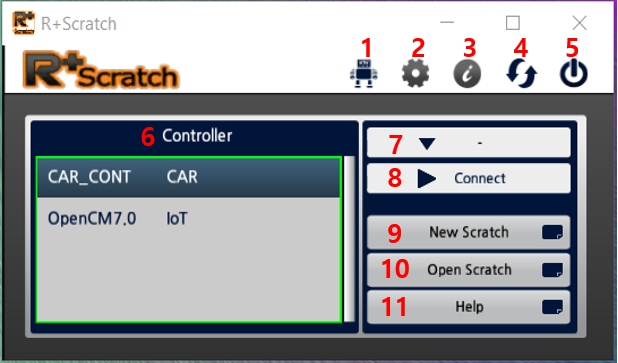
Home Screen
This is the main screen that appears when R+ Scratch is first started. It contains configuration menus.
Settings
Change the language of the program.
Information
Check the version information and update history of the program.
Check for Updates
Check for the latest version update of R+ Scratch.
Close
Close R+ Scratch.
Select Controller
Displays the list of Controllers that are compatible with R+ Scratch.
Port Selection
Shows all the available ports that a user can connect. Either press “Auto Search” or check the Device Manager to determine which port your robot is using.
Connect / Disconnect
Clicking the “Connect” button will connect R+ Scratch with the Controller and allow you to use the “Extension Block” in Scratch2Offline.
If Scratch2Offline and R+ Scratch are properly communicating, the O icon above the “Extension Block” will change from red to green in Scratch2Offline.
New Scratch
If Scratch2Offline is installed, clicking on the “New Scratch” button will load a new Scratch project that includes the blocks relevant for programming the selected Controller in Scratch2Offline.
You will first need to save the Scratch project before it loads in Scratch2Offline.
If Scratch2Offline is not installed, clicking on the “New Scratch” button will link to the Scratch2Offline download page. See Install Scratch 2.0 Offline section.
Open Scratch
If Scratch2Offline is installed, clicking on the “Open Scratch” button will load the list of provided example projects for the selected Controller. Double click on example project from the list to load that project.
You will first need to save the Scratch project before it loads in Scratch2Offline.
If Scratch2Offline is not installed, clicking on the “New Scratch” button will link to the Scratch2Offline download page. See Install Scratch 2.0 Offline section.
Help Menu
Clicking the “Help” button will load a folder containing help files.
Files named after the relevant Controller contain descriptions of the blocks used to program that Controller. Files with a *.json extension can be used when directly adding “Extension Blocks” in Scratch2Offline. See Directly Adding an Extension Block in the Miscellaneous (link) section.
Connect Controller to PC
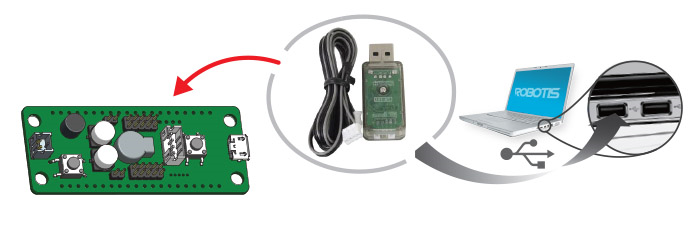
Connect Controller Using Wired Module
This method utilizes a micro B USB cable or an LN-101 (USB Downloader).
Micro B USB Cable

- Connect the Controller to your PC using a micro B USB cable.
- Power on the Controller.
- Click on the “Port Selection” button to see the list of connected devices.
- Click on “Auto Search” to automatically detect the Controller or manually select the COM Port by double clicking on “ROBOTIS Virtual COM Port.”
- Click “Connect” to begin communicating between robot and PC.
LN-101 (USB Downloader)
- Connect the Controller to your PC using an LN-101 (USB Downloader).
- Power on the Controller.
- Click on the “Port Selection” button to see the list of connected devices.
- Click on “Auto Search” to automatically detect the Controller or manually select the COM Port by double clicking on “USB Serial Port.”
- Click “Connect” to begin communicating between robot and PC.
Connect Controller Using Wireless Module
This method utilizes BT-210 Bluetooth module or ZigBee (ZIG-110A Set + ZIG2Serial + USB2DXL)
BT-210 Bluetooth Module
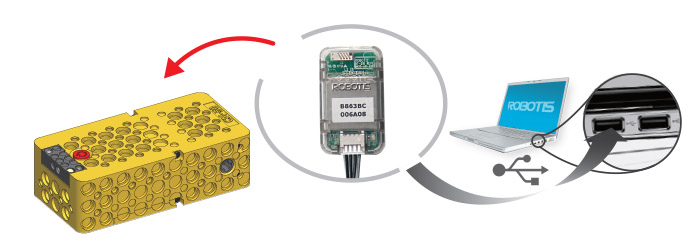
- Connect the BT-210 module to the Controller.
- Power on the Controller.
- Pair the BT-210 module to your PC: How to Connect BT-210 to PC
- Click on the “Port Selection” button to see the list of connected devices.
- Click on “Auto Search” to automatically detect the Controller or manually select the COM Port by double clicking on “Bluetooth Serial Port.”
- Click “Connect” to begin communicating between robot and PC.
ZigBee (ZIG-110A Set, ZIG2Serial, and USB2DYNAMIXEL Required)
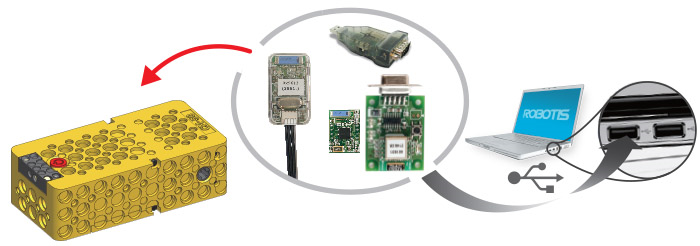
- Connect the ZIG-110A to the Controller.
- Connect the ZIG-100 + ZIG2Serial + USB2DYNAMIXEL setup to your PC.
- Click on the “Port Selection” button to see the list of connected devices.
- Click on “Auto Search” to automatically detect the Controller or manually select the COM Port by double clicking on “USB Serial Port.”
- Click “Connect” to begin communicating between robot and PC.
Install Scratch 2.0 Offline
- Go to the Scratch 2.0 Offline download page (https://scratch.mit.edu/download/scratch2)
- Download Scratch 2.0 Offline Editor.
NOTE : If Scratch 2.0 Offline is not installed, clicking on the “New Scratch” or “Open Scratch” buttons from R+ Scratch’s Home Screen will link to the Scratch2Offline download page.
Miscellaneous
Install USB Driver
- If the driver is properly installed and your Controller is connected to your PC and powered on, you will see “ROBOTIS Virtual COM Port(COM X)” in Device Manager.
- If the device shows up as “USB Serial Port,” then you must update the driver.
- Right-click on “USB Serial Port” and select “Update Driver Software…”
- Select “Browse my computer for driver software”.
- Select “Let me pick from a list of device drivers on my computer”.
- Select “ROBOTIS Virtual COM Port” and click “Next” to finish the installation.
To install the USB driver manually, please visit the following link:
https://robotis.s3.ap-northeast-2.amazonaws.com/support/ko/software/sw_reference/cm150_usb_install.htm
Add Extension Blocks
- Selecting the Controller and clicking the “New Scratch” or “Open Scratch” buttons will open a Scratch project with the blocks related to the Controller automatically included.
- When executing Scratch directly or clicking Create New in the Scratch Menu, you will have to add a block directly as instructed below.
- When you are trying to connect an example downloaded from the Scratch website (https://scratch.mit.edu/starter_projects/) or a previously created Scratch with the Controller, you can add an Extension Block directly.
- Copy the path of the folder that is opened after clicking the Help Menu.
- While holding down the “Shift” key, click the “File” menu. Click on “Import experimental HTTP extension.”
- In the resulting window, paste in the path name and select the *.json file extension of the Controller “Extension Blocks” you wish to add.
- The selected blocks are now shown in the “Extension Block” list.