
Introduction
In computer science, a task generally means a set of relevant activities to complete the work at hand. In RoboPlus terms, a task code is a source code programmed for a robot to complete a task.
A robot operates according to the task code created by the user, and the RoboPlus Task is a program that helps the user to write task code easily. Task code files have a .tskx extension in the PC (or smartphone).
(Previous versions use a .tsk extension, which can be converted to .tskx via R+ Task 2.0)
- What does the Task file have to do with the Motion file?
The Task file is the program code that defines the logic and thought process of how the robot will think and act, and the Motion file is the data which defines the behavior to be taken according to the decision made on the Task file.
If the robot that I make will only be using simple movements, then you do not need to use a Motion file when writing a Task file.
But if I need the robot to perform accurate movements or a great number of movements such as dancing, then using a Motion file will be more efficient.
(If user wants to use a Motion file in the task code, the user must download the Motion file.)

Getting Started
Software Install
![]()
Menu Descriptions
-
Editing Tab for Each Stage
The workspace is divided into Home Tab, Programming Tab, and Debugging Tab.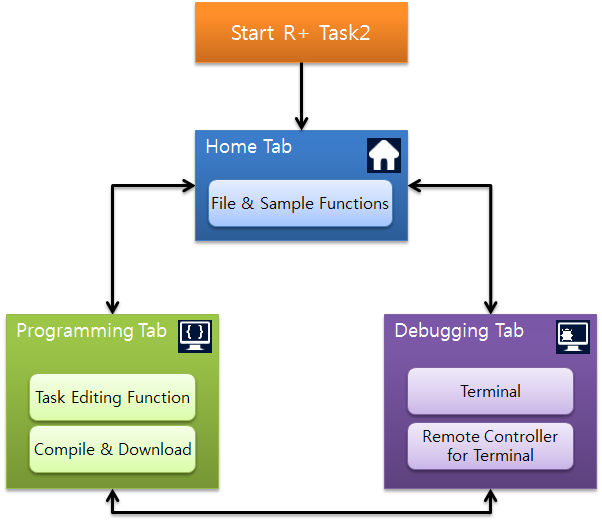
-
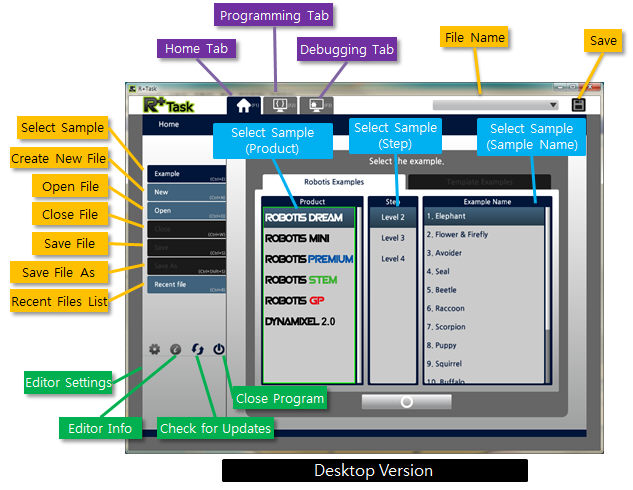
Home Tab
The following figures are the first screen right after starting the program, which includes basic samples, file related menu, update, and settings menu.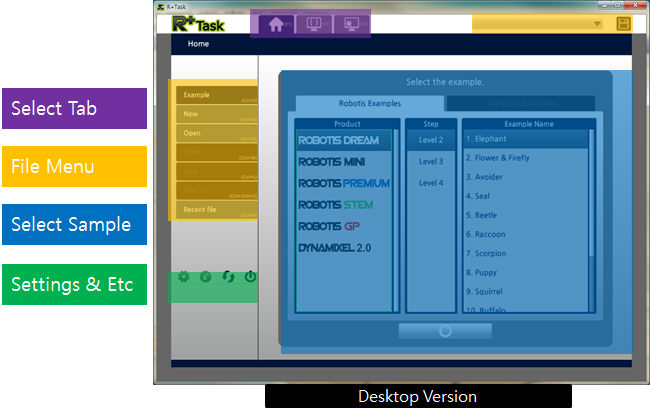
-
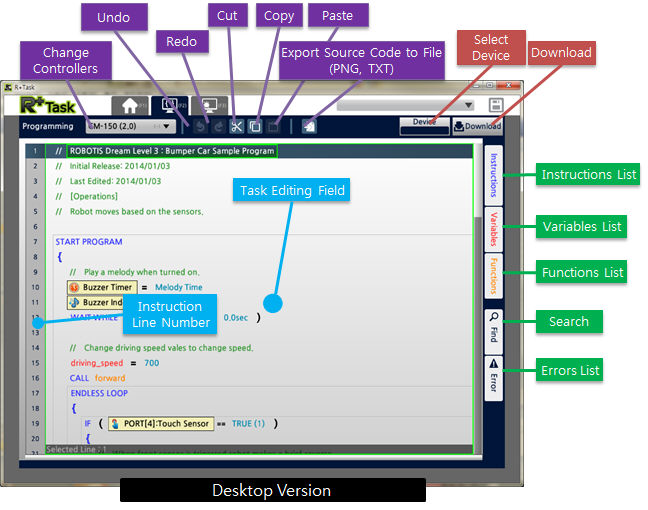
Programming Tab
The following figures display the screen for editing task source code, which provides programming toolbar, source view, outline menu, and download functions.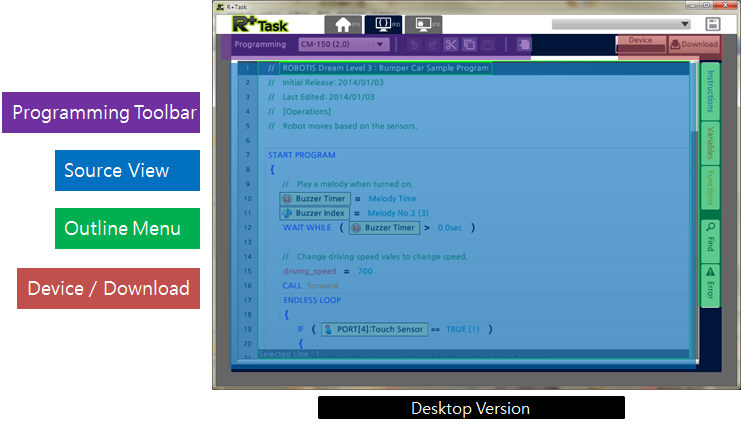
-
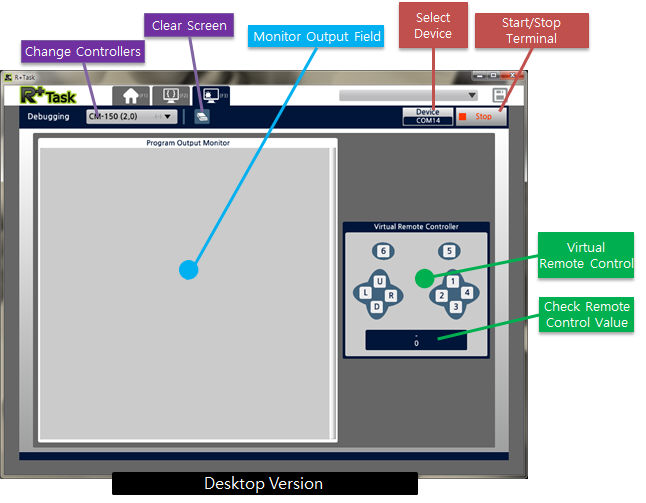
Debugging Tab
The following figures indicate the screen to debug the task code, which provides the output monitor and virtual remote control functions.
(An auto-connect feature has been added for the user’s convenience.)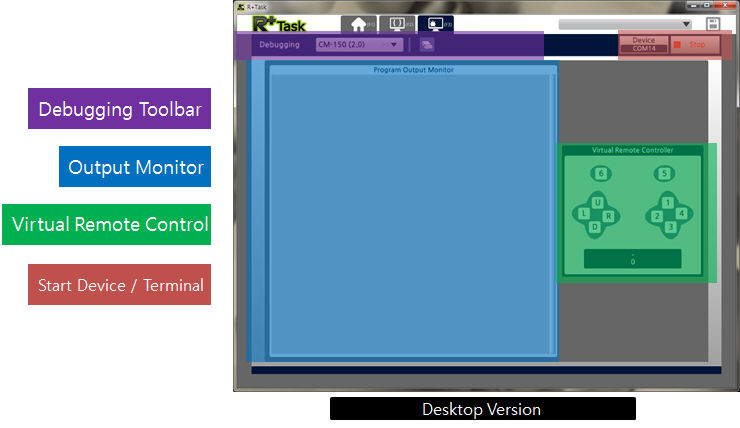
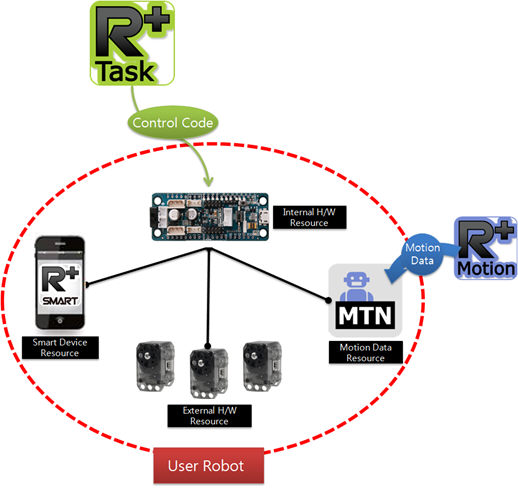
Resources for Task
Resources in Task Code vary depending on the device connected with the controller.
- If controller is connected to an external hardware such as a Dynamic Cell, then the Task Code can use it.
- If controller is connected to a smart app(R+ Smart or R+ IoT), then the Task Code can use it.
- If user has downloaded motion data into the Controller via R+ Motion, then the Task Code can use it.
Resources available in Task Code are comprised as below
Task Code Structure
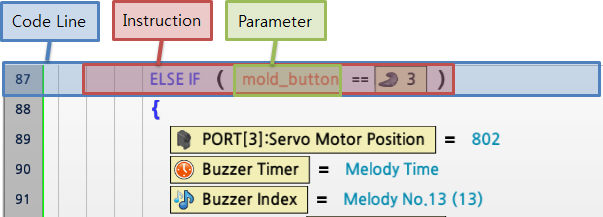
Task code is comprised of 3 elements (code lines, instructions, and parameters).
-
Parameter
This is the smallest unit that represents variables or hardware characteristics. User can read or write the value. -
Instructions
Indicates a single behavior(computation) given to the Controller to execute the program. Each instruction promises a unique behavior, and the number of parameters vary depending on the behavior(computation). -
Code line (Command line)
The smallest unit that executes the program, which is a combination of instruction and parameter. Generally, the program is executed in order of the code lines.
Basic Features
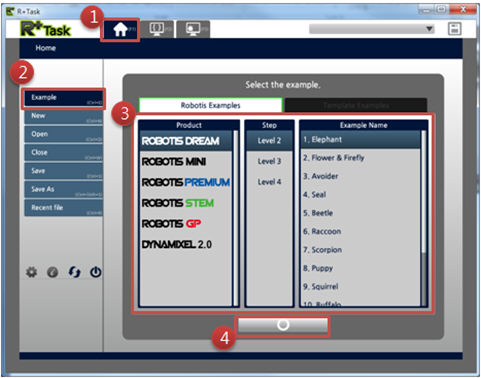
File Open
- Move to Home Tab (When you open the program it starts on Home Tab.)
- Click the
Examplebutton - Select the desired product, steps, and sample name
- Click
Confirmbutton
Create New File
- Move to Home Tab (When you open the program it starts on Home Tab.)
-
Click the
Newbutton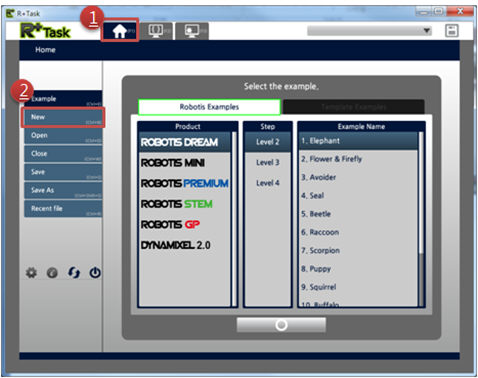
- Choose the controller model and its firmware version (1.0 - old, 2.0 - new)
-
Click
Confirmbutton to create new Task file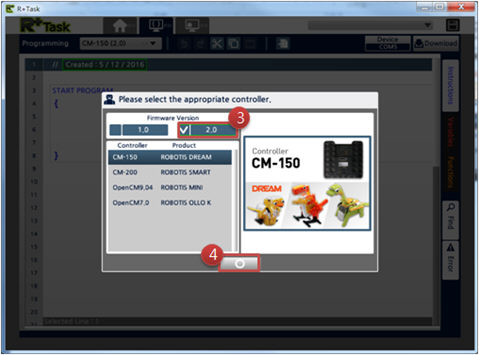
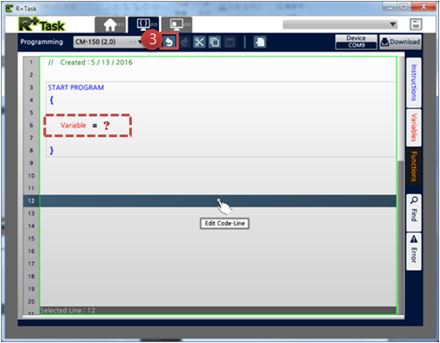
Command Edit
- Move to Programming Tab (When you create a new file it starts on Programming Tab.)
- Click the
Instructionsbutton -
Click the
Loopcategory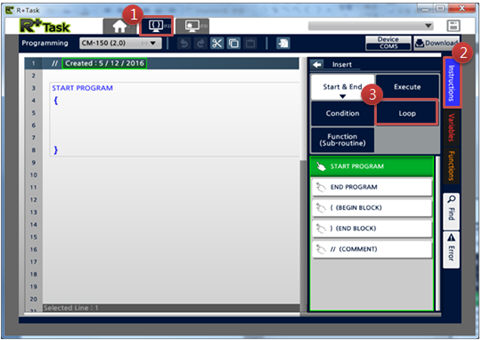
- Drag the
Endless Loopinstruction. -
And drop it on the desired line to add the instruction

Parameter Edit
- Click the “Instructions” button
- Click the “Execute” category
- Drag the “Load” instruction,
-
And drop it on the desired line to add instruction
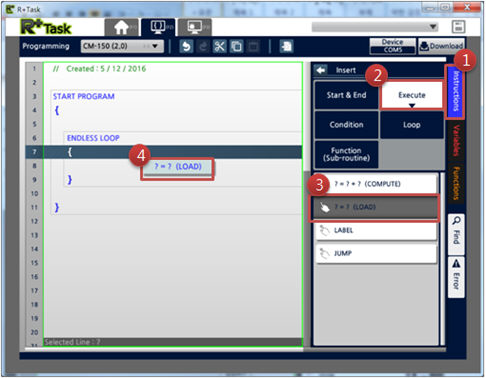
-
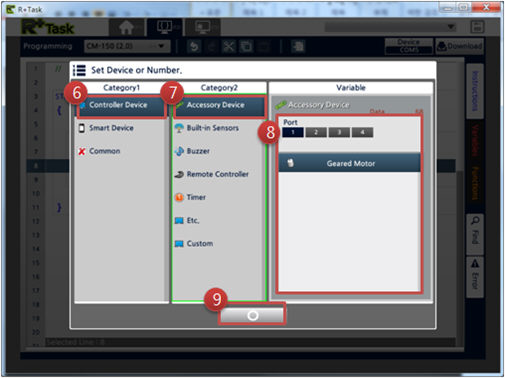
Double-click on the “left-side block” of the added instruction

- Select “Controller Device” in Category1
- Select “Accessory Device” on Category2
- Select Port number 1 and select “Geared Motor”
-
Click the Confirm button to finish editing the instruction
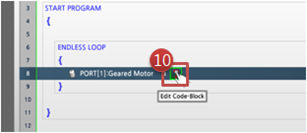
-
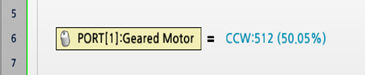
Double-click on the “right-side block” of the added instruction
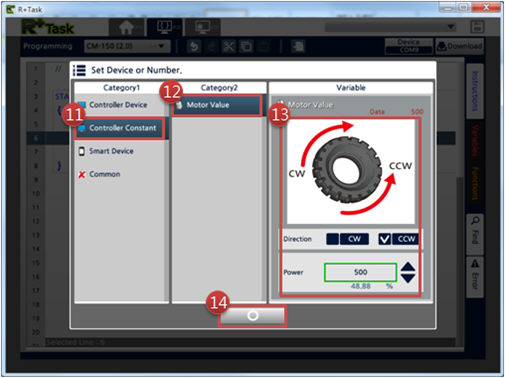
- Select “Controller Constant” in Category1
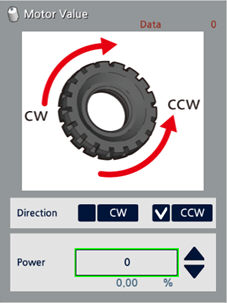
- Select “Motor Value” on Category2
- Select “CCW” for Direction and put in “500” for Power
-
Click the Confirm button to finish editing the instruction
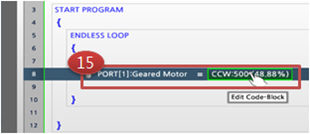
-
Check the edited instruction block
Download Task Code
- Click the “Device” button
- Select the device connected to the robot
- Click the Confirm button
-
When the window closes, click the “Download” button

-
When download completes, the Controller will execute the task (For some of the Controllers, the Controller will close instead of executing the task)
Print Output
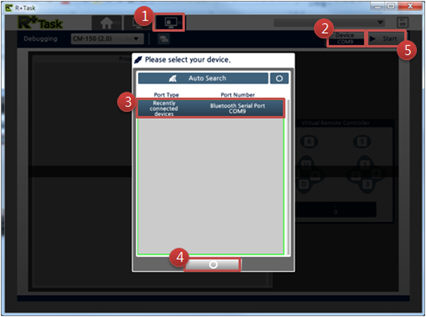
- Move to Debugging Tab
- Click the “Device” button
- Select the device connected to the robot
- Click the Confirm button
-
When the window closes, click the “Start” button
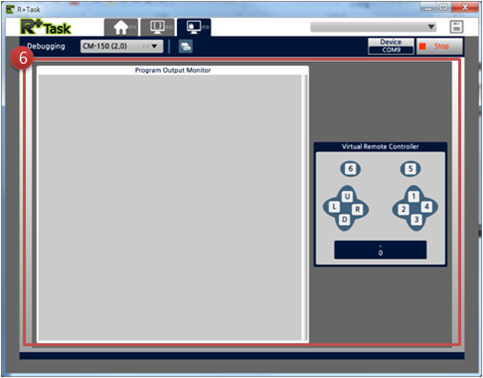
-
When robot is connected, the “Program Output Monitor” and “Virtual Remote Controller” fields will be enabled
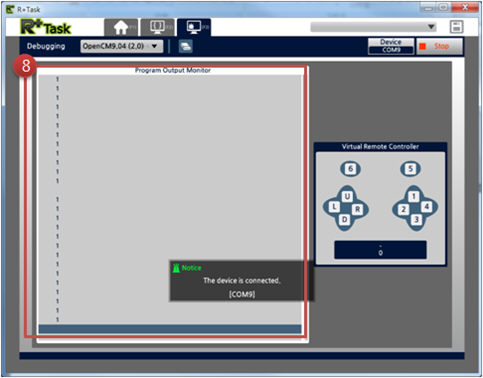
-
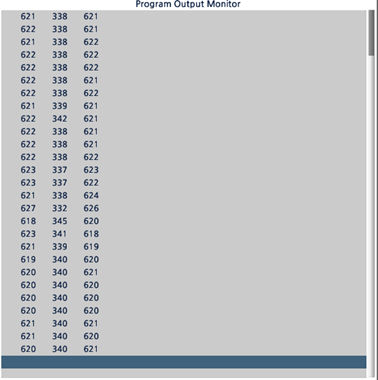
In the source code, if “Print Screen with Line(or Print Screen)” has been used,
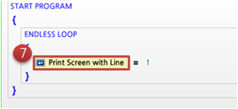
-
The value will be printed in the Output Monitor as below
Programming(Edit)
This section explains the basic editing functions used in R+ Task 2.0
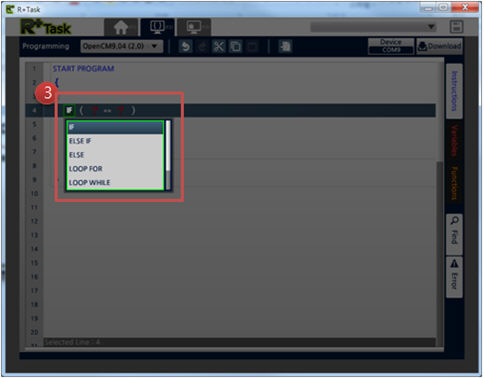
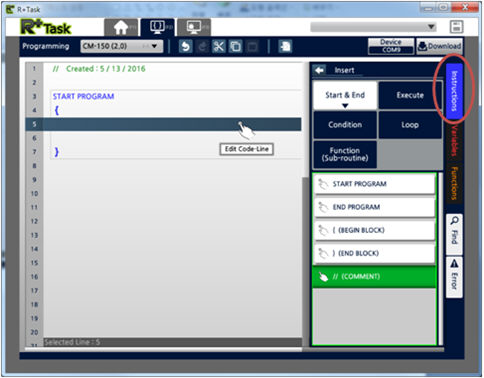
Insert/Change Instruction
- Click the “Instructions” tab on the right (or double-click the location you wish to insert the instruction)
-
Drag-and-drop an instruction on the location that you want
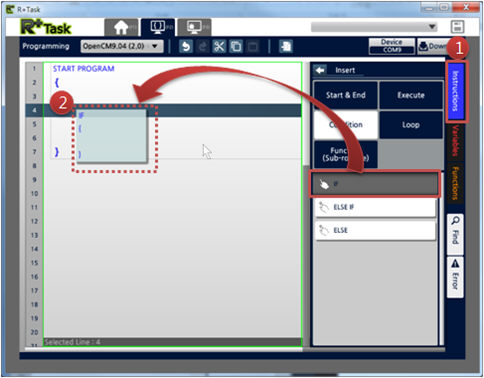
-
If you double-click on an instruction block, you can change it to another instruction
Select Multiple Lines
-
You can select multiple lines by dragging the line numbers on the left
-
If you drag within the line numbers that were already selected, it will partially cancel the selection of those lines
-
If you click directly on the source code, it will cancel the selection of the lines
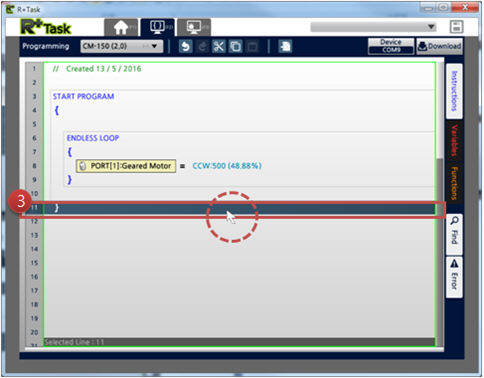
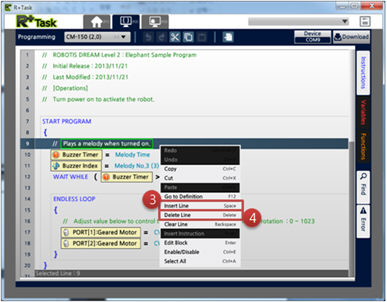
Insert/Delete Line
- Select the location where you wish to insert (or delete) a line with the left mouse button
-
Clicking the right mouse button will display the additional menu
- If you click “Insert Line” it will insert a new line above the currently selected line (keyboard shortcut : Insert)
-
If you click “Delete Line” it will delete the currently selected line (keyboard shortcut : Delete)
Enable/Disable Line
- Select the line which you wish to enable/disable with the left mouse button
-
Clicking the right mouse button will display the additional menu
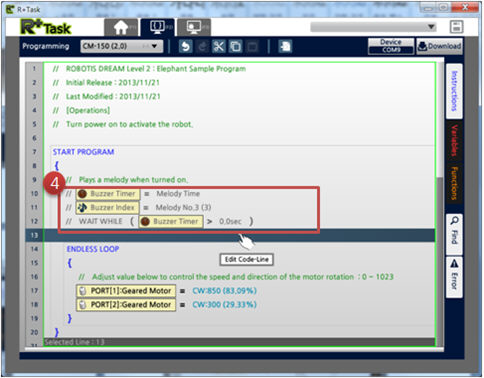
-
If you click “Enable/Disable” it will change the enabled/disabled status of the selected line (keyboard shortcut : Ctrl+E)
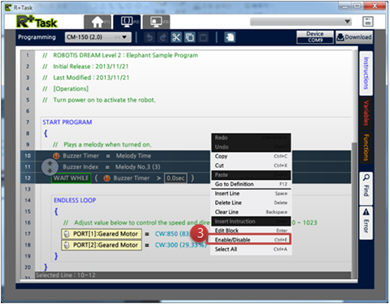
-
Disabled code will be shown in gray and will be excluded during compilation
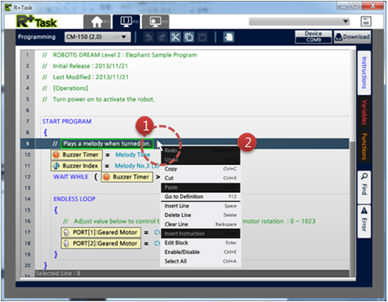
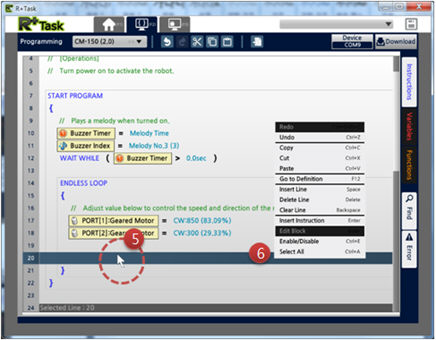
Copy/Cut/Paste
- Select the line which you wish to copy (or cut) with the left mouse button
-
Clicking the right mouse button will display the additional menu
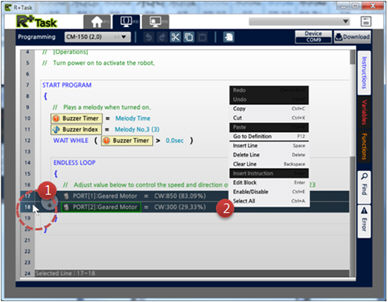
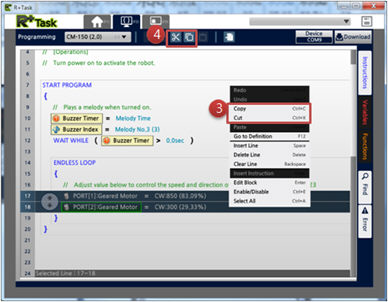
- If you click “Copy” (or “Cut”) it will copy the line to the clipboard
-
You can also use the “Copy” (or “Cut”) buttons from the toolbar on top (keyboard shortcut : Ctrl+C, Ctrl+X)
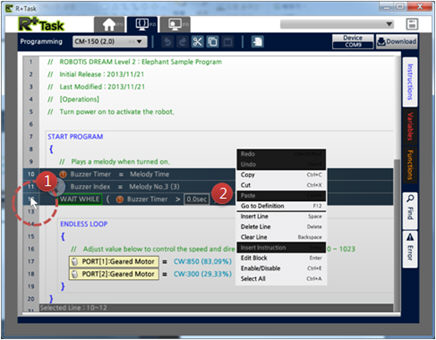
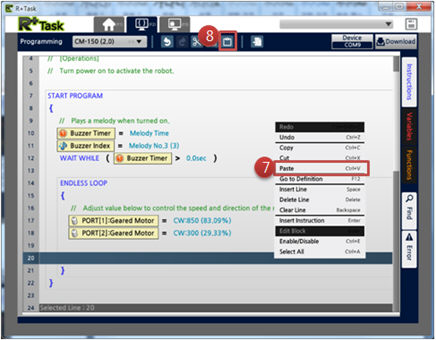
- Select the line which you wish to Paste to with the left mouse button
-
Clicking the right mouse button will display the additional menu
- If you click “Paste” it will paste the content that was copied to the clipboard
-
You can also use the “Paste” button from the toolbar on top (keyboard shortcut : Ctrl+V)
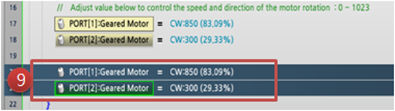
-
The copied code is inserted as in the figure below
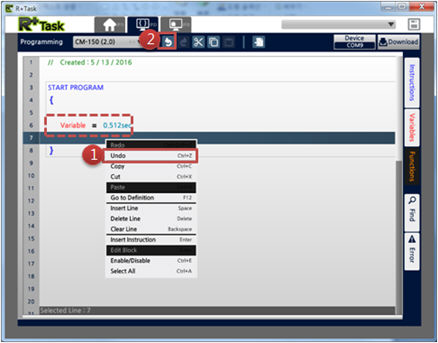
Undo/Redo
- While editing the code, if you click the “Undo” function you can restore the code to the previous state
-
You can also use the “Undo” button from the toolbar on top (keyboard shortcut : Ctrl+Z)
-
If you click the “Redo” button from the toolbar on top, it will rewrite the restored code again (keyboard shortcut : Ctrl+Z)
Programming(Instructions)
This section explains the instructions used in R+ Task 2.0
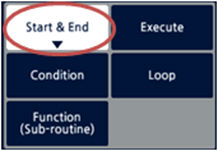
Start/End
This instruction establishes the overall beginning and end of a program, and the valid block for the instruction.
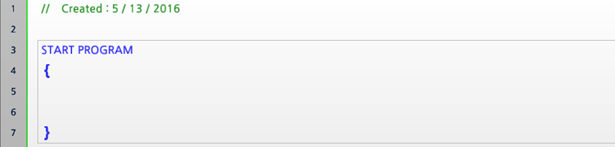
Start Program
- The Start Program instruction is executed regardless of the line number.
- There cannot be more than one Start Program instruction in one program.
- There must be an instruction enclosing block mandatorily.
- When program reaches the end of the Start Program instruction, the program will be end.
-
It is the same concept as the main() function in C programming language.
-
The following figure shows a Start Program instruction that is empty inside.
End Program
- The user can manually set the location where the program will end.
-
If End Program is not set manually, then the program will execute every code in the Start Program instruction and then end naturally.
-
The following displays a “natural end” of a program after executing every code in the Start Program instruction.

-
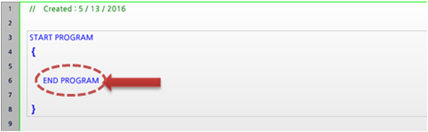
The following displays a forced end of a program when meeting an End Program instruction.
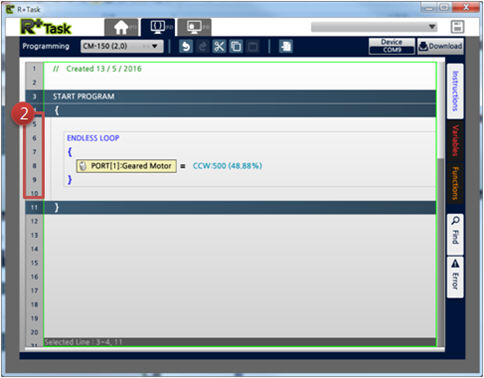
Begin Block / End Block
- A block is an enclosed set of multiple lines of instructions.
- The beginning and end of a block must always go in pairs.
- If the instruction code is only one line then you can omit the block symbols.
-
It is the same concept as brackets ‘{‘, ‘}’ in C programming language
-
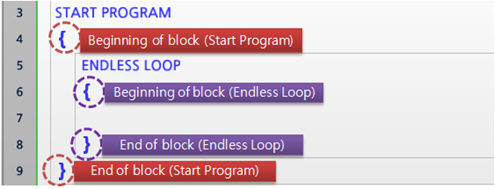
The following figure indicates the block for “Start Program” and “Endless Loop”
-
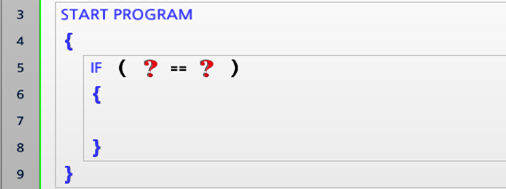
The following figure indicates the block for “Start Program” and “If”
-
As the following figure indicates, if the instruction code is only one line then you can omit the block symbols.

Comment
- If an explanation needs to be added, you can add a comment(memo) in the line.
- By inserting the
//symbol, you can double-click it to modify the content that follows. -
While you are modifying a comment, you can click the ESC key to restore to the previous state of the comment.
-
The following is an example of inserting a comment to make the source code easier to understand.

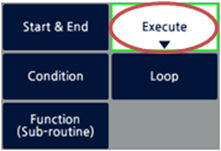
Execute
This is an instruction for giving a command to the device or performing a mathematical calculation. Refer to the following figure for details.
Compute
-
This instruction computes two values to give one result. (C = A + B)
-
You can choose from Add(+), Subtract(-), Multiply(*), And(&), Or(|).
-
The following is an example of using the Compute instruction.

Load
-
This instruction substitutes a value with another one.
- This instruction is used when reading/writing value to a variable or an instruction.
-
The following is an example of writing a value to the variable
Acceleration, and then reading the variable from the Geared Motor.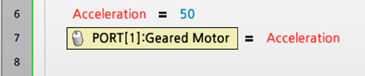
- This instruction is used when reading/writing a device’s value.
-
The following is an example of setting the speed value of a Geared Motor connected to Port 1.
Label/Jump
- These instructions are used for branching the program.
- Label indicates the branch of the program.
- Jump instruction skips to the designated Label and run the code.
The figures below show how the program branches by using Jump.
- The figure on the left shows the program jumping to Mode1 and executing only the code from Mode1.
-
The figure on the right shows the program jumping to Mode2 and executing only the code from Mode2.
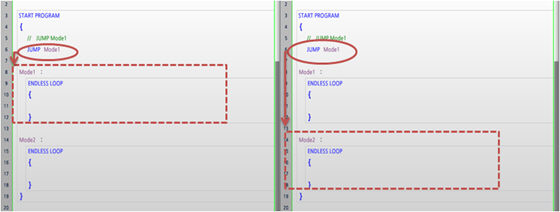
-
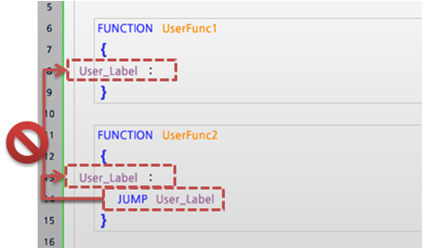
Label and Jump must exist inside the same function block.
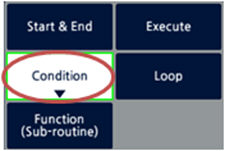
Condition
This instruction controls the flow of program based on the True/False result of Conditional Clause.
Conditional Clause
-
A conditional clause gives the result of a computation as either true or false.
-
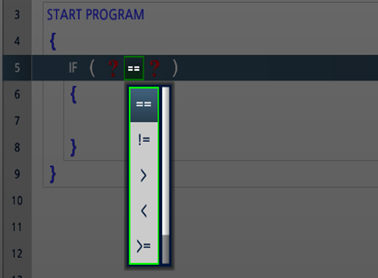
Below are the comparison operators that can be used inside the parenthesis.
| Operators | Description |
|---|---|
| == | The value on the left hand side is equal to the right hand side |
| != | The value on the left hand side is not equal to the right hand side |
| > | The value on the left hand side is greater than the right hand side |
| >= | The value on the left hand side is greater than or equal to the right hand side |
| < | The value on the left hand side is less than the right hand side |
| <= | The value on the left hand side is less than or equal to the right hand side |
-
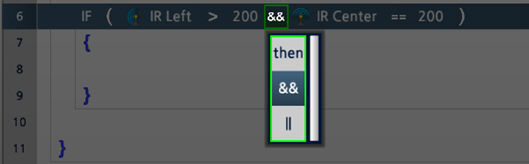
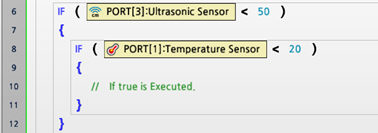
When many conditions must be satisfied, multiple conditional clauses can be used together as below:

-
When using multiple conditional clauses, the following logical operators can be used :
- then : does not connect any conditional clause. Only uses one conditional clause.
- && : two conditional clauses are computed with AND operation
-
|| : two conditional clauses are computed with OR operation
If
- If the conditional clause is true, the code inside the
IFblock is executed. -
It is the same concept as the If statement in C programming language.
-
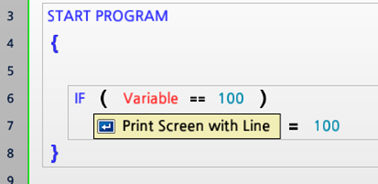
The following is an example of turning the LED on if the variable in the
IFstatement is equal to 100.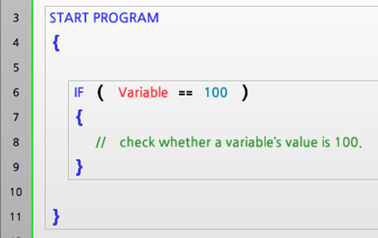
-
If the code to be executed is only one line, then you can omit the block symbols as below.
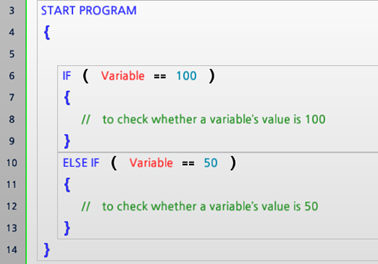
Else If
- This is used to examine another conditional clause when
IForELSE IFstatement is false. ELSE IFblock must be used afterIFblock or anotherELSE IFblock.-
It is the same concept as the ‘Else If’ statement in C programming language.
-
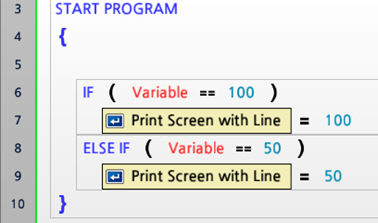
The following is an example of using If to check whether a variable’s value is 100, and the using Else If to check whether the variable’s value is 50.
-
If the code to be executed is only one line, then you can omit the block symbols as below.
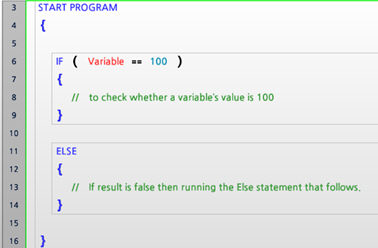
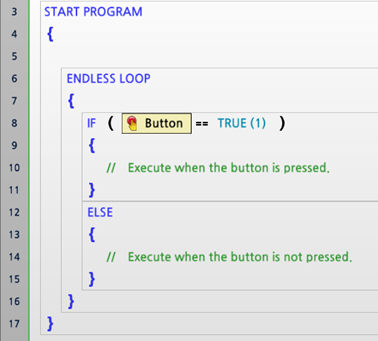
Else
- If neither
IFnorELSE IFstatement are true,ELSEblock will be executed. - The
ELSEblock must be used afterIForELSE IFblock. -
It is the same concept as the ‘Else’ statement in C programming language.
-
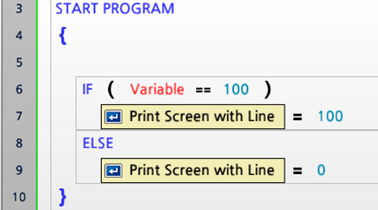
The following is an example of using If to check whether a variable’s value is 100, and if the result is false then running the Else statement that follows.
-
If the code to be executed is only one line, then you can omit the block symbols as below.
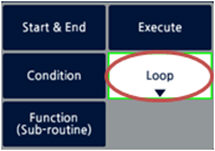
Loop
This is an instruction that is used when the program needs to repeat a specific behavior or computation multiple times.
By setting the repetition block and repetition condition, loop can be applied in a variety of ways. Refer to the following figure for details.
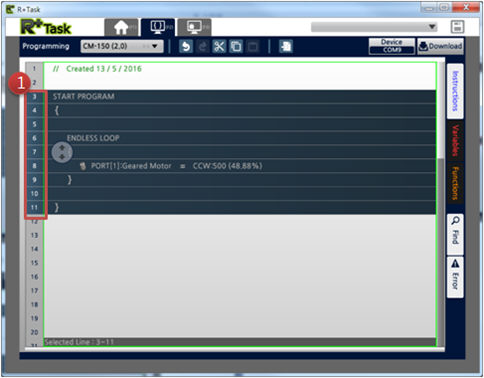
Endless Loop
- The code in the
ENDLESS LOOPblock will repeatedly be executed. - The
BREAK LOOPinstruction can be used to end the repetition. -
It is the same concept as ‘while(1)’ in C programming language.
-
The following is an example of using Endless Loop to print the number 100 on the screen. The
Print Screen with Linecommand is placed in theENDLESS LOOPblock.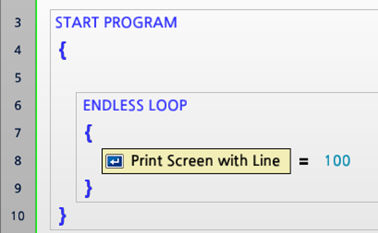
-
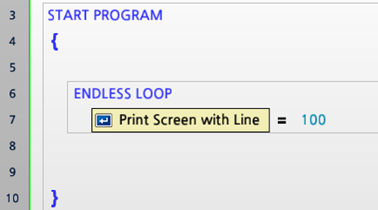
If the code to be executed is only one line, then you can omit the block symbols as below.
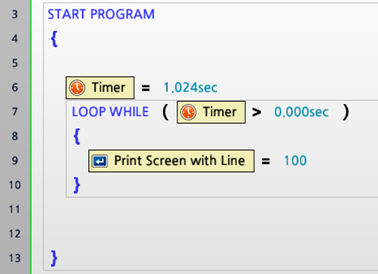
Loop While
- This statement will repeatedly execute from the beginning to the end of the code block as long as the conditional clause is satisfied.
- Just as in Condition instructions, multiple conditional clauses can be used together.
- You can come out of the loop by using the “End Loop” command.
-
It is the same concept as ‘while(conditional clause)’ in C programming language.
-
The following is an example of using Loop While to print the number 100 on the screen for only 1.024 seconds.
-
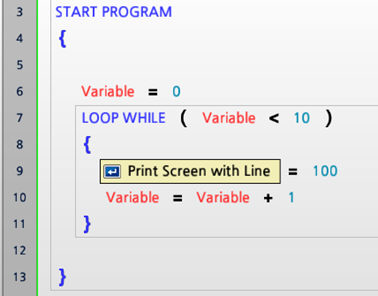
The following is an example of using Loop While and a variable to print the number 100 on the screen just 10 times.
Loop For
- This instruction will execute the
LOOP FORblock for a specified number of times. - Each time the program runs through the block, the variable will be increased by 1.
- The
BREAK LOOPinstruction can be used to end the repetition. - The condition can be described as ( Repeat counter variable = Starting Value ~ End Value ). Therefore, the block will be repeated for End Value - Starting Value + 1 times.
-
It is the same concept as ‘for’ in C programming language.
-
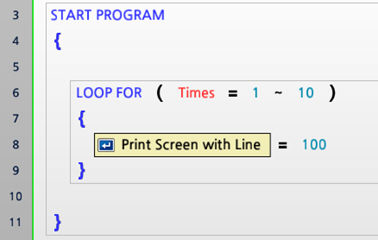
The following is an example of using Loop For to print the number 100 on the screen 10 times.
-
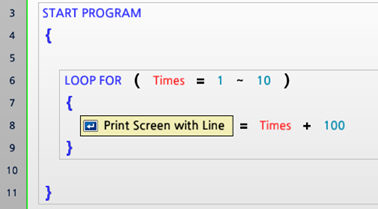
The following is an example of multiplying the Repeat counter variable by 100 and print on the screen. As the Repeat counter variable increases, the printed value will also be increased by 100; 100, 200, 300, 400, 500, 600, 700, 800, 900, 1000.
Wait While
- This instruction will stop running the code while the specific condition meets.
-
It is the same concept as ‘while(conditional clause)’ with an empty code block in C programming language.
-
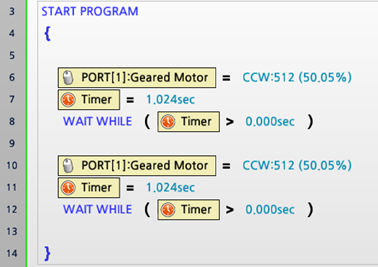
The following is an example of using
WAIT WHILEwith a Timer to hold the program running for 1.024 seconds.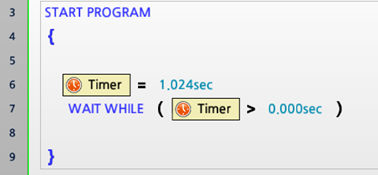
-
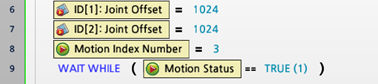
The following is an example of using
WAIT WHILEwith a Motion Status to wait until the motion completes.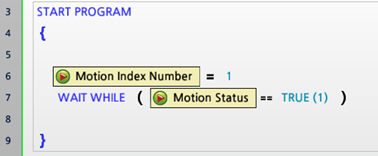
-
The following is an example of using
WAIT WHILEwith a Buzzer Timer to wait until the melody plays.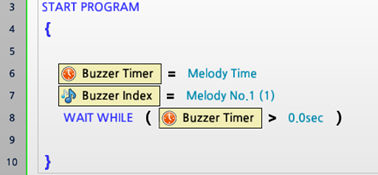
Break Loop
- This instruction will exit the loop block.
- This instruction can only be used within
ENDLESS LOOP,LOOP WHILE, andLOOP FORblocks. -
It is the same concept as ‘break’ in C programming language.
-
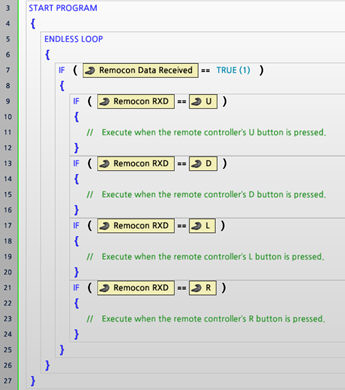
The following is an example of using
BREAK LOOPto exit the loop when the remote controller data is arrived. After exiting the block, followed by code will be executed.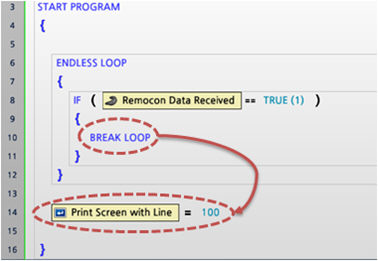
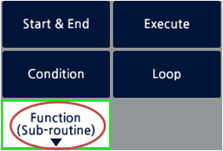
Function(Sub-Routine)
If a specific code is used repeatedly, or if you wish to classify an area of code as a unit that performs a specific behavior, you can group the lines of code as a Function. Refer to the following figure for details.
Function/Call
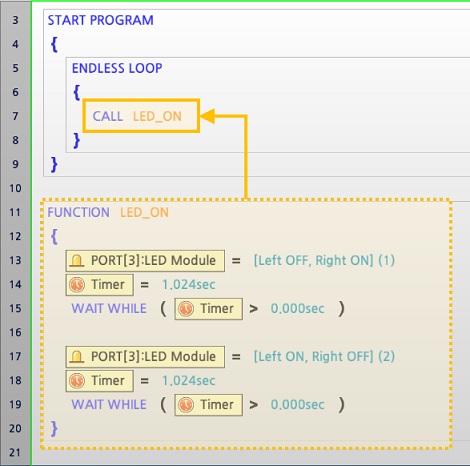
- If a specific code is used repeatedly, or if you wish to classify an area of code as a unit that performs a specific behavior, you can group the lines of code as a Function.
- An adequate use of functions will make the code concise and easy to read.
- A function that has been created can be used with “Call” instruction when needed.
- Functions must be written outside of the main program routine.
- In task, functions cannot configure input or output arguments
-
It is the same concept as a ‘function’ in C programming language.
-
The following is an example of making the action of blinking the LED as a function and using it.
-
The following is the process of selecting a function to call.

-
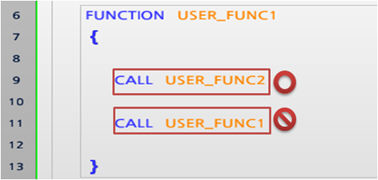
Functions cannot call itself within the same function.
Return
- This instruction is used for exiting a function while it is being executed.
- It can only be used inside a regular function and callback function.
-
It is the same concept as ‘return’ in C programming language.
-
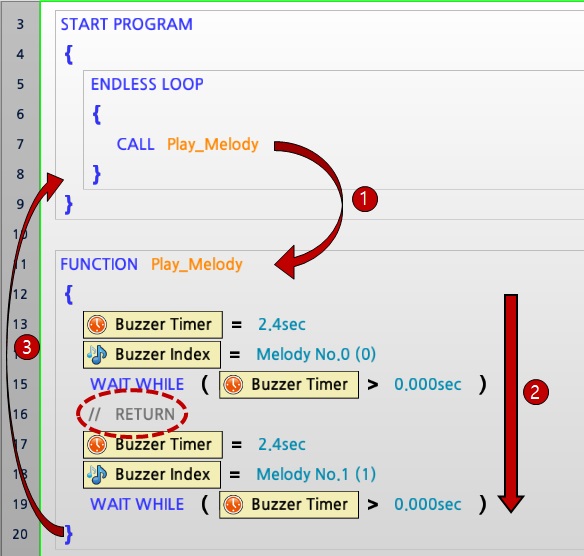
The following is an example of a function being executed until the end without using Return.
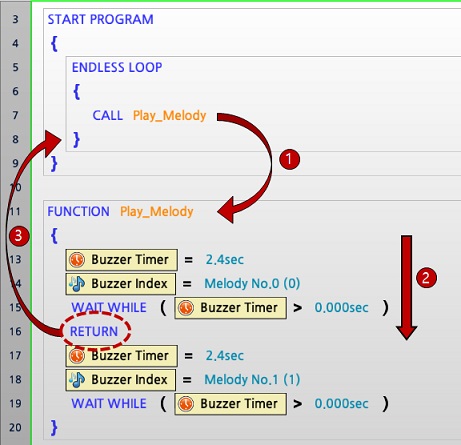
-
The following is an example of a function being executed but encountering Return in the middle of executing the function, which will make the program exit the function.
Callback
- This function is executed independently from the main program routine, executing itself periodically
- Callback functions must be written outside of the main program routine.
- Because it is not allowed to write code within a callback that takes too much time to execute, callback has restrictions in the use of Loops / Variables / Parameter Calls / volume of code.
- The following restrictions must be met when using a callback function.
- Loops, Labels, Jumps, Calls are not allowed
- Communication with an external device is limited to a maximum of 2 times
- The code size of callback function cannot exceed 512 bytes
-
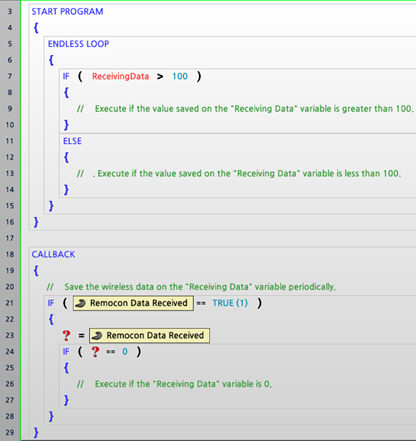
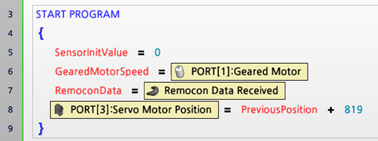
The following is an example of using the callback function to receive wireless data and save it to the variable “received data”.
Programming(Parameters)
This section explains parameters used in R+ Task 2.0. It classifies the parameters that can be used by each device. Refer to the explanation and example codes of each item for details.
Controllers
Accessory Device [Geared motor]
- This is used to control the geared motor connected to the controller.
- Each Controller model has a different set of devices that can be connected to it. Please refer to the Controller Compatibility for more detail.
- Direction : CW (Clock Wise), CCW (Counter Clock Wise)
-
Power : The value ranges from 0 to 1023, where 0 means stop and 1023 is 100% power capacity.
-
The following example is controlling the geared motor.
-
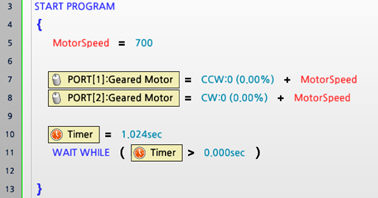
The following example is using the geared motor to move the robot forward.
Accessory Device [Servo motor : drive mode, speed, location]
- This is used to control the servo motor connected to the controller.
- Each Controller model has a different set of devices that can be connected to it. Please refer to the Controller Compatibility for more detail.
- Servo motor drive mode : When the value is True, you can configure the servo motor’s location to situate it at a specific angle. When the value is False, you can configure the servo motor’s speed to rotate it at a specific speed.
-
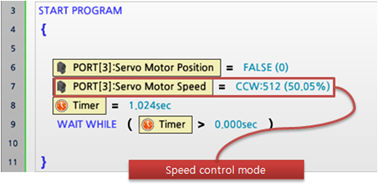
Servo motor speed : Configures the speed of the servo motor.
-
Servo motor location : Configures the location of the servo motor.
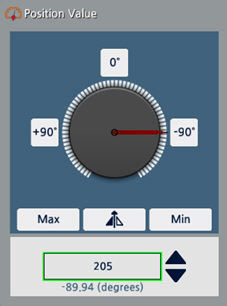
-
The following is an example of controlling the servo motor’s location.

-
The following is an example of rotating the servo motor to control it as a wheel.
Accessory Device : LED Module
- This is used to control the LED module connected to the controller.
- Each Controller model has a different set of devices that can be connected to it. Please refer to the Controller Compatibility for more detail.
-
User can turn on/off the Right LED or Left LED.
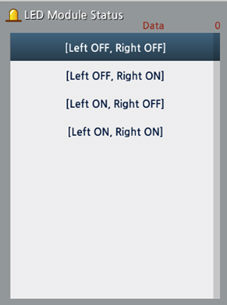
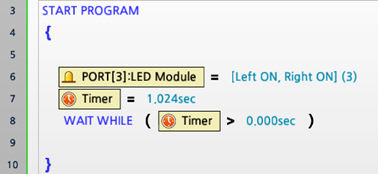
-
The following is an example of controlling the LED module.
Accessory Devices : Various sensors
- This is used to control the various sensors connected to the controller.
- Each Controller model has a different set of sensors that can be connected to it. Please refer to the Controller Compatibility for more detail.
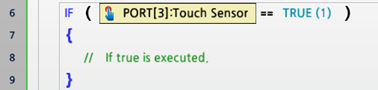
- Touch sensor : used to detect whether there is contact with the touch sensor. (Returns True for contact, False for no contact)
- Touch Sensor Component Information
-
The following is an example of using the touch sensor.
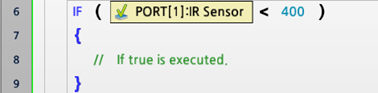
- Infrared sensor : used to measure the distance to the object (The value ranges from 0 to 1023, where the value increases from 0 as the object gets closer.)
- Infrared Sensor Component Information
-
The following is an example of using the infrared sensor.
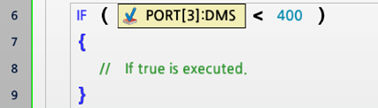
- Distance measurement sensor (DMS) : used to measure the distance with an object (The value ranges from 0 to 1023, where the value increases from 0 as the object gets closer.)
- Distance Measurement Sensor Component Information
-
The following is an example of using the distance measurement sensor.
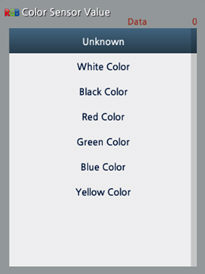
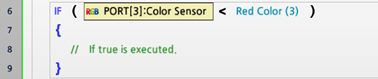
- Color sensor : used to detect the color of an object
-
The list of colors that the color sensor detects is as follows
- Color Sensor Component Information
-
The following is an example of using the color sensor.
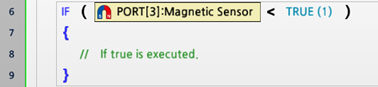
- Magnetic sensor : used to detect magnetic materials near the sensor head (Returns True when magnetic property detected, False when not detected).
- Magnetic Sensor Component Information
-
The following is an example of using the magnetic sensor.
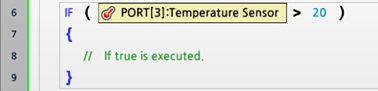
- Temperature sensor : used to measure the temperature of an object
- Temperature Sensor Component Information
-
The following is an example of using the temperature sensor.
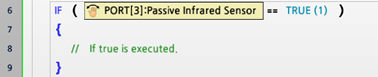
- Motion detection (Passive infrared) sensor : used to detect the motion of an object
- Motion Detecting Sensor Component Information
-
The following is an example of using the motion detection sensor.
- Temperature & humidity (Thermo-hygro) sensor : used to measure the temperature and humidity of an object. (temperature range : -20~120°C, humidity range : 0~100%)
-
The following is an example of using the temperature and humidity sensor.
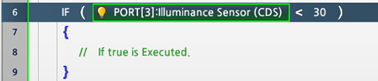
- Illuminance sensor (CDS) : used to measure the brightness of the surroundings. (The value ranges from 0 to 1023, where the value increases from 0 as the surroundings gets brighter.)
-
The following is an example of using the illuminance sensor
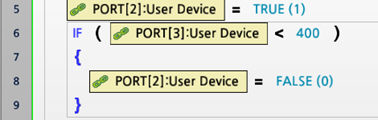
- User device : used to read the result value of the user-created sensor
- Building a User Device
-
The following is an example of using the user device.
Motion Control [Motion index number / Motion status / Joint offset / Turn on Joint LED automatically]
- This section describes specific parameters for executing motions downloaded on controller via R+ Motion.
- Only specific controllers support motion control. (Supported controllers : CM-200, CM-5, CM-510, CM-530, CM-700, OpenCM)
- Motion index number : You can execute a motion by calling the corresponding Motion index number. If the Motion is being executed, you can read the current Motion index number.
-
The following is an example of using the Motion index number.

- Motion Index Number number 0 : Motion stop using an Exit Motion unit.
- Motion Index Number number -1 : Motion stop at the current unit.
More information on Key-Frame, Motion Unit and Motion is available at Motion Data
- Motion status : returns True if motion is being executed, returns False if motion is not being executed
-
The following is an example of using the Motion status to wait until the motion finishes.

- Joint offset : When a motion is executed, it adds a value between -255~255 to every joint. For instance, if the joint offset is -50 and the location values for the motion data have been set to 300 -> 400 -> 500, the location values will be changed to 250 -> 350 -> 450 and then executed.
-
The following is an example of applying an offset values to a specific joint.

-
The following is an example of configuring a specific joint to not be affected by the Motion data values.
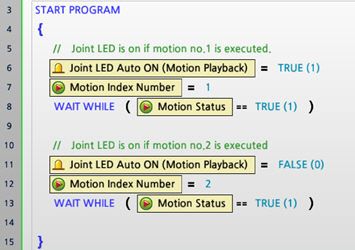
- Turn on joint LED automatically : used to turn on/off DYNAMIXEL LED while a Motion is being executed. This feature is only supported in OpenCM 9.04
- The following is an example of using the “turn on joint LED automatically” function when executing a Motion.
-
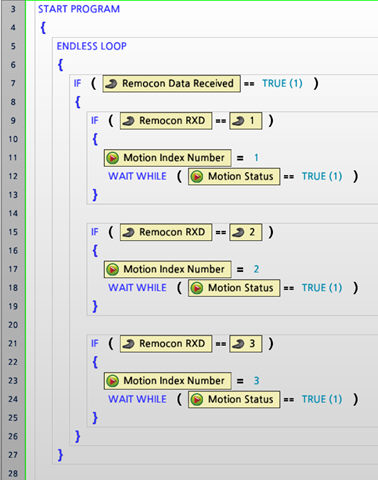
The following is an example of executing a Motion that is saved in the Controller.
-
Pressing different buttons on the Remote Controller will execute their corresponding Motions.
Built-in Sensor1 [Result of sound counter / Real-time sound counter]
- This is a function that uses the Controller’s embedded mic to detect and count each time a sound that is louder than a certain level occurs. For instance, it can detect and count clapping sounds to make the robot move in a certain way.
- Each Controller model supports different types of sensors. Please refer to each Controller’s manual for more detail. (CM-100A, CM-150, CM-200, CM-5, CM-510, CM-530, CM-700, OpenCM)
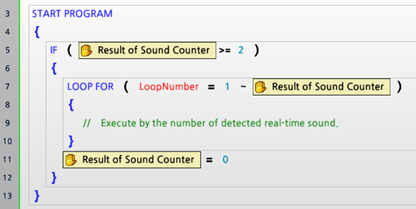
- Result of sound counter : This counts the total number of times sound was detected. If you want to reset the counter, you can insert 0 manually.
-
The following is an example of using the Result of Sound Counter.
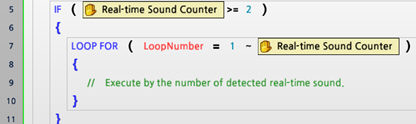
- Real-time sound counter : This counts the number of times sound was detected in real-time. If no sound is detected for 0.8 seconds, the counter is reset to 0.
-
The following is an example of using the Real-time Sound Counter.
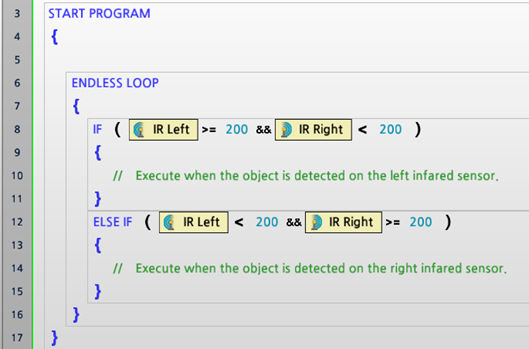
Built-in Sensor 2 [Left infrared sensor / Center infrared sensor / Right infrared sensor]
- This is used to read the value of the infrared sensor embedded in the Controller
- The value of the infrared sensor ranges from 0 to 1023, where the value increases from 0 as the object gets closer.
- Each Controller model supports different types of sensors. Please refer to each Controller’s manual for more detail. (CM-100A, CM-150, CM-200, CM-5, CM-510, CM-530, CM-700, OpenCM)
- Left infrared sensor : used to read the value of the infrared sensor located at the bottom left side of the Controller
- Center infrared sensor : used to read the value of the infrared sensor located at the front and center of the Controller
-
Right infrared sensor : used to read the value of the infrared sensor located at the bottom right side of the Controller
-
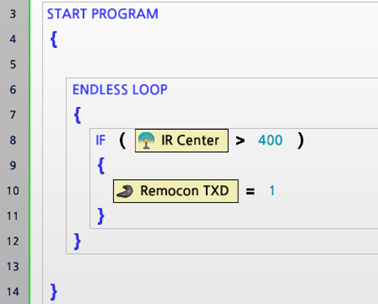
The following is an example of using the values of the infrared sensors of the Controller.
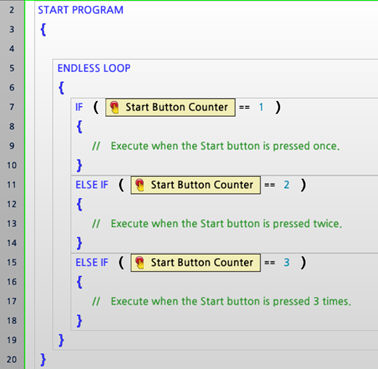
Built-in Sensor 3 [Start button counter / Controller button]
- This is used to read the value of buttons embedded in the Controller.
- Each Controller model supports different types of sensors. Please refer to each Controller’s manual for more detail. (CM-100A, CM-150, CM-200, CM-5, CM-510, CM-530, CM-700, OpenCM)
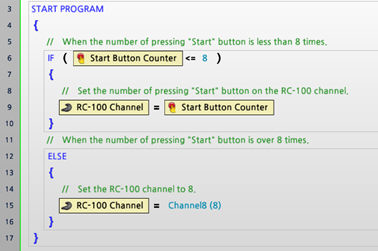
- Start button counter : This is used to read the number of times the Start button was rapidly pressed when the Controller was first turned on. The value of the Start Button Counter ranges from 0 to 255.
-
The following is an example of using the Start button counter.
- Controller button : This is used to read the status of the Controller’s buttons. Each Controller mode has different buttons you can use.
-
The following is an example of using buttons for CM-5, CM-510, CM-530.
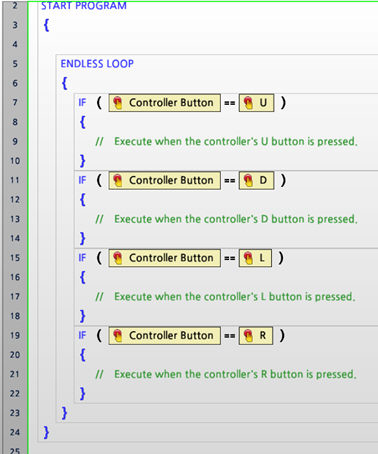
-
The following is an example of using buttons for OpenCM9.04.
Buzzer [Buzzer index / Buzzer timer]
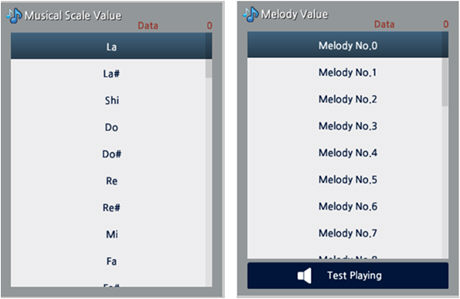
- This is used to play a musical scale or melody using the Buzzer embedded in the Controller.
- The Buzzer timer should be configured first and then the type of Buzzer (or Buzzer index) configured afterwards for the Buzzer to work properly.
-
The following figure shows the screens to select the type of buzzer.
-
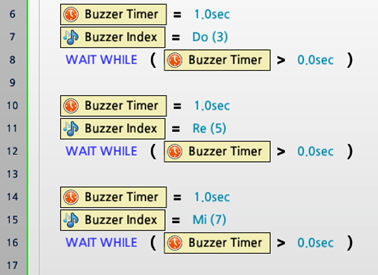
The following is an example of playing a musical scale from the Controller. When playing a musical scale, the Buzzer timer can be set between 0~5 seconds.
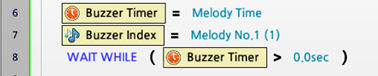
- The following is an example of playing a melody from the Controller. When playing a melody, the Buzzer timer should be set as the melody’s run time.
Remote Controller [Received wireless data, Wireless data to send / Wireless ID / RC-100 channel]
- These are the parameters that send and receive data with external devices using the wireless communication module (Bluetooth, infrared, ZigBee) connected to the Controller.
- It is generally used when controlling a robot with theRC-100 or smartphone virtual remote controller, but it can also be used to communicate with a user developed software.
- The range of the data value that can be sent and received is restricted from 0 to 65535. (2 bytes)
-
Received wireless data : used when the Controller receives data from the outside

-
Wireless data to send : used when the Controller transmits data to other devices

-
New wireless data arrived : when the Controller receives data from the outside, it returns the value True

-
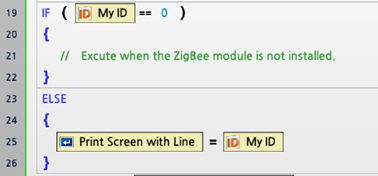
My robot’s wireless ID (My ID) : when using ZigBee, it checks my robot’s ZigBee ID
-
Pairing robot’s wireless ID (Remocon ID) : when using ZigBee, it sets the pairing robot’s ZigBee ID

-
RC-100 channel : when using an infrared receiver, it sets the channel’s value(if the value is 255, it will operate in Bluetooth/ZigBee mode)
-
The following is an example of processing a wireless data received from the Controller
-
The following is an example of the Controller sending data to the outside
Timer [Timer / Precision (High-resolution) timer / Powersave timer]
-
Timer and Precision timer are used to configure the value of a count-down timer on the Controller.
- Timer : This is used to set the value of a count-down timer on the Controller. The value of the Timer ranges from 0 to 255, and the unit is 0.128 seconds.
-
The following is an example of using Timer to wait approximately 1 second (1.024 seconds).

- Precision timer : This has the same function as Timer but counts the time more precisely. The value of the Timer ranges from 0 to 65535, and the unit is 0.001 second.
-
The following is an example of using Precision Timer to wait exactly 1 second (1.000 second).

- Powersave timer : This is used for the Controller’s sleep mode function. The value of the Powersave Timer ranges from 0 to 255, and the unit is 1 minute.
-
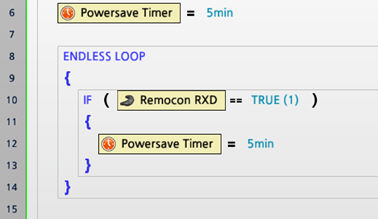
The following is an example of using Powersave Timer to configure sleep mode for the Controller. If a new wireless data arrives within 5 minutes, it resets the Powersave Timer value.
Miscellaneous [Random number / Built-in LED / Print screen / Print screen with line]
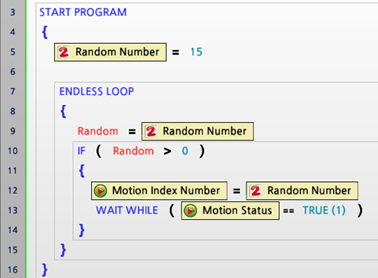
- Random number : This is used to generate a random number between 0 and a maximum value. You can set a number as the maximum value. The range of the maximum value is from 0 to 255
-
The following is an example of using Random Number to execute a random motion. This is done by generating a random number between 0 and 15 to execute a corresponding motion.
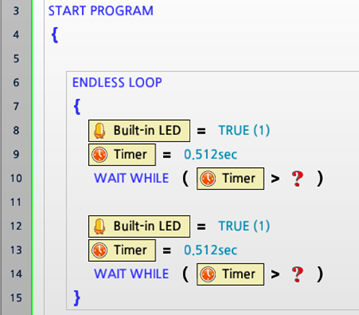
- Built-in LED : used to control the build-in LED (Aux LED)
-
The following is an example of using a built-in LED. It is turning the built-in LED on and off every 0.512 second interval.
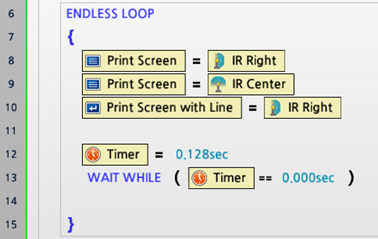
- Print screen : used to check a specific value from the task code on the screen
- Print screen with line : used to check a specific value from the task code on the screen, and afterwards change lines
-
The following is an example of using Print Screen and Print Screen with Line to print the sensors’ values.
DYNAMIXEL
These are the parameters for reading or writing values in DYNAMIXEL Control Table. Please refer to DYNAMIXEL Control Table for more details.
DYNAMIXEL actuator
-
Turn Torque On/Off : used to turn DYNAMIXEL Torque on/off Torque is turned on when True, Torque is turned off when False.
-
The following is an example of turning on the Torque of DYNAMIXEL with ID number 1 when the Controller’s button is pressed.

-
LED : used to turn DYNAMIXEL LED on/off
LED is turned on when True, LED is turned off when False. -
CW margin / CCW margin : used to read/configure DYNAMIXEL Margin value
The range of the value is from 0 to 255, but it is recommended not to change the default value (1).
Please refer to DYNAMIXEL Control Table for more detail. -
CW slope / CCW slope : used to read/configure DYNAMIXEL Slope value
There are a total of seven phases which the value can be set to, and the representative values of each phase are set as in the table below.
Please refer to DYNAMIXEL Control Table for more detail.Level Real Data Value Representative Data Value 1 0 (0x00) ~ 3(0x03) 2 (0x02) 2 4(0x04) ~ 7(0x07) 4 (0x04) 3 8(0x08) ~ 15(0x0F) 8 (0x08) 4 16(0x10) ~ 31(0x1F) 16 (0x10) 5 32(0x20) ~ 63(0x3F) 32 (0x20) 6 64(0x40) ~ 127(0x7F) 64 (0x40) 7 128(0x80) ~ 254(0xFE) 128 (0x80) -
P gain / I gain/ D gain : used to read/configure DYNAMIXEL PID values
P gain refers to Proportional Gain, for which the smaller the value is the larger the clearance gets, and the power level decreases near the target location.
I gain refers to Integral Gain, and D gain refers to Derivative Gain. -
Target position : used to read/configure DYNAMIXEL target position
The “motor position value” control can be used to designate the angle position as shown below.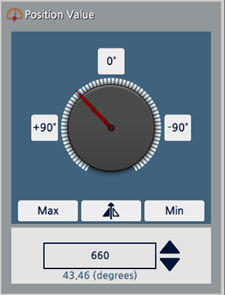
-
Moving speed : used to read/configure DYNAMIXEL speed
The “motor control value” control can be used to designate the rotation direction and power value as shown below.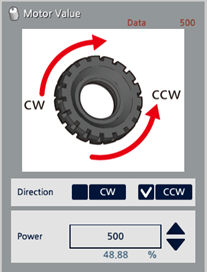
- Torque limit : used to read/configure DYNAMIXEL torque limit
- Current position : used to read DYNAMIXEL current position
- Current speed : used to read DYNAMIXEL current speed
- Current weight : used to read DYNAMIXEL current weight
- Current voltage : used to read DYNAMIXEL current voltage
- Current temperature : used to read DYNAMIXEL current temperature
-
Check movement : used to read DYNAMIXEL movement status. Returns True for movement, False for no movement.
-
Parameters that can be used for DX/RX/AX series : Turn torque on/off, LED, CW margin / CCW margin, CW slope / CCW slope, Target position, Moving speed, Torque limit, Current position, Current speed, Current weight, Current voltage, Current temperature, Check movement
-
Parameters that can be used for MX series : Turn torque on/off, LED, P gain / I gain / D gain, Target position, Moving speed, Torque limit, Current position, Current speed, Current weight, Current voltage, Current temperature, Check movement
- Parameters that can be used for XL series : Turn torque on/off, LED, P gain / I gain / D gain, Target position, Moving speed, Torque limit, Current position, Current speed, Current weight, Current voltage, Current temperature, Check movement
Infrared sensor array
-
Infrared sensor value (numbers 1~7) : used to read the infrared sensor value from the infrared sensor array
The measured value can vary depending on the color or texture of the wall or object, and the sensor is optimized for use within 0 to 5 cm. -
Infrared detection standard value (numbers 1~7) : used as the standard values for the infrared sensor array to determine whether the color is white or black.
| Black detection | LED | |
|---|---|---|
| Sensor value <= set value | BIT 1 | ON |
| Sensor value > set value | BIT 0 | OFF |
- Buzzer index : used to configure the type of Buzzer for the infrared sensor array
-
Buzzer timer : used to configure the duration of the Buzzer sound in the case that the infrared sensor array’s Buzzer is used.
The Buzzer timer should be configured first and then the type of Buzzer (or Buzzer index) configured afterwards for the Buzzer to work properly. -
Auto configuration of detection standard value : used to define the beginning and end of auto-searching the detection standard values of the color black Refer to the example below for more detail.
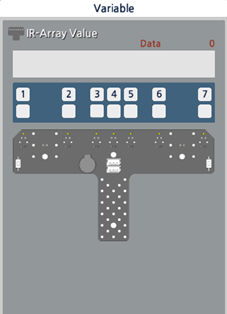
- Infrared object detection result : used to read whether an object has been detection in the infrared sensor array
| Binary value | Decimal value | Black detection |
|---|---|---|
| 0000001 | 1 | Black detection for IR sensor #1 |
| 0000010 | 2 | Black detection for IR sensor #2 |
| 0000100 | 4 | Black detection for IR sensor #3 |
| 0001000 | 8 | Black detection for IR sensor #4 |
| 0010000 | 16 | Black detection for IR sensor #5 |
| 0100000 | 32 | Black detection for IR sensor #6 |
| 1000000 | 64 | Black detection for IR sensor #7 |
Use can check the value while looking at the screen as shown below.
Custom
-
User can access the address of an external device such as DYNAMIXEL directly to perform read/write tasks.
-
User can read/write by selecting the specified address in units of Byte, Word, or DWord.Write or read in Byte or DWORD variable to write/read on user accessed address
-
Please refer to DYNAMIXEL Control Table for more detail.
Common
These are basic variables and constants that can be used in every device.
Variable
- This is a storage space within the program where you can write and read many data.
- Using a variable can be convenient when a number has to be remembered/recorded or when a common value has to be changed in multiple parts at once.
-
The following is an example of using variables.
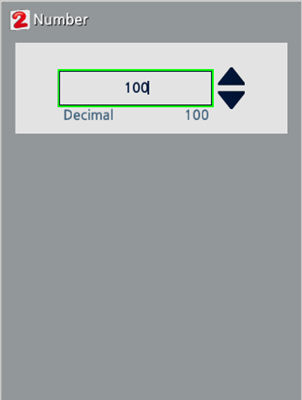
Number (Decimal number)
- This is used when a number has to be input directly within the program.
- It is mainly used in a conditional clause to compare values.
-
The value ranges from -2147483648 to 4294967295.
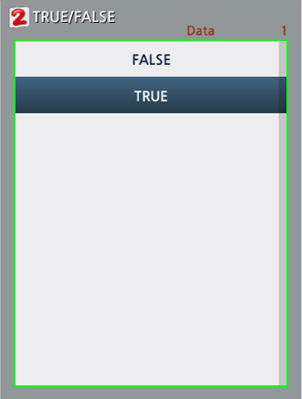
True/False
- This is used when a True/False value has to be input directly within the program.
- It is mainly used in a conditional clause to compare status.
-
The value ranges from 0~1. False is 0, and True is 1.
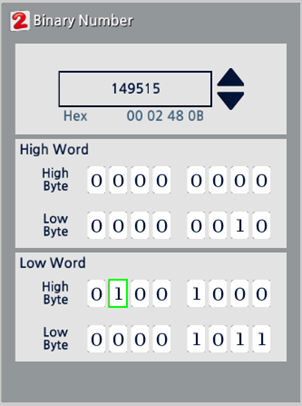
Binary number
- This is used when a number has to be input directly within the program.
- It is mainly used when a bit computation is required, and it is express in binary format.
-
The value ranges from 0 to 4294967295. (Hex : 00 00 00 00 ~ FF FF FF FF)
Useful Tips
Search Variables/Functions
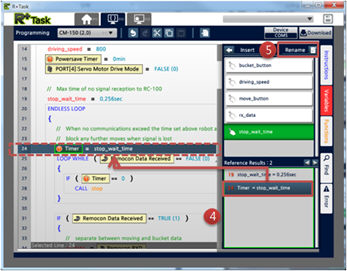
This is a feature to find the location where a variable or function has been used. It provides the option to change the name of each variable or function.
- Click the “Variable (or Function)” button on the right. (There must be at least one variable or function.)
- Select the target that you wish to find reference in the “Variables list (or Functions list)”
-
You can check the locations at which the selected variable (or function) has been used in the “Reference Results” field
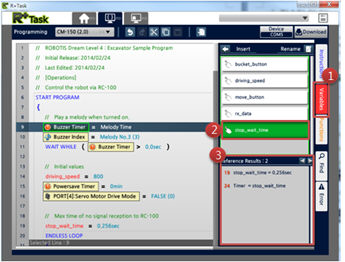
- If you select one of the results in the “Reference Results” field, it will take you to the specific location within the source code.
-
If you click the “Rename” button at the top, you can change the name of the variable (or function) for the whole source code.
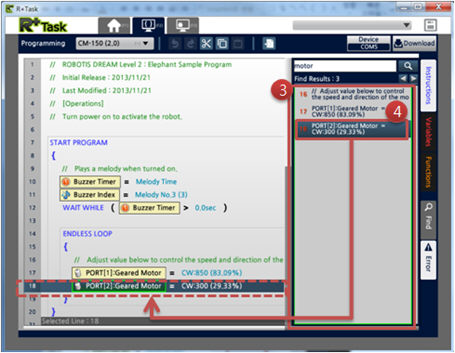
Search Keyword
This is a function to search for components used in the program code.
- Click the Search button at the bottom right.
-
Type the search word in the search bar that appears on top.
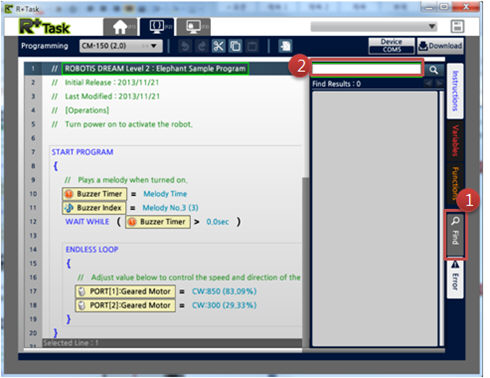
- In the task code, the “search result” will be shown as a list below.
-
If you click on an item in the list, it will move to that line.
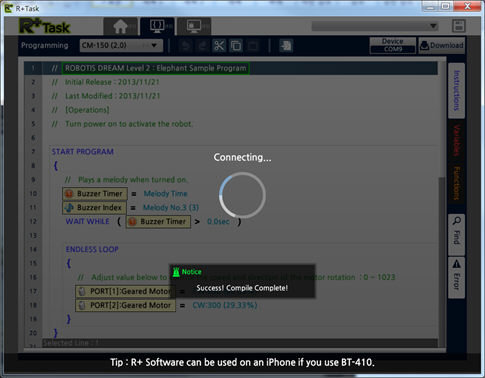
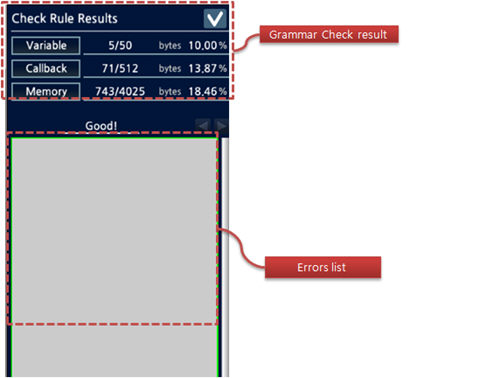
Grammar/Compile Check
In order to download the task code to the controller, it must go through a grammar check and compile process. If you try to download to the controller or click the “Error” button, it will run the grammar check and compile process automatically.
- Grammar Check : This is the process of examining whether the instructions used in the task code are compatible instructions with the controller, and whether there are any errors in the grammar.
All errors must be corrected before it can move on to the next step. - Compilation : This is the process of converting the code that has finished grammar check into a machine language that the controller can interpret.
The number of variables, callback usage, and memory usage are examined during the compilation process.
FAQ
- Supported Products?
See Product Compatibility Guide, and check if your controlelr is compatible with R+Task 2.0
- Can TSK files that were used in the previous Task 1.0 also be used on Task 2.0?
Yes. However, if you load a previous TSK file into Task 2.0 and save it again, it will be converted to a TSKX format so it will no longer be compatible with Task 1.0.
- The controller will not shut down after downloading a task. What should I do?
In R + Task 2.0, when you download a task the task is executed. (For controllers : CM-150, OpenCM9.04, OpenCM7.0…)
- Can I use Bluetooth module in R+ Task 2.0?
Support of Bluetooth module is different for each controller, so please refer to the specifications of each Bluetooth module: BT-110, BT-210, BT-410
- The controller does not connect well. What should I do?
Restart the controller by turning it off and then on, and try again. If the problem continues, please update the controller’s firmware to the latest version. Controller Firmware Update
- I do not want to see the help animation any more. What should I do?
Go to Home Tab -> Settings Menu and uncheck the option “Tutorials” and the help animation will not appear anymore.