Simulation
DARWIN-OP 3D Simulator
Webots Installation
Determine whether you have 32-bit or 64-bit OS
Windows Version Check
Windows 32-bit
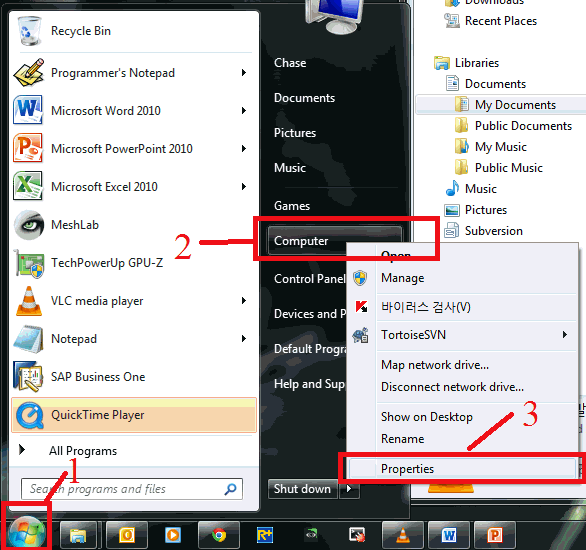
- Click on the
Startbutton - Point to
Computerandright clickon it - Click on
Properties

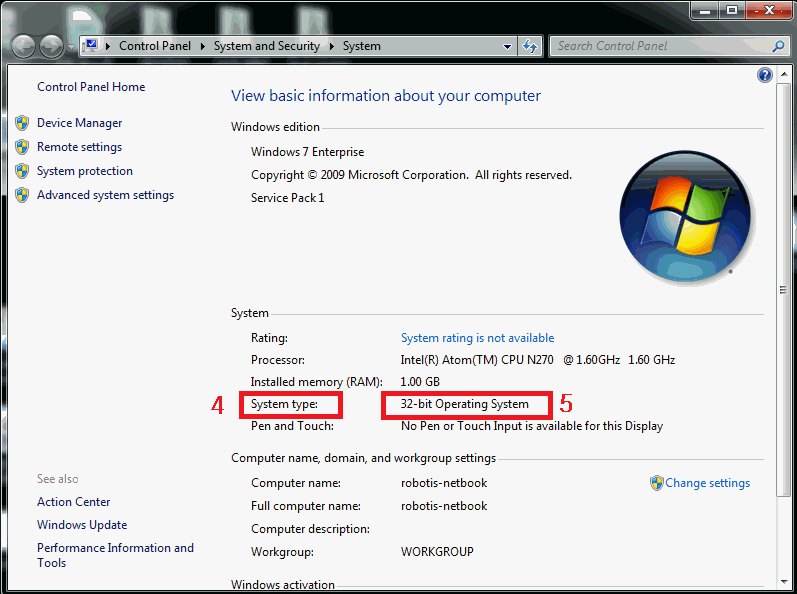
- Look for
System type - It displays
32-bit Operation System
This means you have 32-bit Windows
Windows 64-bit
- Click on the
Startbutton - Point to
Computerandright clickon it - Click on
Properties
- Look for
System type - it displays 64-bit Operating System
This means you have 64-bit Windows

Windows 32-bit vs 64-bit
Let’s find out another another way to indicate whether you have Windows 32-bit or Windows 64-bit
- Click on the
Startbutton - And click on
Computer(left click this time)

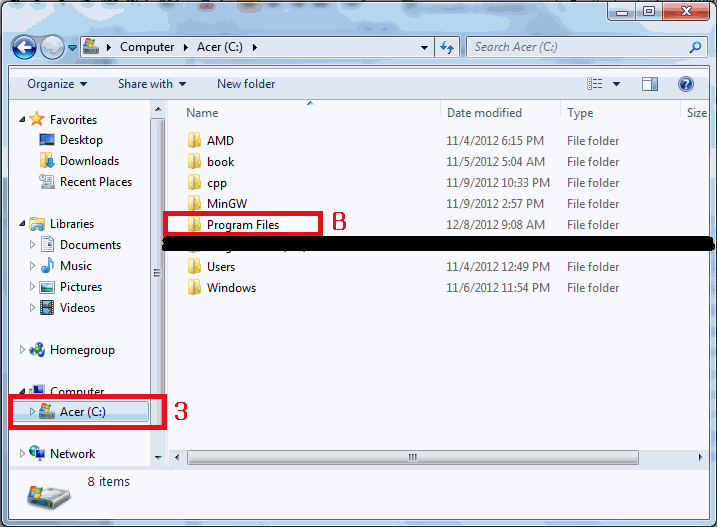
- Click on (C:)
- A : 64-bit Windows has 2 folders named Program Files (x86) and Program Files
On 64-bit Windows Webots is stored in Program Files (x86)
- A : 64-bit Windows has 2 folders named Program Files (x86) and Program Files
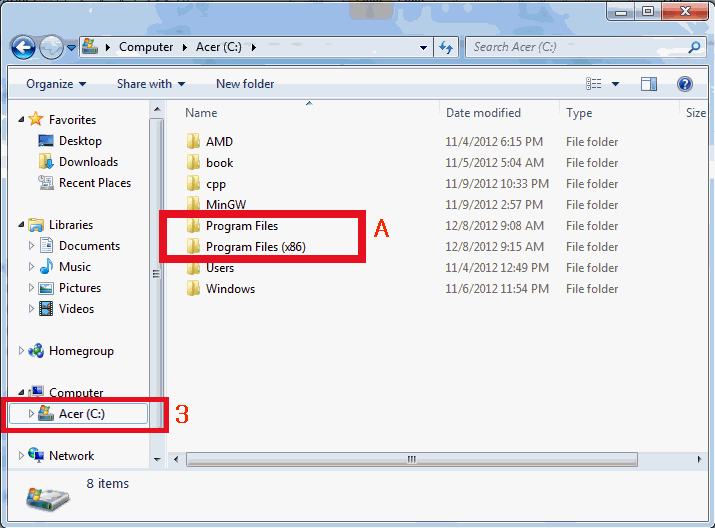
- B : 32-bit Windows only has Program Files
On 32-bit Windows Webots is stored in Program Files
Install Webots
Download Webots
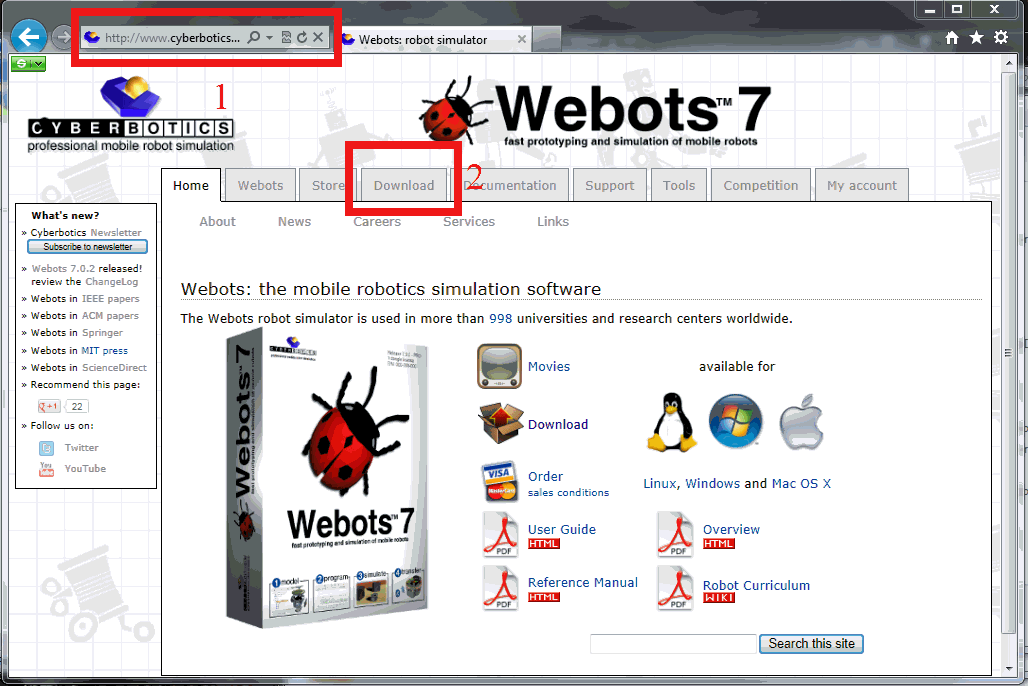
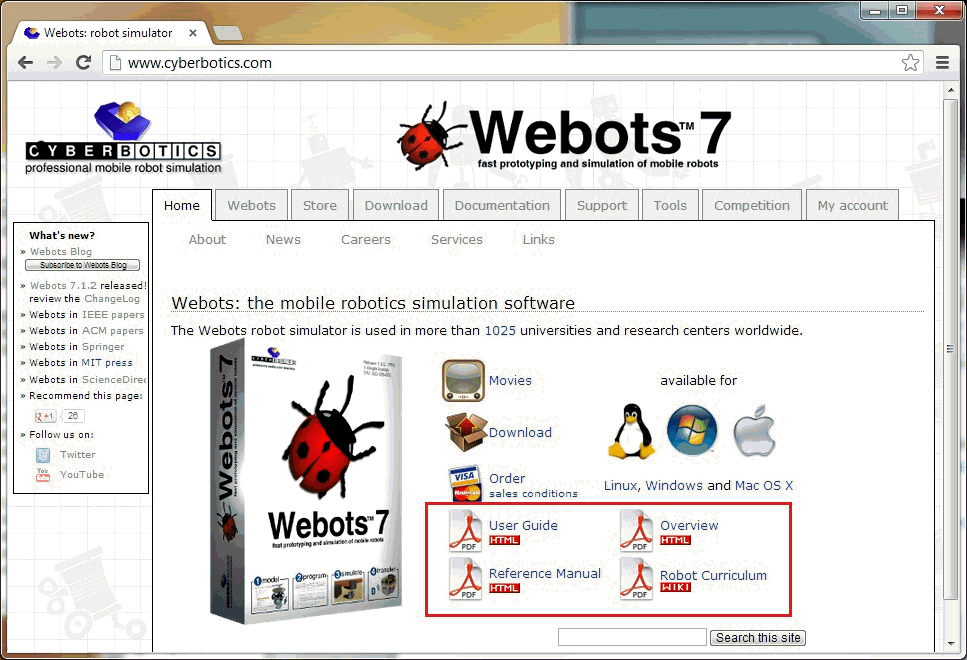
- Visit www.cyberbotics.com
- Click on Download
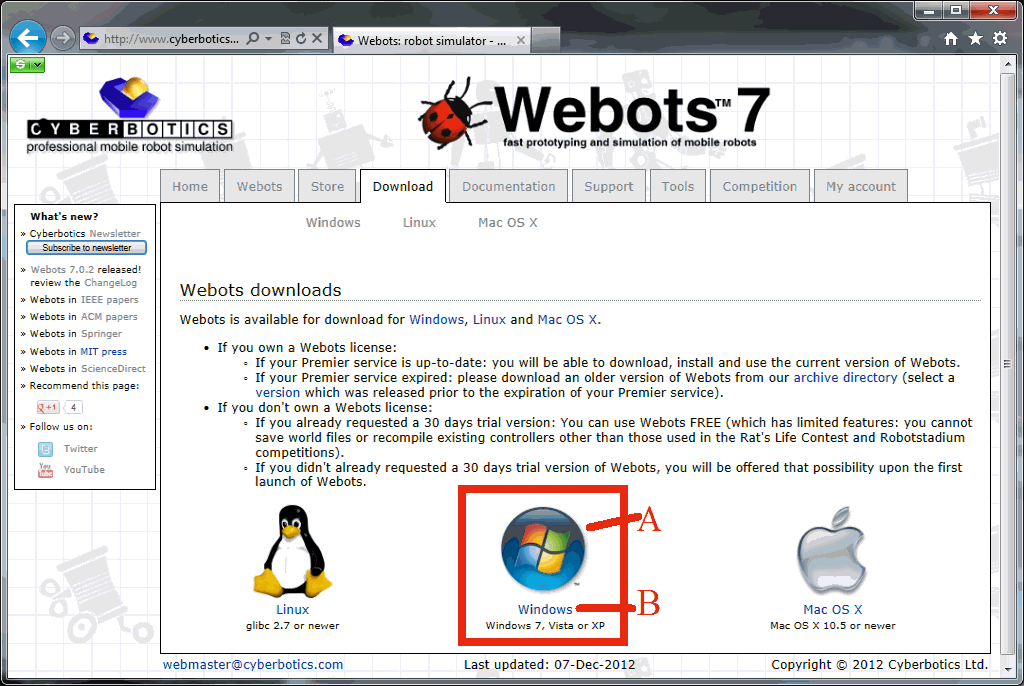
- Option A : Click on the Windows logo
- Option B : Click on Windows
- Click on the link for file
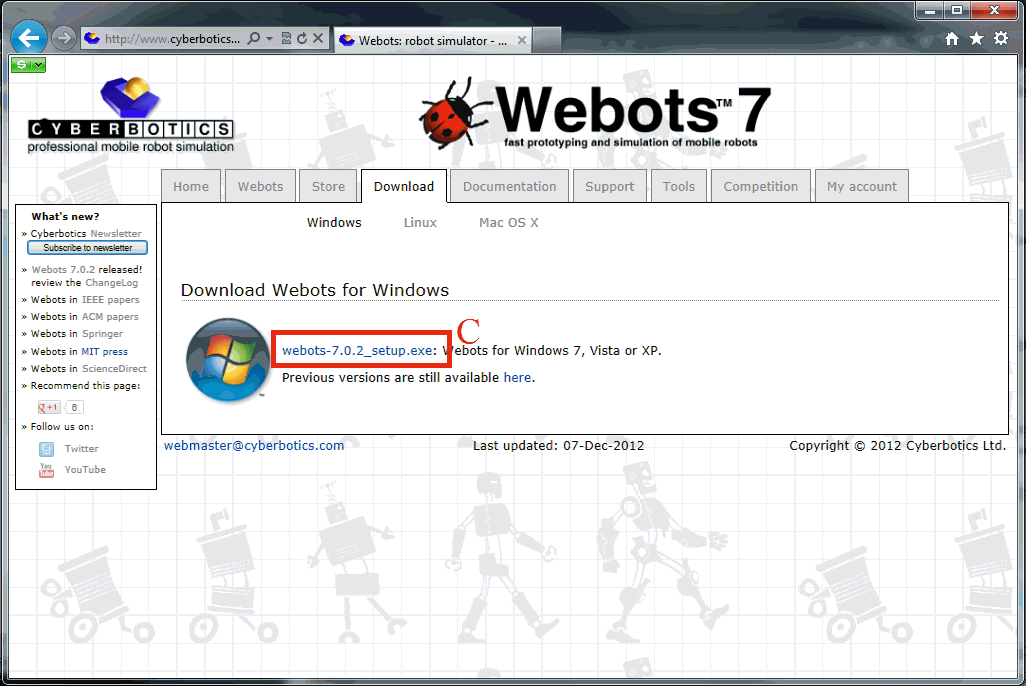
This message will appear at the bottom of your web browser Click on Save to download file

Install Webots (For 32-bit Windows)
For 64-bit Windows, use C:\Program Files (x86)\Webots\
For 32-bit Windows, use C:\Program Files\Webots\
Once downloading is complete its time to install Webots
Let’s find the installation file located in the downloads destination (normally the Downloads directory)
- Click on the
Startbutton - And click on
Computer(left click this time)

- Under the Favorites option (upper left part of window)
- Click on ‘Downloads’ and you will be moved to the Downloads directory
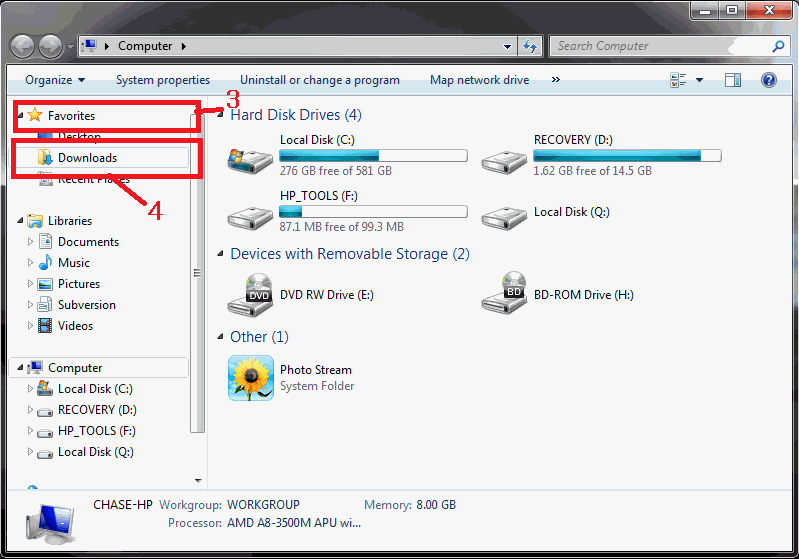
Move to the Downloads directory
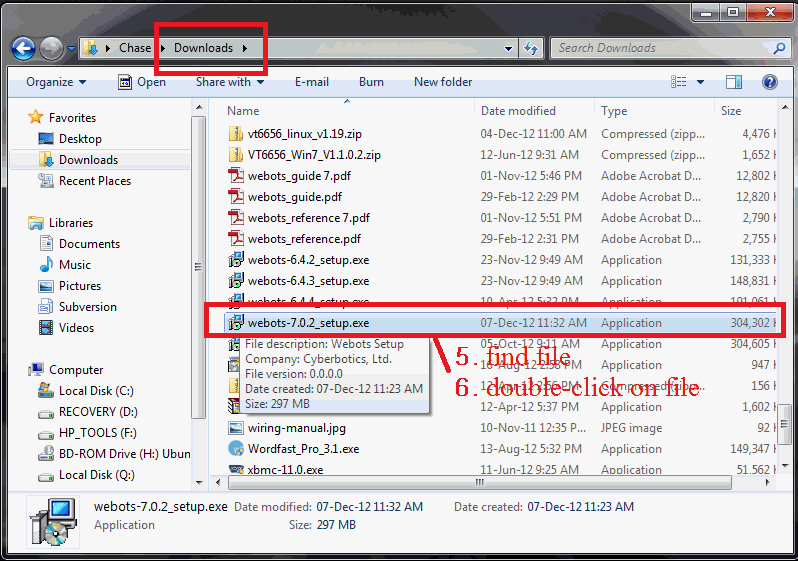
- find file
- Double-click on file to begin installation
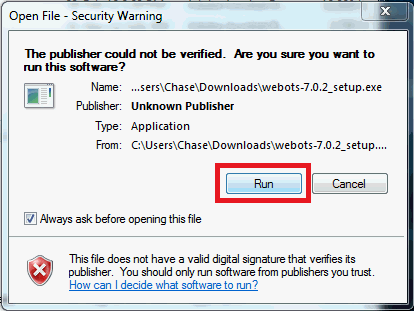
A security warning will appear.
- Simply click on
Runto begin installation
- Click on
Next

From the Select Destination Location window.
Make sure the installation path reads C:\Program Files\Webots.
If not, then manually specify it to C:\Program Files\Webots.
- Then click on Next

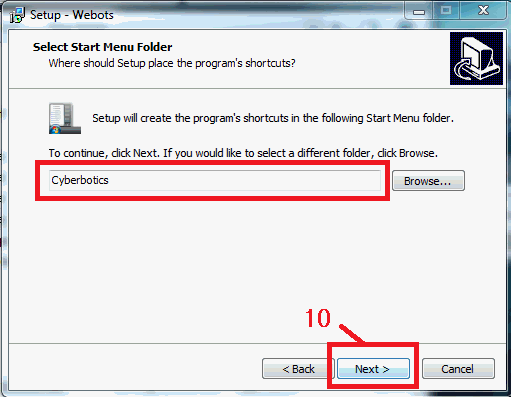
From Select Start Menu Folder window.
Make sure the destination folder reads Cyberbotics.
If not, then manually specify it to Cyberbotics.
- Then click on Next
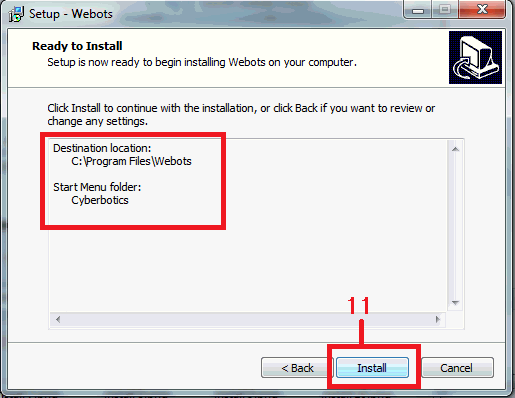
From the Ready to Install window.
The Destination location and Start Menu Folder are set.
- click on Install

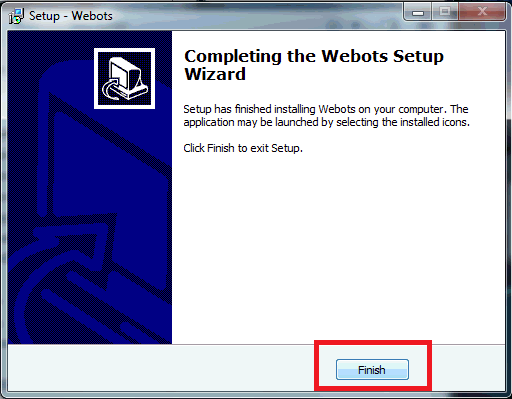
Once the green bar is full, Completing the Webots Setup Wizard will appear
- Click on Finish to finish installing Webots. You have now finished installing Webots
Run Webots
Running Webots
Once installation is complete the newly extracted folder will automatically pop up
Once installation is complete go to:
- Click on the Start button
- Go to My Computer

- WEBOTS_HOME is
- 64-bit Windows C:\Program Files (x86)\Webots\
- 32-bit Windows C:\Program Files\Webots\
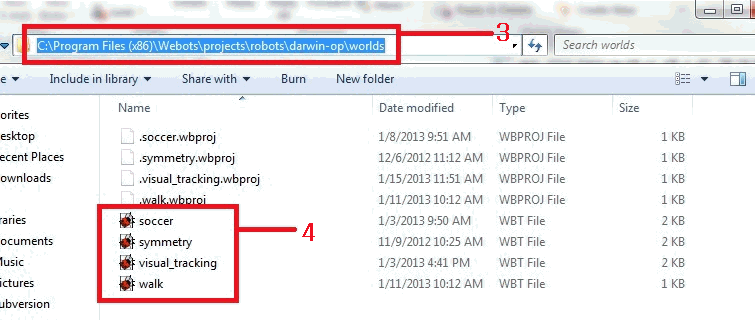
- Go to $WEBOTS_HOME/projects/robots/darwin-op/worlds
- Pick any of the 4 ‘walk’ ‘symetry’ ‘visual_tracking’ or ‘soccer’ by double-clicking
- After double-clicking on the world file Webots will automatically start
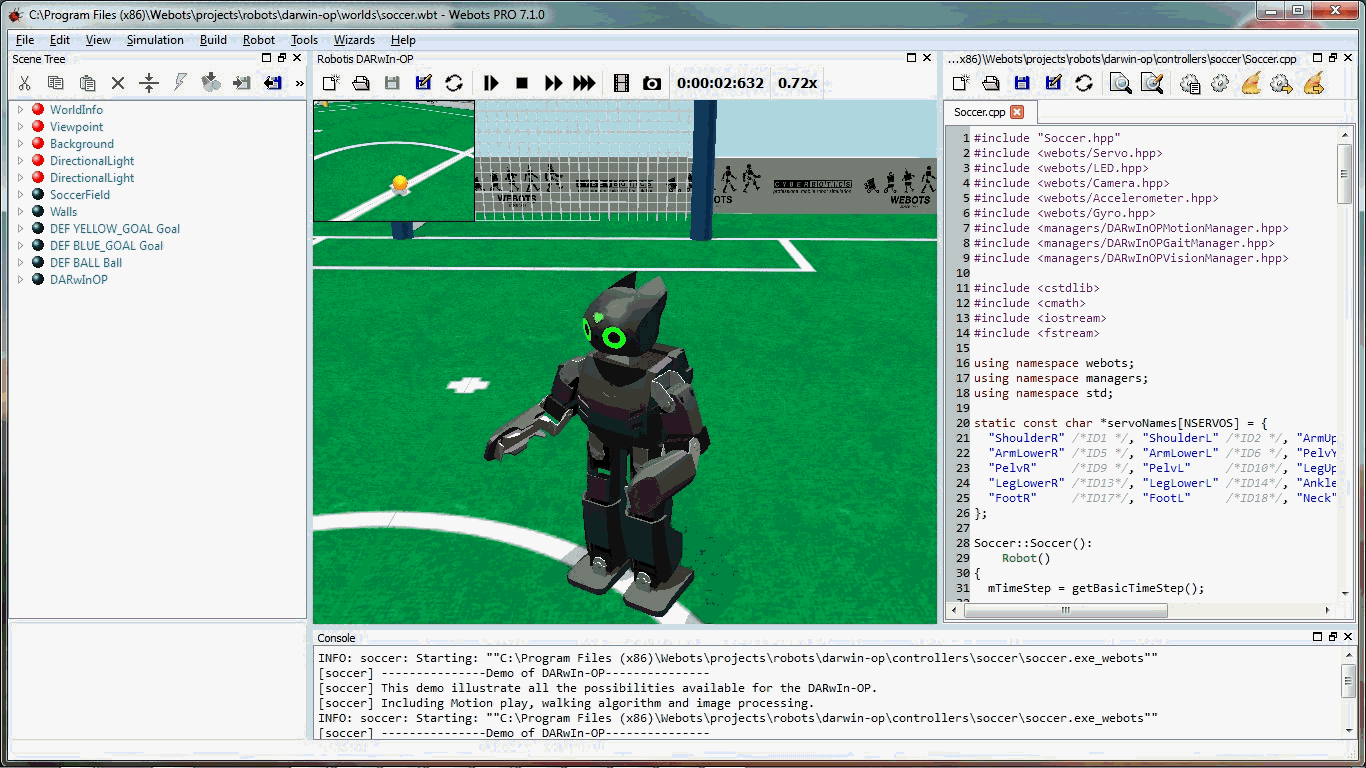
Webots GUI

- Scene tree : Contains the elements of the simulation world
- 3D window : Contains the visual rendering of the scene tree
- Console : Command line window displaying output values
- Text editor : Displays text files such as robot programs
Creating a new project
Now that Webots is running you can create your own DARWIN-OP based simulation project.
You may have noticed that the simulation automatically begins when Webots starts (the timer runs).
The simulation must be stopped before creating a new project.
- Click on the Stop button
- Click on the Revert Simulation button
- The simulation resets and you will see the model in an inactive state
- Click on an empty line from the automatically opened controller file from the Text editor.
- Make a small change (i.e. press the space bar on an empty line)
- Click on the Save or Save As icon. A small window will pop up asking you save changes elwhere. Click on OK
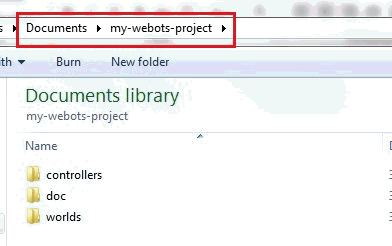
- Pick a place other than $WEBOTS_HOME (i.e. My Documents/my-webots-project)
- Click on Copy and the set of files will copy to the assigned directory.
- Finally click on Close.


Working with your project
Notice that the working directory contains a few separate subdirectories.
“controllers” contains subdirectories, where each subdirectory contains the robot model’s program. There is no limit on the number of program subdirectories.
“worlds” contains world file(s). There is no limit on the number of world files allowed inside this subdirectory.
“doc” (new in Webots v7.1.x) contains documentation on cross-compilation feature that allows user to run Webots code on a real DARWIN-OP (please go to the cross-compilation for more details).
Go into the “controllers” subdirectory and there are a few that were automatically created when you created your working project.
Each program subdirectory contains at least one cpp (C++) file that contains the main loop of the controller.
You create separate subdirectories and write programs in languages other languages.

You may write programs with any text editor or any IDE asides from the integrated text editor from Webots GUI if you wish.
However, compiling and building the code will only work with the Webots GUI.
Cross Compile
Getting the Sources
Using this guide
This guide assumes you are familiar with Webots and requires some knowledge of Webots’ software APIs. This guide assumes user familiarity with the terms controller and world Please use this guide in conjunction with Webots user guide and reference guide. You can download both guides from www.cyberbotics.com
Getting the sources
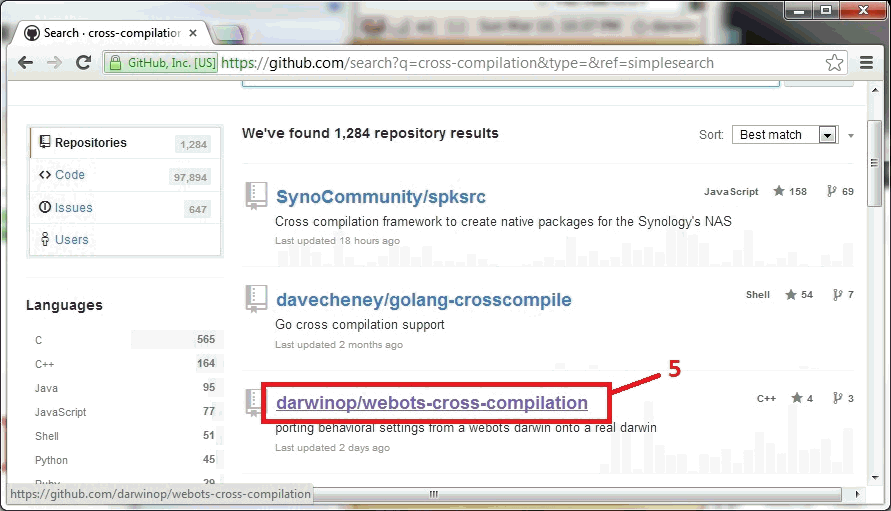
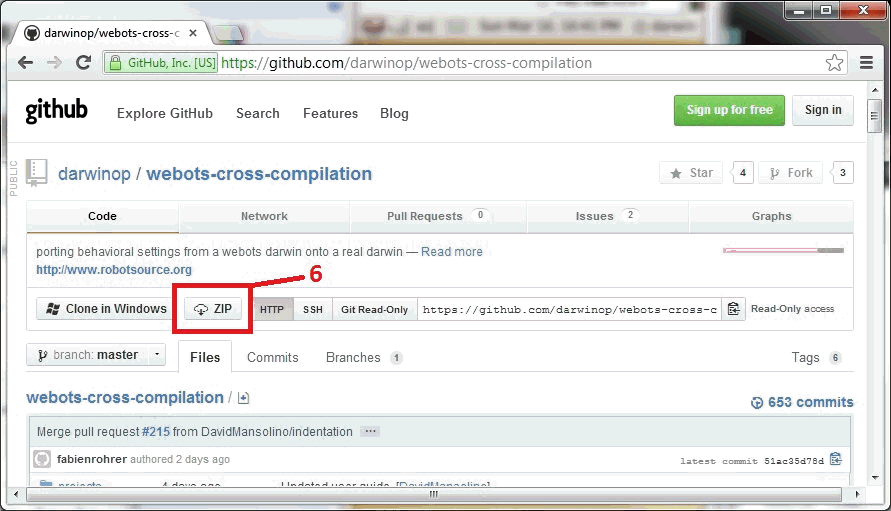
- Visit www.github.com
- Click on Search tab
- Input cross-compilation on the search bar
- Click on the search button

- scroll and look for
darwinop/webots-cross-compilation.
Once in the source page you may download the source directly as a .zip file
- Click on the zip button to download the source to your PC. Once downloaded decompress the file.
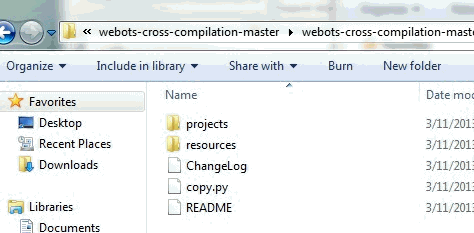
The unzipped file will look something like this. Its now time to transfer these files to the real robot.
Transferring the Sources
Connect to DARWIN-OP via wired or wireless LAN
- Click on the Start button
- Go to My Computer
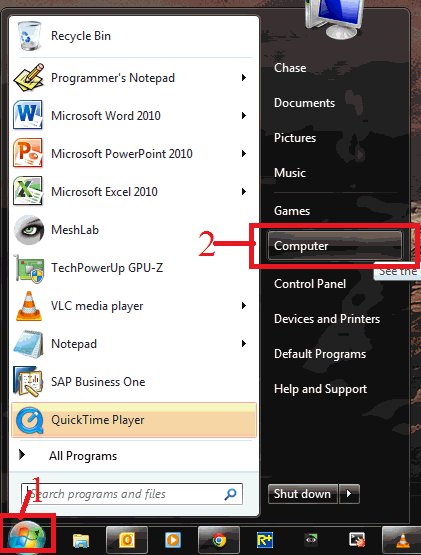
The PC from DARWIN-OP can act as a Samba drive.
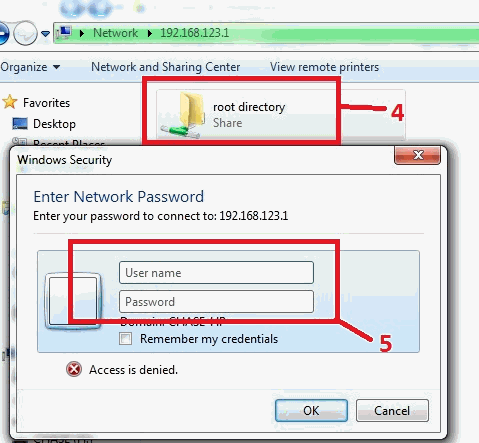
- If connected via wired LAN access the PC by inputting
\\192.168.123.1.
If connected via wifi then use the IP address assigned to DARWIN-OP from your router.
For more information on connecting to DARWIN-OP click here
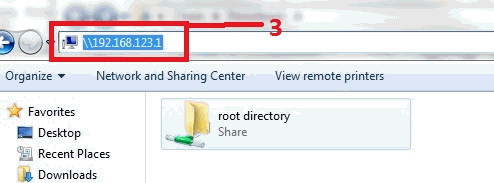
- Double click on “root directory”
- You will be prompted to enter the username and password
User name: darwin
Password: 111111
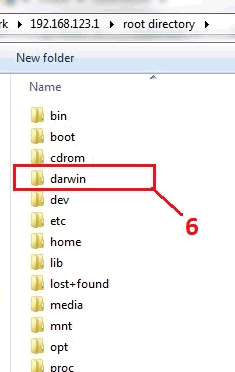
Once inside DARwin-OP’s SSD drive look for a directory named darwin.
This is the location of DARWIN-OP’s software (Framework library and C++ sources)
- Double click on darwin directory
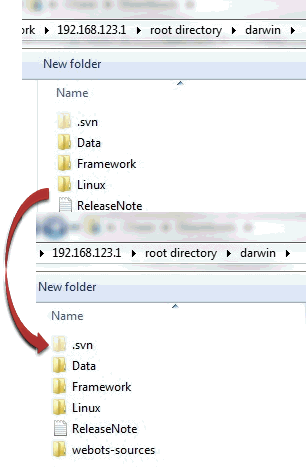
Once inside darwin directory you will see the usual subdirectories.
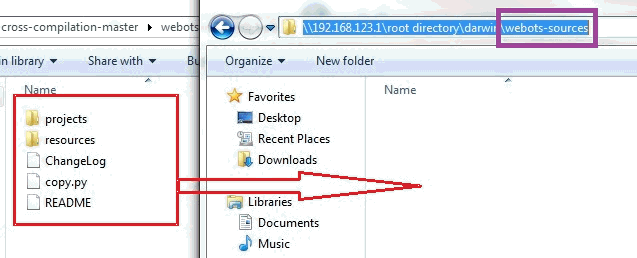
- Create a subdirectory to transfer the cross-compilation sources. Let’s say webots-sources.
- Transfer the unzipped contents cross-compilation sources to webots-sources.
- Transfer (copy) the unzipped contents cross-compilation sources to webots-sources.
Setting Up the Sources
Open up a terminal window (either via remote desktop or SSH). For more information click here
Make sure you have root user privileges.
Make sure to update DARWIN-OP’s Framework library to the latest version.
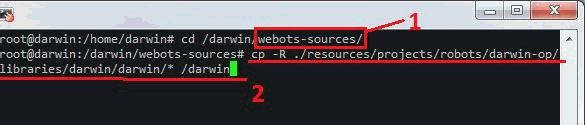
- From the terminal window go to webots-sources
- Merge the Modified DARWIN-OP Framework library with the default Framework by inputting
cp –R ./resources/projects/robots/darwin-op/libraries/darwin/darwin/* /darwin
After merging its time to recompile the Framework and default sources
- Go to
/darwin/Linux/builddirectory - Type make clean;make
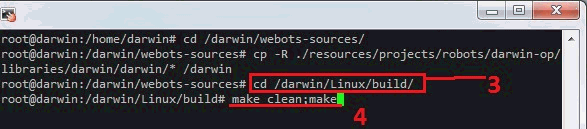
- Go to
/darwin/Linux/project/demodirectory - Type make distclean;make

- Allow users without root user privileges to manipulate the contents of /darwin directory by entering
chown darwin.darwin /darwin

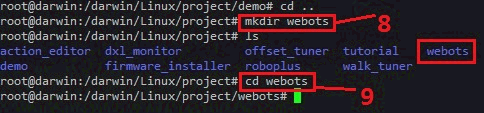
-
Create a new directory in
/darwin/Linux/project/
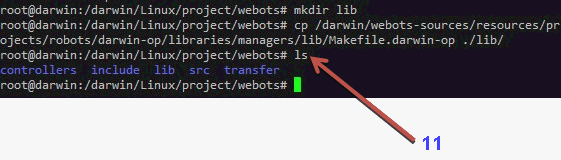
Lets say webots (mkdir webots) -
go into the webots subdirectory (
cd webots)
- In the newly-created webots sub-directory its time to copy include, src, lib, transfer, and controllers from webots-sources
- For src:
cp –r /darwin/webots-sources/resources/projects/robots/darwin-op/libraries/manegers/src/ ./ - For include:
cp –r /darwin/webots-sources/resources/projects/robots/darwin-op/libraries/manegers/include/ ./ - For lib:
cp –r /darwin/webots-sources/resources/projects/robots/darwin-op/libraries/manegers/lib/ ./ - For transfer:
cp –r /darwin/webots-sources/resources/projects/robots/darwin-op/transfer/ ./ - For controllers:
cp –r /darwin/webots-sources/projects/robots/darwin-op/controllers/ ./
- For src:
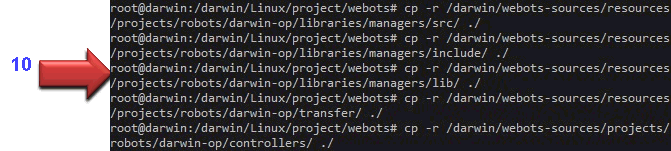
- Type ls and there should be 5 directories
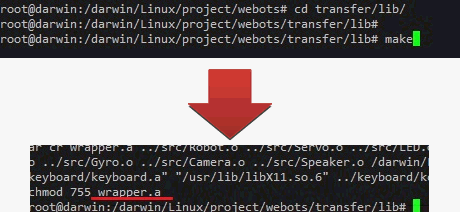
- Its time to compile the wrapper library. Go to transfer/lib subdirectory (
cd transfer/lib) - Type make to compile and build the wrapper library
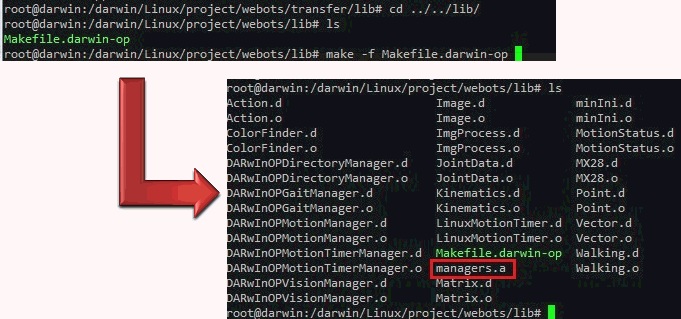
- Its time to compile the managers library. From the transfer/lib sub-directory go to webots/lib subdirectory (
cd ../../lib) - Type make –f Makefile.darwin-op to compile and build the managers library.
- Type ls and look for a file named managers.a
Cross-compilation sources are now set. Its time to compile Webots controller files for the virtual model and run them in the real robot.
Compiling Webot Controller
You can run the very same controller file used on the virtual model in the real robot
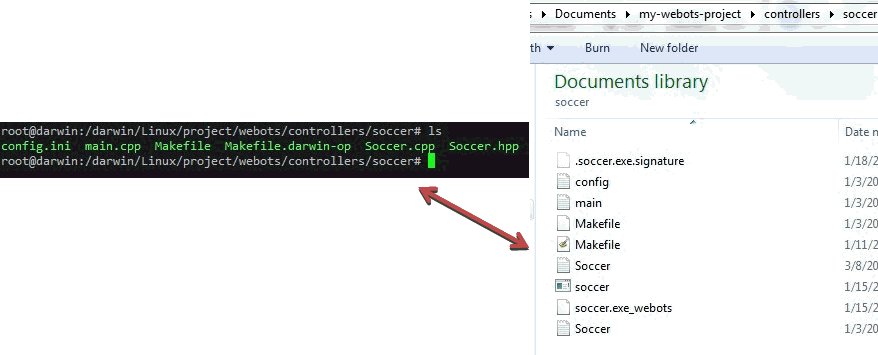
- From the webots/lib subdirectory go to webots/controllers (
cd ../controllers) - Type ls and there will be a list of sub-directories. Each directory contains the exact same controller (.cpp) file from the Webots simulator. Let’s have a look at “Soccer”

From the Soccer controller directory you may notice the pre-compiled contents are the same.
There is a: Soccer.cpp, Soccer.hpp, main.cpp, config.ini, Makefile, Makefile.darwin-op
Take a look at the controller sub-director from your DARWIN-OP Webots project for the simulator. Both contain exactly the same files.
Soccer.cpp in the real robot
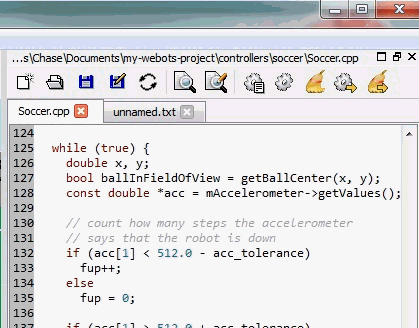
Soccer.cpp in Webots GUI
The exact same code will run in both virtual model and real robot with as little differences as possible.
You may have noticed there are 2 Makefiles. You can safely assume Makefile.darwin-op is the Makefile to compile Webots controller in the real robot.
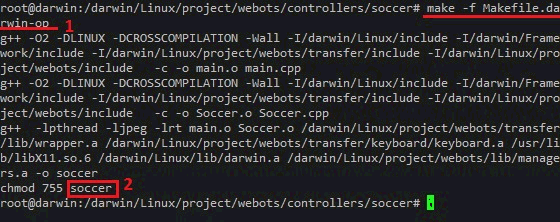
- To compile the controller in the real robot input the following command
make –f Makefile.darwin-op
- You should see an executable after completion.
“chmod 755 soccer” that is the executable file being soccer
Run the controller in Webots simulator first. Then do the same in the real robot
- To run the Webots controller simply enter:
./soccer - To end the program: Hold the
Controlkey then press theCkey - To run the Webots controller as a background process enter:
./soccer& - To kill the soccer program running as a background process enter:
killall soccer - To decompile the build then you would need to clean it by:
make clean –f Makefile.darwin-op
Create & Run Custom Controller
Let’s say you want to modify the ‘walk’ controller, but you want to do so as a different controller from walk. You also want to expand robot control by adding side step functionality. You want to do all the testing in Webots GUI (none in the real robot) before porting your code to the real robot.
- Go to your DARWIN-OP Webots project directory
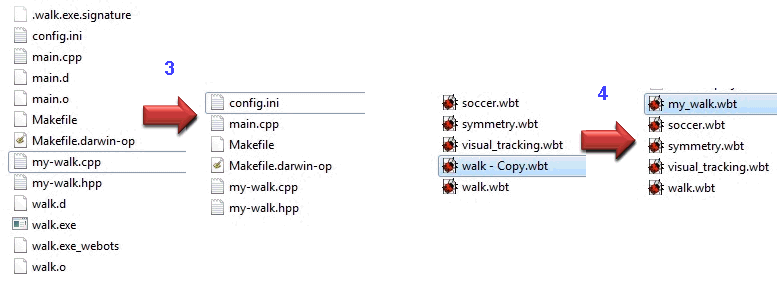
- From the controllers sub-directory make a duplicate of the walk directory (and its contents) and let’s say my-walk.

- Go into your newly-created my-walk directory and do the following:
- on every file change anything with ‘walk’ to ‘my_walk’
- rename
walk.cppandwalk.hpptomy_walk.cppandmy_walk.hppThere may be some post-build files (.c, .d, exe) from the previous build of walk. Feel free to manually delete them
- From the
worldssubdirectory create duplicate ofwalk.wbtand rename itmy_walk.wbt
Once you made all the changes for all files.
Start Webots by double-clicking on my_walk.wbt the simulation will begin with the previous walk controller loaded to the model. Stop the controller and revert the simulation.
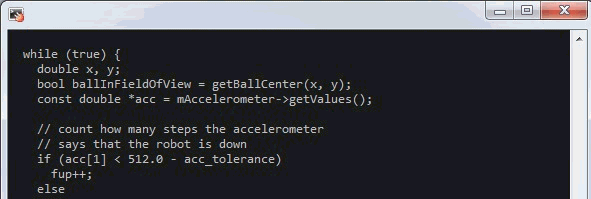
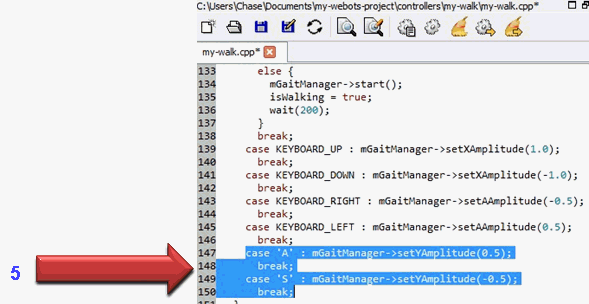
- From the text editor open the controller file (my-walk.cpp), and in the main loop (my-walk::run()) add 2 more cases as you see in the image below.
- Pressing the
Akey the model will sidestep to the left - Pressing the
Skey the model will sidestep to the right
- Pressing the
Hint setYAmplitude(double) deals with sidesteps
Save your changes.
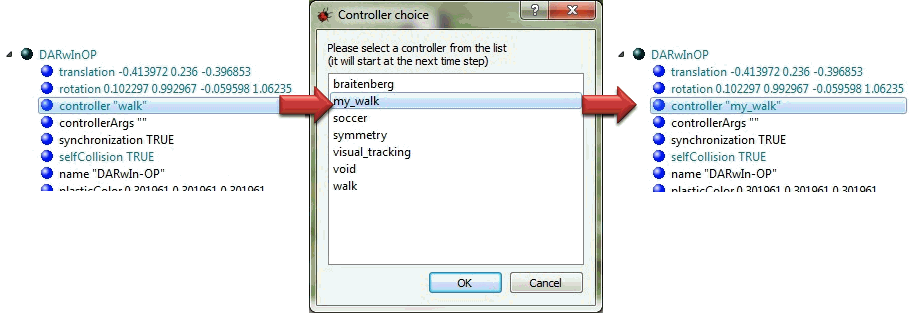
- From the scene tree expand the DARWIN-OP node. On controller change
walktomy walk.
Save changes to the world
After saving your world return to the text editor.
Compile your new controller and run it in the simulator.
You should be able to sidestep left and right in addition of being able to turn the model normally.
Now its time to transfer my_walk to the real robot.
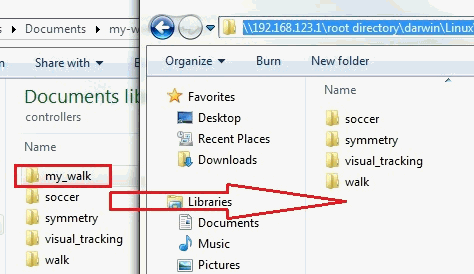
The easiest way to do so is by accessing DARWIN-OP via Samba drive as done previously.
Once inside go to: root directory darwin Linux project webots controllers.
Copy your my_walk directory from your Webots project to controllers directory in DARWIN-OP.
There will be some post-build files (.o, .d, exe, etc) created during the simulation. Feel free to delete these as they are irrelevant in the real robot.
You may choose to delete the Makefile as well because its not necessary in the real robot but must keep Makefile.darwin-op.
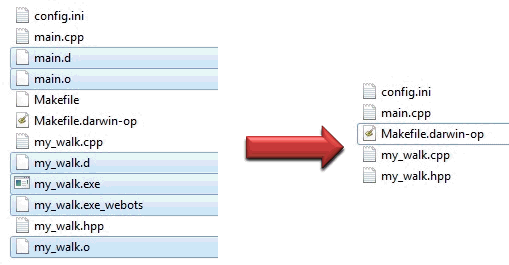
Feel free to delete the highlighted files. They are not useful in the real robot
You can verify that the transfer process was OK by:
- Going to the
controllersdirectory - Type ls to see the contents
Then go to my_walk directory compile the controller (make –f Makefile.darwin-op)

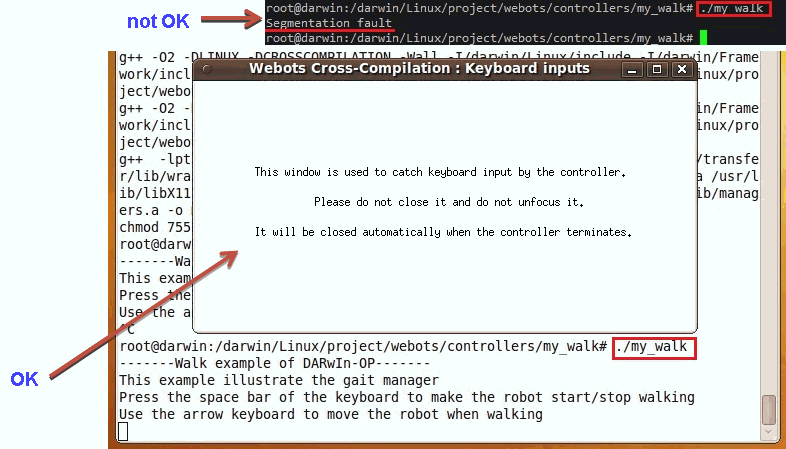
When executing this controller in particular do not use SSH client (PuTTY) instead use remote desktop (VNC). Otherwise the program will halt with a segmentation fault error.