Task Instructions
Start/End
This instruction establishes the overall beginning and end of a program, and the valid block for the instruction.
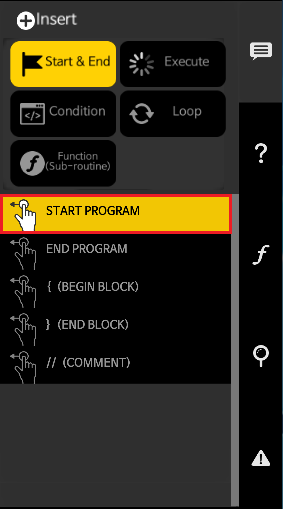
Start Program
- The Start Program instruction is executed regardless of the line number.
- There cannot be more than one Start Program instruction in one program.
- The Start Program instruction must be enclosed with a set of opening and closing brackets properly.
- When program reaches at the end of the Start Program instruction, the program will be terminated.
- The Start Program instruction can be compared to the main() function in C programming language.
The following image is an empty Start Program instruction.

End Program
- This instruction sets the location where the program terminates.
- If End Program does not exist, program will run through the code until the last line.
The following is the code that terminates when it reaches to the end.

The following is the code that force terminates at END PROGRAM line.

Begin Block / End Block
- A block is an enclosed set of multiple lines of instructions.
- The beginning and end of a block must be paired.
- If there is only one instruction code in the block, Begin / End Blocks can be omitted.
The following code shows START PROGRAM and ENDLESS LOOP blocks.

The following code shows START PROGRAM and IF blocks.

The following code shows when the blocks can be omitted.

Comment
- If an explanation needs to be added, you can add a comment(memo) in the line.
- By inserting the
//symbol, you can double-click it to modify the content that follows. - While you are modifying a comment, you can click the ESC key to restore to the previous state of the comment.
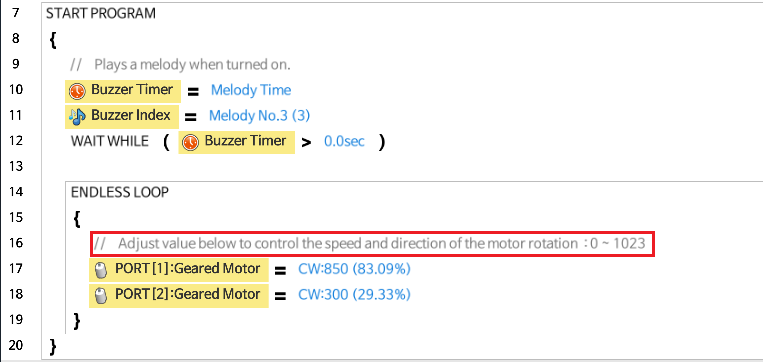
The following is an example of inserting a comment to make the source code easier to understand.
Execute
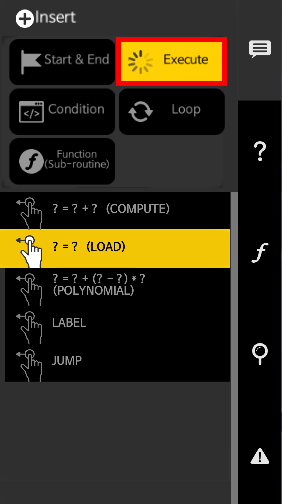
This is an instruction for giving a command to the device or performing a mathematical calculation. Refer to the following figure for details.
Compute
-
This instruction computes two values to give one result. (C = A + B)

-
Add(+), Subtract(-), Multiply(*), Divide(/), Modulo(%), And(&), Or(|) can be used.

- Add( + ) : Adds two numbers.
- Subtract( - ) : Take the second number away from the first number.
- Multiply( * ) : Multiply two numbers.
- Divide( / ) : Divide the first number by the second number and return the quotient (The remainder will be ignored).
- Modulo( % ) : Divide the first number by the second number and return the remainder (The quotient will be ignored).
- AND( & ) : Use bitwise AND operation for two values. Both values must be true for the result to be true.
- OR( | ) : Use bitwise OR operation for two values. Either value must be true for the result to be true.
The following is an example of using the Compute instruction.

Load
- This instruction substitutes a value with another one.
- This instruction is used when reading or writing a value to a variable or an instruction.
-
This instruction is used when reading or writing a value to a device.

The following is an example of writing a value to the variable Acceleration, and then reading the variable from the Geared Motor.

The following is an example of setting the speed value of Geared Motor connected to Port 1.

Polynomial
- This instruction is used when calculating an expression with multiple operators.
-
Variables and constants can only be used in the expression.
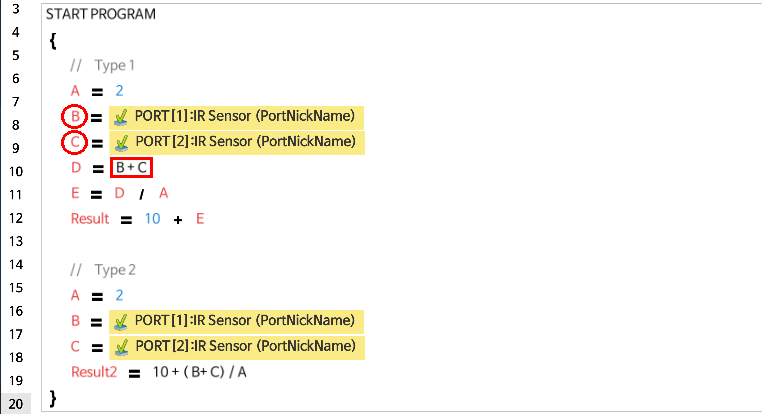
-
The Multi Compute creates invisible temporary variables in the controller that consumes variable memory area.
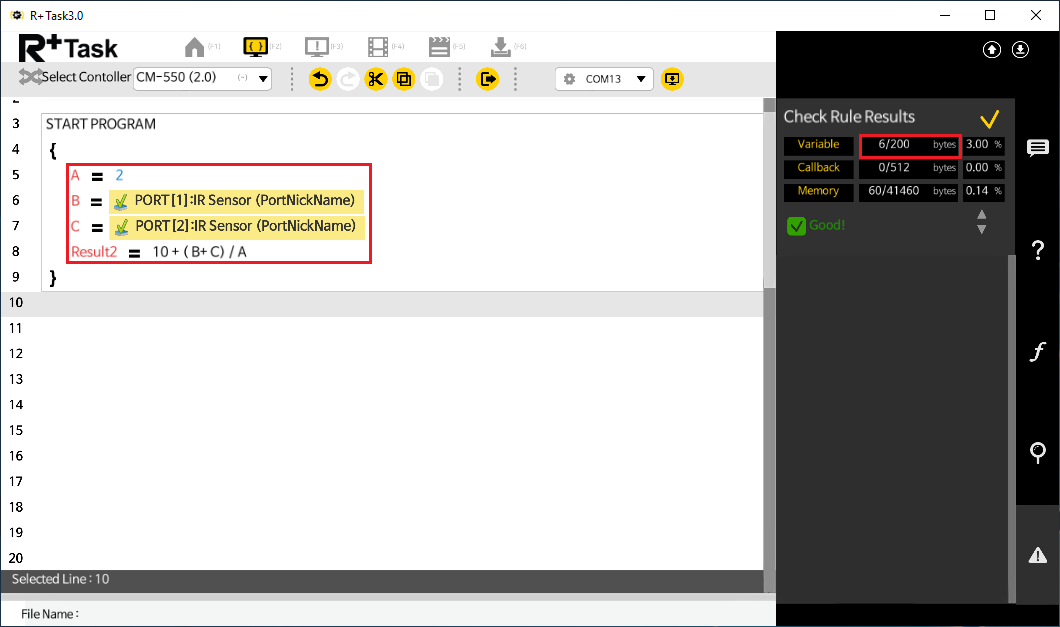
-
Using an invalid expression will return the error message.

Label/Jump
- These instructions are used for branching the program.
- Label indicates the branch of the program.
- Jump instruction skips to the designated Label and run the code.
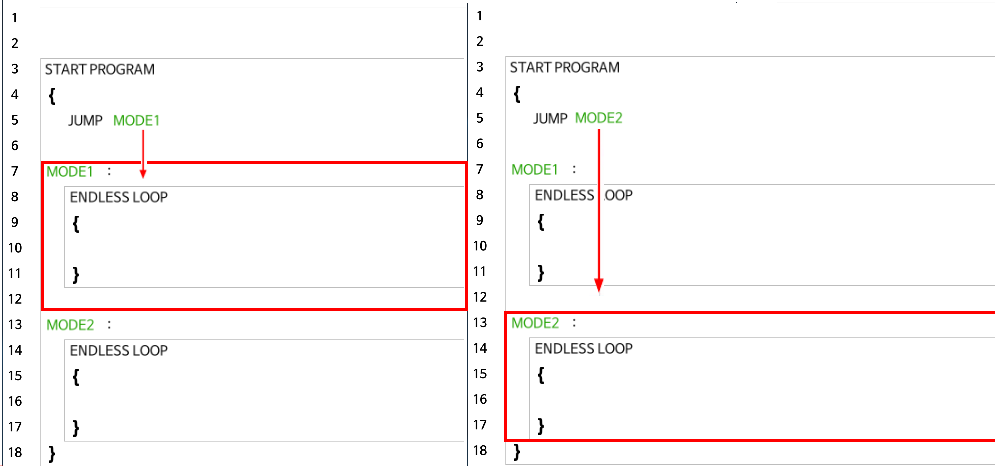
The following examples show how Label and Jump can be used.
- The left example will run the Mode1 only and skip the Mode2.
-
The right example will run the Mode2 only and skip the Mode1.
-
Label and Jump must exist inside the same function block.
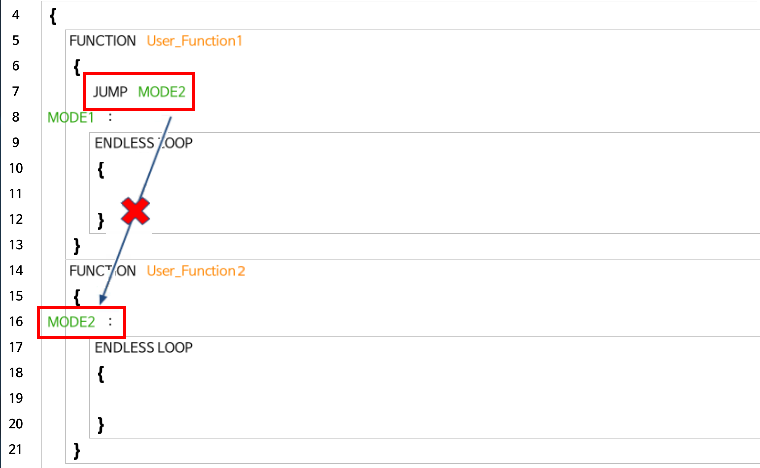
Condition
This instruction controls the flow of program based on the True/False result of Conditional Clause.
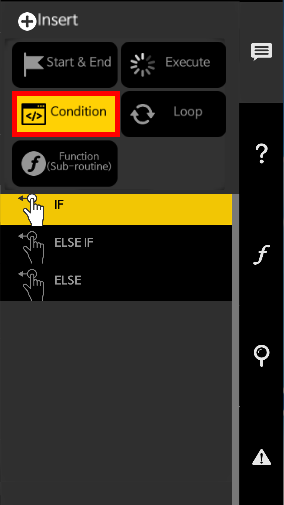
Conditional Clause
- A conditional clause returns the computation result as either true or false.
- Below are the comparison operators that can be used inside the parenthesis.
| Operators | Description |
|---|---|
| == | The value on the left hand side is equal to the right hand side |
| != | The value on the left hand side is not equal to the right hand side |
| > | The value on the left hand side is greater than the right hand side |
| >= | The value on the left hand side is greater than or equal to the right hand side |
| < | The value on the left hand side is less than the right hand side |
| <= | The value on the left hand side is less than or equal to the right hand side |
More than one condition can be examined as shown below.

- When using multiple conditional clauses, the following logical operators can be used.
| Logical Operators | Description |
|---|---|
| then | Do not use additional conditional clause. |
| && | Use logical AND operation for two conditions. Both conditions must be true for the result to be true. |
| \ | Use logical OR operation for two conditions. Either condition must be true for the result to be true. |

If
- If the conditional clause is true, the code inside the
IFblock is executed.
The following is an example of turning the LED on if the variable in the IF statement is equal to 100.

Begin / End Blocks can be omitted when there’s only one instruction in the block.

Else If
- This is used to examine another conditional clause when
IFstatement is false. ELSE IFblock must be used afterIFblock or anotherELSE IFblock.
The following is an example of using IF and ELSE IF statements.

Begin / End Blocks can be omitted when there’s only one instruction in the block.

Else
- If neither
IFnorELSE IFstatement are true,ELSEblock will be executed. - The
ELSEblock must be used afterIForELSE IFblock.
The following is an example of using IF, ELSE IF, and ELSE blocks.
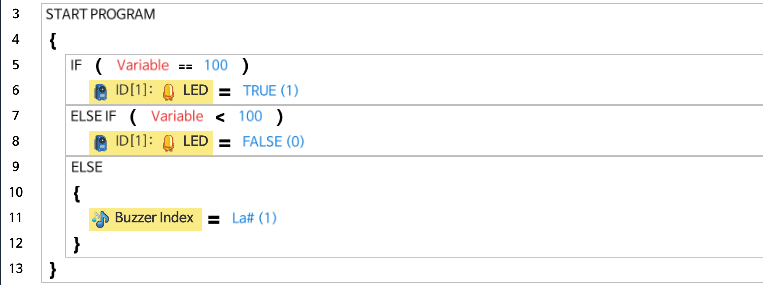
Begin / End Blocks can be omitted when there’s only one instruction in the block.

Loop
This instruction is used when the program needs to repeat a specific behavior or to run an instruction multiple times.
The Loop blocks can be configured in various ways by setting a specific condition.
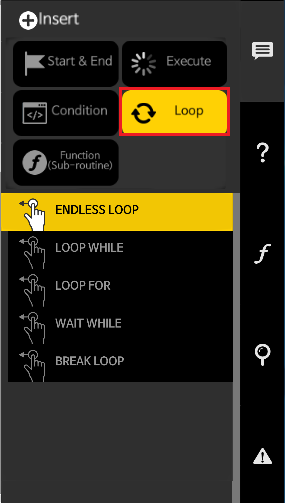
Endless Loop
- The code in the
ENDLESS LOOPblock will repeatedly be executed. - The
BREAK LOOPinstruction can be used to end the repetition.
The following is an example of using Endless Loop to print the number 100 on the screen. The Print Screen with Line command is placed in the ENDLESS LOOP block.

Begin / End Blocks can be omitted when there’s only one instruction in the block.

Loop While
- The code in the
LOOP WHILEblock will repeatedly be executed as long as the condition meets. - Just like the
Conditioninstructions, multiple conditional clauses can be combined. - The
BREAK LOOPinstruction can be used to end the repetition.
The following is an example of using LOOP WHILE to print the number 100 on the screen for 1.024 seconds.

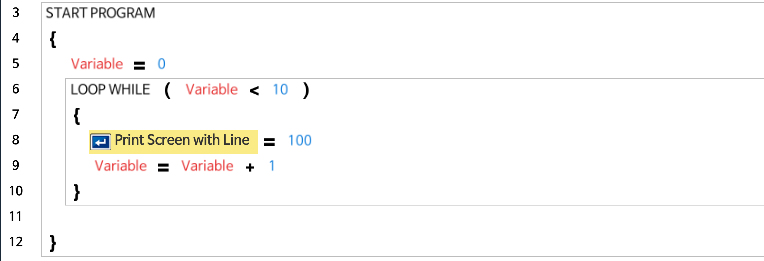
The following is an example of using LOOP WHILE and a variable to print the number 100 for 10 times.
Loop For
- This instruction will execute the
LOOP FORblock for a specified number of times. - Each time the program runs through the block, the variable will be increased by 1.
- The
BREAK LOOPinstruction can be used to end the repetition. - The condition can be described as ( Repeat counter variable = Starting Value ~ End Value ). Therefore, the block will be repeated for End Value - Starting Value + 1 times.
The following is an example of using Loop For to print the number 100 on the screen 10 times.

The following is an example of multiplying the Repeat counter variable by 100 and print on the screen. As the Repeat counter variable increases, the printed value will also be increased by 100; 100, 200, 300, 400, 500, 600, 700, 800, 900, 1000.

Wait While
- This instruction will stop running the code while the specific condition meets.
The following is an example of using WAIT WHILE with a Timer to hold the program running for 1.024 seconds.

The following is an example of using WAIT WHILE with a Motion Status to wait until the motion completes.

The following is an example of using WAIT WHILE with a Buzzer Timer to wait until the melody plays.

Break Loop
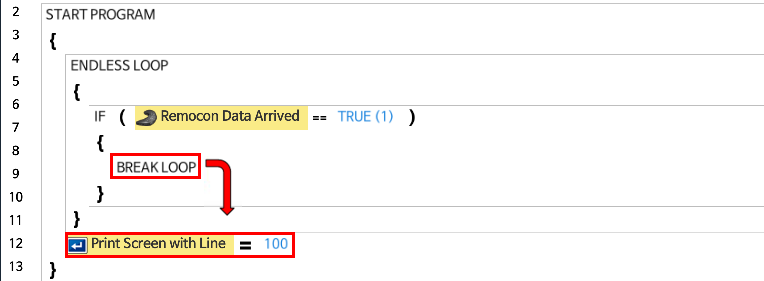
- This instruction will exit the loop block.
- This instruction can only be used within
ENDLESS LOOP,LOOP WHILE, andLOOP FORblocks.
The following is an example of using BREAK LOOP to exit the loop when the remote controller data is arrived. After exiting the block, followed by code will be executed.
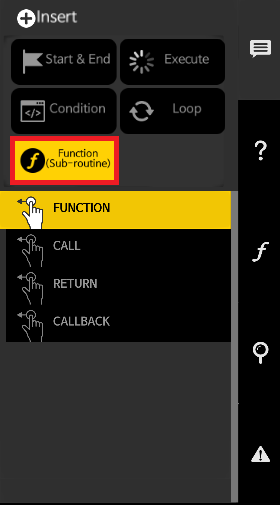
Function(Sub-Routine)
If a specific code is used repeatedly, or if you wish to classify an area of code as a unit that performs a specific behavior, you can group the lines of code as a Function. Refer to the following figure for details.
Function/Call
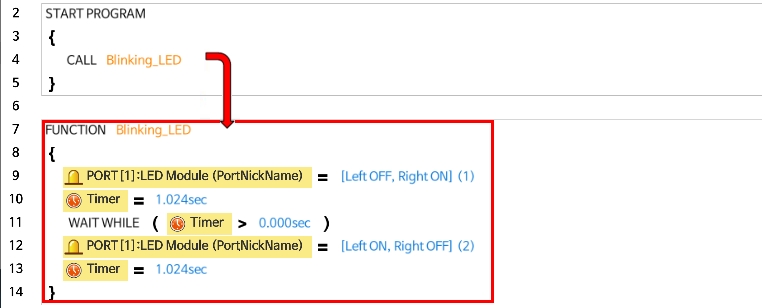
- When the same code is used in different locations in the program, such code can be defined within a
FUNCTIONblock. - An adequate use of functions will make the code concise and easy to read.
- A function that has been created can be used with “Call” instruction when needed.
- Functions must be written outside of the main program routine.
- In task, functions cannot configure input or output arguments
The following is an example of making the action of blinking the LED as a function and using it.
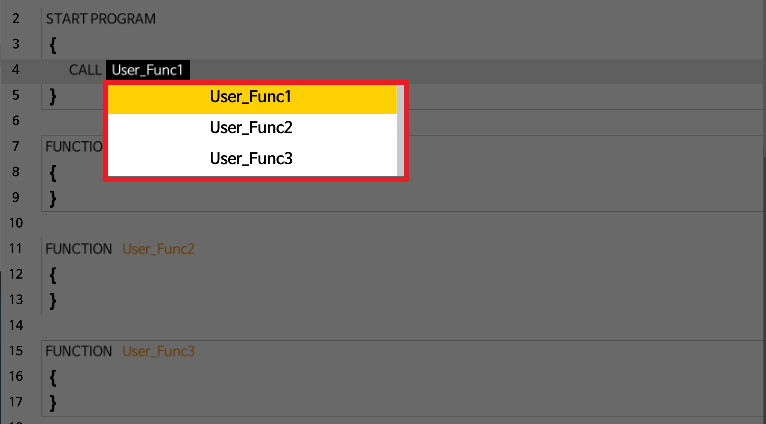
The following is the process of selecting a function to call.
Functions cannot call itself within the same function.

Return
- This instruction is used for exiting a function while it is being executed.
- It can only be used inside a regular function and callback function.
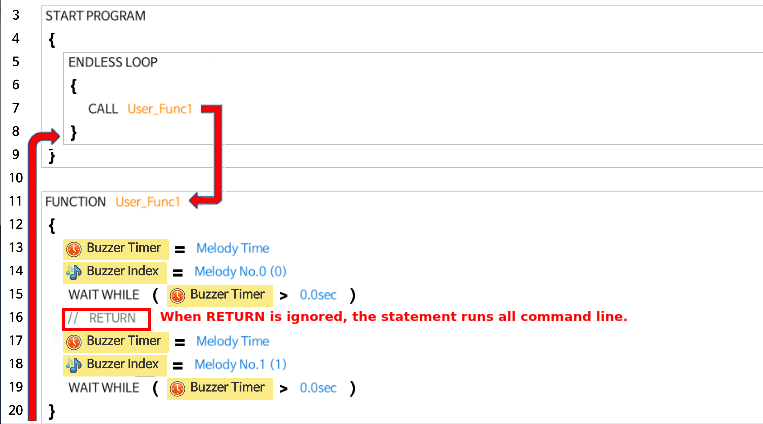
The following is an example of a function being executed until the end without using Return.
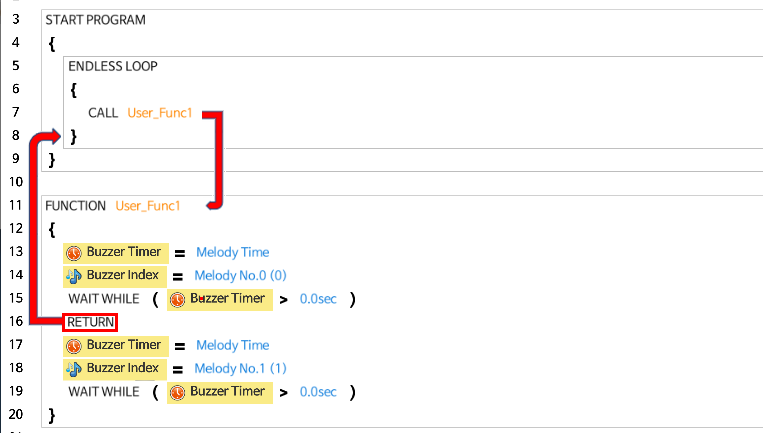
The following is an example of a function being executed but encountering Return in the middle of executing the function, which will make the program exit the function.
Callback
- This function is executed independently from the main program routine, executing itself periodically
- Callback functions must be written outside of the main program routine.
- Because it is not allowed to write code within a callback that takes too much time to execute, callback has restrictions in the use of Loops / Variables / Parameter Calls / volume of code.
- The following restrictions must be applied when using a callback function.
- Loops, Labels, Jumps, Calls are not allowed in the Callback
- Communication with an external device is limited to a maximum of 2 times
- The code size of callback function cannot exceed 512 bytes
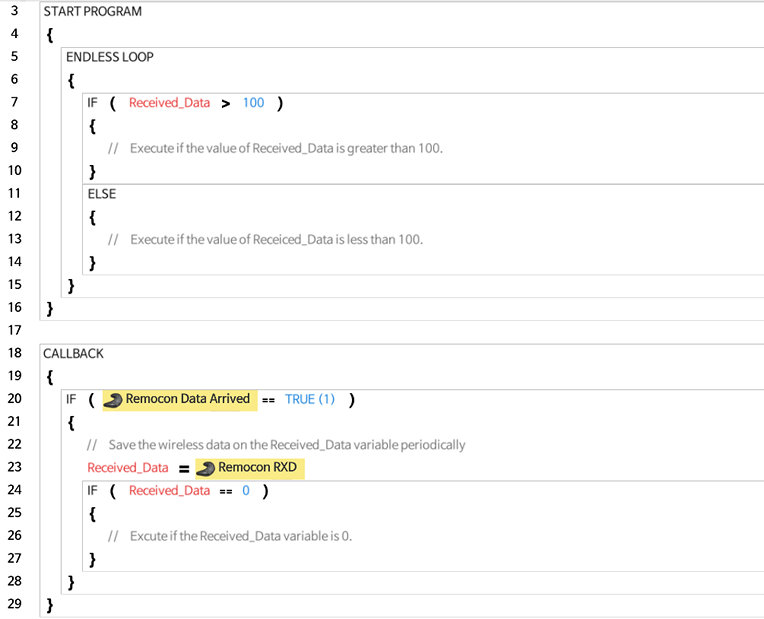
The following is an example of using the callback function to receive wireless data and save it to the variable “received data”.
