
Maintenance
Fuse Replacement
There may be a time when you turn the rocker switch on DARWIN-OP may not power up at all regardless of power source (DC, battery). If that’s the case then this is most likely caused by a blown or defective fuse.
The fuse is rated at 12V (volts) and 10A (amps).
Replacing the fuse requires requires disassembly of DARWIN-OP’s main body and expose the sub-controller CM-730.
Once the sub-controller is exposed locate the fuse. The diagram below shows the fuse location enclosed by the red rectangle.
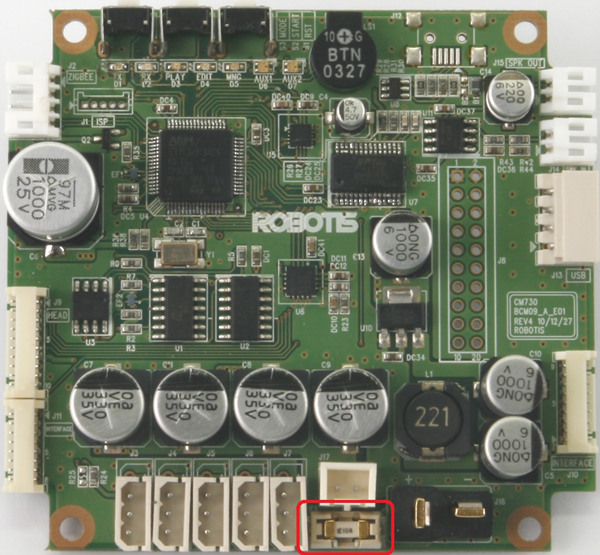
Carefully remove the fuse with a pair of tweezers. Afterwards carefully insert a new fuse.
WARNING : Improper care during removal or insertion of the fuse may result in damage(s) to the fuse housing or/and other components of the sub-controller Cm-730.
Hardware Maintenance
You can find Assembly, Wiring and Fabrication manuals here courtesy of RoMeLa.
Maintenance
Robotis recommends that DARWIN-OP users perform preventive maintenance once every 1200 minutes (20 hours) worth of motion.
Robots are moving mechanical parts and preventive maintenance is necessary to keep robots in optimum conditions.
Perform maintenance in a well-lit and dry place.
Neglect may result in unnecessary and costly damage.
Procedure
Every single screw and nut should be tightened.
Overtightening is not necessary and may be counterproductive as it may damage the threading of the bolts and wrenches.
Disassembling DARWIN-OP
Remove the battery.
Remove the plastic skin on DARWIN-OP. This includes the head and body.
If your DARWIN-OP includes FSR units on its feet then you should also remove the plastic casing from the feet.
Divide DARWIN-OP into the following groups/sections
- Upper body and neck (ID 1, 2, and 19) frames (2 elbow/shoulder, neck, sub controller, 4 short inter-actuator)
Disconnect any connection between sub controller and main controller.
Disconnect any cables between the arms and upper body.
Remove arms from upper body. - Head (IS 20) frames (head frame, USB camera)
- Each arm (ID 3,5 right, ID 4,6 left) frames (hand, elbow/shoulder, and actuator lateral)
- Torso (ID 7, 8, 9, 10) frames (main controller, groin, 2 dxl-main controller bumper, power sitch pcb, power sitch, l lower back, 2 hip, 4 long inter-actuator)
Disconnect cables from legs to torso. Remove legs from torso.
Main controller does not need to be detached from forso. - Each thigh (ID 11 right thigh, ID 12 left thigh) frames (2 actuator lateral, thigh)
- Knee and lower leg (ID 13, 15 right, ID 14, 16 left) frames (leg, actuator lateral
- Foot (ID 17 right, ID 18 left) frame (2 long inter actuator, foot, ankle
Wiring
Ensure that all connections are properly secured.
Ensure that the long cables are laid flat free of twists.
Replace cables whenever the protective coat has a cut leaving the wire(s) exposed to air.
Cleaning
Please ensure that the actuators, main controller and sub controller are free of dust. Although dust may not harm the internal components of both main controller and sub controller under dry condition, humidity may cause static potentially doing costly permanent damage to the controllers.
The recommended tools to remove dust, dirt and debris compressed air blower, or a non-metallic soft brush
DYNAMIXEL Replacement
There may be an instance where you will need to replace DYNAMIXEL actuator due to failure. The following page will guide you on how to replace DYNAMIXEL actuator.
To replace an MX-28 on DARWIN-OP you need to complete the following procedures.
- Proper installation of horn, bearing set to the new MX-28.
- Proper ID and baud rate setting.
Please refer to the Assembly Guide for reference during replacement procedure.
Proper Installation of Horn and Bearing Set
Every MX-28 on DARWIN-OP comes comes installed with the horn (front side of actuator). Some of the MX-28’s come with the bearing set (rear side of actuator) installed as well. You will need a wrench for 2.5mm thick bolt (provided).

Installing the Horn
Place the thrust horn washer into the actuator before inserting the horn. You must carefully align the horn to the wheel gear serration by aligning dots.

Once alignment is properly done, gently push the center of the horn toward the actuator. Make sure that the horn washer is in place as you tighten the bolt.
Installing the Bearing Set
You may need to remove the bearing set from the previous actuator and reinstall it into the new actuator. The bearing set can also be purchased separately. As bearing set is rotating freely, therefore alignment is not required when assembling to DYNAMIXEL.

For more information on the bearing set please click here. Note that the bearing set is for the RX-28, which will fit perfectly on the MX-28 as they both share the exact physical dimensions.
Proper ID and baud rate setting#
Method A
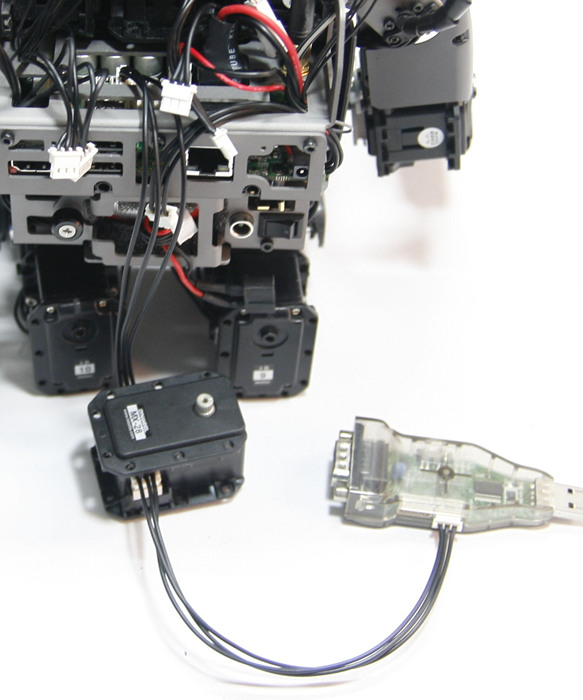
You have USB2DYNAMIXEL and a Robotis dedicated robot controller (CM-5, CM-510, or CM-700)
- Provide power to new MX-28. That is connect one TTL port from the MX-28 to the controller; then power on the controller.
- Connect the other TTL port of the MX-28 to the USB2DYNAMIXEL dongle (Make sure to set the switch to “TTL” on the dongle).
- Connect the dongle to an open USB port in your PC. Run DYNAMIXEL Wizard.
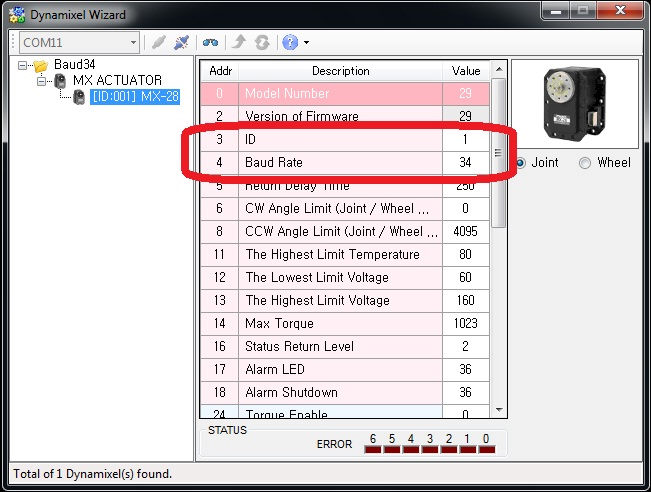
- Change the ID number from 1 to the proper number.
- Change the baud rate from 34 (576000 bps) to 1 (1 Mbps).

- After replacement is done. Run DXL Monitor and reset all DYNAMIXEL.
Click Dynamixel Wizard for more information.
Method B
You have USB2DYNAMIXEL but do not have a Robotis dedicated robot controller (CM-5, CM-510, or CM-700).
Steps 2 through 5 from Method A remains unchanged. Step 1 needs to be modified for proper power supply.
You will need 2 separate 3-pin TTL cables (they come supplied with every DARWIN-OP). The following procedure is recommended:
-
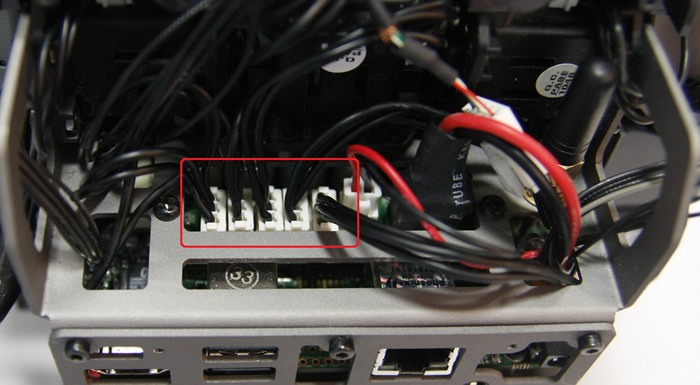
Open the Interface panel of DARWIN-OP (back cover). Carefully remove the plastic back panel to prevent any damages to the interface board cables.
-
Disconnect both Interface Board cables.

- Temporarily disconnect ALL currently connected cables. You can choose any TTL port. Do not disconnect the power cable from sub-controller to main controller. Doing so will not allow Dynamixel Wizard proper DYNAMIXEL search.
-
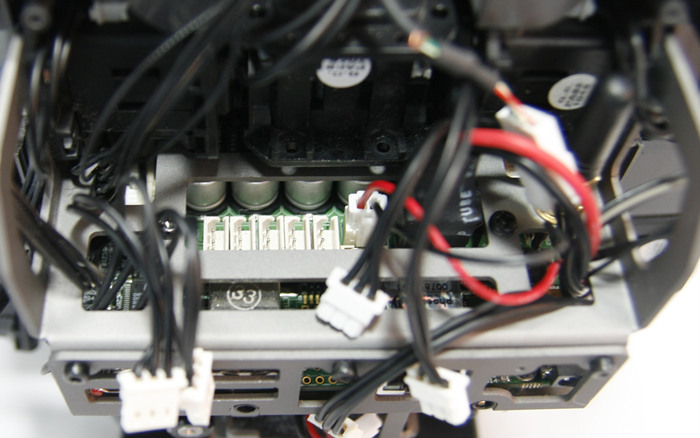
Connect a spare TTL cable to any open port and the other end to the new MX-28.
-
Connect a second TTL cable to the other port of the MX-28. Connect the other end of the cable to the USB2DYNAMIXEL controller. Afterwards connect USB2DYNAMIXEL to the PC.
-
Turn the switch on on DARWIN-OP and let Ubuntu load (this process may take up to 2 minutes).
NOTE : The head LED will remain green and will not turn amber. The demo program will not run automatically. -
Connect to DARWIN-OP and run DYNAMIXEL Monitor.
Once DYNAMIXEL Monitor is running all actuators will show as “fail” even with the new MX-28 connected. Do not exit DYNAMIXEL Monitor. Leave the program running.
- On Windows run DYNAMIXEL Wizard.
Change address 4 (baud rate) from the default value of 34 to 1. You must perform this operation with DYNAMIXEL Wizard as DYNAMIXEL Monitor does not support this function currently. If you do not change the baud rate then DYNAMIXEL Monitor will fail to scan the actuator. Change address 3 (ID) from the default value of 1 to the desired value. You may also use DYNAMIXEL Monitor to change ID as well.
NOTE : RoboPlus Manager does not currently support the CM-730 controller because it lacks the Serial Connector input.
Once the baud rate value is set to 1 you may return to DYNAMIXEL Monitor and type scan to verify success on baud rate change (the first attempt may show the new actuator as “fail” if so type scan again until “OK” shows on screen).
Once all changes are made you still need to exit DYNAMIXEL Monitor and Shut down DARWIN-OP properly. Once shut down and powered off replace DYNAMIXEL actuator and restore all connections. Once connections are restored return to DXL Monitor and reset all DYNAMIXEL.
If you are replacing 2 or more DYNAMIXEL then you must perform this procedure again as Dynamixel Wizard will show errors when multiple DYNAMIXEL’s with the same ID and same baud rate are connected.
Once the actuator has been replaced it is highly recommended that you update the firmware with Firmware Installer so that ALL DYNAMIXEL are matched with the same firmware.
Method C
You do not have USB2DYNAMIXEL controller nor a Robotis dedicated robot controller (CM-5, CM-510, or CM-700).
Ensure you perform proper horn installation and proper bearing set installation (if applicable).
Example 1
Replace the the right elbow (ID 5) with a new actuator without disconnecting the remaining actuators.
If so let’s assume we need to replace the right elbow (ID 5) and already replaced the actuator before performing the software changes:
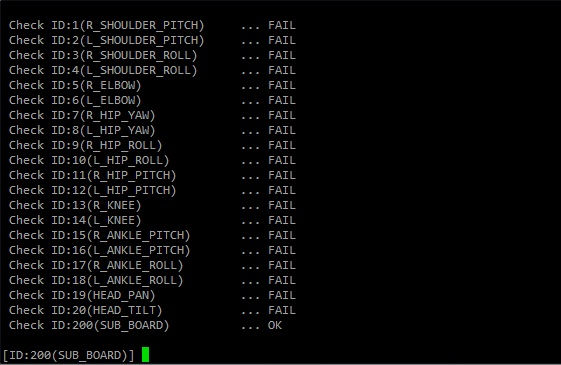
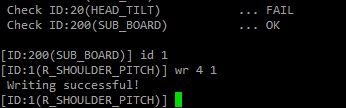
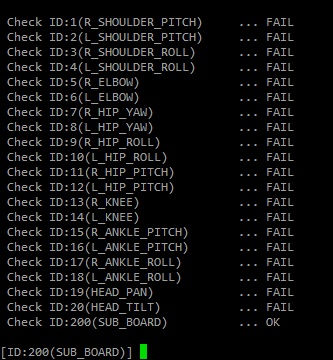
- Run DXL Monitor You will see the following appear on screen
Despite installing the new actuator replacement for ID 5 the software still displays as “fail.” Now its time to make the proper changes.
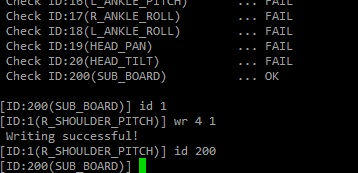
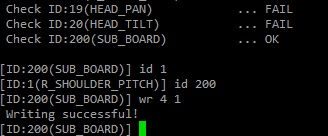
- Go to ID 1 by typing id 1 and temporarily assign a different ID number. You may assign numbers between 21 and 199 but refrain from numbers between 1 and 20. let’s say change to 39 so type wr 3 39.
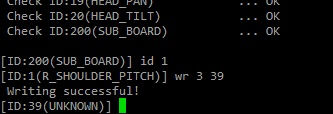
Notice that the command prompt changed from ID:1 R_SHOULDER_PITCH to ID:39 UNKNOWN.
- Return to the CM-730 command prompt by typing id 200.
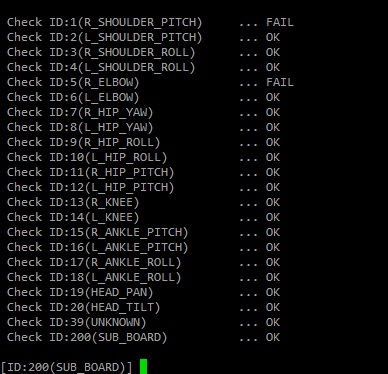
- Type scan and notice the “extra” ID on ID 39. You’ll also notice that ID 1 and 5 failed.
- Type the command wr 4 34 while remaining in ID 200. This means that the communications baud rate between the CM-730 and MX-28 switched from 1Mbps to 576000 bps.
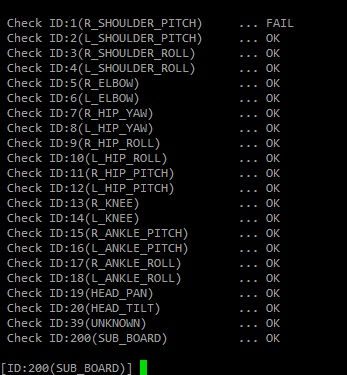
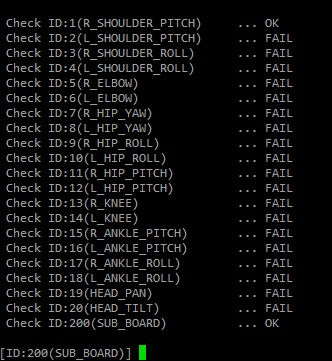
- Type scan and the following will appear onscreen
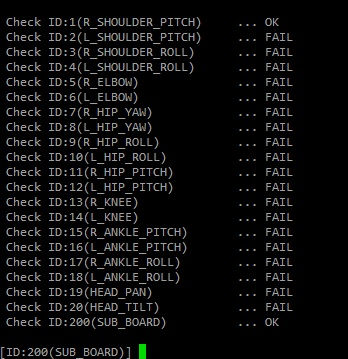
Notice that all actuators fail except ID 1 (remember that the default values on a new DYNAMIXEL is ID 1 and baud rate 34). Notice that ID 39 does not appear anymore. No need to worry this is because ID 39 does not currently have a specific function in DARWIN-OP and the baud rate of said ID is 1 Mbps; whereas the current baud rate between the CM-730 and and MX-28 is 57600 bps.
- go to ID 1 by typing id 1
- The command prompt will change from ID 200 to ID 1
- change the baud rate from 34 to 1 by typing wr 4 1
- Once baud rate of the new actuator matches with the rest of the actuators return to to ID 200 by typing id 200
- Change the baud rate between CM-730 and MX-28 back to 1 Mbps by typing wr 4 1
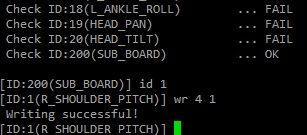
- Return to ID 1 by typing id 1; change the ID from 1 to desired ID. In this case to ID 5 by typing wr 3 5
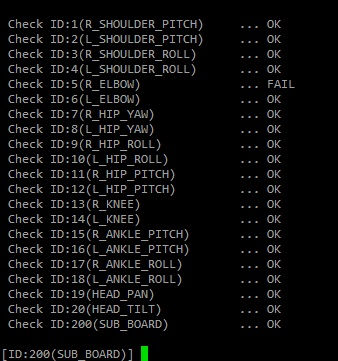
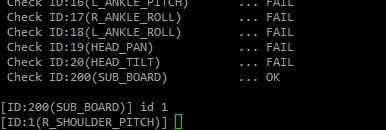
- Return to ID 200 and type scan. Notice that ID 5 has been set, but ID 1 still failed and there’s ID 39. Go to ID 39 by typing id 39
Remember that ID 39 is a temporary ID change for ID 1. Now its time to revert the change back.
- Go to ID 39 by typing id 39. Restore ID 1 again by typing wr 3 1. Return to ID 200 and run scan.
- Run reset all and all DARWIN-OP will be back to normal again.
Repeat the same procedure again if replacing more than 1 actuator.
Example 2
Replace the the right elbow (ID 5) with a new actuator with less software manipulation.
Just like Method B disconnect all DYNAMIXEL from the CM-730 but do not disconnect the power from CM-730 to Main Controller.
However in this case instead of the need for 2 3-pin TTL cables you’ll only need 1.
- Connect the new actuator to any TTL port.
- Turn DARWIN-OP on and run DXL Monitor. Do not worry about setting DARWIN-OP in the kneeling position during this procedure as the demo program will fail to run automatically due to the disconnected DYNAMIXEL. Please set DARWIN-OP in a stable position (either sitting or laying down on its belly).
- Run scan and you will notice that all ID’s will fail
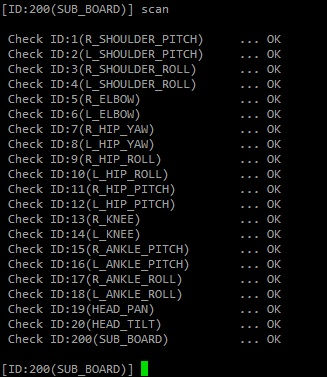
- Change the baud rate on ID 200 from 1 Mbps to 57,600 bps by typing wr 4 34
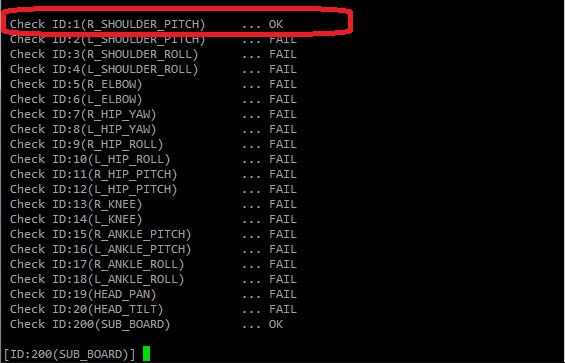
- Run scan again and you’ll notice the OK on ID 1 (remember that all new DYNAMIXEL have default values 1 for ID and 34 for baud rate).
- Go to ID 1. Change the baud rate of ID 1 from 57,600 bps to 1 Mbps by typing wr 4 1
- Return to ID 200 and change the baud rate back to 1 Mbps
- Return to ID 1 and make the ID change. In this case change to ID 5 by typing wr 3 5
- Return to ID 200.
- The ID change is done. Shut down DARWIN-OP properly, power off. Perform replacement, restore all connections and turn DARWIN-OP on again. Remember to set DARWIN-OP in the kneeling position as all actuators are connected and the demo program will run automatically.
- Perform the killall procedure to end the demo program. Run DXL Monitor and reset all DYNAMIXEL.
For multiple DYNAMIXEL’s, you may only repeat steps 3 through 9. You can disconnect the actuator after step 9, connect the new DYNAMIXEL and run from step 3 again.
Once done replacing DYNAMIXEL(s) and settings set appropriately run Firmware Installer. Select option 2 and you are done. This is an important final step because it sets the angle limits on the joints.
DARWIN-OP is back to normal again.
Example 1 requires less hardware work but more programming work, as well as keeping careful track of changes made during programming and repeating the entire process for multiple DYNAMIXEL’s.
Example 2 requires more hardware work (unscrewing/screwing disconnecting/connecting), but less on software work.
Pick the method that most convenient for you.
NOTE : The reset all procedure at the end is necessary because DXL Monitor will set the angle limits on all DYNAMIXEL. Setting angle limits is a robot safety mechanism to prevent joints from overextending, therefore preventing damage to the robot.
Pressing the reset button on DARWIN-OP will reset settings of the sub-controller CM-730 to default values. For example:
- If the CM-730 has the baud rate changed from 1 Mpbs to 576000 bps, pressing the reset button will change the baud rate back to 1Mpbs (default).
- If the eye LED has been changed from blue to orange, pressing the reset button will change the color back to blue (default).
Controller Connection
Sometimes you may find DARWIN-OP irresponsive despite the main controller (fitPC) and sub-controller (CM-730) operating normally. In such case it may be a rare connection loss between the main controller and sun-controller.
The main controller and sun-controller are connected by a physically modified USB connection. Although USB is quite reliable, just like any other USB device you may lose connection.
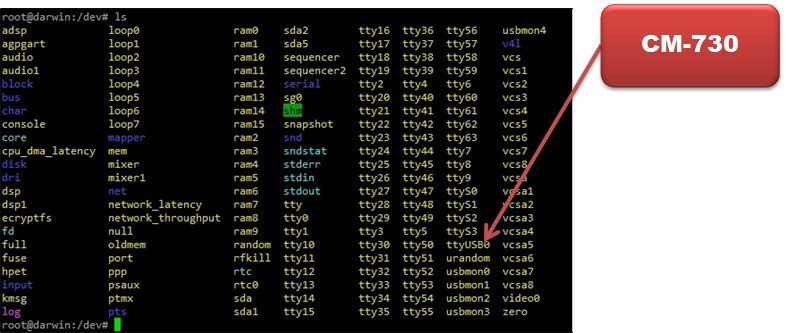
You can verify the connection by the following:
- Hardware component
- Verify proper physical connection between main controller and sub-controller
- Software component
- Running any program from the source code should output a message about CM-730 not detected.
- go the the ‘/dev’ directory, type ls and look for ttyUSB0. If its not there then there’s a connection loss. In such case simply restart DARWIN-OP.
If problem persists contact ROBOTIS for an RMA Procedure.
Camera Connection
There may be an instance when DARWIN-OP’s main controller may lose connection with the camera. Please ensure that the USB camera cable is properly connected to the the camera and main controller.
To verify camera connection with Linux OS perform the following.
- On a terminal window go to the ‘/dev’ directory.
- Type ls and you’ll see a list of devices and look for ‘video0’ This is the camera as an USB device.
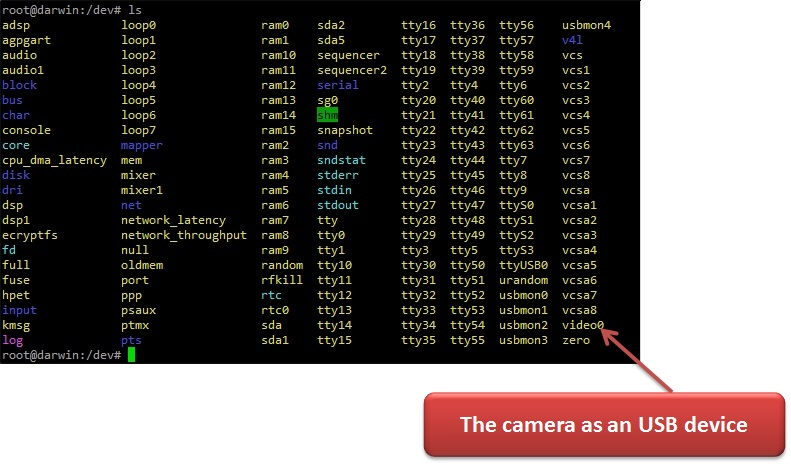
If you do not see a ‘video0’ device then you may need to replace the camera cable and/or camera. in such case you may replace the USB cable, the camera, or contact ROBOTIS for an arrangement.
NOTE : If you lose physical(mechanical) connection between the main controller and sub-controller, then you automatically lose camera connection. This is because the USB cable for the CM-730 and camera share the same molex connection.
Self Maintenance Checklist
You may run your own maintenance check should DARWIN-OP have some anomalies.
Power does not turn on
Check and proceed
- Does DARWIN-OP eyes turn blue when turning power on?
- yes
Check for fan noise
- no, but Cm-730 powers on
Check the LED cable from CM-730 to eye. If the cable is defective then post your problem here.
- yes
- Can you hear fan noise from the back of DARWIN-OP?
- yes
Check for LED’s
- no, but CM-730 powers on
Check the cable from CM-730 to Interface board (back). if the cable is defective contact us for an arrangement.
- no, and CM-730 is not getting power
If that’s the problem then post the problem here.
- yes
NOTE : If the CM-730 does not get any power then the FitPC will not get any power.
- Does the head LED turn on?
- yes
Check for “Ubuntu does not start” symptom.
- no, but CM-730 and FitPC turn on fine
If the cable is defective then post your problem here.
- no, but CM-730 turns on fine
Check the physical connection between CM-730 and FitPC; followed by connecting a HDMI?DVI display, mouse, and keyboard and operate DARWIN-OP’s PC. Check for “Ubuntu does not start” symptom.
- yes
Ubuntu does not start
- Connect a HDMI/DVI display, mouse, and keyboard and operate PC.
- Operate PC from DARWIN-OP
- Does the FitPC’s main screen with the Intel Atom logo appear?
- yes, the PC is still good.
You may use Linux’s advanced settings to restore the OS or, use the provided USB thumbdrive and restore OS.
- no
post your problem here.
- yes, the PC is still good.
Demo program does not work when turning DARWIN-OP on
- Properly shut down DARWIN-OP and restart again. If this happens again more then twice then check the following
- There are a few ways to Shut down DARWIN-OP.
- Do you have the most updated firmware version of the CM-730 and MX-28 installed?
Run Dynamixel Monitor….. are all Dynamixel OK?- no
Install the latest firmware
- yes
There’s a chance that the baud rate of any of the MX-28’s is/are not properly set to 1 Mbps.
Use Dynamixel Monitor to check if address 4 (baud rate) is set at value 1. If any MX-28 is not set at 1 Mbps then set it to 1 Mbps. - yes, the MX-28 had the latest version of firmware, baud rate was 1 Mbps and ID was properly set. But, after some time Dynamixel Monitor shows as fail.
In this case post your issue here.
- no
- Check Connections
Make sure that the main controller and the sub-controller are physically connected
Make sure to check
- the camera
- camera cable
- cable connection to camera
- cable connection to main crontroller
- make sure they are physically connected
- run this procedure.
Specific joint(s) doesn’t/don’t work
- Are cables around the joint worn out?
- yes
Replace cable(s). Keep in mind due to the nature of the daisy chain (serial) network of DYNAMIXEL some MX-28 may appear as malfunctioning (not working at all).
The MX-28 connected directly to the CM-730 are “most significant” If any “most significant” MX-28 or connecting TTL cable to said MX-28 go defective then all connected “lesser significant” MX-28(s) will appear malfunctioning as well.
The following is the connection order from “most significant” to “least significant”
ID1 -> ID3 -> ID5
ID2 -> ID4 -> ID6
ID19 -> ID20
ID7 -> ID9 -> ID11 -> ID13 -> ID15 -> ID17
ID8 -> ID10 -> ID12 -> ID14 -> ID16 -> ID18
For example. if ID 13 does bad then ID15 and ID17 will appear to go bad. However, ID11, ID9, and ID7 remain unaffected. - no
Use DXL Monitor to check status of the MX-28(s). As a precautionary measure it is strongly advised th check the “lesser significant” MX-28 first and work your way up to the defective MX-28. If you ran all checks and the MX-28 still malfunctions then post your problem here.
- yes
Unusual motions/DARWIN-OP “behaves” strangely.
- Check the robot limbs. Are there any defective frames?
- Look for any bad frames around the defective area. There’s a chance that bolt(s) and nut(s) may have come loose. Tighten them and check the status of the MX-28 and check for proper position sensor (horn) alignment. For any defective frames post your problem here.
Slow or choppy motions
- Battery conditions (if DARWIN-OP is running only under battery)
- DARWIN-OP has been programmed to beep if battery power is low. However, in noisy environments you may not be able to hear such beeps. Keep an eye for any slow, strange, or choppy motions.
- Linux OS conditions
The OS from the fitPC has been optimized so that DARWIN-OP can perform smoothly.
There’s a chance that there are too many programs running in the background.
Likely causes:- turning on automatic updates while DARWIN-OP is operating
- actively running remote desktop during operations
- setting a very-high display resolution (i.e. 1080p)
- any program/process that takes too many fitPC resources
- any combination from a to d. Please bear in mind that this is a limitation of Intel Atom’s system design and not from Linux OS, nor the fitPC, nor ROBOTIS.
- Interfacing conditions
- We strongly recommend interfacing with DARWIN-OP via SSH terminal rather than remote desktop. However, if remote desktop is a must then close any background programs from Ubuntu and use conventional screen resolutions (i.e. 1024x768).
DARWIN-OP cannot “see/find” the ball
1 Check Color and White Balance Settings
- Color and white balance settings are always an issue with image processing; this includes DARWIN-OP. You must always check lighting conditions in your working environment. With this issue in mind we have provided a color and white balance calibration testing program.
Head and eye LED do not turn on nor the LED’s from the back of DARWIN-OP
- Please refer to the Layout of the LED’s. Please see “Power does not turn on” symptom.
Can’t get any sound from DARWIN-OP
- Check in the following order; if any of these solutions solves the audio issue you may not need to run the remaining tests.
- There may be an instance when audio may have been disabled.If that’s the case you can re-enable audio by a simple Ubuntu restart or you may need to enable audio again via control center. If this does not solve the issue move on to the next resolution.
- if audio capabilities have “disappeared” from Ubuntu then you may need to re-enable it by installing Ubuntu’s audio drivers. If this does not solve the issue move on to the next resolution.
- If Ubuntu’s audio capabilities are fine then you need to check the volume level on Ubuntu. make sure that the volume level is at least 75%. If audio capabilities on Ubuntu and volume levels are fine then move on to the next resolution.
- Check the audio speaker (located in chest) and CM-730, check the audio cable between FitPC and CM-730. In this case you may need to replace the speaker. If a replacement is necessary please post your issue here.
Recovery
Recovery(Ubuntu 9.10)
Install Ubuntu 9.10
Reference : http://www.fit-pc2.com/wiki/index.php?title=Installing_Ubuntu_9.10
- Prepare Installation Media
- You can use USB CD-ROM Drive or USB Flash drive (disk-on-key) as installation media
- Download Ubuntu 9.10 Desktop installation
- If you are using USB CD-ROM - burn downloaded image directly on CD.
- If you are using USB Flash drive, 1GB would be enough. Download usb-creator to create bootable installation flash drive.
- Installation of generic Ubuntu 9.10 Desktop
- Standard Ubuntu installation - choose timezone, partitions, username, password etc.
- Unplug USB CD-ROM / USB Flash drive and reboot
- Login using previously selected username and password
- Reference : https://help.ubuntu.com/9.10/installation-guide/i386/index.html
NOTE : Please note that the command used in Linux operating system is case sensitive.
- Required system changes
- Remember to enter sudo su at the command line to gain writing privelges otherwise file editing will not happen.
- Add the following lines to
/etc/apt/sources.list - In this case enter gedit /etc/apt/sources.list (if using gedit) to edit the file.
 ## Repository for fit-PC2 users provided by Compulab
 deb http://fit-pc2.com/download/ubuntu/dists/karmic binary/
 deb-src http://fit-pc2.com/download/ubuntu/dists/karmic source/
- Connect DARWIN-OP to the internet via ethernet.
-
Refresh update manager
$ sudo apt-get update -
Install kernel image, kernel headers, graphic drivers and media player for HD playback:
$ wget http://www.robotis.com/download/linux/darwin/linux-headers-2.6.31-34-fitpc2i-r1.deb $ wget http://www.robotis.com/download/linux/darwin/linux-image-2.6.31-34-fitpc2i-r1.deb $ sudo dpkg -i *.deb $ sudo apt-get install xserver-xorg-video-poulsbo mplayer-vaapi mplayer-skins - Do NOT restart the robot yet. Select Restart Later.
-
(Optional) If you want to get the kernel source:
$ wget http://www.robotis.com/download/linux/darwin/linux-source-2.6.31-34-fitpc2i-r1.deb - (Optional) You may install w32codecs, libdvdcss2 and other usefull packages from Medibuntu repository.
-
Comment out snd-hda-intel options in
/etc/modprobe.d/alsa-base.conf# Power down HDA controllers after 10 idle seconds # options snd-hda-intel power_save=10 power_save_controller=N -
Remove generic image and sources that are not fully compatible with fit-PC2i.
$ sudo apt-get purge linux-generic linux-image-generic linux-headers-generic linux-image-$(uname -r) linux-headers-$(uname -r) && sudo apt-get autoremove - Restart fit-PC2i
- Ubuntu 9.10 is now installed.
Additional Software Installation
After installing ubuntu 9.10 you must install the following softwares
- For Development
-
Install g++ compiler
$ sudo apt-get install g++ -
Install Functions manuals
$ sudo apt-get install manpages-dev -
Install Libraries
$ sudo apt-get install libjpeg62-dev libncurses5-dev
-
- For Connections
-
Install SSH server
$ sudo apt-get install openssh-server - Install Samba server
On Ununtu’s desktop go to Applications > Ubuntu Software Center and search for “samba”
Download Samba and install it. Configure samba server. - Configure VNC server, Install FreeNX(https://help.ubuntu.com/community/FreeNX), etc..
-
Miscellaneous Utilities
-
Subversion : Source code version control system client program
$ sudo apt-get install subversion -
madplay : Decode and play MPEG audio FILE(s). (This program must be installed for demo program)
$ sudo apt-get install madplay -
guvcview : a simple GTK+ interface for capturing and viewing video from devices supported by the Linux UVC driver.
$ sudo apt-get install guvcview
CM-730 Firmware Installation
Refer to Firmware Installer section.
MX-28 settings
Refer to DYNAMIXEL Monitor section. Use reset all command.
Recovery(Linux Mint 9)
Install Linux Mint 9
Reference : http://www.fit-pc.com/wiki/index.php/Installing_Linux_Mint_9
- Prepare Installation Media
- You can use USB CD-ROM Drive or USB Flash drive (disk-on-key) as installation media
- Download Linux Mint 9 “Isadora” - Gnome CD (32-bit)
- If you are using USB CD-ROM - burn downloaded image directly on CD.
- If you are using USB Flash drive, 1GB would be enough, use “Startup Disk Creator” utility to create LiveUSB.
- Installation of generic Linux Mint 9
- Standard Linux Mint installation: choose timezone, partitions, username, password etc.
- Unplug USB CD-ROM / USB Flash drive and reboot
- Login using previously selected username and password
NOTE : Please note that the command used in Linux operating system is case sensitive.
- Required system changes
- Remember to enter sudo su at the command line to gain writing privelges otherwise file editing will not happen.
- Add the following lines to
/etc/apt/sources.list - In this case enter gedit /etc/apt/sources.list (if using gedit).
 ## Repository for fit-PC2 users provided by Compulab
 deb http://fit-pc2.com/download/ubuntu/dists/lucid binary/
 deb-src http://fit-pc2.com/download/ubuntu/dists/lucid source/
- Connect DARWIN-OP to the internet via ethernet.
-
Refresh update manager
$ sudo apt-get update -
Install kernel image, kernel headers, graphic drivers and media player for HD playback:
$ wget http://www.robotis.com/download/linux/darwin/linux-headers-2.6.35.4-robotis_r1_i386.deb $ wget http://www.robotis.com/download/linux/darwin/linux-image-2.6.35.4-robotis_r1_i386.deb $ wget http://www.robotis.com/download/linux/darwin/xserver-xorg-video-poulsbo_1.5-1742_i386.deb $ sudo dpkg -i *.deb $ sudo update-initramfs -c -k 2.6.35.4-robotis $ sudo update-grub2 $ sudo apt-get install mplayer-vaapi mplayer-skins - Don’t restart here. Select “Restart Later”.
-
(Optional) If you want to get the kernel source:
$ wget http://www.robotis.com/download/linux/darwin/linux-source-2.6.35.4-robotis_r1_all.deb -
Remove generic image and sources that are not fully compatible with fit-PC2i.
$ sudo apt-get purge linux-generic linux-image-generic linux-headers-generic linux-image-$(uname -r) linux-headers-$(uname -r) && sudo apt-get autoremove - Restart fit-PC2i
- Linux Mint 9 is now installed.
Additional Software Installation
After installing Linux Mint 9 you must install the following software
- For Development
-
Install g++ compiler
$ sudo apt-get install g++ -
Install Functions manuals
$ sudo apt-get install manpages-dev -
Install Libraries
$ sudo apt-get install libjpeg62-dev libncurses5-dev
-
- For Connections
-
Install SSH server
$ sudo apt-get install openssh-server - Install Samba server
On Ununtu’s desktop go to Applications > Ubuntu Software Center and search for “samba” Download Samba and install it. Configure samba server.
- Configure VNC server, Install FreeNX(https://help.ubuntu.com/community/FreeNX), etc..
-
Miscellaneous Utilities
-
Subversion : Source code version control system client program
$ sudo apt-get install subversion -
madplay : Decode and play MPEG audio FILE(s). (This program must be installed for demo program)
$ sudo apt-get install madplay -
guvcview : a simple GTK+ interface for capturing and viewing video from devices supported by the Linux UVC driver.
$ sudo apt-get install guvcview
CM-730 Firmware Installation
Refer to Firmware Installer section.
MX-28 settings
Refer to DYNAMIXEL Monitor section. Use reset all command.
Clonezilla Recovery
You can recover the operating system in DARWIN-OP via Clonezilla. The recovery software is the same as the factory-default installed with DARWIN-OP.
NOTE : Download the recovery image from here
- Choose recovery image
- Check DARWIN-OP SSD capacity before downloading the corresponding image
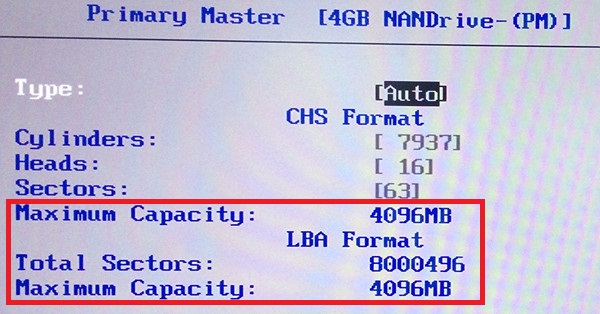
- How to check DARWIN-OP’s SSD capacity
- Turn on DARWIN-OP and press the ‘F2’ key to enter the BIOS menu.
-
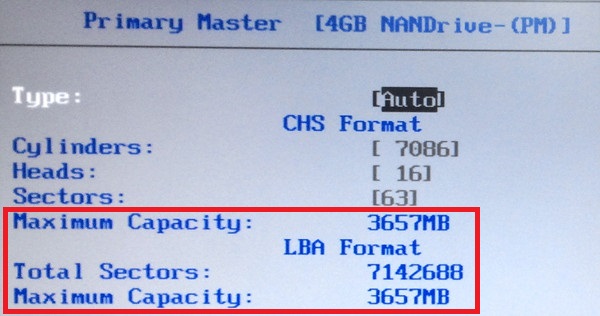
From the menu enter Primary Master(4GB NANDrive(PM))
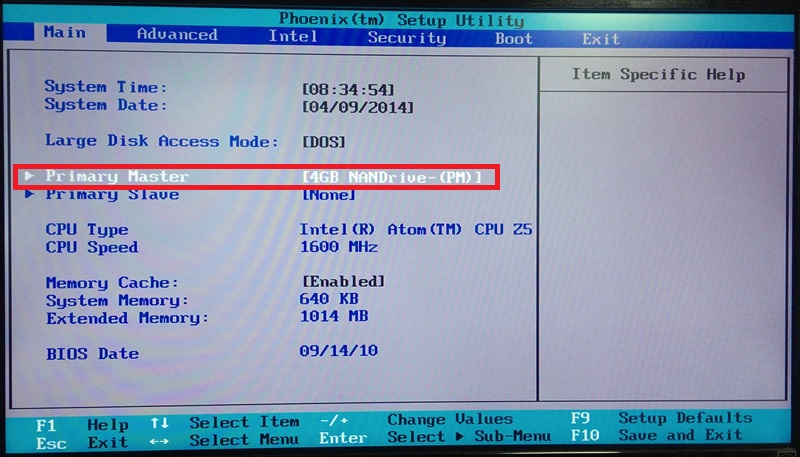
- Check the capacity as shown below. Then download a matching image.
| SSD Capacity 3.6GB | SSD Capacity 4GB |
|---|---|
 |
 |
NEW: Create Recovery USB
-
Create a Clonezilla Live USB via Tuxboot.
Download Tuxboot : https://sourceforge.net/projects/tuxboot/files/0.6/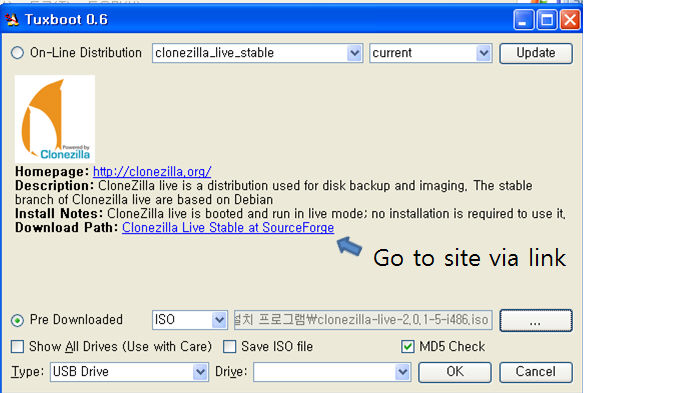
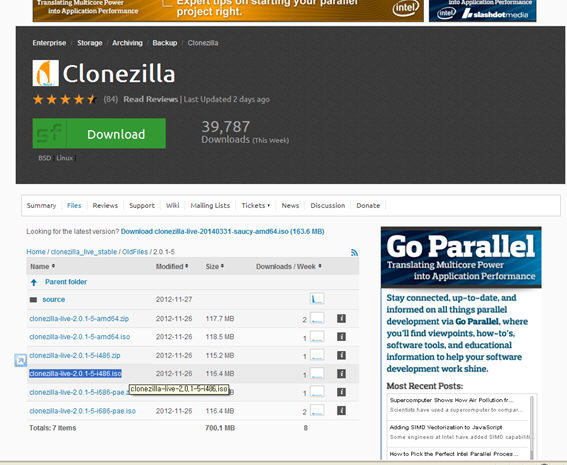
Oldfiles folder -> 2.0.1-5 folder select and download
clonezilla-live-2.0.1-5-i486.iso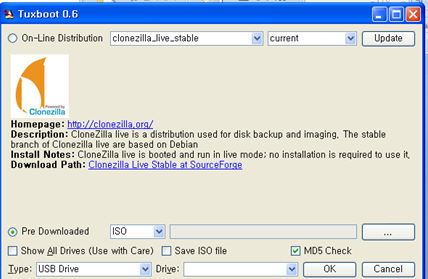
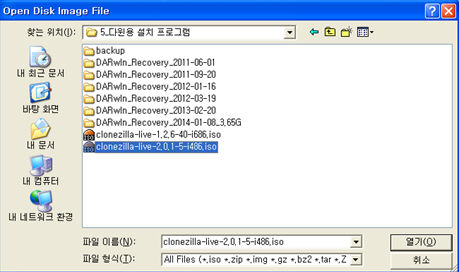
Select pre-downloaded and look for the file
clonezilla-live-2.0.1-5-i486.iso, then click OK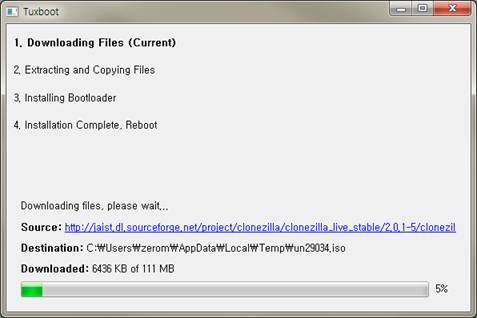
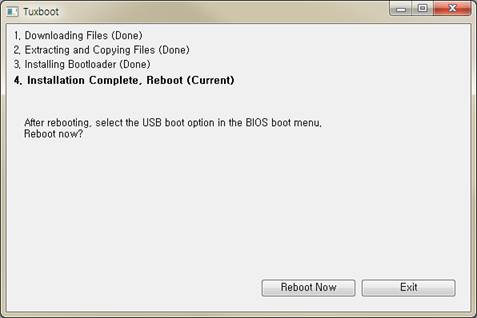
Once complete click on Exit
-
Place the image under
/home/partimagof your USB drive. That is copy into the directory DARwIn_Recovery_2012-03-19
OLD: USB Flash Memory Preparation
Go to http://clonezilla.org/liveusb.php for instructions on Clonezilla live USB flash. The provided image file is located in the directory
/DARwIn_Recovery_date of recovery creation (yyy-mm-dd) from the USB thumbdrive
Boot Sequence
Connect the USB thumbdrive into a USB port power on DARWIN-OP and press the F2 key to access Phoenix(tm) Setup Utility (DARWIN-OP’s PC system BIOS).
Select the “Boot” tab and in “Boot order” select USB CDROM as top priority.
After boot selection go to the “Exit” tab and select Exit Saving Changes, pick yes.
Operating System Recovery with Clonezilla
- The first option from Clonezilla: Select default menu
Clonezilla live (Default settings, VGA 800x600) - Choose language: English (default)
en_US.UTF-8 English - Configuring console-data: keymap. Select the default option from the menu
Don’t touch keymap - Start Clonezilla: Select the default option from the menu
Start_Clonezilla Start Clonezilla - Clonezilla: Select the following
device-image work with disks or partitions using images - Mount Clonezilla image directory: this is the partition where Clonezilla will perform recovery
local_dev Use local device (Ex: hard drive, USB drive)
Press the “ENTER” key after selection. - Clonezilla - Opensource Clone System (OCS) | Mode: Select the following
sdb1 3925MB_vfat(In_USB_DISK_)_usb-SMI_USB_DISK_AA00000000001154-0:1
Ensure you see the term “sdb1” and “vfat” along with the size if your USB thumbdrive. - Clonezilla - Opensource Clone System (OCS) : “/” Select default menu
/ Top_directory_in_the_local_device
Press “Enter” to continue…… - Clonezilla - Opensource Clone System (OCS) : Select default menu
Beginner Beginner mode: Accept the default options - Clonezilla: Select mode: Select the following
restoredisk Restore_an_image_to_local_disk - Clonezilla - Opensource Clone System (OCS) | Mode: restoredisk
- Clonezilla - Opensource Clone System (OCS) | Mode: restoredisk : Select the destination partition
sda 4096MB_4GB_NANDrive__ata-4GB_NANDrive_0000000000R1Y19998XU
< Press “Enter” to continue…… > Press the “ENTER” key
< Are you sure you want to continue? ? > press the Y key
< Let me ask you again, Are you sure you want to continue? ? > confirm by pressing the Y key. - Partclone: after completeing restoration
< Press “Enter” to continue…… > press the “ENTER” key. - You can either power off or reboot> Make sure you remove the USB thumbdrive. after making your selection.
Video
NEW: USB Flash Memory Preparation
- Select either of the following
- From Mount Clonezilla image directory select
skip and pick Use existing /home/partimag (writable device. E.g. hard disk/USB drive)
- From Clonezilla: Select mode
select restoredisk pick Restore_an_image_to_local_disk
- From Mount Clonezilla image directory select
- Then press Enter
USB Flash Memory Preparation
Go to http://clonezilla.org/liveusb.php for instructions on Clonezilla live USB flash.
The provided recovery image file is located in the directory:
/home/partimag/DARwIn_Recovery_[date of recovery creation(yyyy-mm-dd)]
From the USB thumbdrive.
Boot Sequence
Connect the USB thumbdrive into a USB port.
Power on DARWIN-OP and press the F2 key to access Phoenix(tm) Setup Utility (DARWIN-OP’s PC system BIOS). Select the “Boot” tab and in “Boot order”. Select USB HDD as top priority.
After boot selection go to the “Exit” tab and select “Exit Saving Changes”, pick Yes.
Operating System Recovery with Clonezilla
- The first option from Clonezilla: Select the default option from the menu
- Clonezilla live (Default settings, VGA 800x600)
- Choose language: English (default)
- en_US.UTF-8 English
- Configuring console-data: Select the default option from the menu
- Don’t touch keymap
- Start Clonezilla: Select the default option from the menu
- Start_Clonezilla Start Clonezilla
- Clonezilla: Select the default option from the menu
- device-image work with disks or partitions using images
- Mount Clonezilla image directory: Select the following
- skip Use existing /home/partimag (Writable device. E.g. hard disk/USB drive)
- < Press “Enter” to continue……> : Press “Enter” key
- Clonezilla – Opensource Clone System (OCS) : Select the default option from the menu
- Beginner Beginner mode: Accept the default options
- Clonezilla: Select mode: Select the following
- restoredisk Restore_an_image_to_local_disk
- Clonezilla – Opensource Clone System (OCS) | Mode: restoredisk : Choose the image file to restore
- Ex) DARwIn_Recovery_2012-03-19 2012-0316-1405_sda
- Clonezilla – Opensource Clone System (OCS) | Mode: restoredisk : Choose the target disk
- Sda 4096MB_4GB_NANDrive__ata-4GB_NANDrive_0000000000R1Q199982a
- < Press “Enter” to continue …… > : Press “Enter” key
- < Are you sure you want to continue? ? (y/n) > : Press ‘Y’ key and Press “Enter” key
- < Let me ask you again. Are you sure you want to continue? ? (y/n) > : Press ‘Y’ key and Press “Enter” key
- Starting to restore image to device. Wait until done.
- After completing restoration
- < Press “Enter” to continue…> : Press “Enter” key.
- Now you can choose to: Choose 0 or 1
- (0) Poweroff
- (1) Reboot
- Make sure you remove the USB thumbdrive, and reboot the DARWIN-OP.