Quick Start
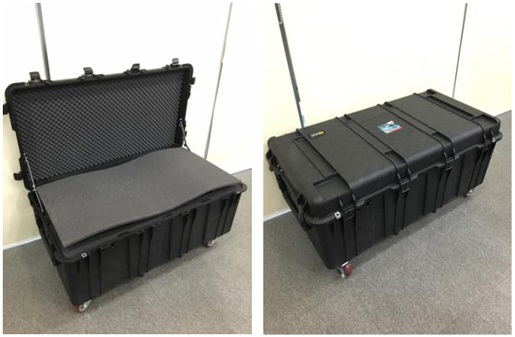
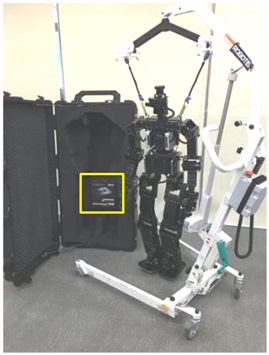
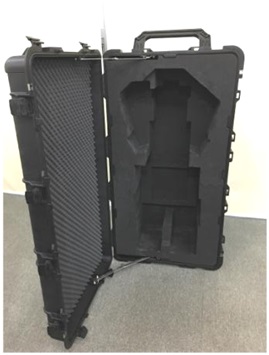
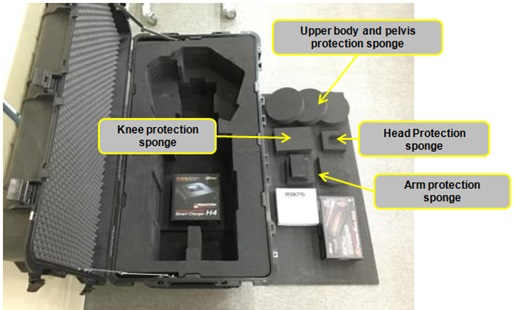
Unpacking
-
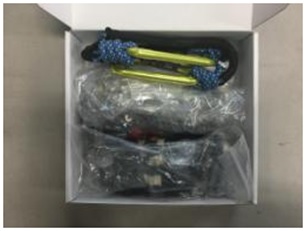
Open the case and remove the sponge. Red dot Direction of the robot’s head
-
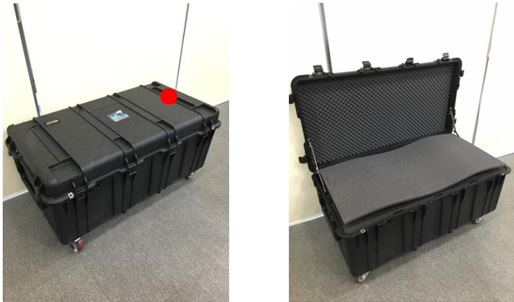
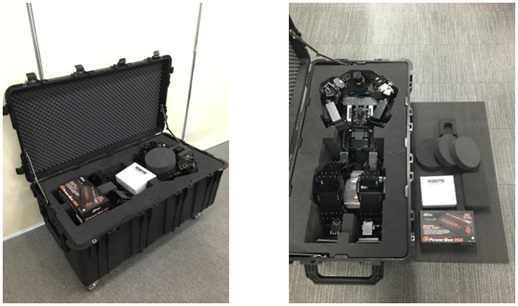
Take out shock absorption sponge, Charger supply, Consumables box.
-
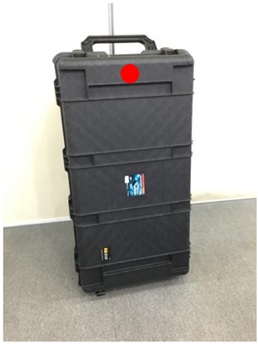
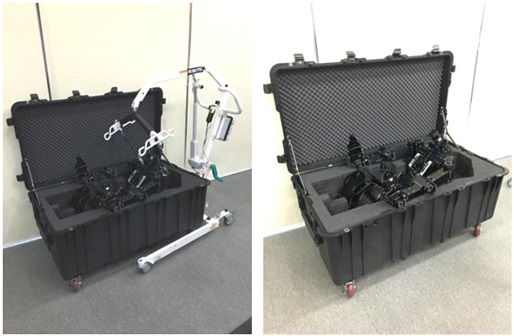
Close the case. The head should face up. Red dot Direction of the robot’s head
-
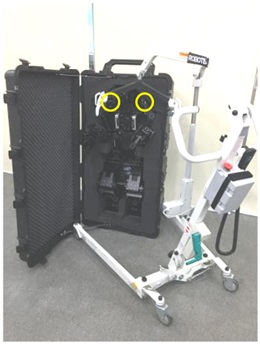
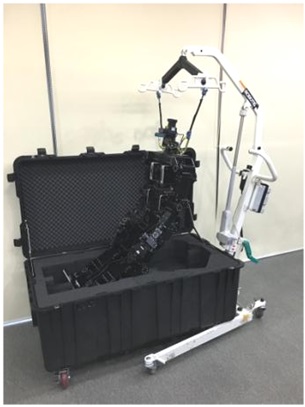
Open the box and hang the carabiners on the lift
-
Hang the i-bolt on the carabiners. Drag the upper body out of the case. Yellow dot Location of the i-bolt
-
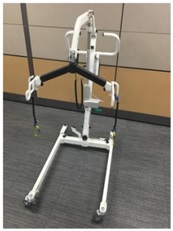
The robot will come out naturally via the lift. Please use your hands to take out the robot’s legs.
-
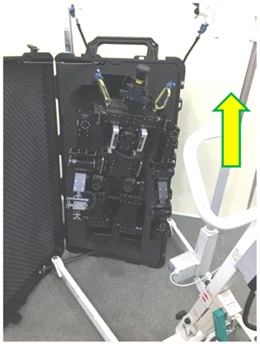
Raise the lift and take out the battery charger box. Yellow square is the Battery charger box
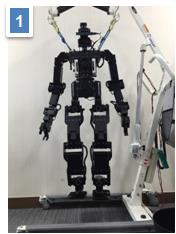
Power On
-
Hang THORMANG on the lift. Raise THORMANG’s feet off the ground.
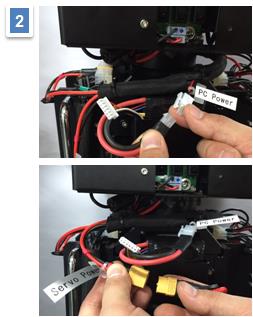
- (Using power supply) Plug into the power supply(18V, over 10A) to provide power to pc cable.
Plug into the power supply(24V, over 30A) to provide power to body cable(Using Battery Pack instead of the power supply)
You can select either the power supply or battery pack to supply power on THORMANG.
If you want to use the battery pack, please follow the steps below.- Ensure the battery packs are fully charged.
- Open the battery compartment door (unscrew the thumbscrew) and insert the battery packs. Close and secure the compartment (screw the thumbscrew).
- Connect battery connectors with two battery power connectors.
-
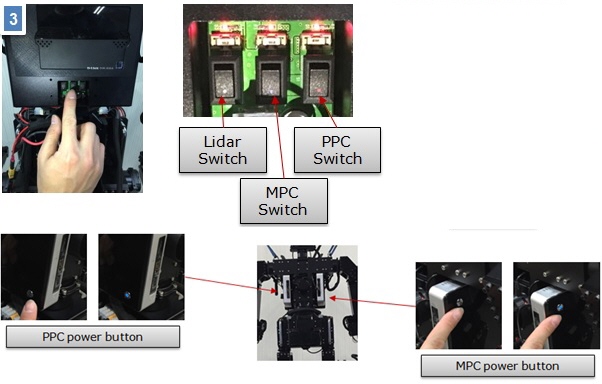
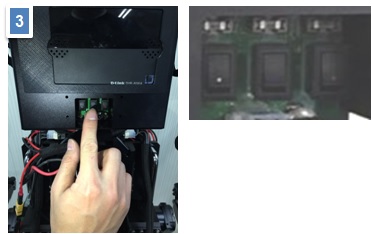
First, witch on three switches on the power board, and then turn on the MPC and PPC.
-
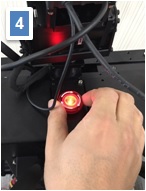
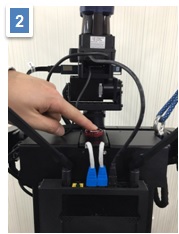
Release the E-stop button. If the E-stop button is pressed, the system is inactive.
Connect to THORMANG3
Open the network setting page of your computer and set the IP address of your computer to be in the same network with THROMANG3(Example: 10.17.3.xxx)
- Connection Information
- MPC (Motion PC) IP Address :
10.17.3.30 - PPC (Perception PC) IP Address :
10.17.3.35 - MPC & PPC user name :
robotis - MPC & PPC password :
111111
- MPC (Motion PC) IP Address :
Example with SSH Client (Windows)
- Execute SSH client program (ex: PuTTY)
- Input THOR-MANG 3 MPC’s IP address :
10.17.3.30 - Select SSH as a connection type and then open the connection.
- Input THOR-MANG 3 MPC’s user name :
robotis
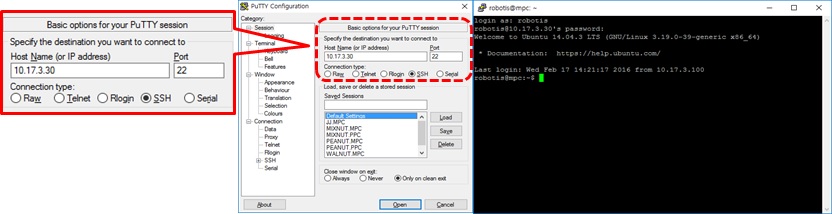
Input THOR-MANG 3 MPC’s password : 111111
ROBOTIS recommends users to connect with THROMANG3 via SSH client.
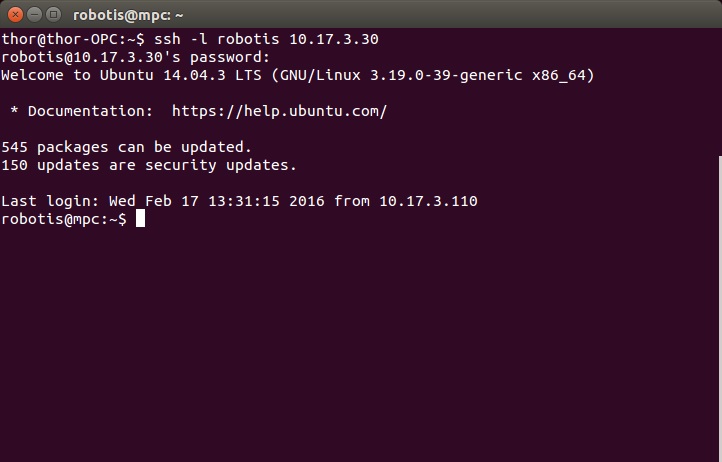
Example: SSH Client (Ubuntu)
- Open the terminal window.
- Type the following SSH command with the MPC’s user name and IP address :
$ ssh –l robotis 10.17.3.30 - Input the MPC’s password :
111111
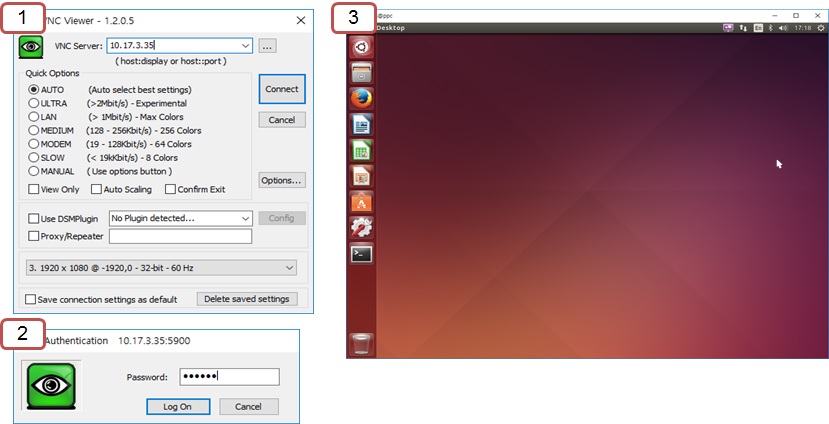
Example: VNC client (Windows)
- Execute VNC client program (e.g. Ultra VNC Viewer)
- Input the MPC’s IP address :
10.17.3.30 - Input the MPC’s password :
111111
Basic Operation
Basic Manipulation Demo
Run the roscore
-
Connect to the PPC with SSH client program (IP: 10.17.3.35)
$ ssh 10.17.3.35 -l robotis- user name :
robotis - password :
111111
- user name :
-
Run the
roscore$ roscore
Run the thormang3 manager
![]()
CAUTION : The command differs depending on the version of ROBOTIS THORMANG3.
NOTE: DYNAMIXEL PRO+ is renamed as DYNAMIXEL-P.
- Revised Date: Jan 2th, 2020.
-
Revised Model Name: See the following table.
Previous New H54P-200-S500-R PH54-200-S500-R H54P-100-S500-R PH54-100-S500-R H42P-020-S300-R PH42-020-S300-R M54P-060-S250-R PM54-060-S250-R M54P-040-S250-R PM54-040-S250-R M42P-010-S260-R PM42-010-S260-R
- Connect to the MPC with SSH client program (IP: 10.17.3.30)
$ ssh 10.17.3.30 -l robotis- user name :
robotis - password :
111111
- user name :
- Run the manager
Please check the IMU version and thethormang3 manager.launchfile before running the manager.- THORMANG3 PRO Ver.
$ roslaunch thormang3_manager thormang3_manager.launch - THORMANG3 PRO+ Ver.
$ roslaunch thormang3_p_manager thormang3_p_manager.launch
- THORMANG3 PRO Ver.
Play basic walking simple demo
-
Connect to the PPC with SSH client program (IP: 10.17.3.35)
$ ssh 10.17.3.35 -l robotis- user name :
robotis - password :
111111
- user name :
-
The following command will execute the manipulation demo.
$ rosrun thormang3_manipulation_demo thormang3_manipulation_demo -
5 commands are programmed and can be executed from the terminal window.
- demo 1 : go to initial pose (from base module)
$ rostopic pub -1 /robotis/manipulation_demo/command std_msgs/String "ini_pose"
-
demo 2 : set manipulation module
$ rostopic pub -1 /robotis/manipulation_demo/command std_msgs/String "set_mode" -
demo 3 : go to manipulation base pose - Joint Space Control
$ rostopic pub -1 /robotis/manipulation_demo/command std_msgs/String "base_pose" -
demo 4 : move right arm (without torso) - Task Space Control
$ rostopic pub -1 /robotis/manipulation_demo/command std_msgs/String "right_arm" -
demo 5 : move left arm (with torso) - Task Space Control
$ rostopic pub -1 /robotis/manipulation_demo/command std_msgs/String "left_arm"
Basic Walking Simple Demo
Run the roscore
-
Connect to the PPC with SSH client program (IP: 10.17.3.35)
$ ssh 10.17.3.35 -l robotis- user name :
robotis - password :
111111
- user name :
-
Run the
roscore$ roscore
Run the thormang3 manager
![]()
CAUTION : The command differs depending on the version of ROBOTIS THORMANG3.
NOTE: DYNAMIXEL PRO+ is renamed as DYNAMIXEL-P.
- Revised Date: Jan 2th, 2020.
-
Revised Model Name: See the following table.
Previous New H54P-200-S500-R PH54-200-S500-R H54P-100-S500-R PH54-100-S500-R H42P-020-S300-R PH42-020-S300-R M54P-060-S250-R PM54-060-S250-R M54P-040-S250-R PM54-040-S250-R M42P-010-S260-R PM42-010-S260-R
- Connect to the MPC with SSH client program (IP: 10.17.3.30)
$ ssh 10.17.3.30 -l robotis- user name :
robotis - password :
111111
- user name :
- Run the manager
Please check the IMU version and thethormang3 manager.launchfile before running the manager.- THORMANG3 PRO Ver.
$ roslaunch thormang3_manager thormang3_manager.launch - THORMANG3 PRO+ Ver.
$ roslaunch thormang3_p_manager thormang3_p_manager.launch
- THORMANG3 PRO Ver.
Play basic manipulation demo
-
Connect to the PPC with SSH client program (IP: 10.17.3.35)
$ ssh 10.17.3.35 -l robotis- user name :
robotis - password :
111111
- user name :
-
The following command will execute the walking demo.
$ rosrun thormang3_walking_demo thormang3_walking_demo -
5 commands are programmed and can be executed from the terminal window.
- demo 1 : go to initial pose (from base module)
$ rostopic pub -1 /robotis/walking_demo/command std_msgs/String "ini_pose"
-
demo 2 : set manipulation module
$ rostopic pub -1 /robotis/walking_demo/command std_msgs/String "set_mode" -
demo 3 : enable/disable balance algorithm – Balance ON / OFF
$ rostopic pub -1 /robotis/walking_demo/command std_msgs/String “balance_on” $ rostopic pub -1 /robotis/walking_demo/command std_msgs/String “balance_off” -
demo 4 : walk forward – One step forward walking (balance should be turned on)
$rostopic pub -1 /robotis/walking_demo/command std_msgs/String “forward” -
demo 5 : walk backward – One step backward walking (balance should be turned on)
$ rostopic pub -1 /robotis/walking_demo/command std_msgs/String “backward”
Power Off
-
Hang THORMANG on the lift

-
Press the E-Stop button(Turn off the DXL power)
-
After both PCs are turned off, switch off three switches on the power board.
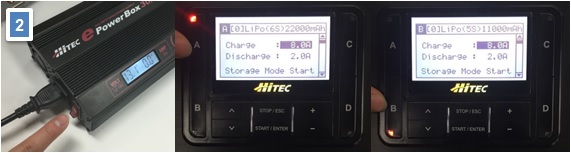
Battery Charge
- Connect all battery sockets in to the battery charger sockets.
- Channel 1 connect the yellow jack
- Channel 2 has a white terminal
- Connect the DC power supply to the battery charger.
- Insert the AC plug of the DC power supply into the power socket.
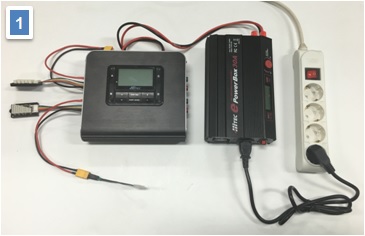
-
Power on and check the settings. See the below images. The different settings to match the settings by pressing the button.
-
Connect the white male charging connector to the female connector of the battery. Connect the battery’s white balance connector to the cell balance connector(6 pin connector).
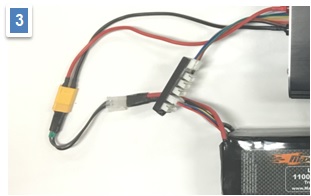
-
Connect the yellow male charging connector to the female connector of the battery.
Connect the battery’s white balance connector to the cell balance connector(7 pin connector).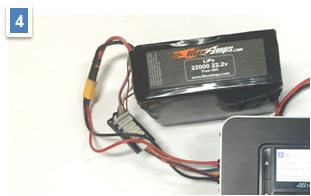
-
Select channel A. Then, press and hold the START button when the cursor is on the “Charge” option. When the screen changes, press ENTER to start charging battery if configuration is fine.
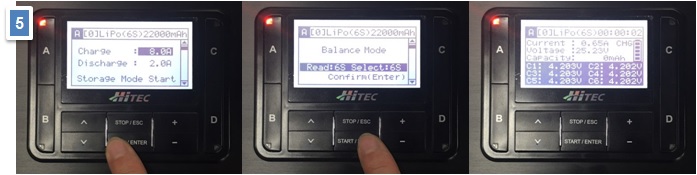
-
Select channel A. Then, press and hold the START button when the cursor is on the “Charge” option. When the screen changes, press ENTER to start charging battery if configuration is fine.

- Melody is played (when the battery is fully charged), press the ESC button and unplug all connectors.
NOTE : Each 4 channels can be charged independently.
Repacking
-
Put the battery charger box into the case.
-
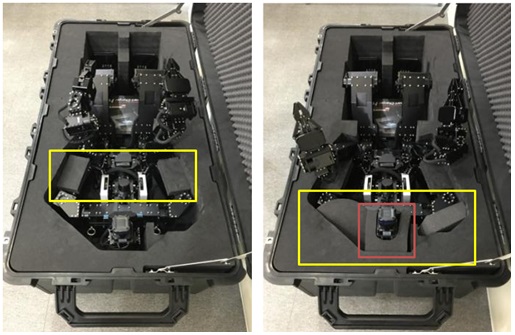
Pack the robot by placing its feet first. Please be careful with the handling to prevent damage to the robot’s arm.
-
Bend the robot’s head forward. If the lift doesn’t go down, separate the lift and carabiners
-
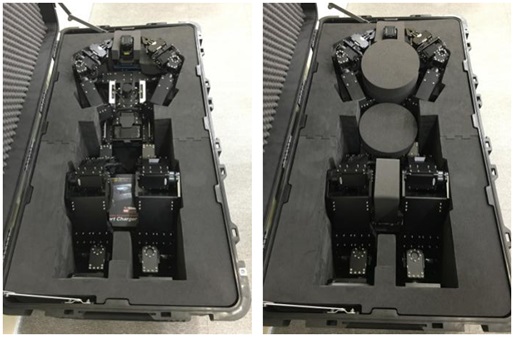
Refer to the pictures: Put the sponge for arm and head protection.
-
Refer to the pictures for robot arm arrangement. Put the sponge for upper body and knee protection.
-
Cover the case with the sponge and close the lid.