
THORMANG3 Operation
Preparation
Time Synchronization (MPC)
Reference : ROS network Setup, 5. Timing issues
- Connect to the MPC(Motion PC)
- via ssh
- Run below command on the terminal.
$ ssh robotis@10.17.3.35 - Input password :
111111
- Run below command on the terminal.
- via VNC
- via ssh
- Synchronize time with the PPC(Perception PC)
- If this is the first synchronization, create the script file.
- Create the script file with an editor.
$ gedit ~/timesync - Copy below contents in the script file.
#! /bin/sh sudo date --set='-2 secs' sudo ntpdate 10.17.3.35 sudo hwclock -w - Modify the script file permission(Add execute permission)
$ sudo chmod +x timesync - Execute the script file to synchronize time.
$ ~/timesync
- Create the script file with an editor.
- If this is not the first synchronization, execute the script file.
$ ~/timesync
- If this is the first synchronization, create the script file.
roscore (PPC)
CAUTION : If roscore is terminated while it is running, relaunch roscore, thormang3 sensors and thormang3 manager.
- Connect to the PPC
- via ssh
- Run below command on the terminal.
$ ssh robotis@10.17.3.35 - Input password.
111111
- Run below command on the terminal.
- via VNC
- via ssh
- Launch roscore
Execute below command on the Terminal$ roscore
thormang3 sensors (PPC)
- Connect to the PPC
- Execute thormang3_sensors.launch file
$ roslaunch thormang3_sensors thormang3_sensors.launch
Reference : thormang3_sensors
THORMANG3 Manager (MPC)
Turn on the actuator power before executing THORMANG3 Manager.
- Connect to the MPC
- Get superuser permission
$ sudo bash - Execute thormang3_manager.launch file
# roslaunch thormang3_manager thormang3_manager.launchReference : thormang3_manager
- If program is loaded, torque of the actuator will be turned on.
- How to check thormang3 working
Reference 1 : How to execute Simple Demonstration
Reference 2 : How to execute OPC’s GUI program
Simple Demo
Manipulation Simple Demo
Simple demo of the thormang3_manipulation_module
Install & Build
Reference : PPC Installation
Usage
-
Connect to the PPC with SSH client program (IP: 10.17.3.35).
$ ssh 10.17.3.35 -l robotis -
You can execute simple demo with the following command.
$ rosrun thormang3_manipulation_demo thormang3_manipulation_demo -
There are 5 commands for simple demonstration.
- demo 1 : go to initial posture (from base module)
$ rostopic pub -1 /robotis/manipulation_demo/command std_msgs/String "ini_pose" - demo 2 : set manipulation module
$ rostopic pub -1 /robotis/manipulation_demo/command std_msgs/String "set_mode" - demo 3 : go to manipulation initial posture - Joint Space Control
$ rostopic pub -1 /robotis/manipulation_demo/command std_msgs/String "base_pose" - demo 4 : move right arm (without torso) - Task Space Control
$ rostopic pub -1 /robotis/manipulation_demo/command std_msgs/String "right_arm" - demo 5 : move left arm (with torso) - Task Space Control
$ rostopic pub -1 /robotis/manipulation_demo/command std_msgs/String "left_arm"
- demo 1 : go to initial posture (from base module)
Walking Simple Demo
Simple demo of the thormang3_walking_module
Install & Build
Reference : PPC Installation
Usage
- Connect to the PPC with SSH client program (IP: 10.17.3.35).
$ ssh 10.17.3.35 -l robotis - You can execute simple demo with the following command.
$ rosrun thormang3_walking_demo thormang3_walking_demo_node -
There are 5 commands for simple demonstration.
- demo 1 : go to initial posture (from base module)
$ rostopic pub -1 /robotis/walking_demo/command std_msgs/String "ini_pose" - demo 2 : set manipulation module
$ rostopic pub -1 /robotis/walking_demo/command std_msgs/String "set_mode" - demo 3 : make balance algorithm enable/disable – Balance ON / OFF
$ rostopic pub -1 /robotis/walking_demo/command std_msgs/String "balance_on" $ rostopic pub -1 /robotis/walking_demo/command std_msgs/String "balance_off" - demo 4 : walk forward – One step forward walking (balance should be turned on)
$ rostopic pub -1 /robotis/walking_demo/command std_msgs/String "forward" - demo 5 : walk backward – One step backward walking (balance should be turned on)
$ rostopic pub -1 /robotis/walking_demo/command std_msgs/String "backward"
- demo 1 : go to initial posture (from base module)
GUI Program
How to monitor and control THORMANG3 from the remote.
What is OPC
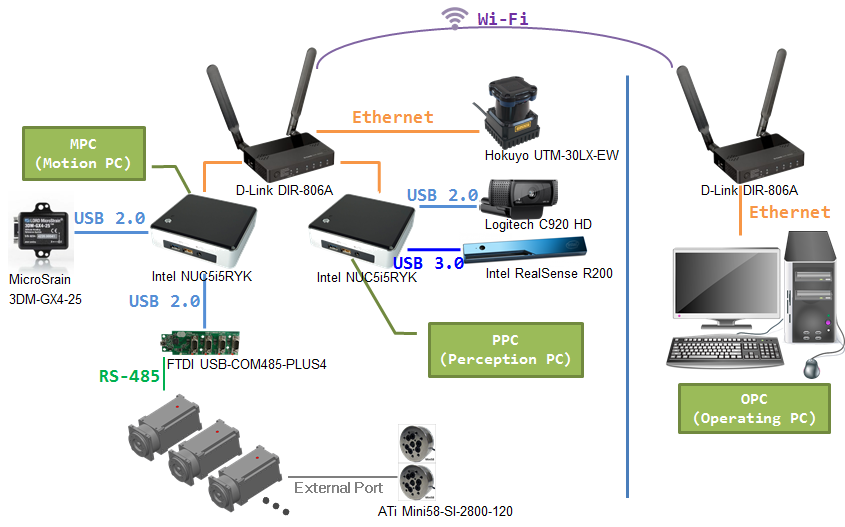
Operating PC is used to control the robot from the outside.
Recommended PC Info
- OS
- Ubuntu 16.04 LTS
- ROS(Robot Operating System)
- version : kinetic
- installation(Desktop-Full) : http://wiki.ros.org/kinetic/Installation/Ubuntu
- environment setting : http://wiki.ros.org/ROS/Tutorials/InstallingandConfiguringROSEnvironment
- ROBOTIS ROS Package
OPC Network setting
Reference : Example Setting for OPC
- IP Address : Static IP address is recommended
ex ) IP address: 10.17.3.100 Netmask : 255.255.255.0 Gateway : 10.17.3.1
- ROS network environment setting
ReferenceROS Network Setup
- Open the bash file to configure environment
$ gedit ~/.bashrc - Append below contents at the end of the
.bashrcfile# Set ROS Kinetic source /opt/ros/kinetic/setup.bash source ~/catkin_ws/devel/setup.bash ##### Set ROS Network #### # PPC CORE(10.17.3.35) export ROS_MASTER_URI=http://10.17.3.35:11311 # local ROS IP export ROS_IP=10.17.3.100ROS_MASTER_URI : PPC(10.17.3.35)
ROS_IP : OPC(10.17.3.100) -
Use below command to apply modified configuration or open a new terminal window.
$ source ~/.bashrc
Visualized Monitoring
Related ROS Packages
- RViz
RViz is a 3D visualization tool for robots. Rviz visualizes robot’s posture, camera image, pointcloud and sensor data.Reference : http://wiki.ros.org/rviz
- Robot Model
ROS uses URDF(Unified Robot Description Format) robot model information.Reference : http://wiki.ros.org/urdf
- TF
TF is generated from Robot model information and each joint data. User can identify Robot’s posture and relative position of each frame with TF.Reference : http://wiki.ros.org/tf
- Other sensor related Packages
uvc_camera, urg_node, etc.
Run monitoring THORMANG3
- Launch ROS program for THORMANG3
Reference : How to run THORMANG3’s program
- Synchronize time with the PPC(Perception PC)
- If this is the first synchronization, create the script file.
- Create a script file with an editor.
$ gedit ~/timesync - Copy below contents in the script file.
#! /bin/sh
sudo date --set='-2 secs'
sudo ntpdate 10.17.3.35
sudo hwclock -w
PPC(10.17.3.35)
- Modify the script file permission(Add execute permission)
$ sudo chmod +x timesync - Execute the script file to synchronize time.
$ ~/timesync
- Create a script file with an editor.
- If this is not the first synchronization, execute the script file.
$ ~/timesync
- If this is the first synchronization, create the script file.
- Run Visualization Tool
User can monitor the robot with below command.$ roslaunch thormang3_description thormang3_opc.launch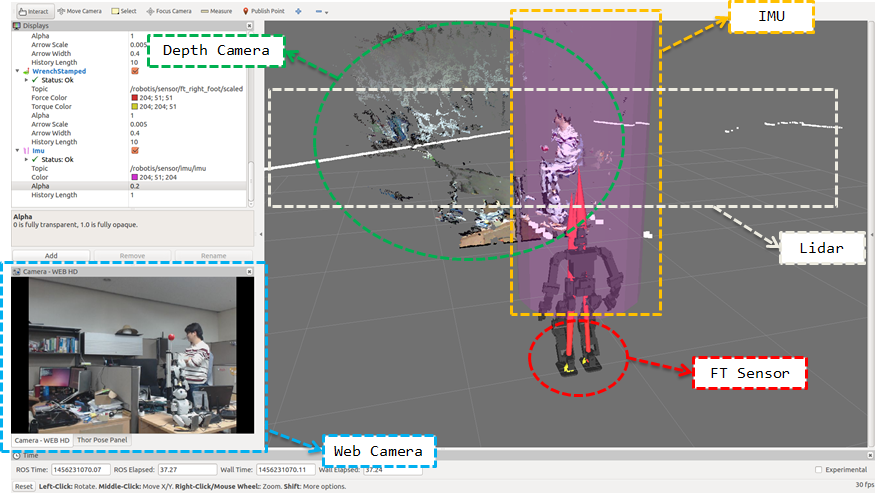
Remote Control(GUI Demo)
Demo program for remote control is provided.
Walking, manipulation, head control are provided.
- Run thormang3 demo
The following command will launch the demo program.$ roslaunch thormand3_demo thormang3_demo.launch - Basic Operations
-
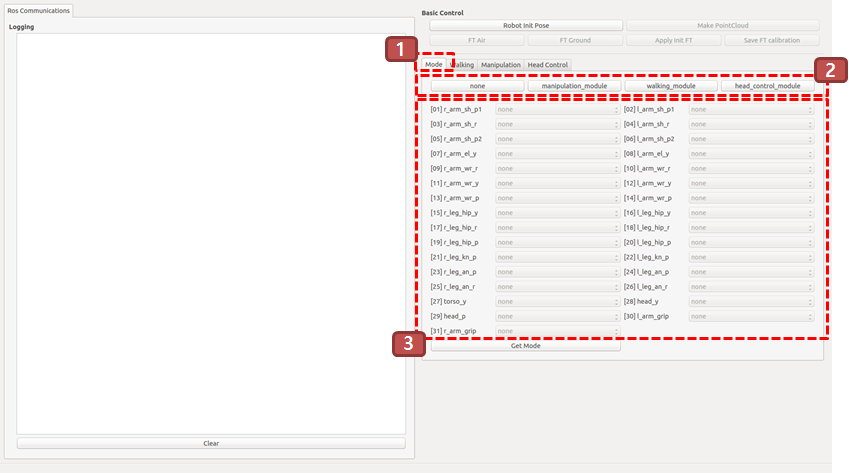
Switching Modes
The framework of THORMANG3 is consisted of multiple modules.
Switching mode will decide which module to use. - Move to
Modetab - Click the mode at the top to activate
-
Check all joints are switched to selected mode.
-
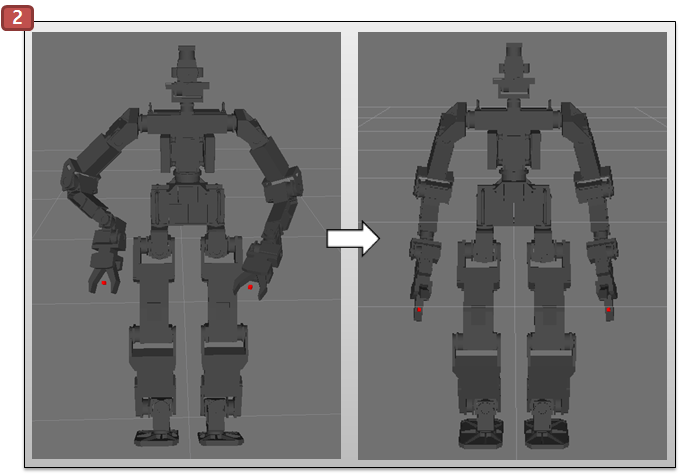
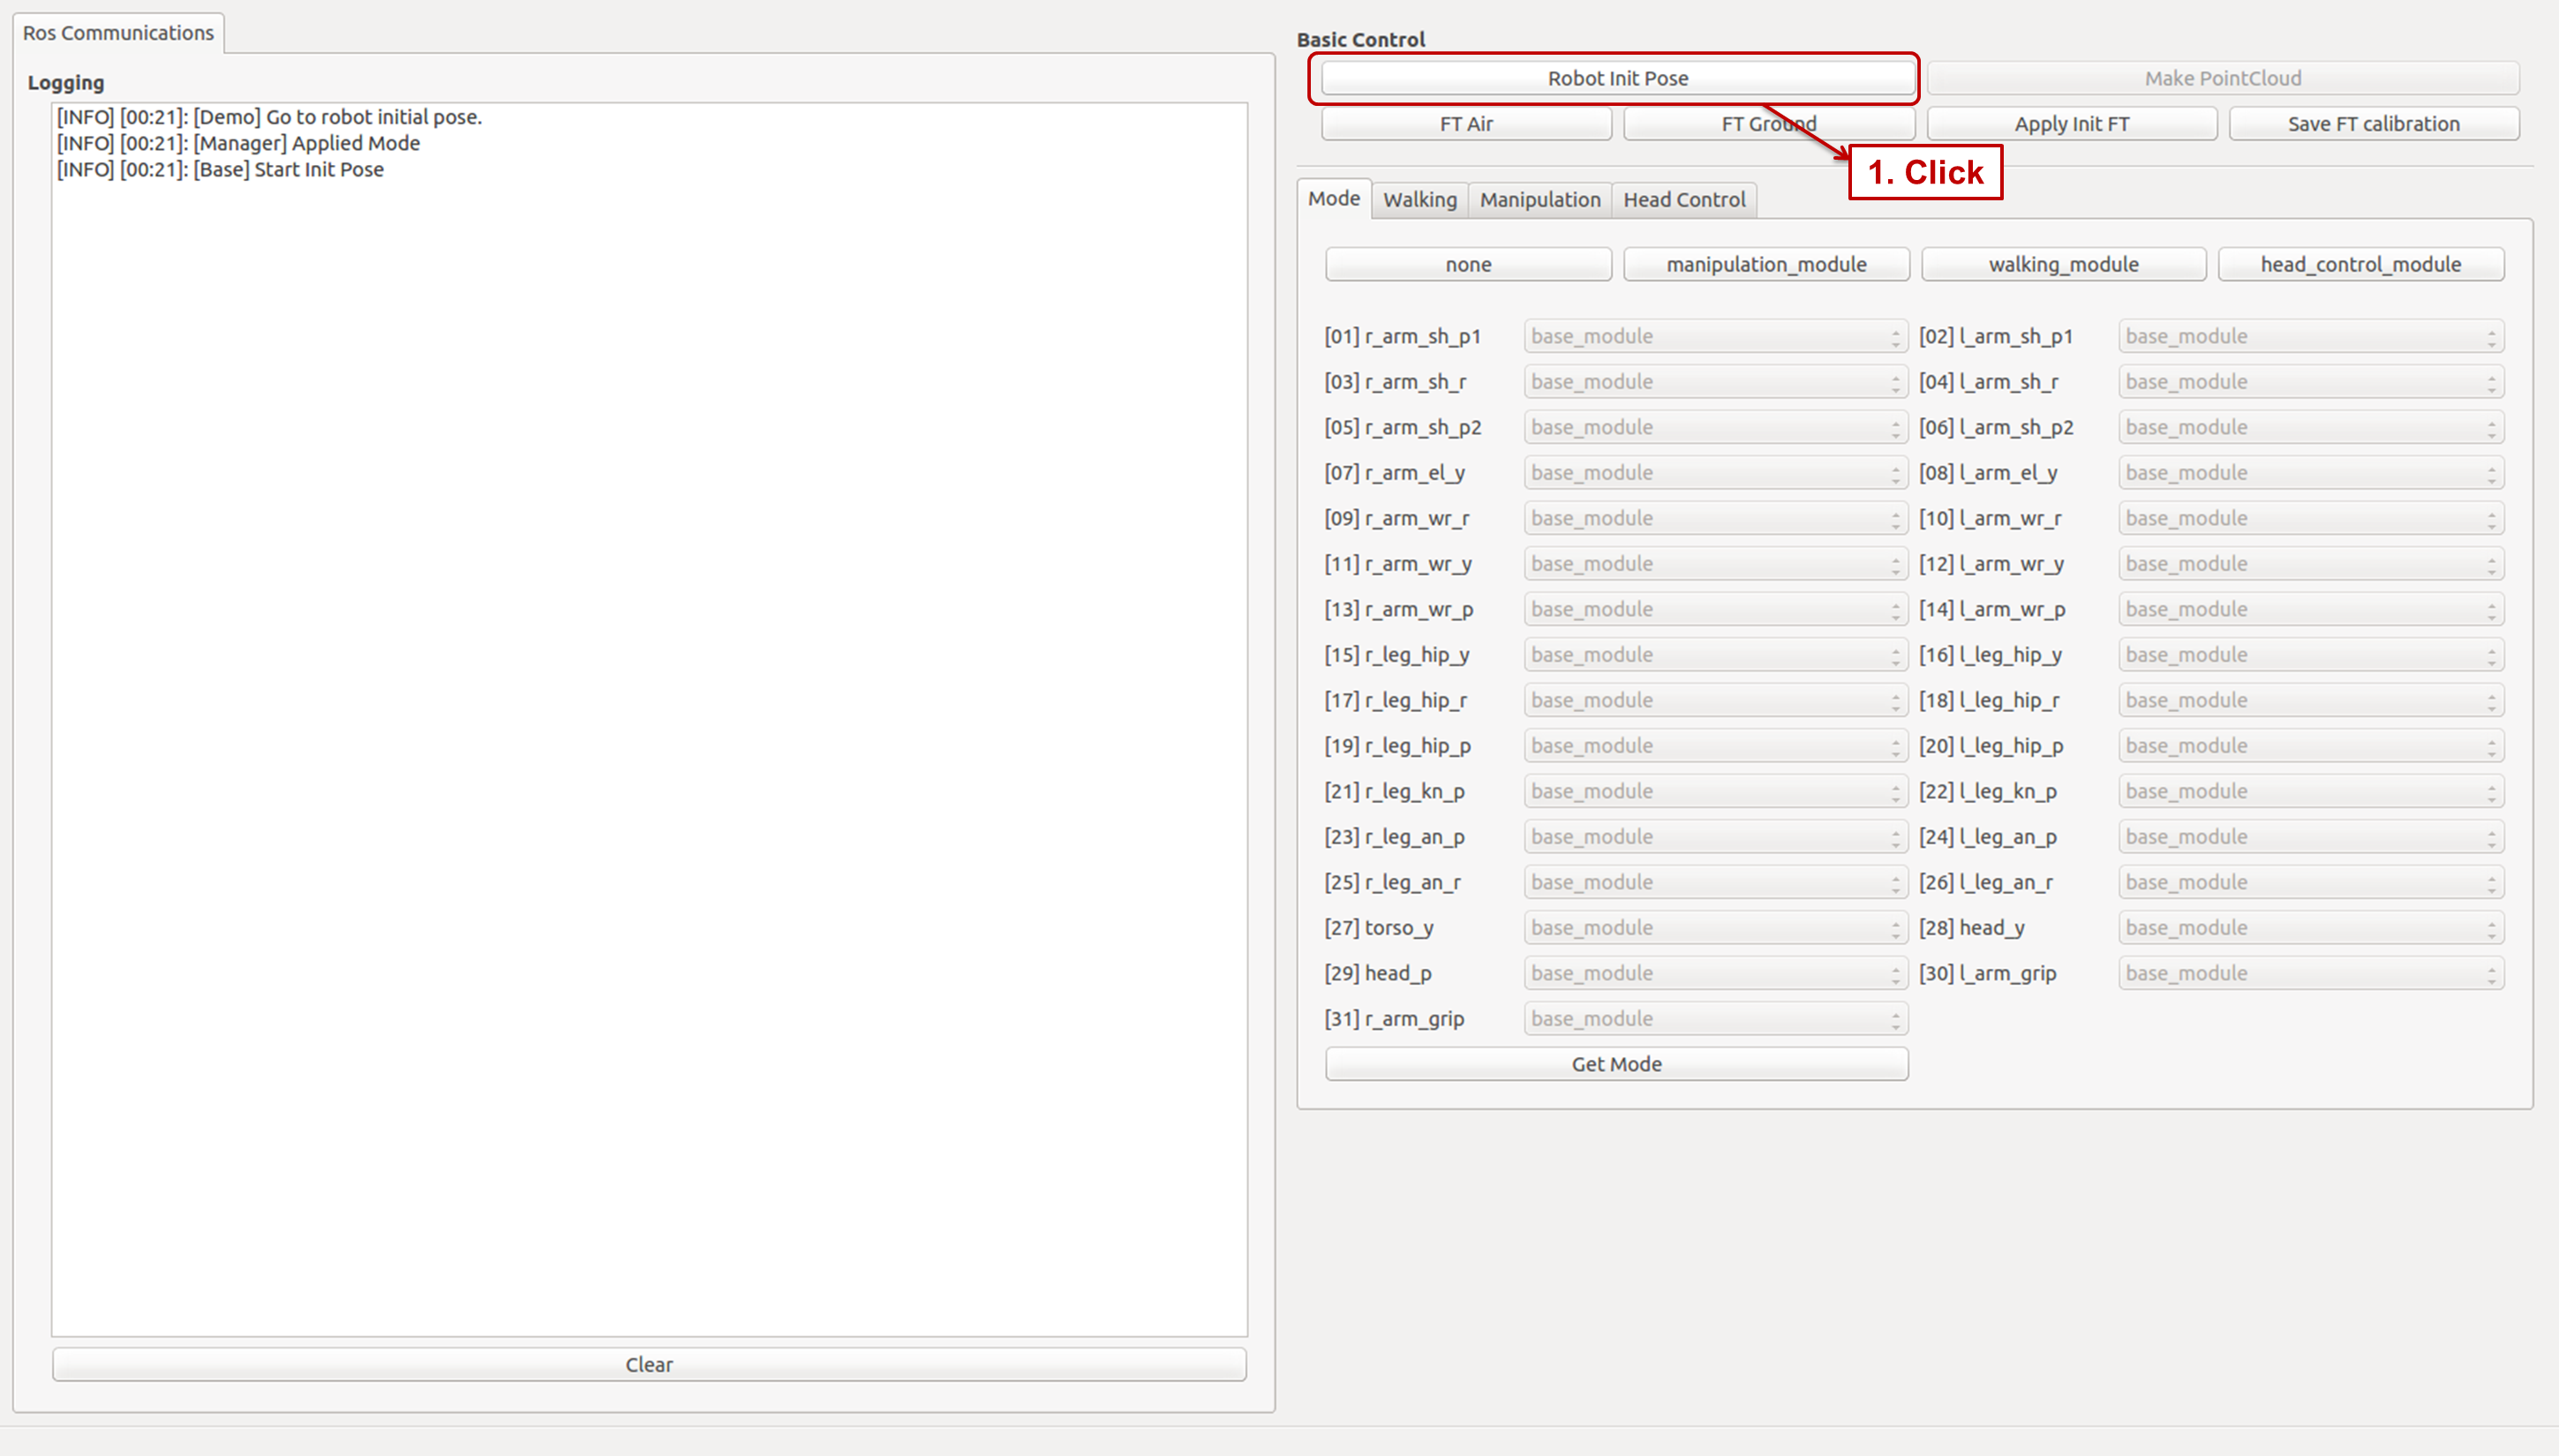
Initial Posture
In order to operate the robot safely, the robot should be operated from the initial posture.
ClickRobot Init Posebutton at the top of demo program(Effective regardless of current mode)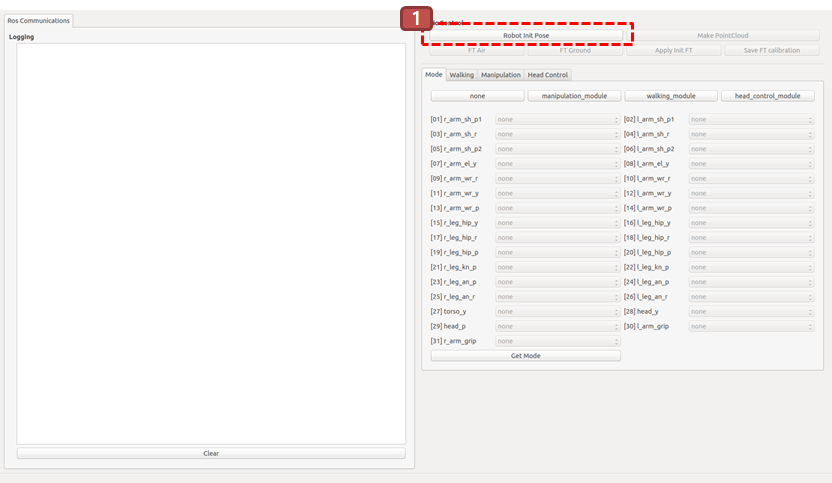
Calibrate FT Sensors
Instructions about how to calibrate FT Sensors on THORMANG3’s feet. Balance Algorithm for walking works well when FT Sensors are calibrated.
Install & Build
Reference : OPC Installation
Run
Reference : How to execute OPC’s GUI program
Usage
- Move to Robot Init Pose
- Click
Robot Init Posebutton on the top.
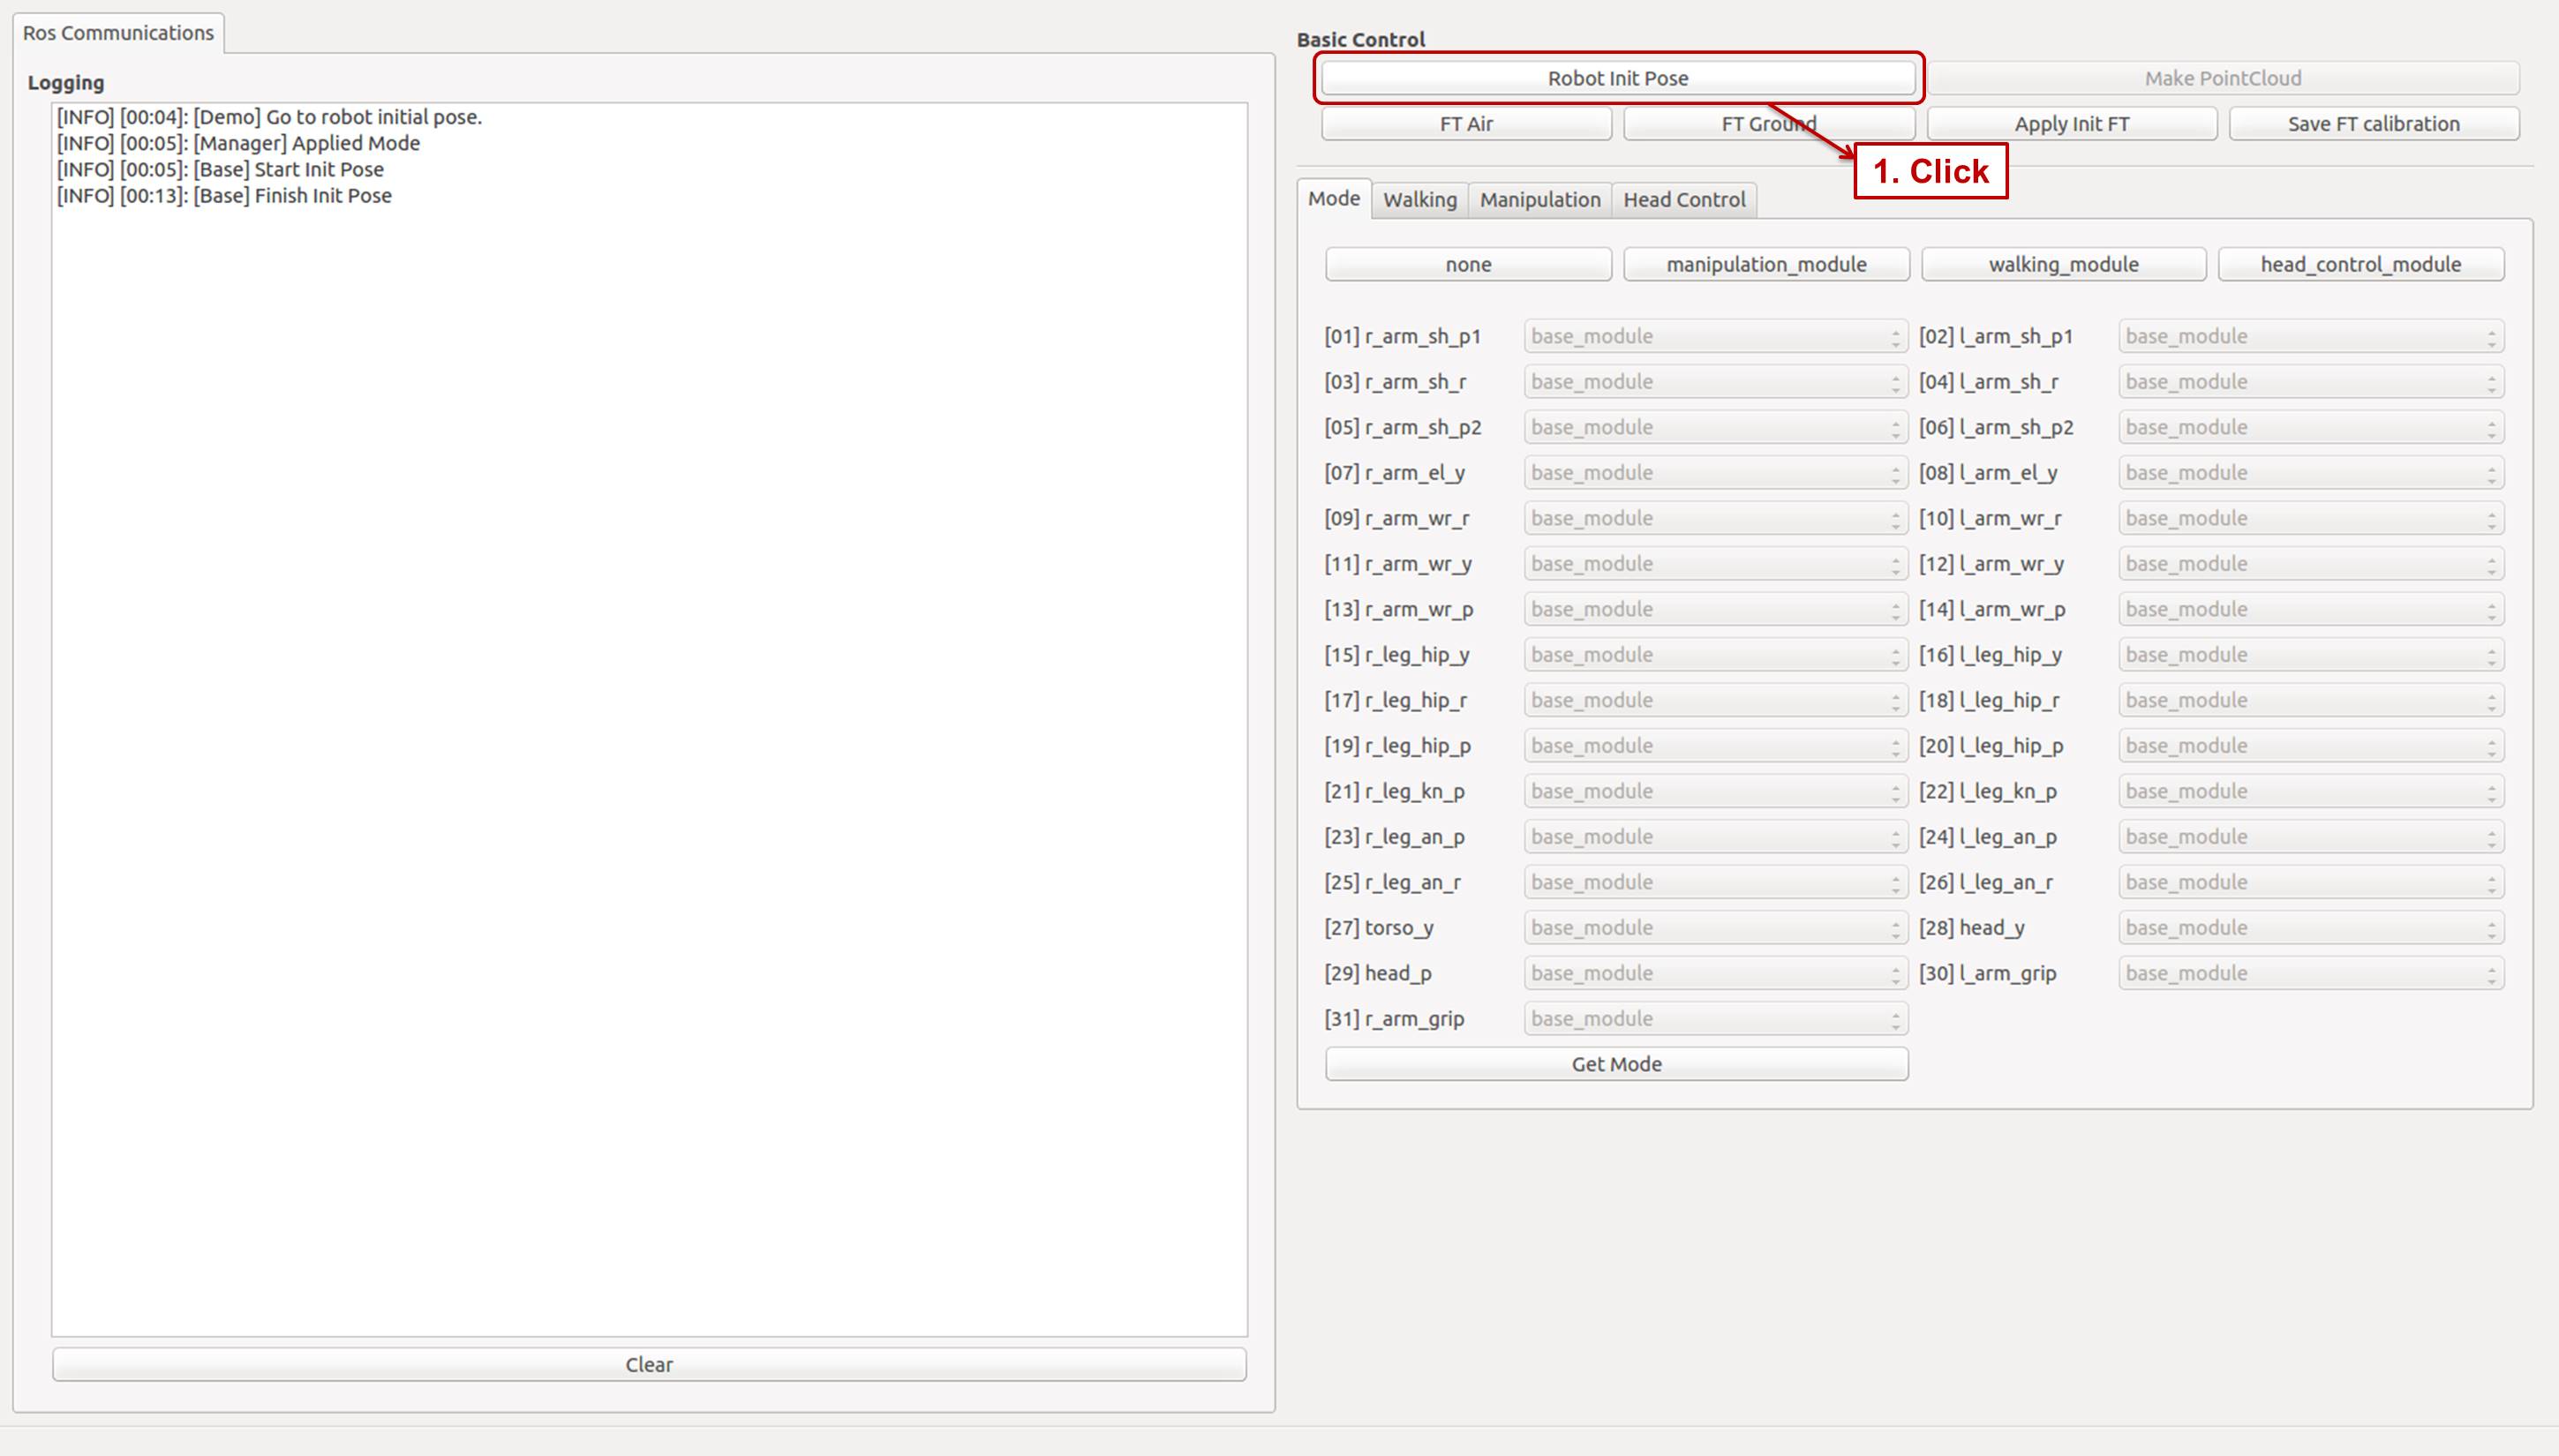
- Click
- Measure FT Air
- After reaching to Robot Init Pose, click
FT Airbutton to measure the Force Torque value in the air. - THORMANG3 must be hanging on the lift for this procedure.
- After reaching to Robot Init Pose, click
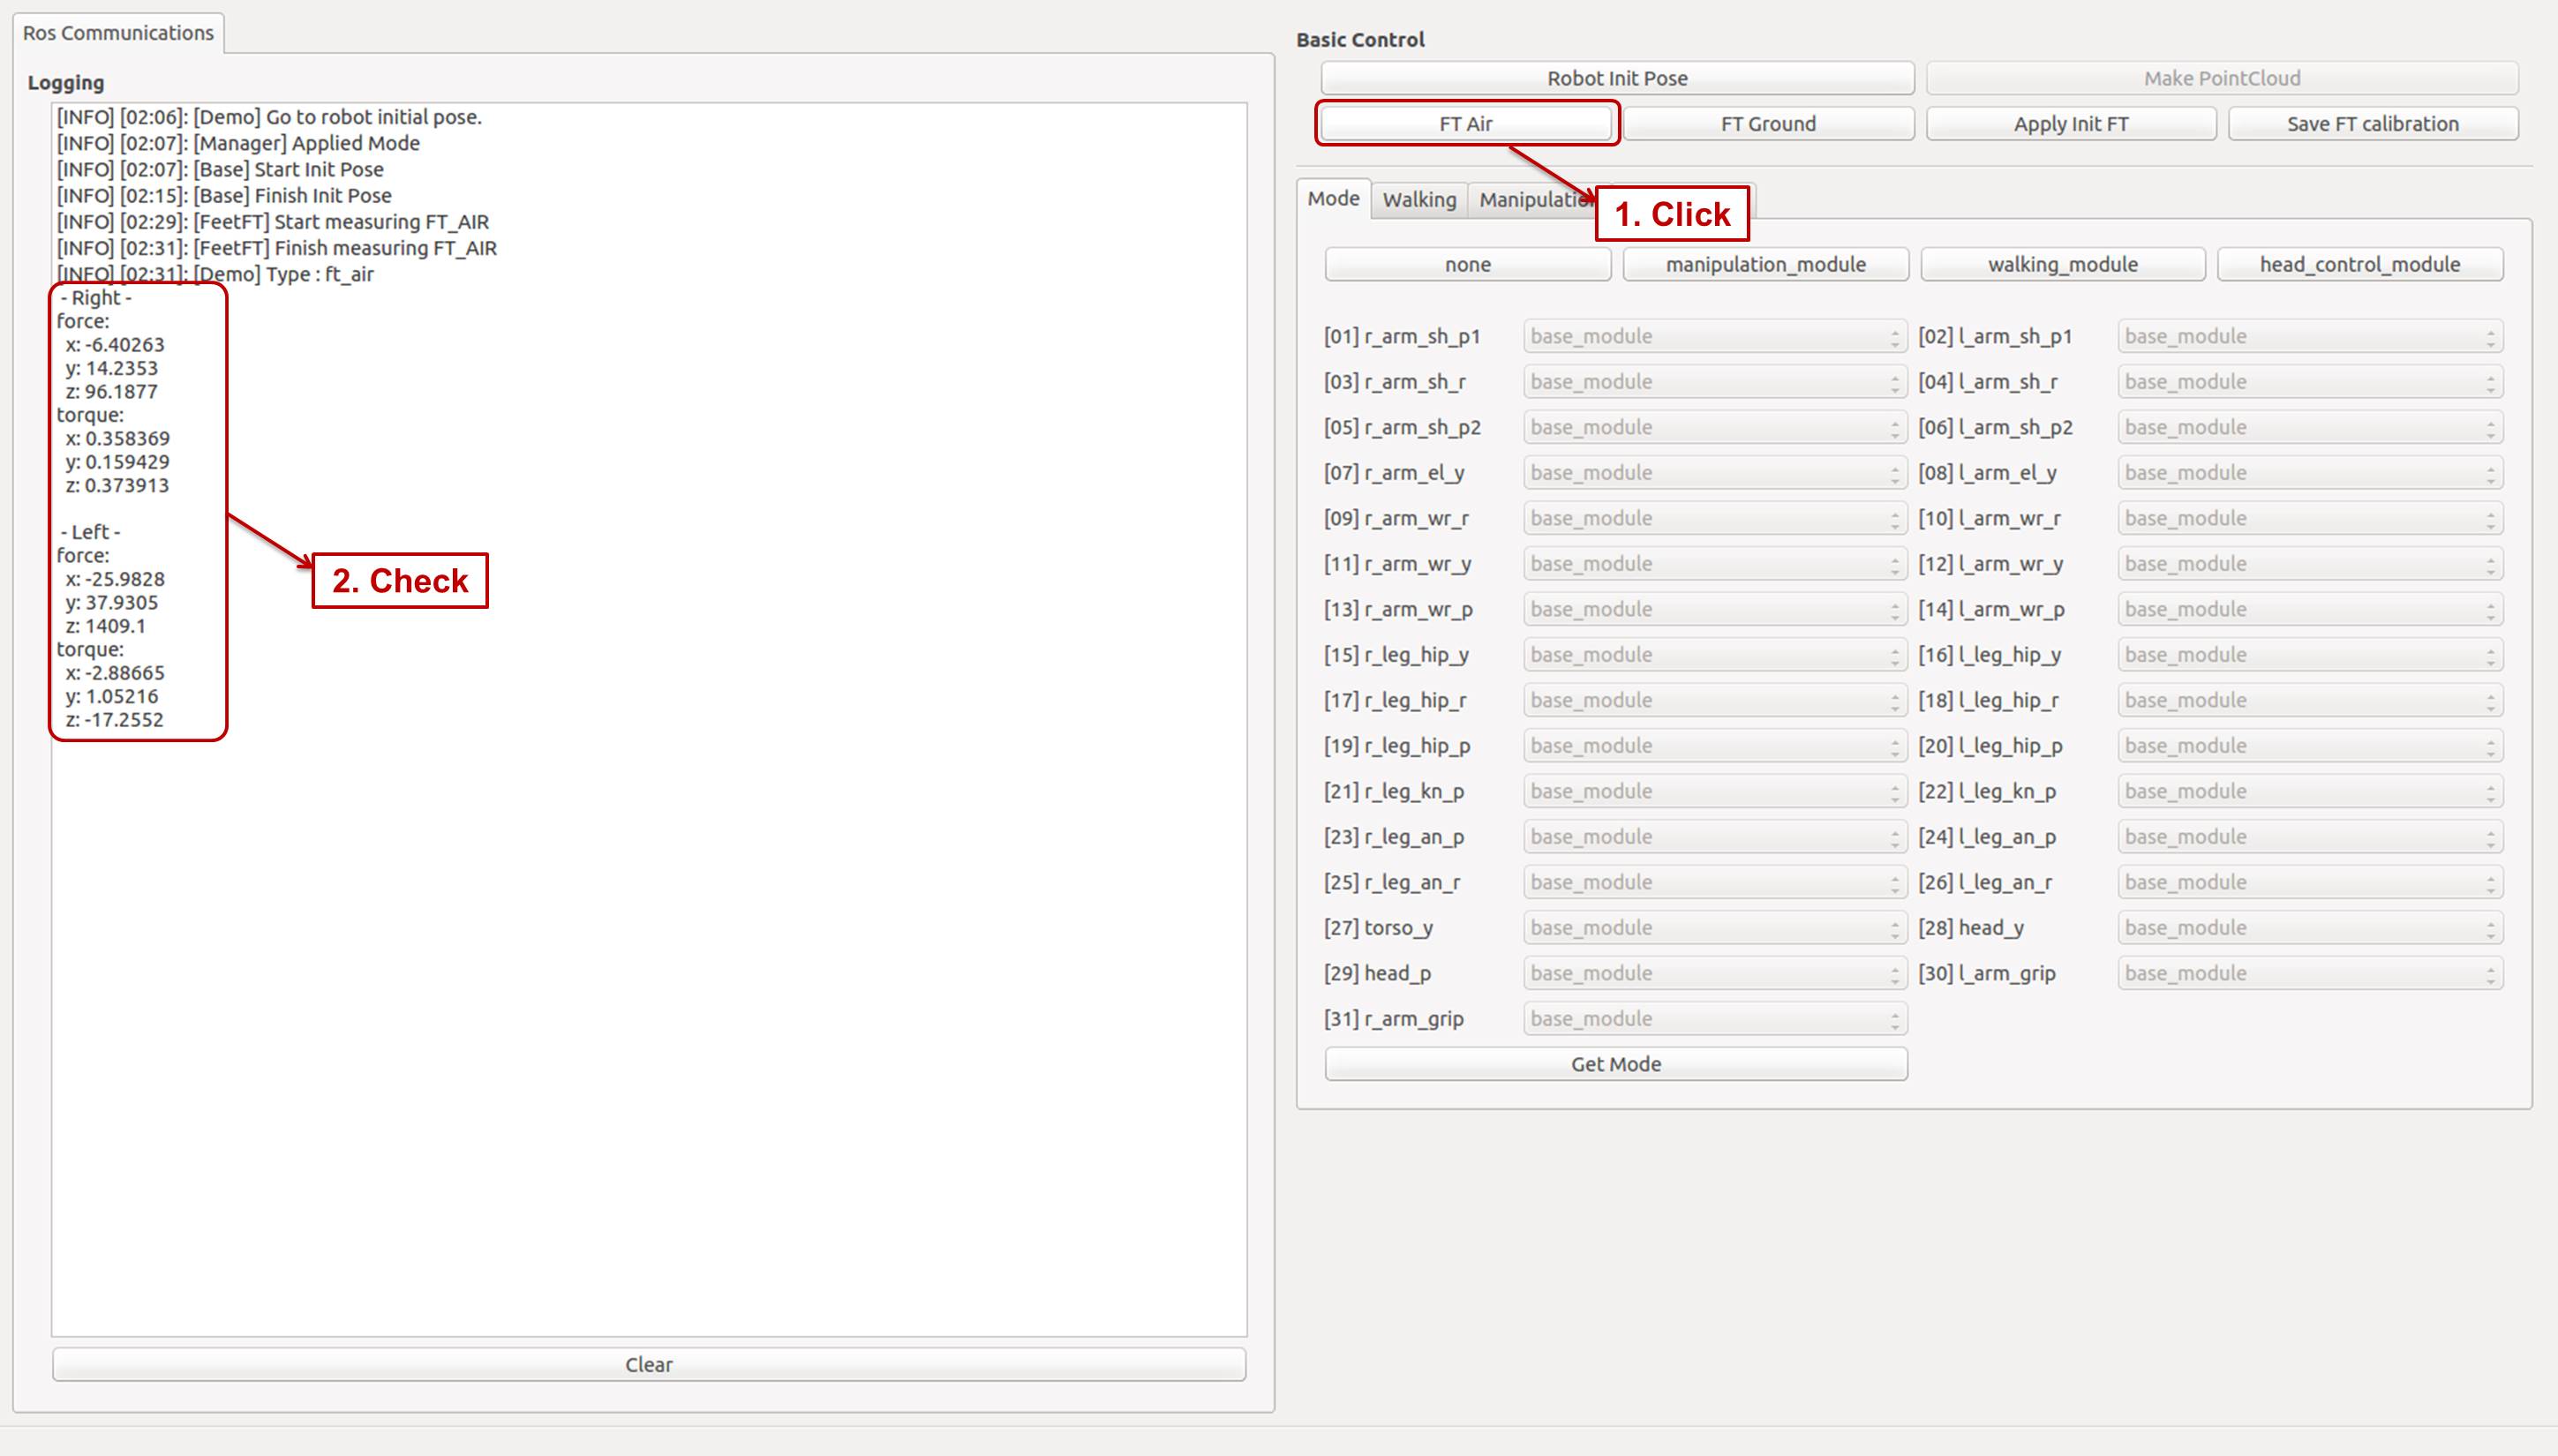
- Measure FT Ground
- After completing previous procedure, click
FT Groundbutton to measure the Force Torque on the ground. - THORMANG3 must be standing on the ground for this procedure.
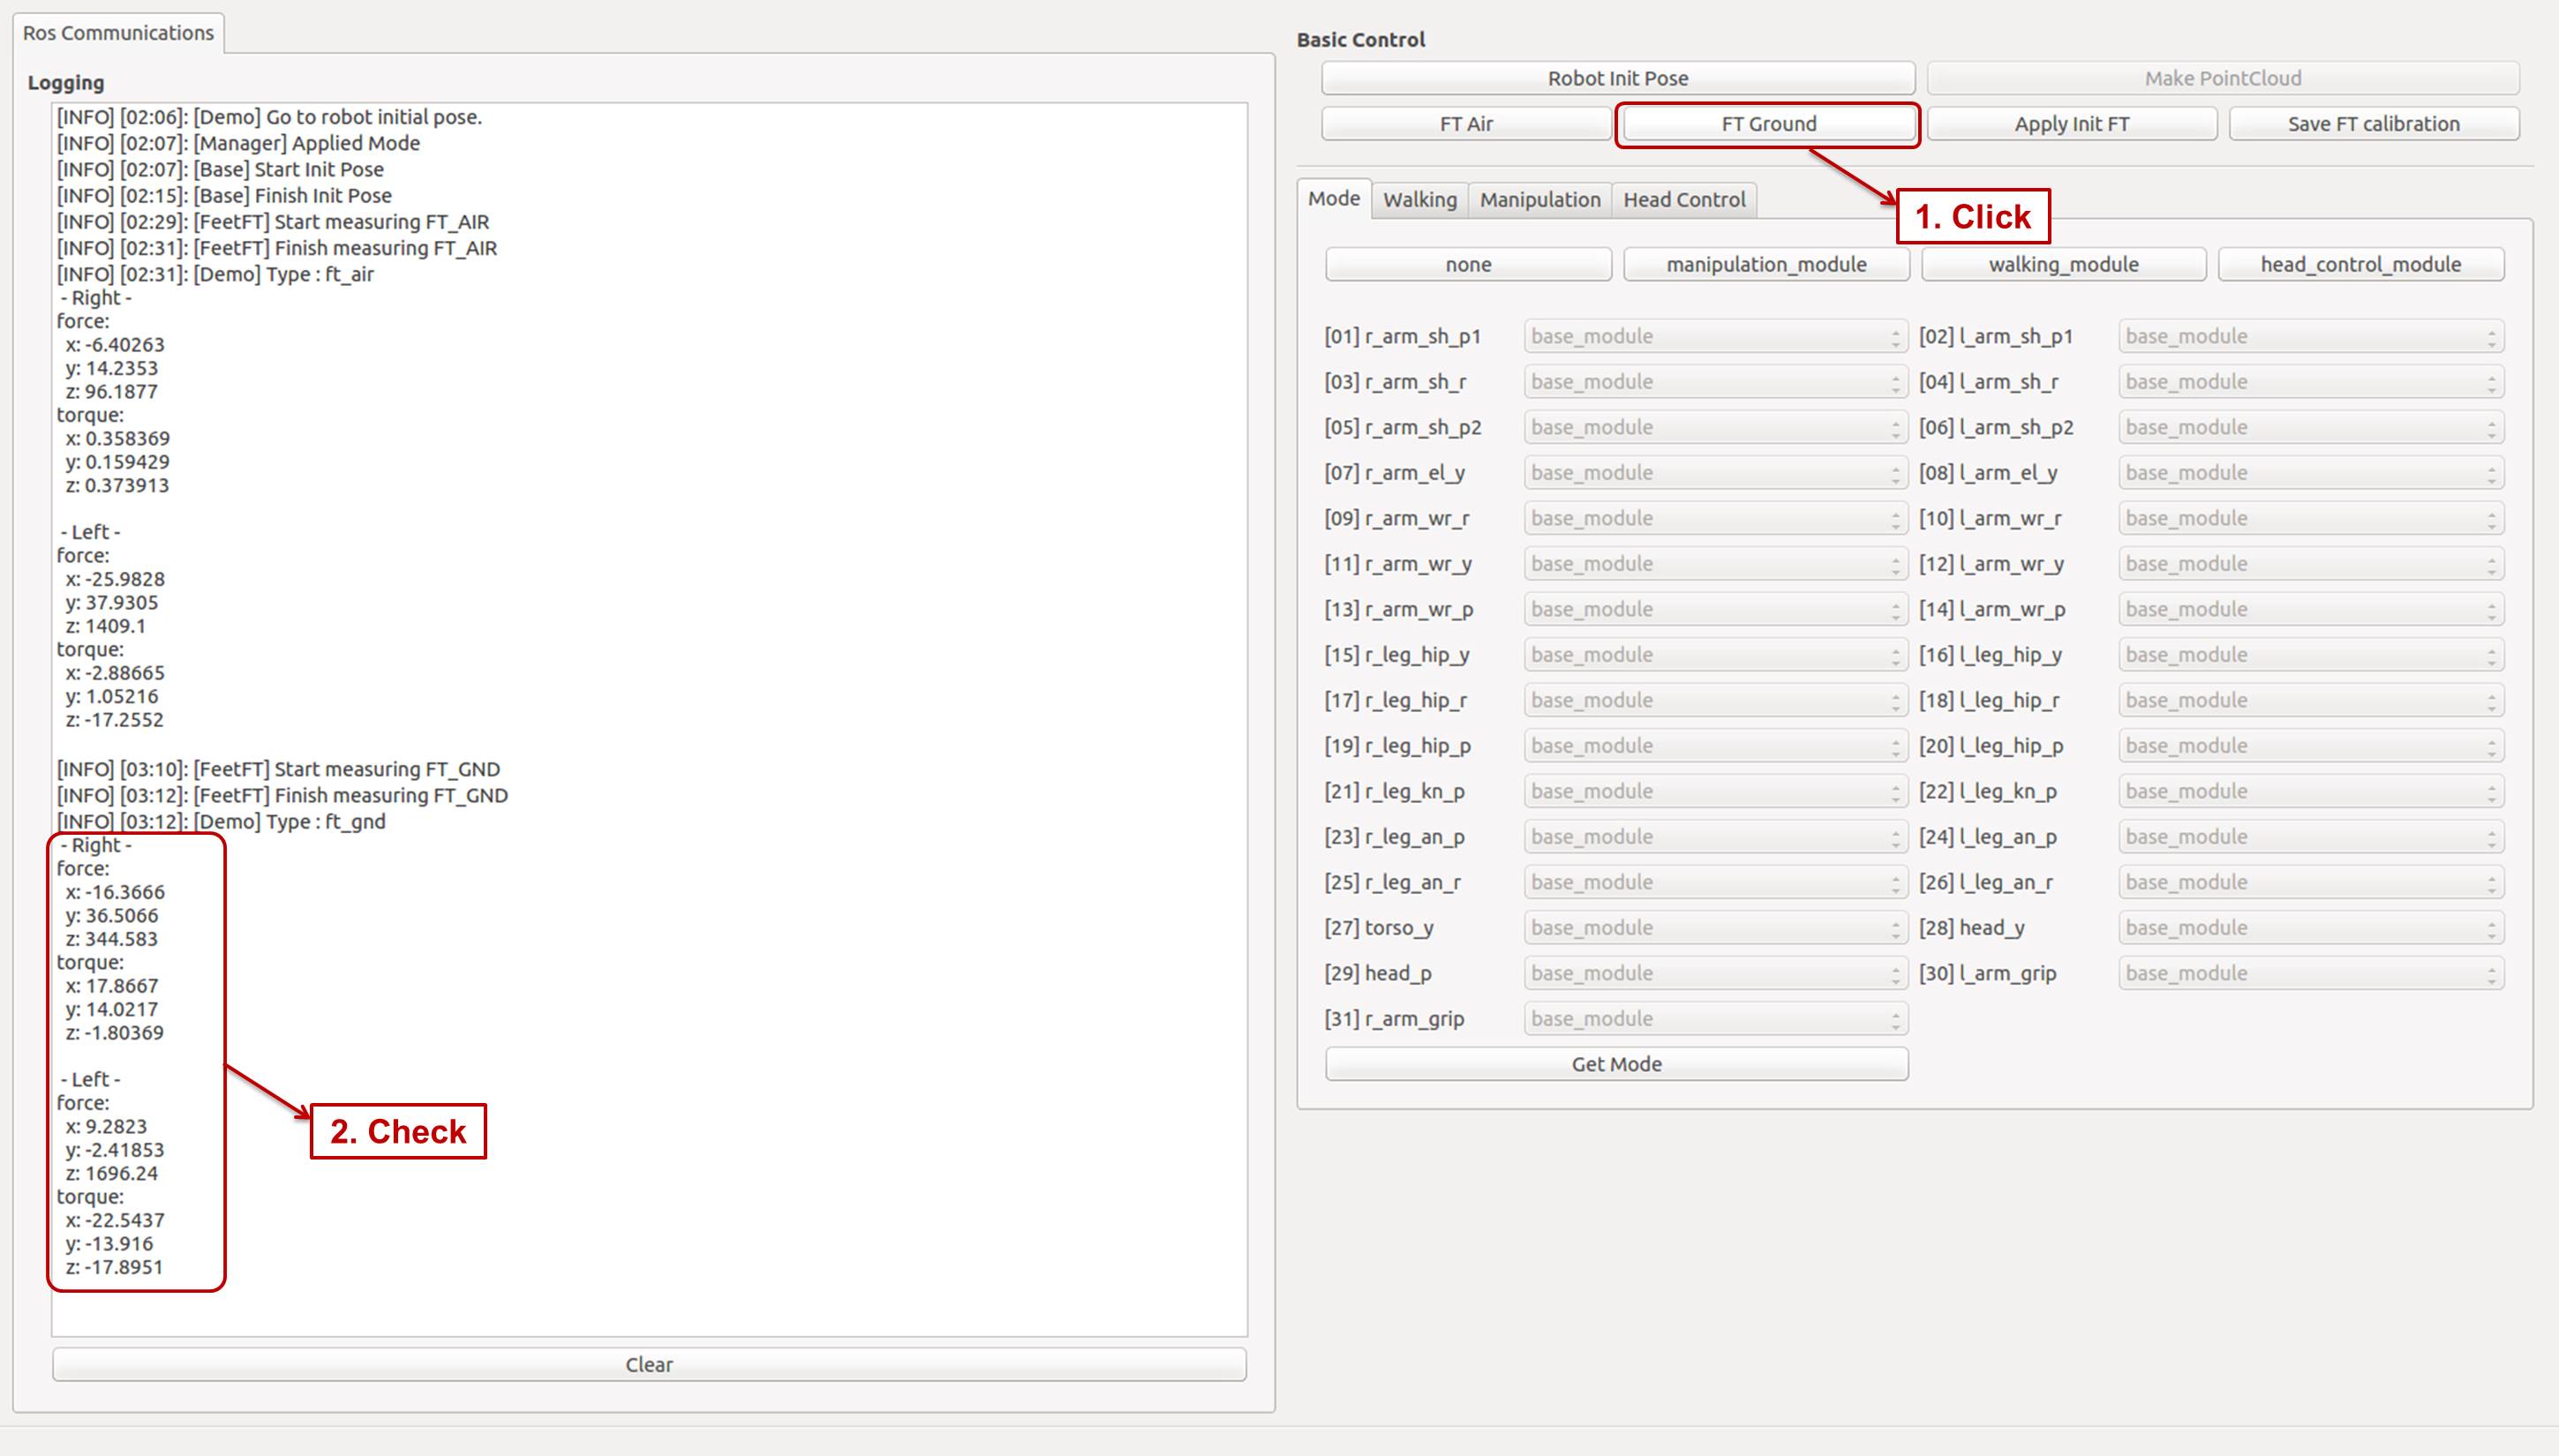
- Measured values are displayed on the left of GUID.
- If measured Fz value on the ground is greater than the measured value in the air by more than around 210N, it is normal.
- If the value is smaller than around 210N, repeat 1~3 procedure from above.
- After completing previous procedure, click
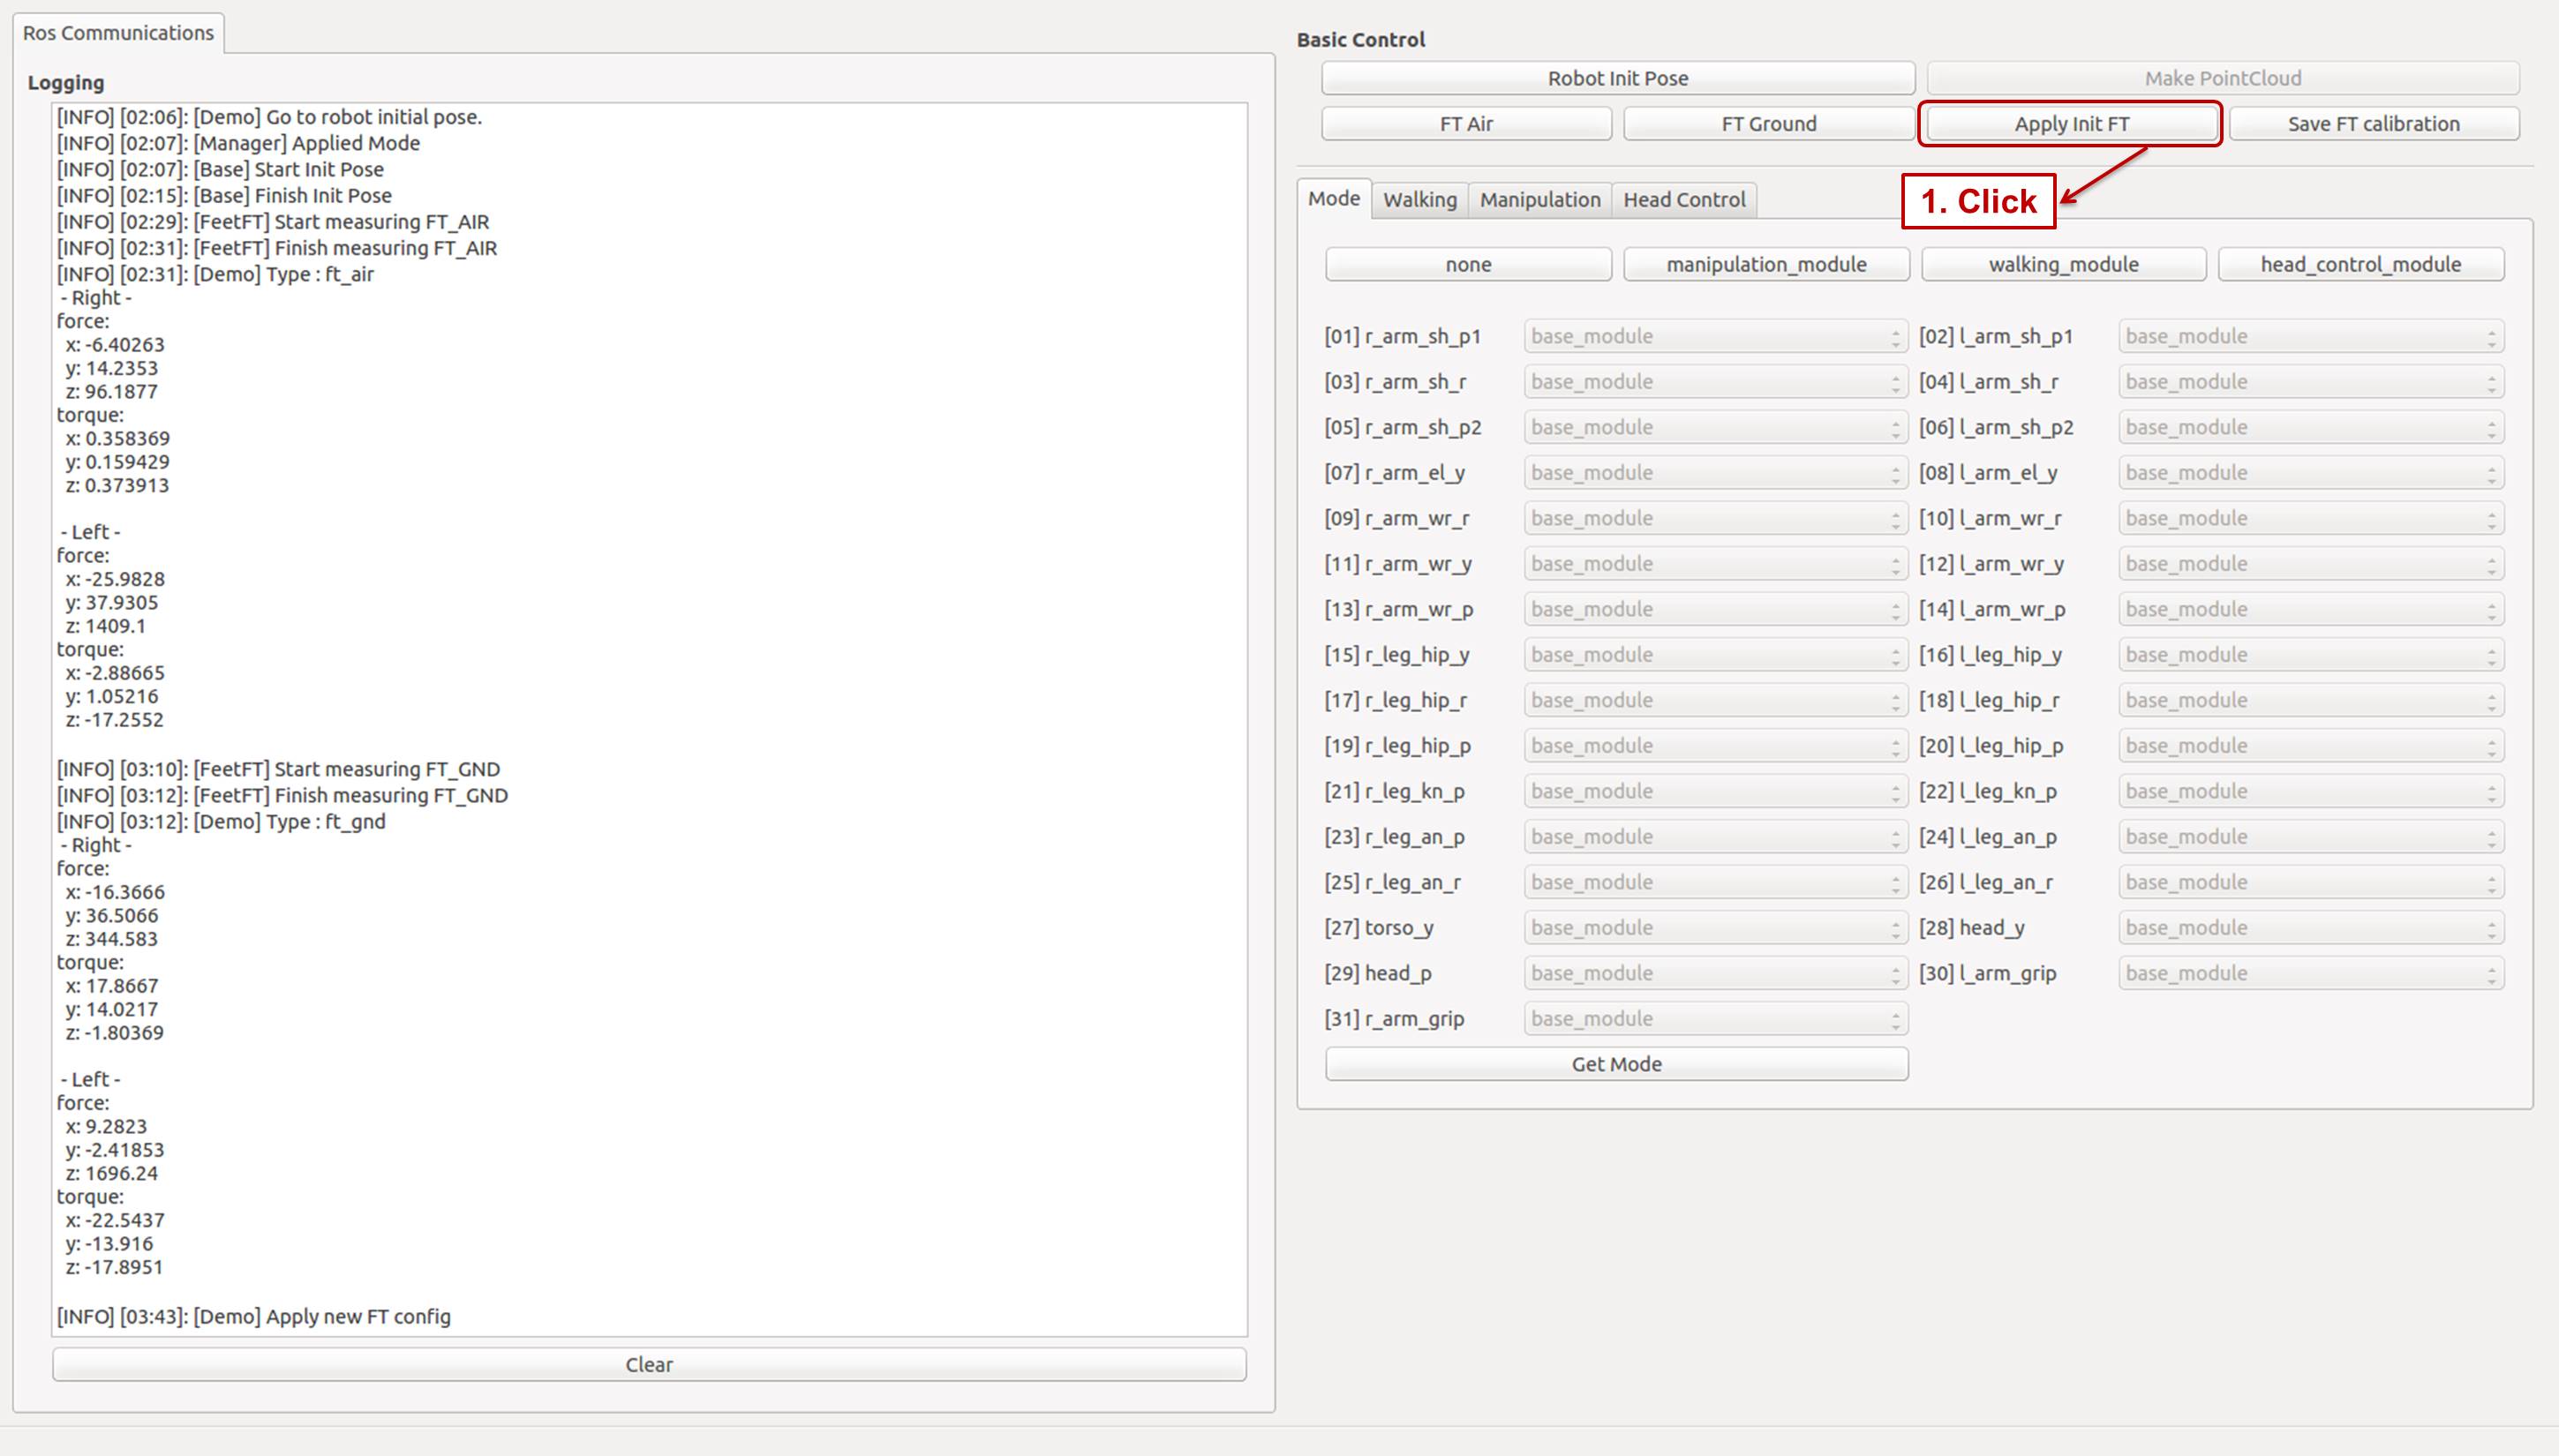
- Apply Init FT
- After completing above procedures, click
Apply Init FTbutton. - Measured Force Torque values in the air and on the ground are transmitted to thormang3_feet_ft_module and FT Sensor calibration is completed.
- After completing above procedures, click
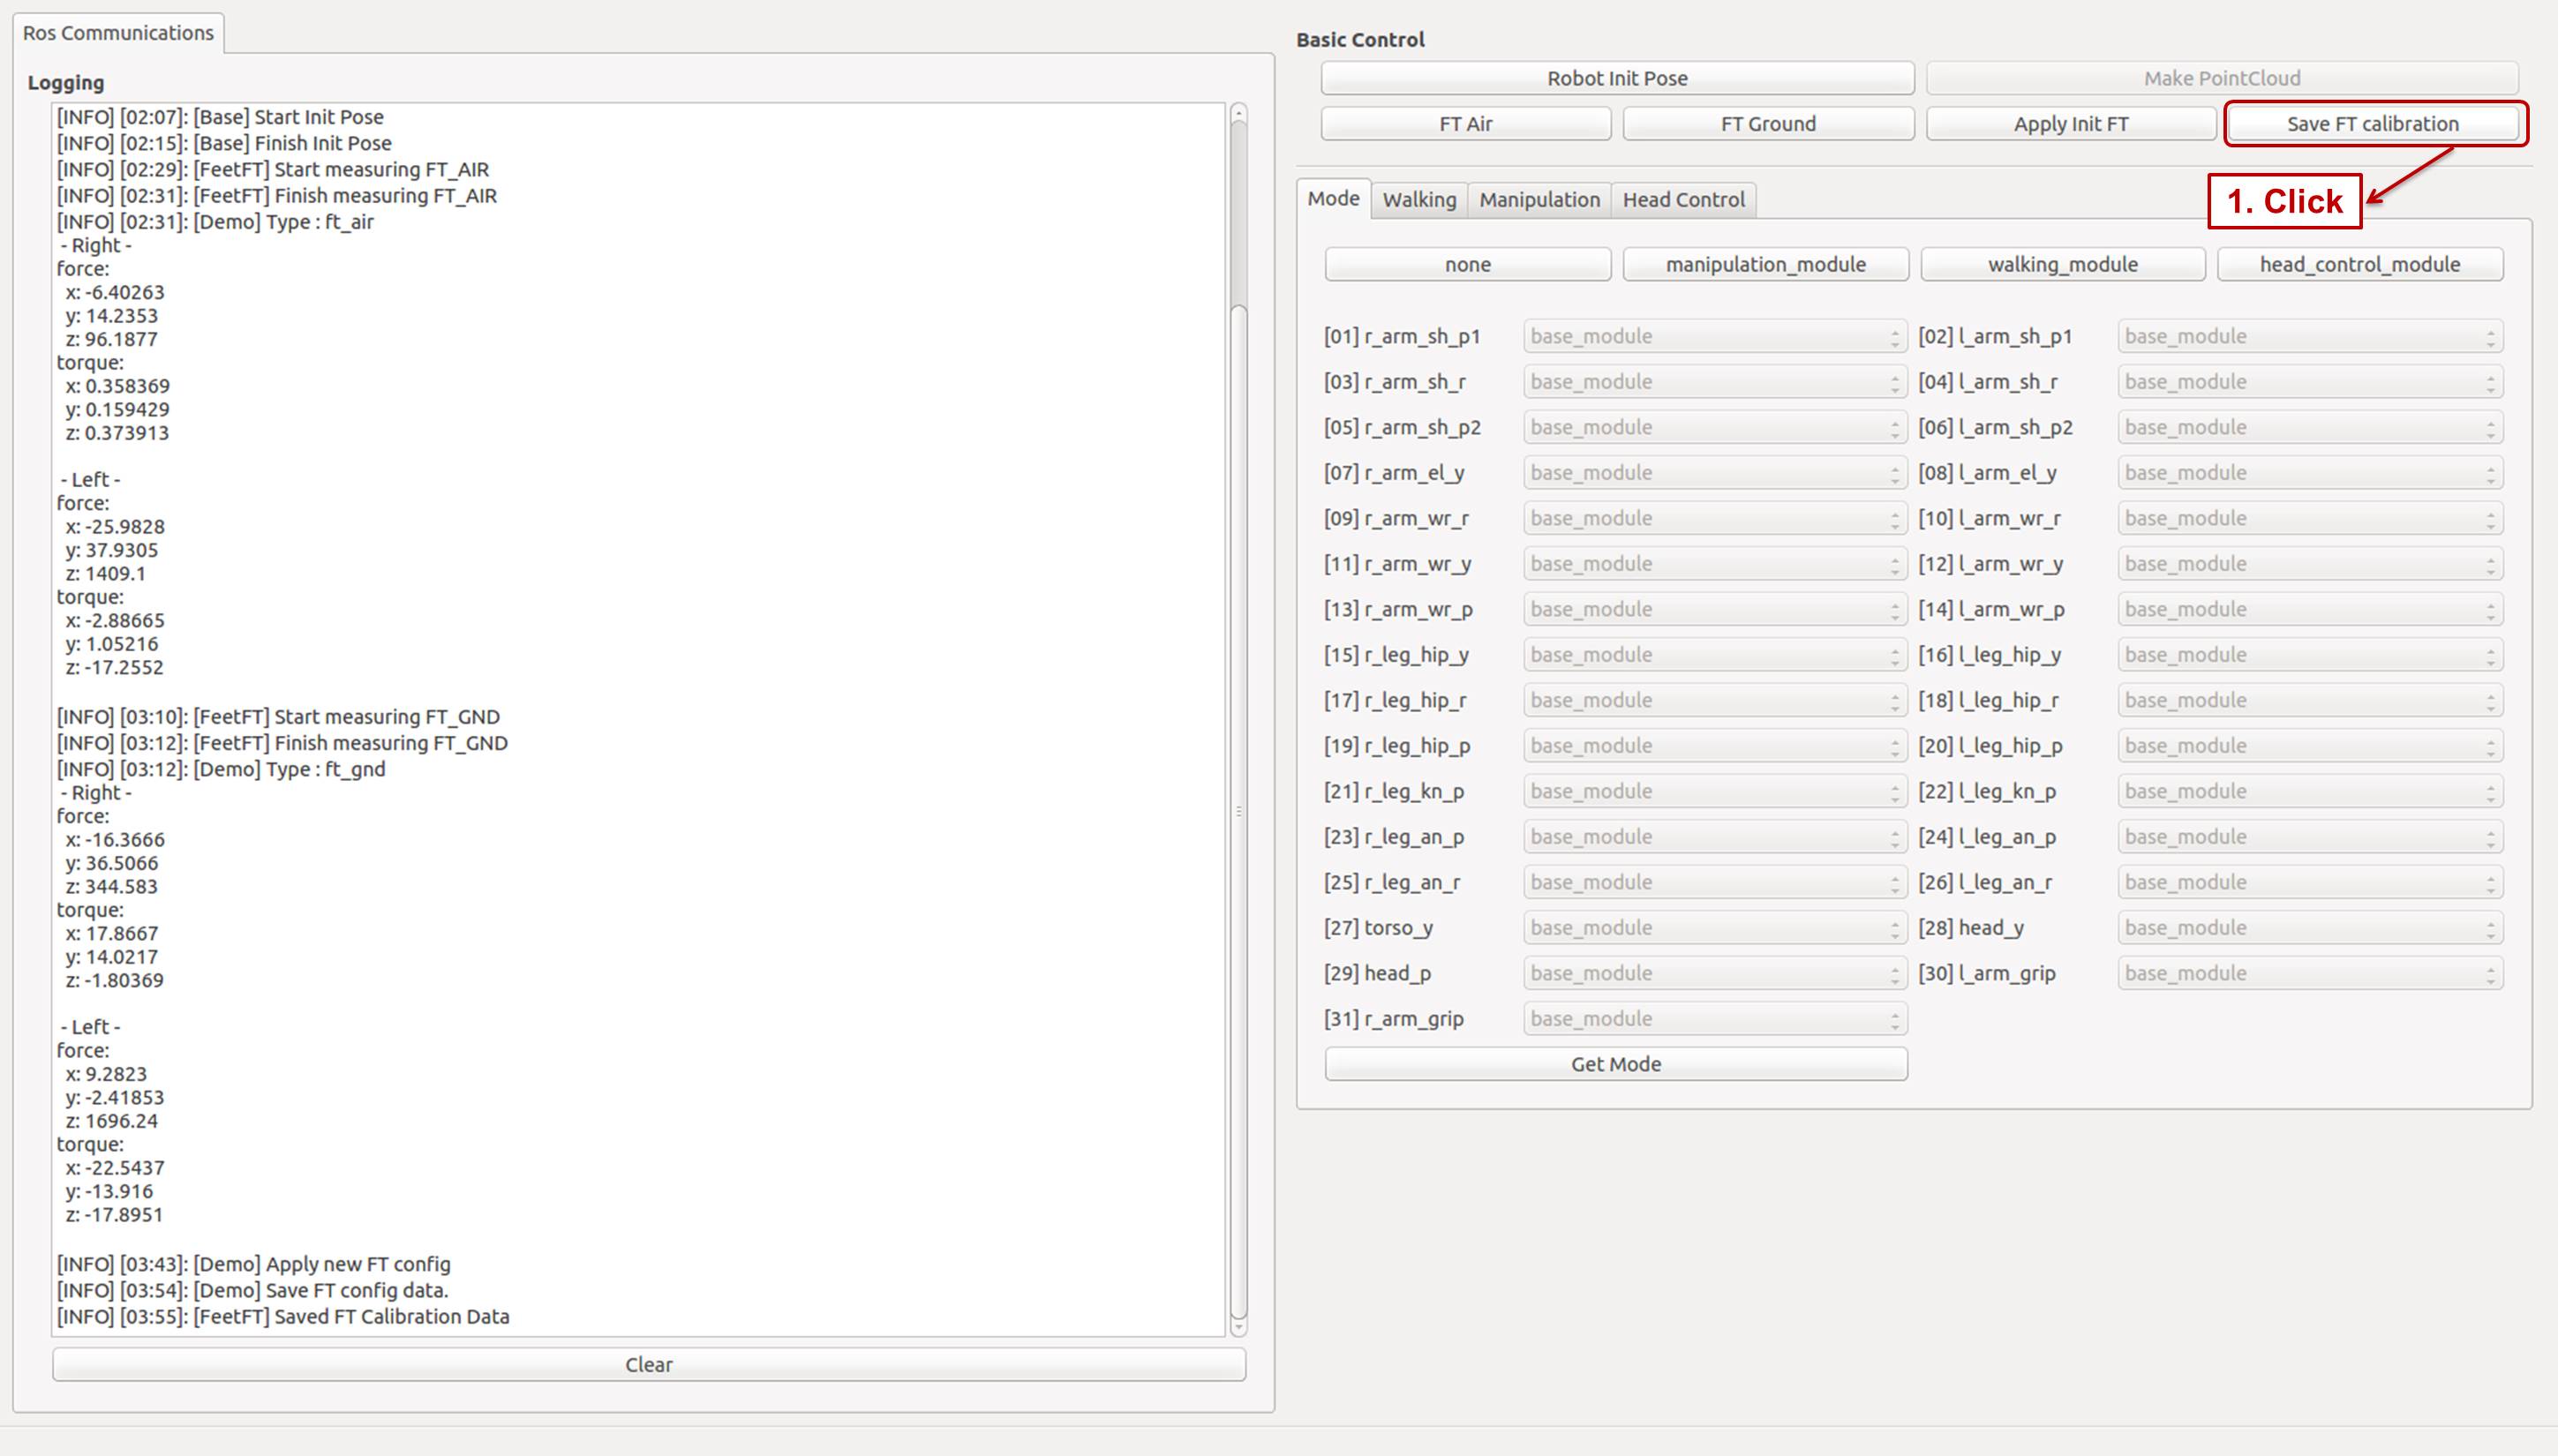
- Save FT Calibration
- If you want to save current calibration, click
Save FT calibrationbutton.
- If you want to save current calibration, click
Operate Head Module
Instructions about controlling head of THORMANG3.
Lidar data(2D) can be assembled to PointCloud(3D) by moving the head with Head Control Mode.
User can manipulate head joints to move the sensor attached head.
How to operate Head Control module
-
Assemble LaserScan
-
Change the Mode
-
Assemble
ClickMake PointCloudbutton in theBasic Controlof the demo program.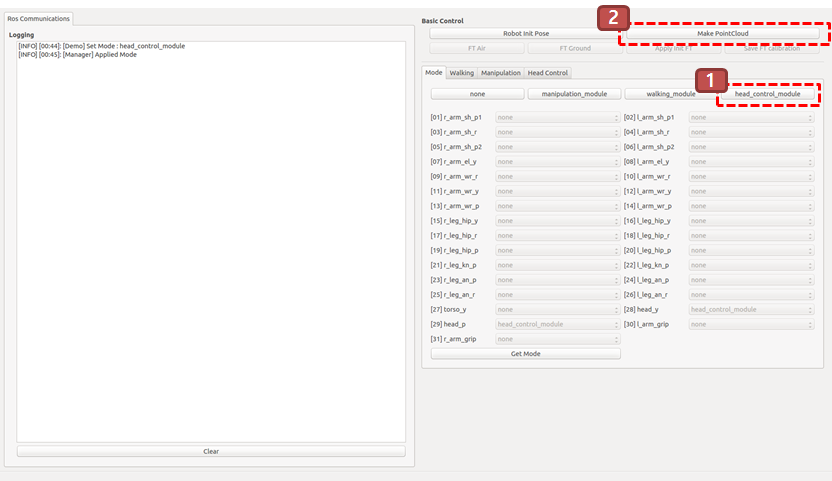
-
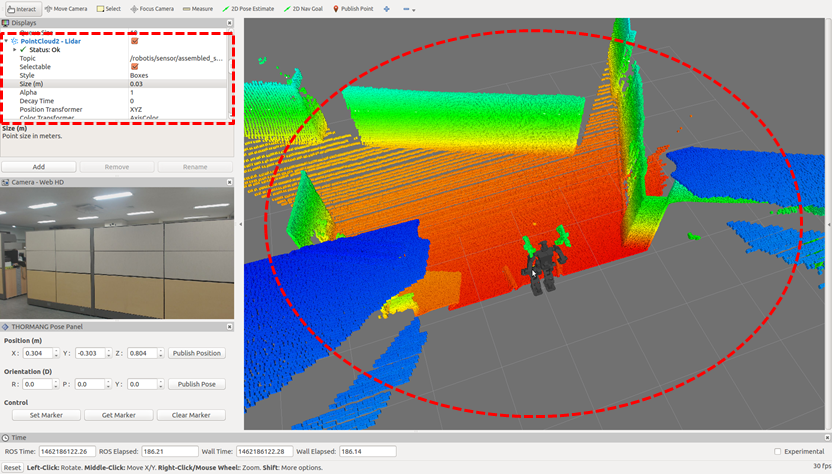
Check the pointcloud
Assembled pointcloud can be seen on the RViz screen.- Execute Visualization Tool
- Add topic
- Click
Addbutton on the Display window on the left. - Select
By topictab on the new window - Select
/robotis/sensor/assembled_scan/PointCloud2
- Click
-
Check PointCloud on the 3D screen
-
-
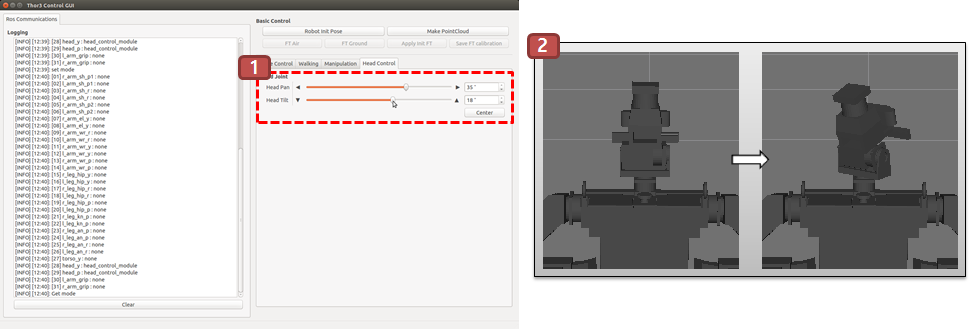
Head Joint Control
-
Change the Mode
-
Select
Head Controltab of the demo program. -
Change the value for specific joint.
-
Operate Manipulation Module
Instructions about how to operate the manipulation module on the OPC GUI program.
How to operate the Manipulation module
Manipulation Control Mode can control and receive feedback of the upper body.
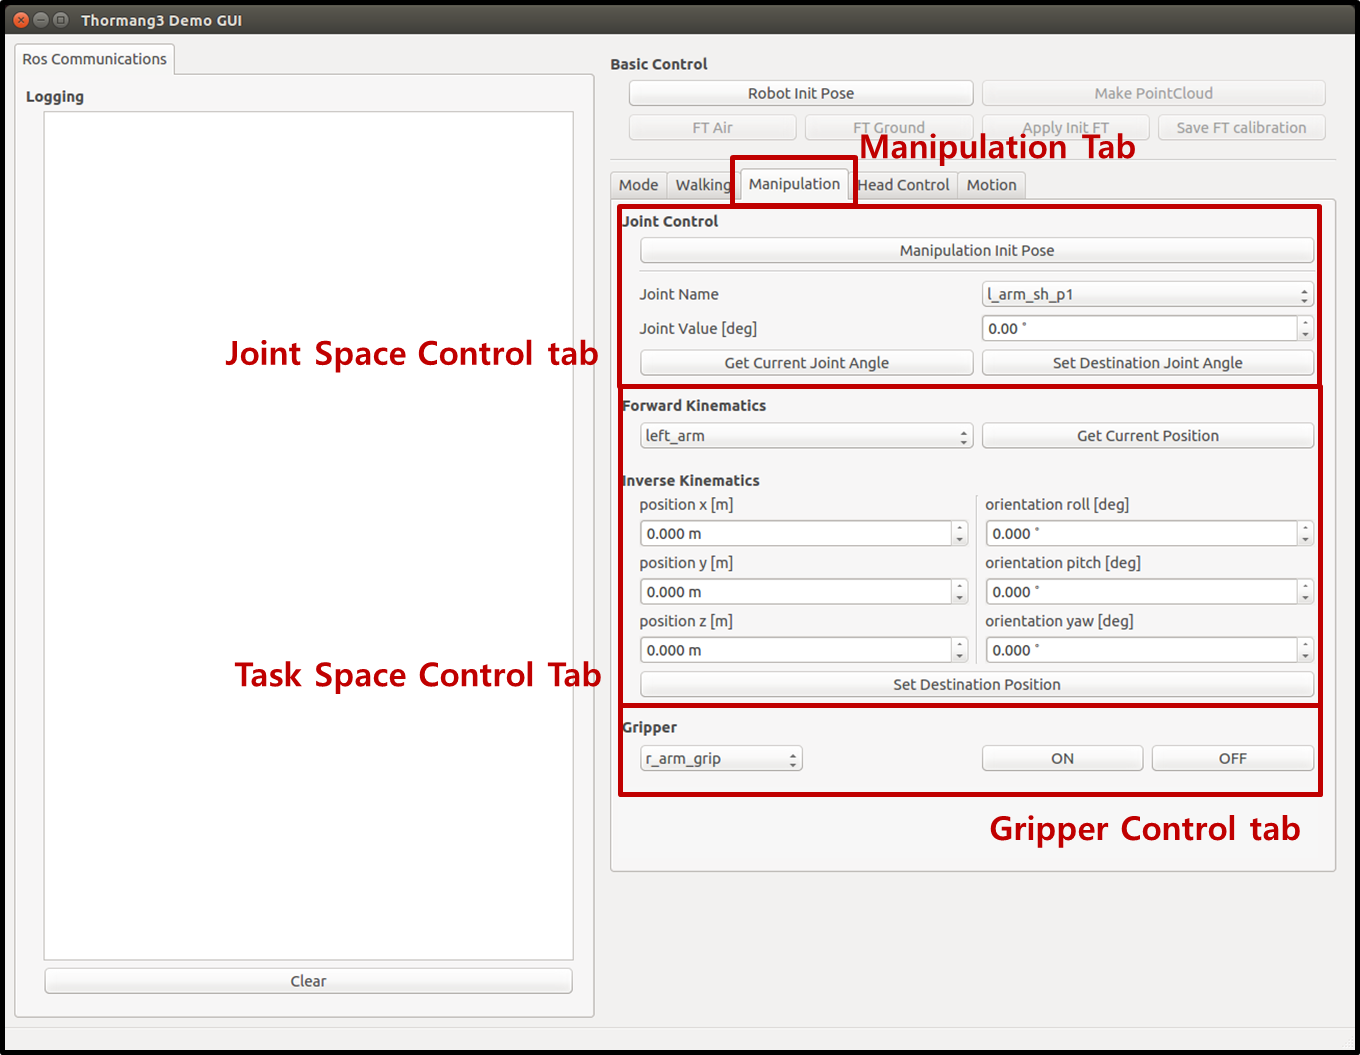
Joint Space Control
- Change the Mode
- Click
Manipulationtab of the demo program.
- Click
- Manipulation Initial Pose
- Click
Manipulation Init Posein theJoint Control.
- Click
- Update the value of specific joint.
- Select desired joint from
Joint Name. - Write target value in
Joint Value [°]. - Click
Set Destination Joint Anglebutton.
- Select desired joint from
- Obtain current joint value.
- Select desired joint from
Joint Name. - Click
Get Current Joint Anglebutton.
- Select desired joint from
Task Space Control
- Change the Mode
- Click
Manipulationtab of the demo program.
- Click
- Manipulation Initial Pose
- Click
Manipulation Init Posein theJoint Control.
- Click
- Write the target value of End effector.
- Select a specific group in the
Forward Kinematicstab. - write target value in the
Inverse Kinematicstab. - Click
Set Destination Positionbutton.
- Select a specific group in the
- Obtain current value of End effector.
- Select a specific group in the
Forward Kinematicstab. - Click
Get Current Positionbutton.
- Select a specific group in the
Gripper Control
- Change the Mode
- Click
Manipulationtab of the demo program.
- Click
- Manipulation Initial Pose
- Click
Manipulation Init Posein theJoint Control.
- Click
- Gripper Operation
- Select a specific group in the
Grippertab. - Click
ON/OFFbuttons.
- Select a specific group in the
Operate Walking Module
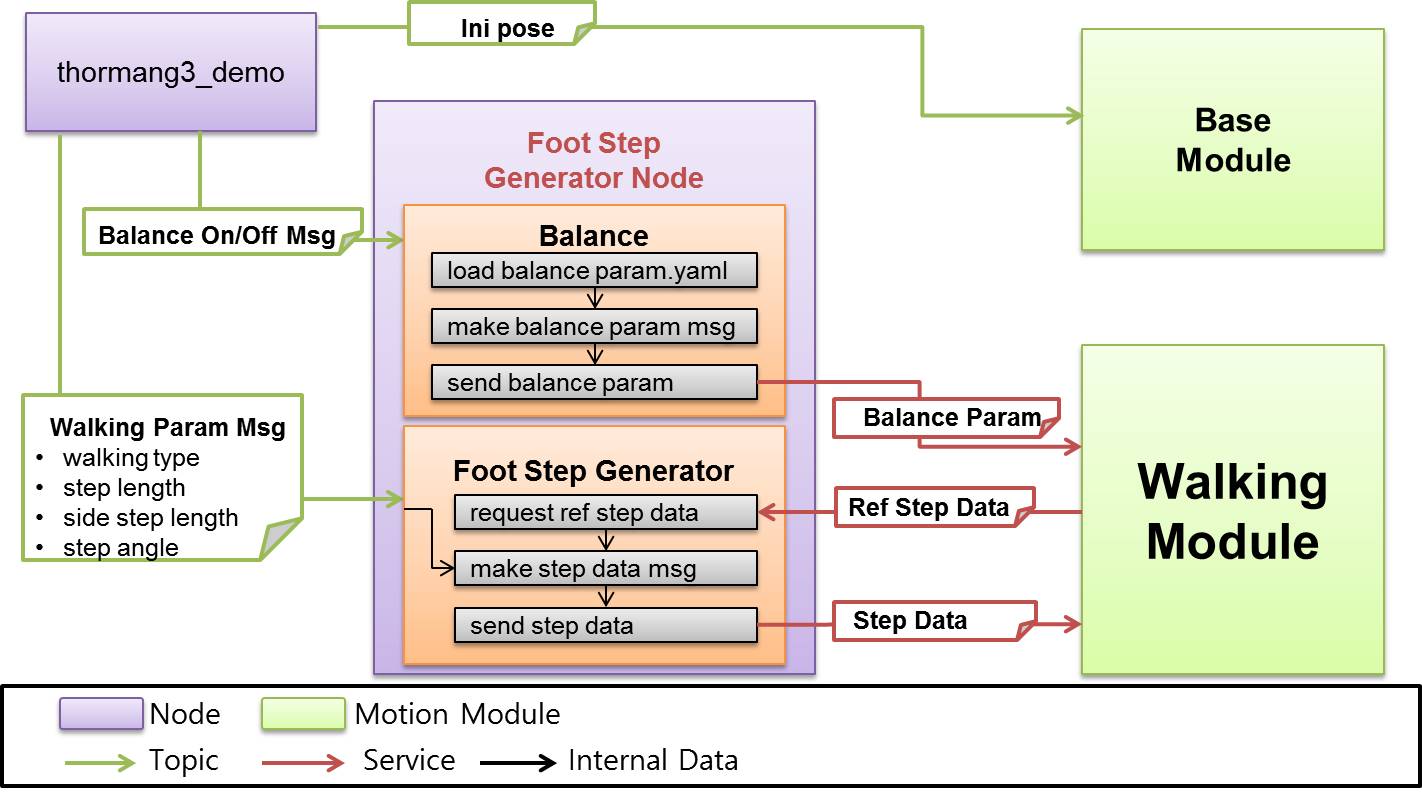
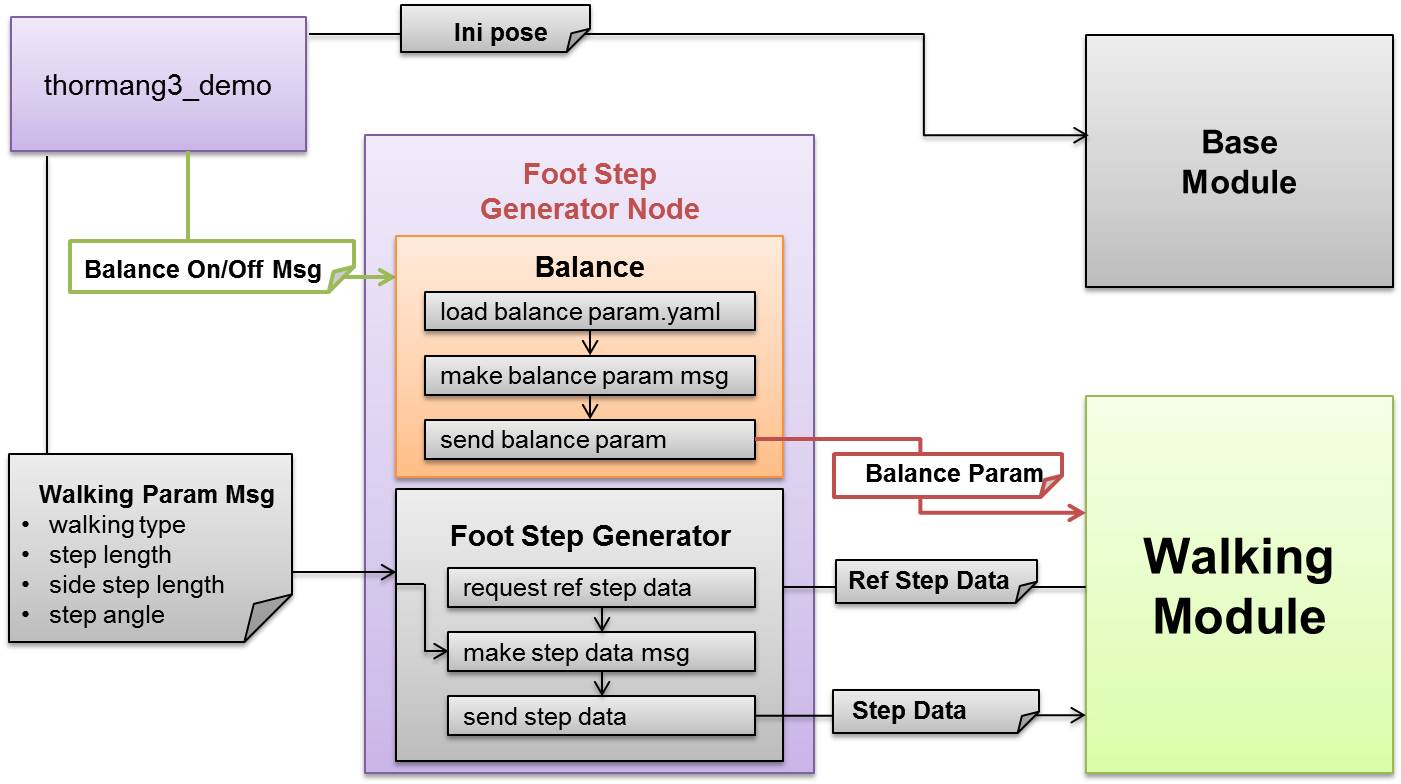
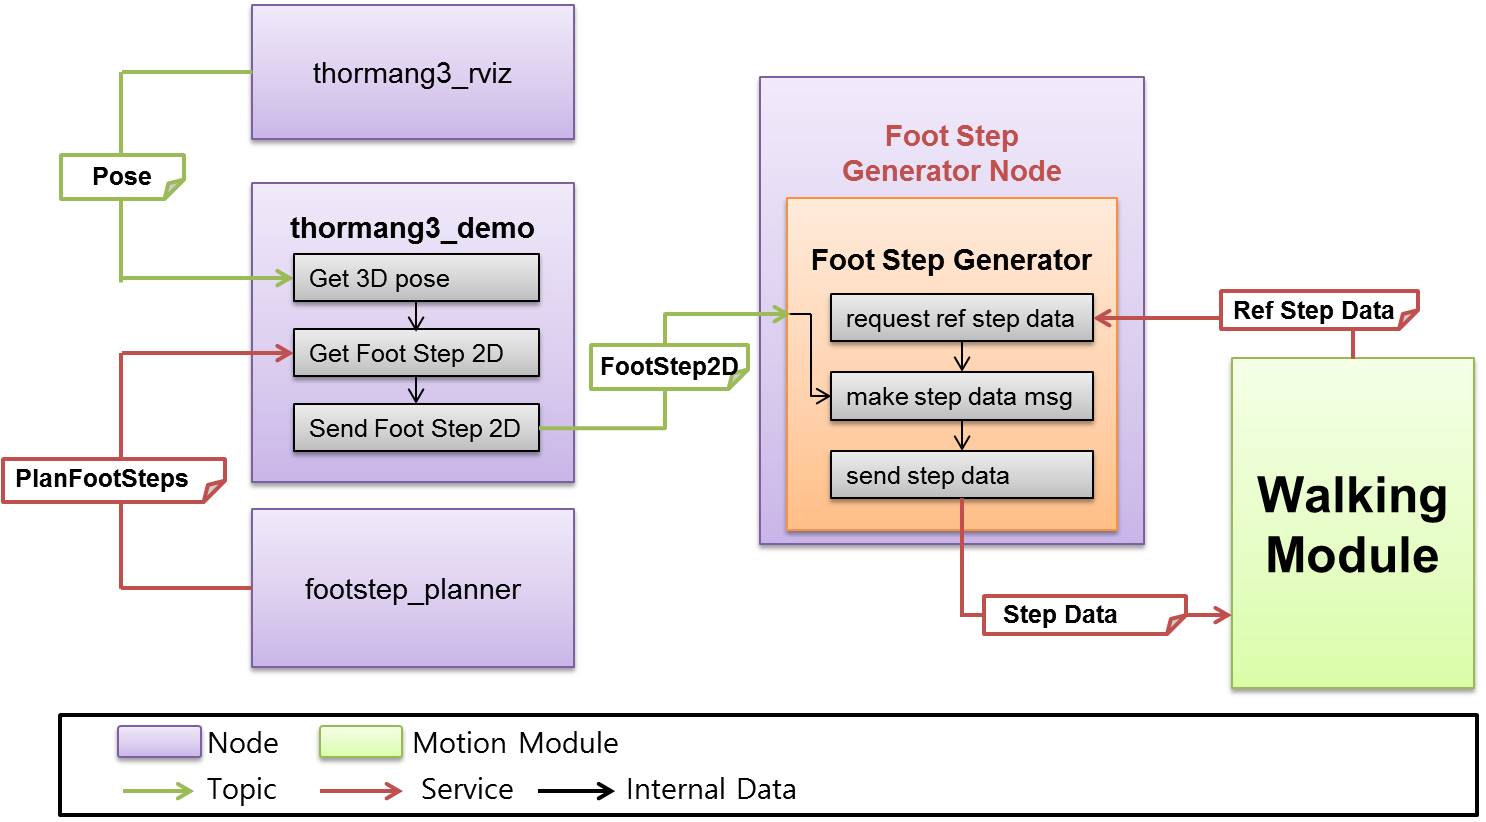
Walking with thormang3_demo and thormang3_foot_step_generator
Examples to control walking by using thormang3_demo and thormang3_foot_step_generator.
Structure looks like the below figure.
Install & Build
Reference : OPC Installation
Run
Reference : How to execute OPC’s GUI program
Usage
- Move to Robot Init Pose
- Click the
Robot Init Posebutton.
- Click the
- FT Sensor Calibration
- FT sensor calibration is important for the walking operation.
- FT Sensor calibration is recommended when there are significant environmental changes such as motor replacement and temperature change.
- FT Sensor calibration can be done as below.
Reference : How to calibrate feet ft sensors
- Set Mode
- Click the
Walking Modulebutton to switch to Walking Mode.
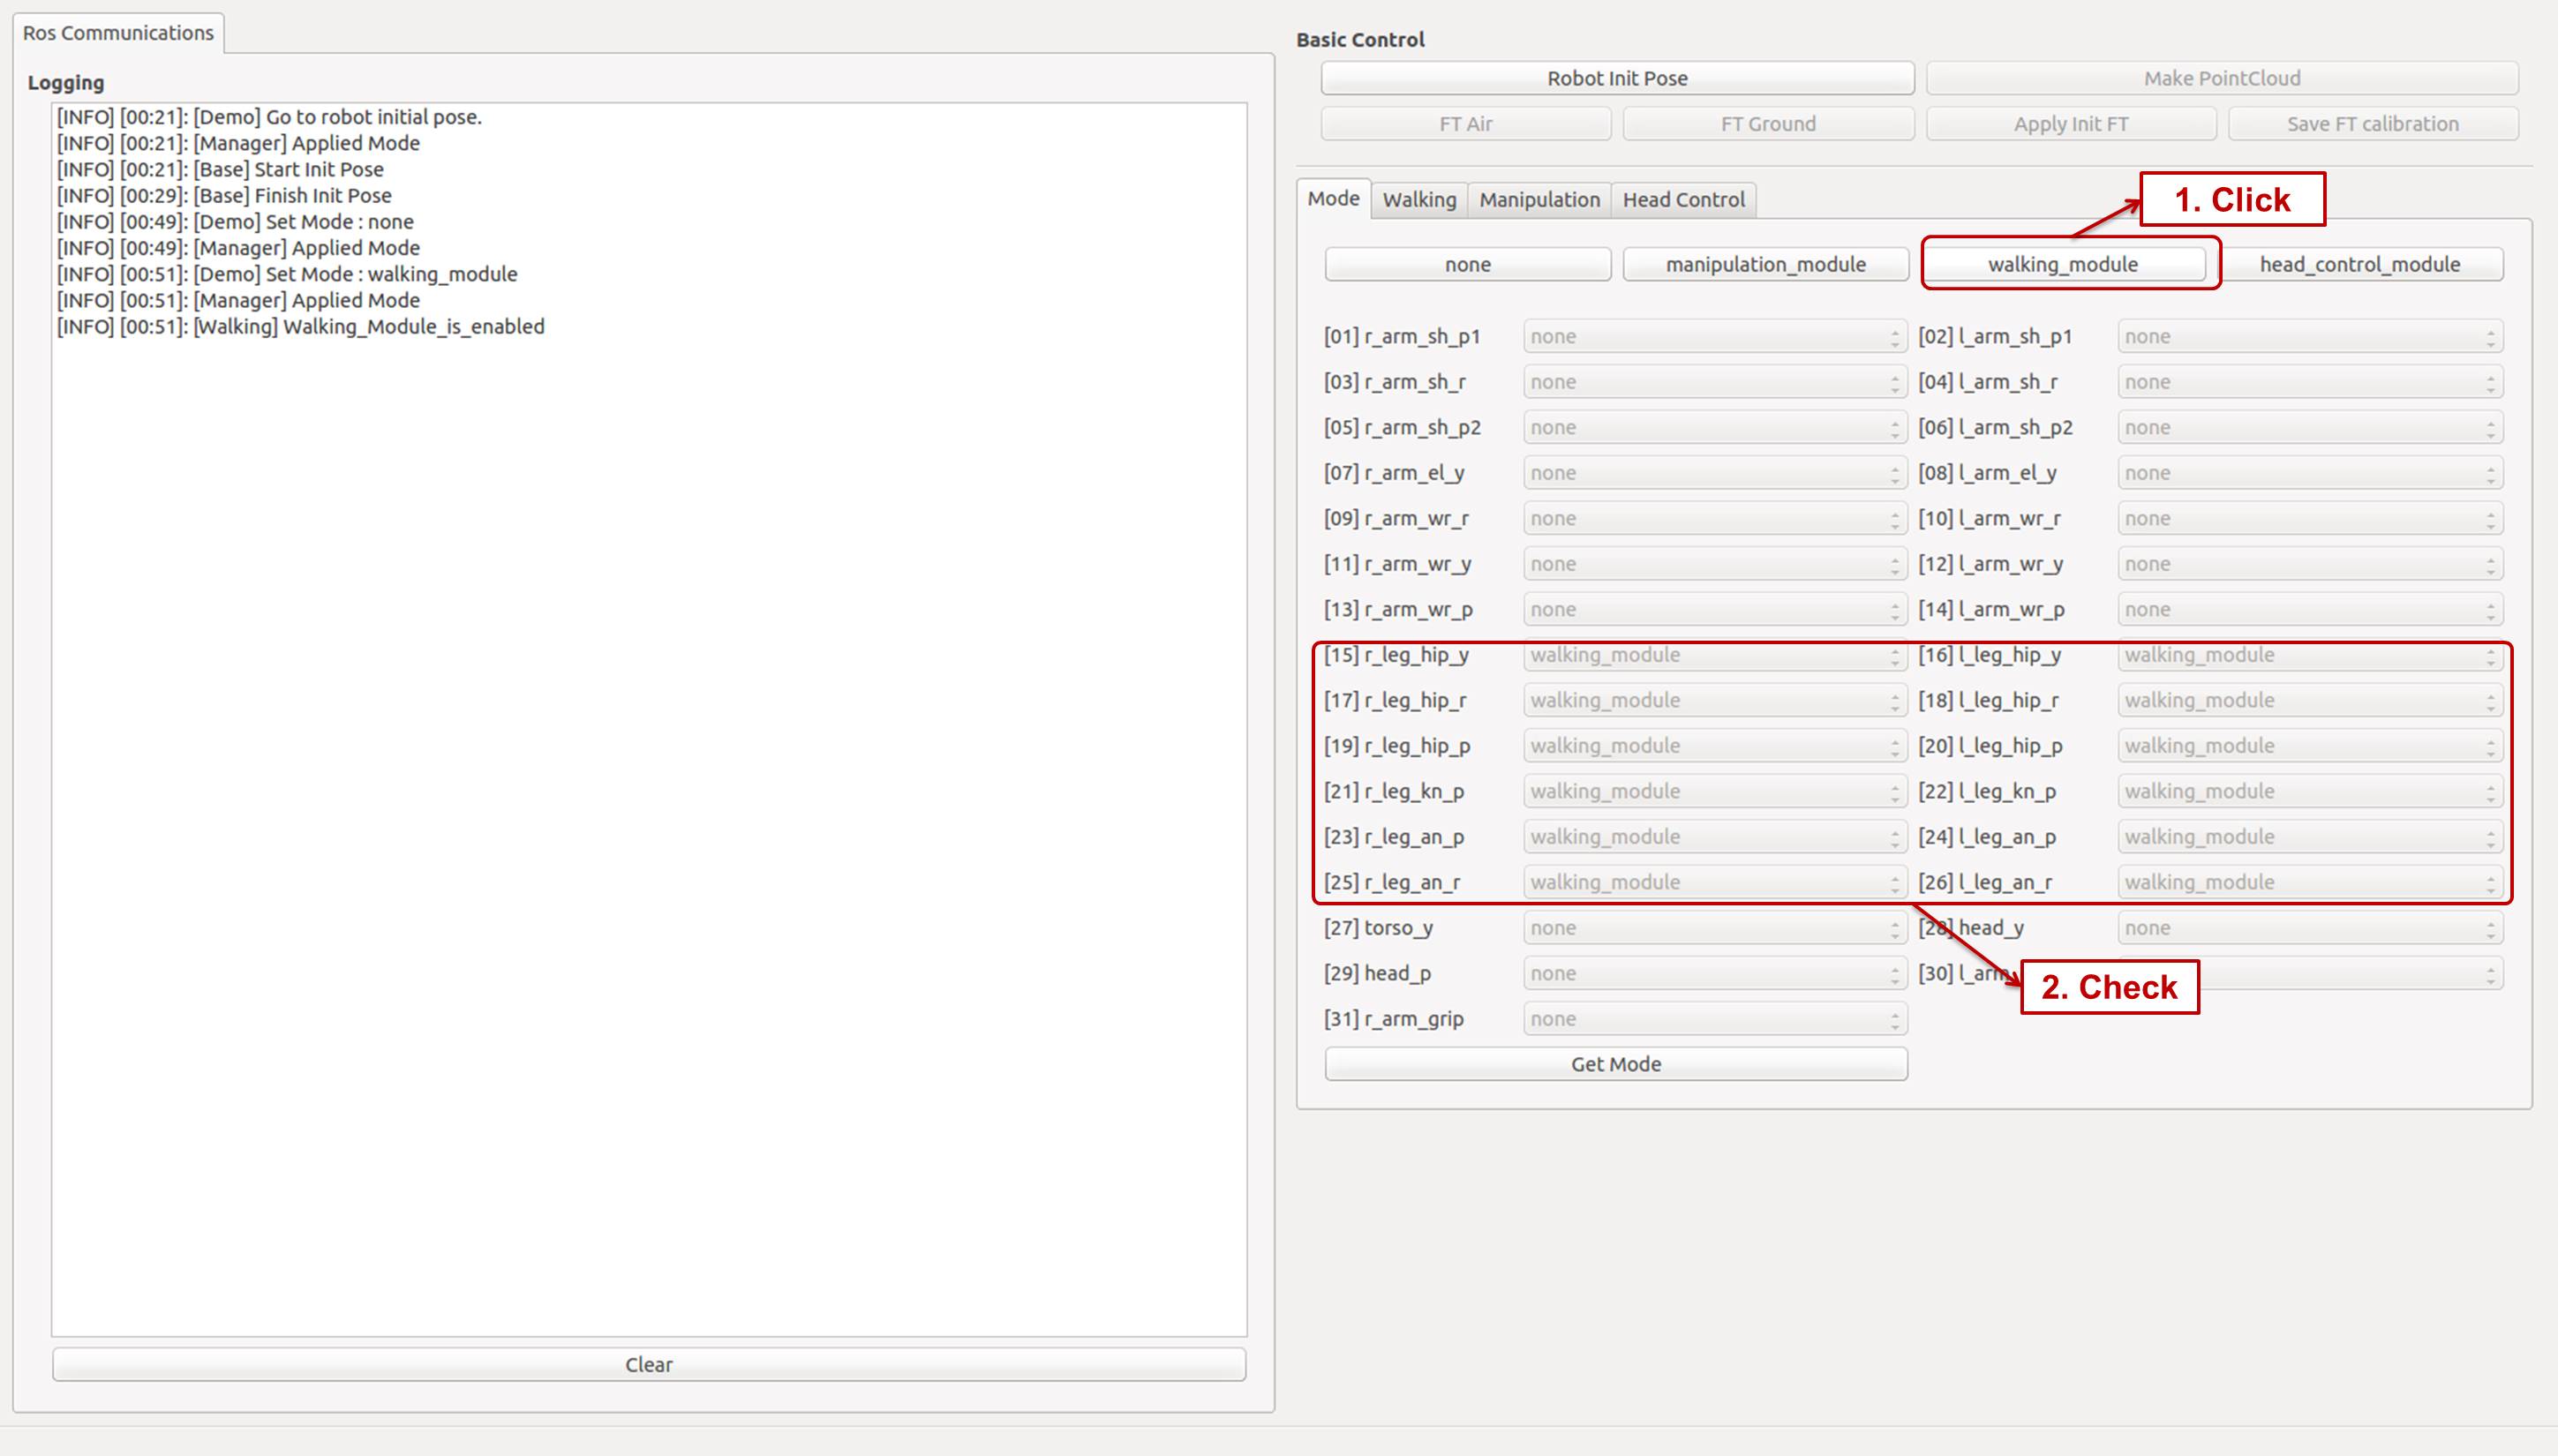
- Click the
- Balance On
- Select the
Walkingtab from the demo program. - Click
Onbutton in theBalance Control.
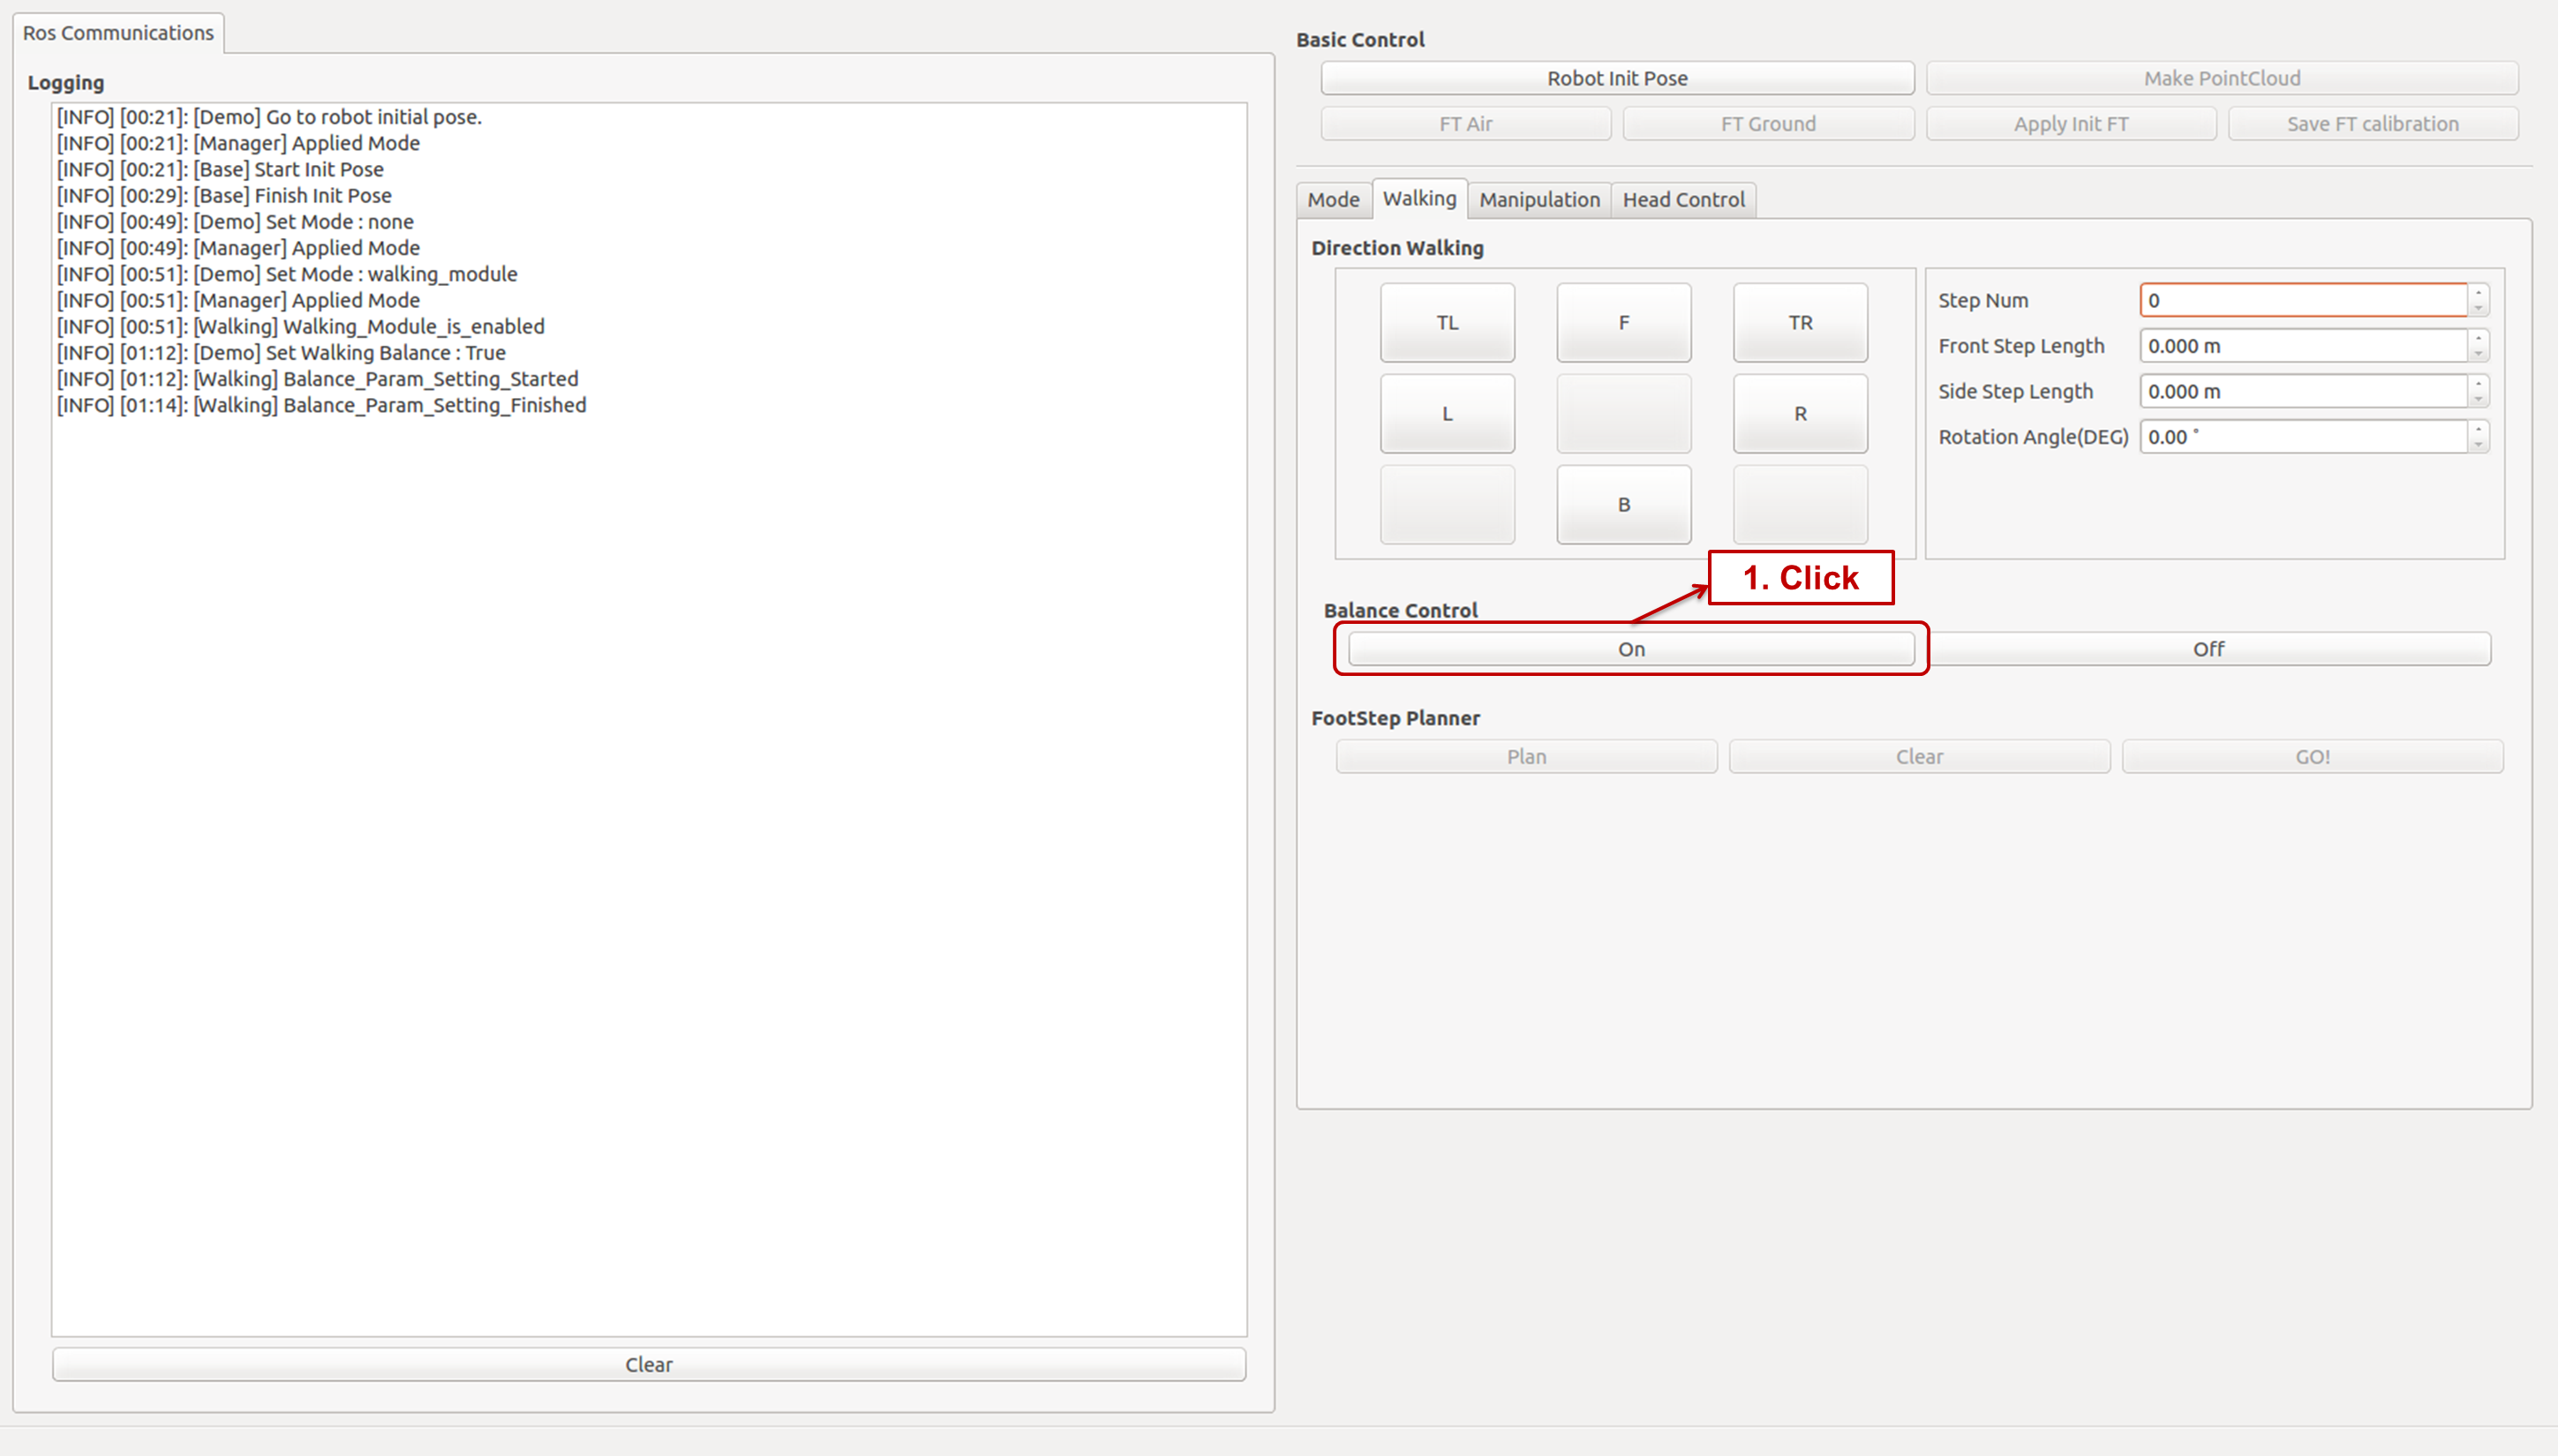
- Balance is turned on by configuring [Balance Parameter] with the
/robotis/walking/set_balance_paramservice. - Balance Parameter is updated with the saved value in the [thormang3_foot_step_generator/data/balance_param.yaml].
- Select the
- Walking Control
- Configure Walking Parameters on the right of the
Direction Walkingpanel. - After configuring parameters, clicking one of Walking Directions will initiate walking of THORMANG3.
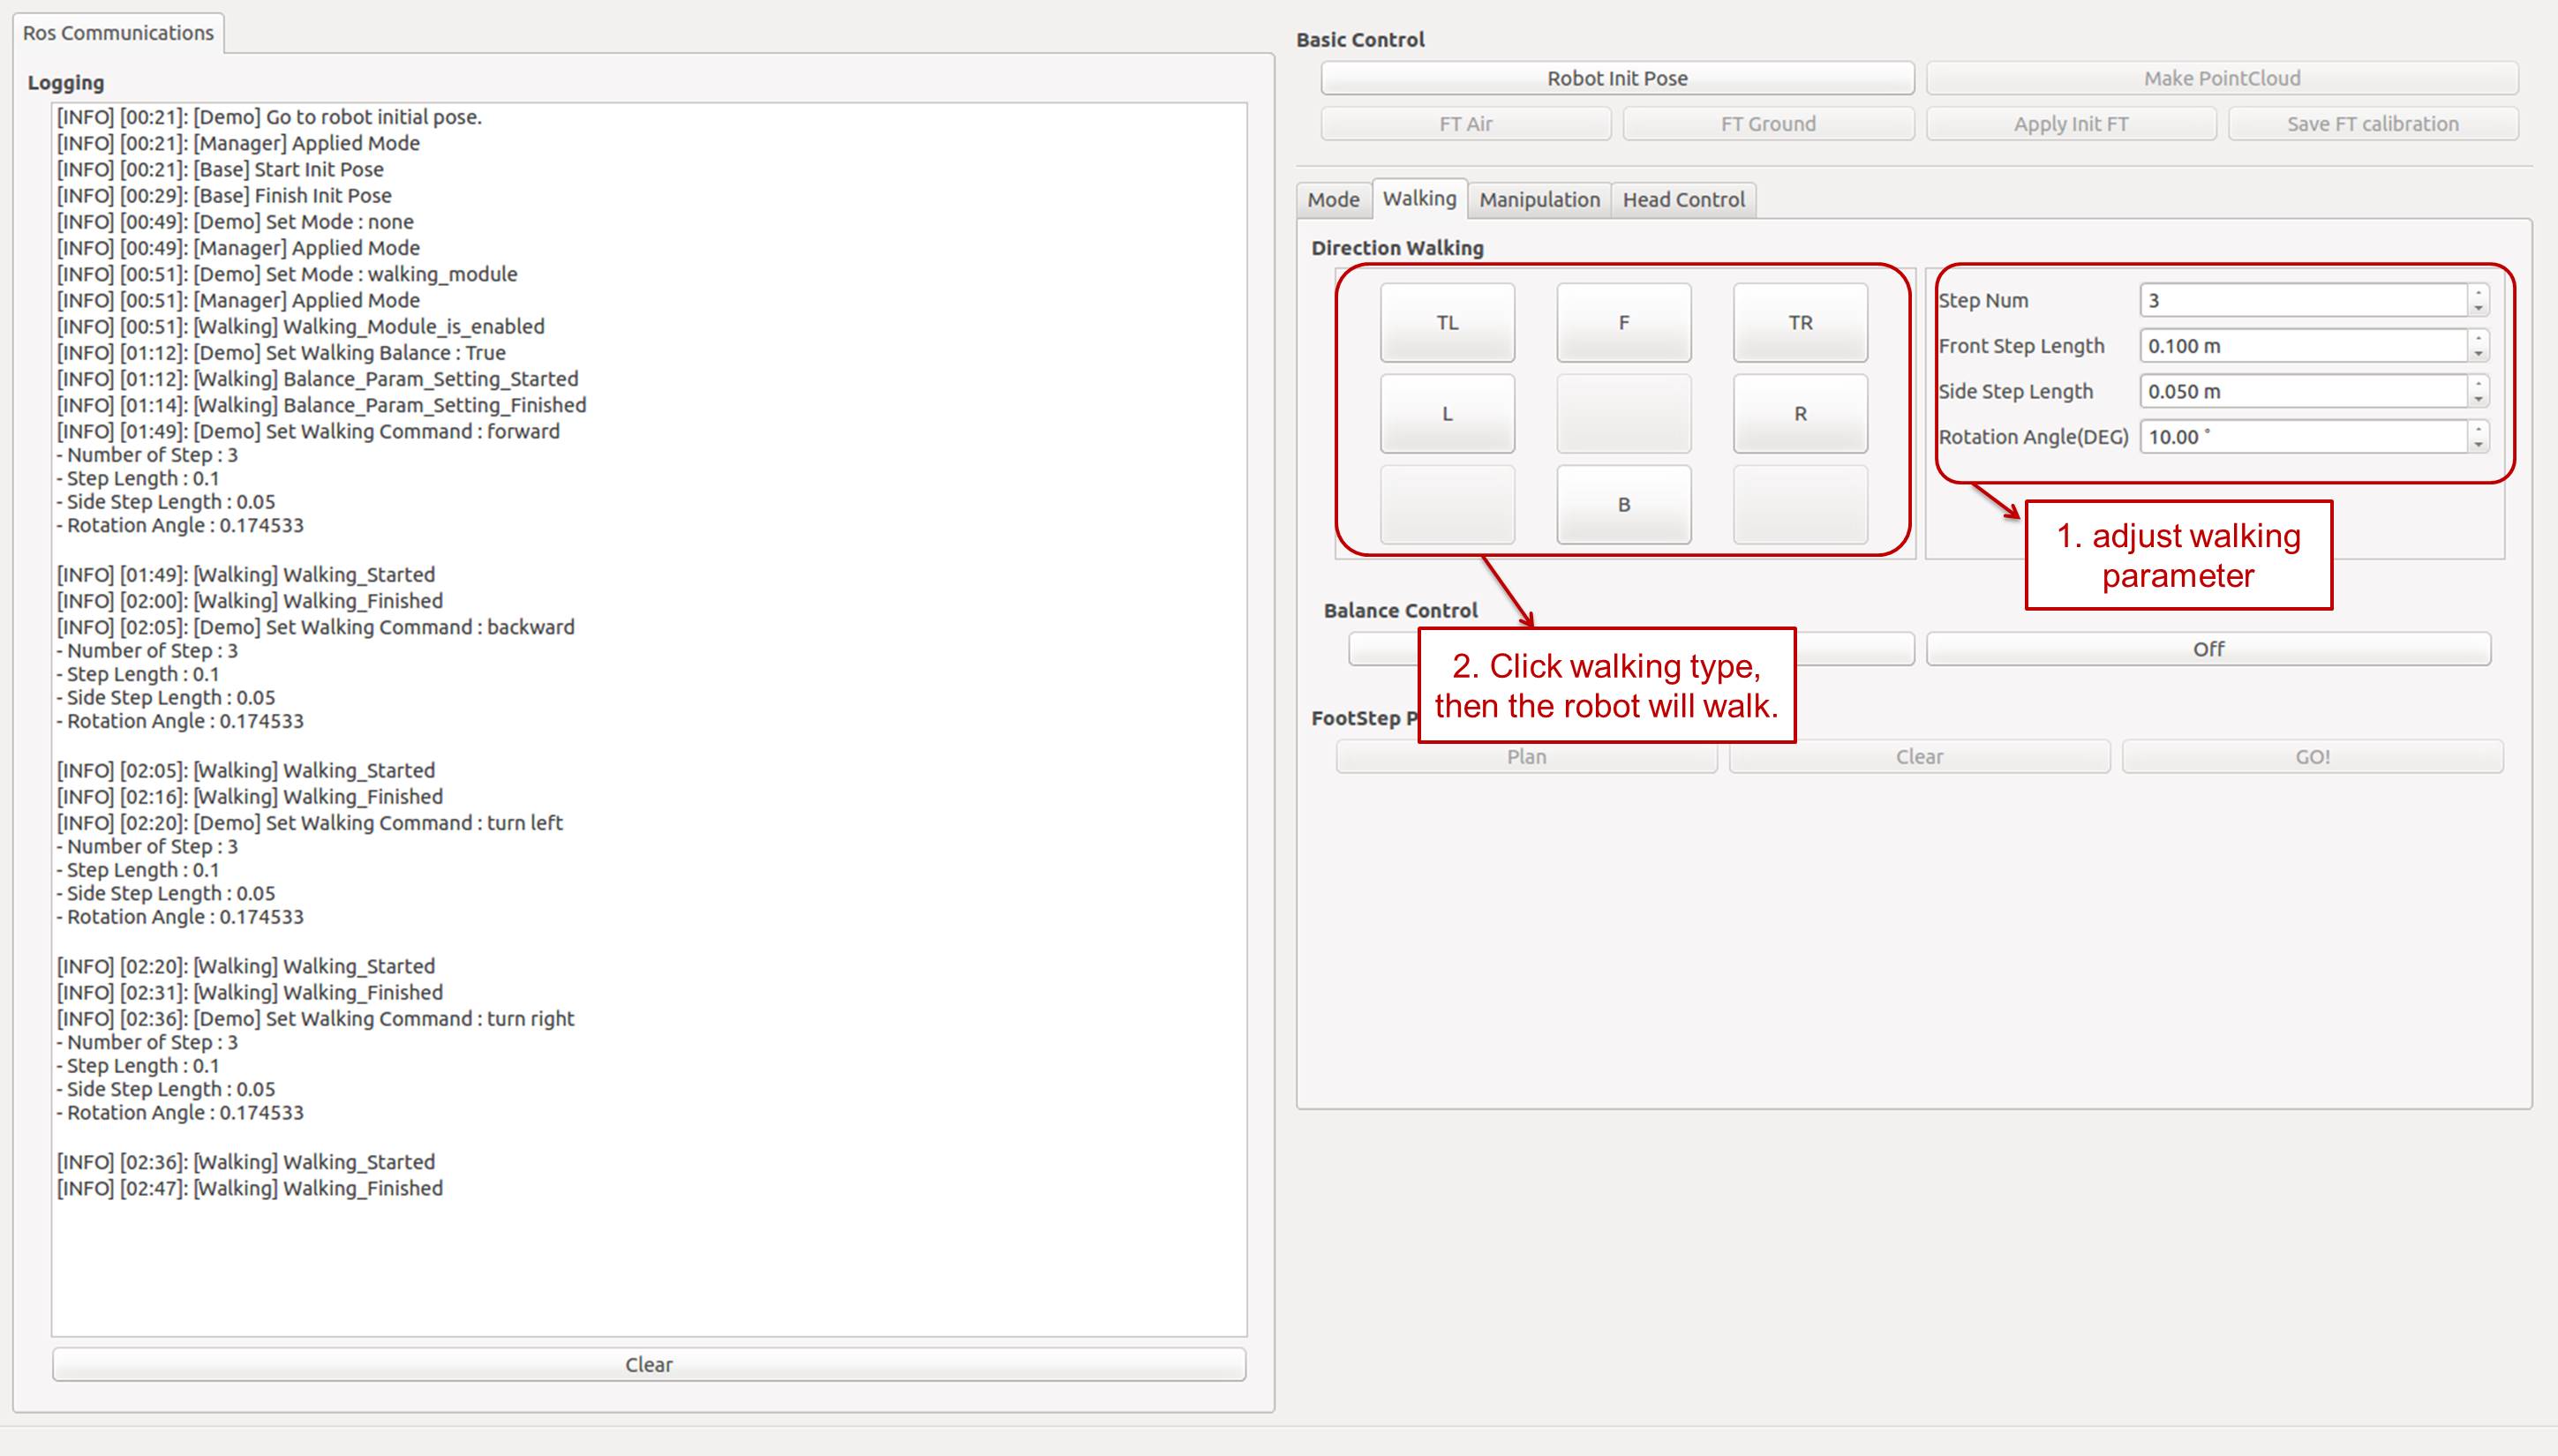
- The procedure flows as below.

- Configure Walking Parameters on the right of the
Walking with thormang3_demo and footstep_planner
A walking example that follows StepData using footstep_planner.
Install & Build
Reference : OPC Installation
Run
- Execute thormang3_demo as below.
Reference : How to execute OPC’s GUI program
- Execute footstep_planner.
Usage
- Basic Operation
- Sequentially proceed 1~4 of Usage from above “Walking with thormang3_demo and thormang3_foot_step_generator”.
- Add Visualization
- Click the
Addbutton on the Rviz window. - Select the
By Topictab and select the/demo/foot_step_marker/MarkerArray, then clickOK.
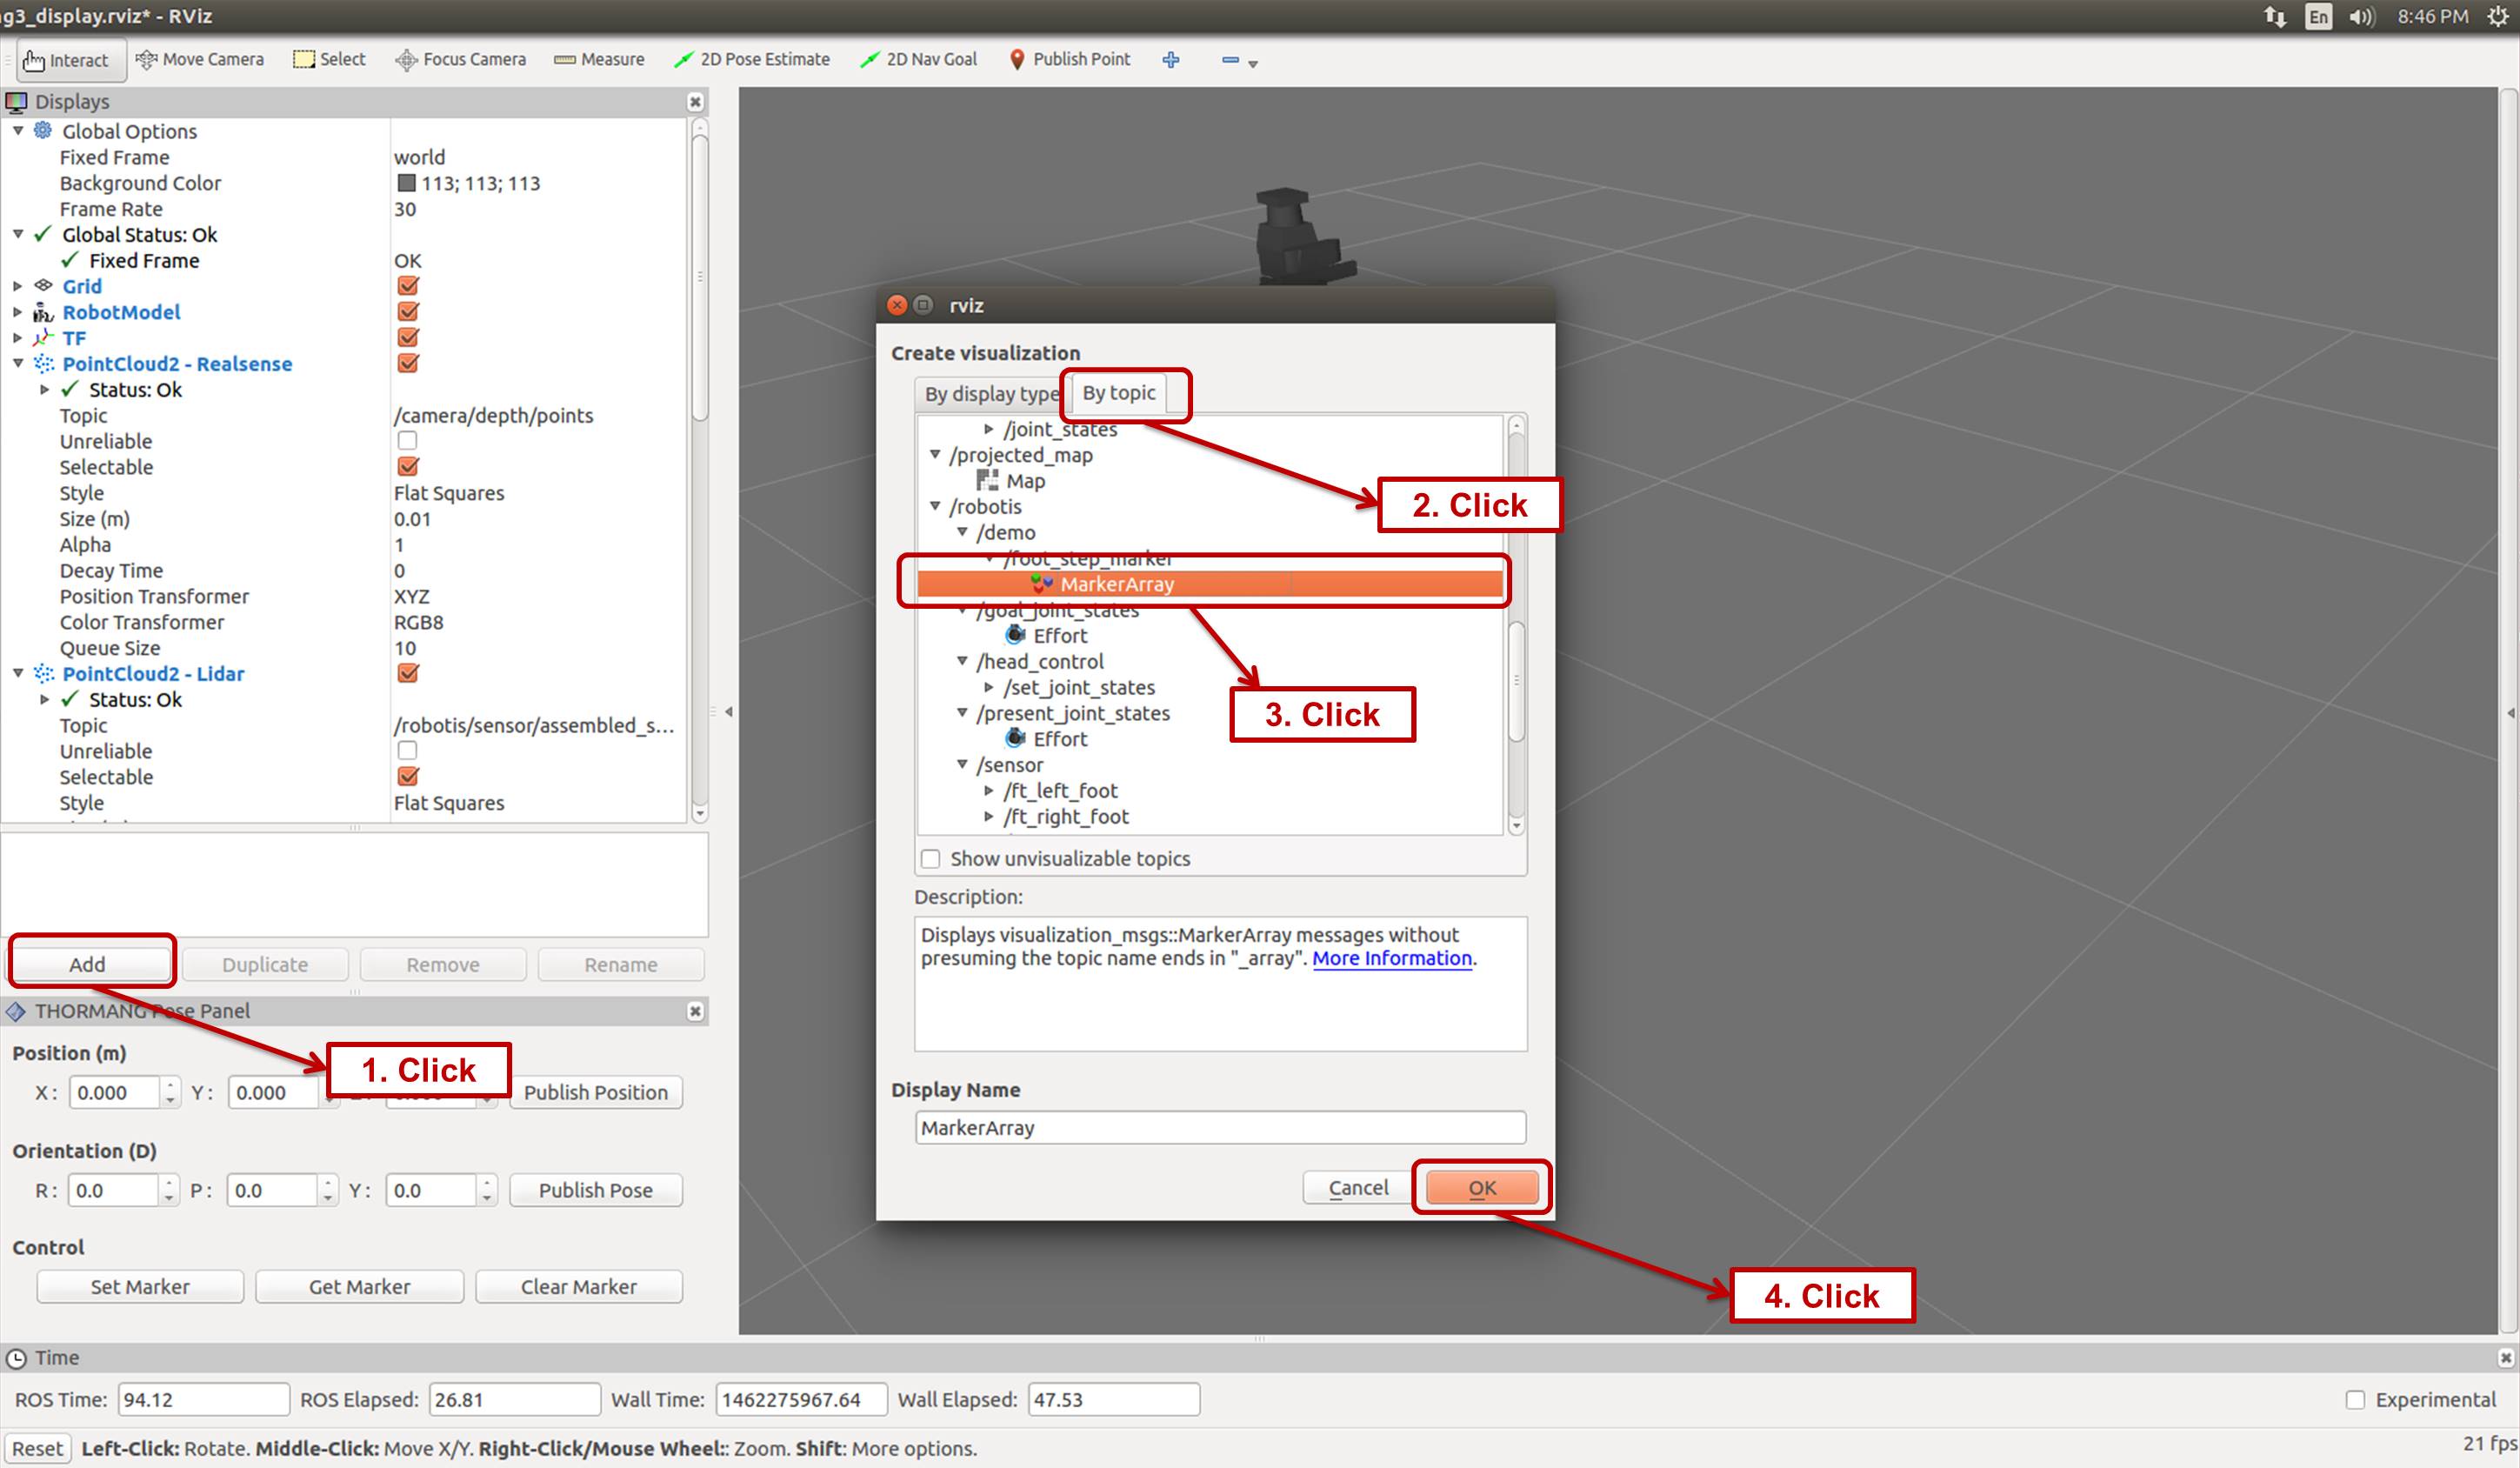
- Click the
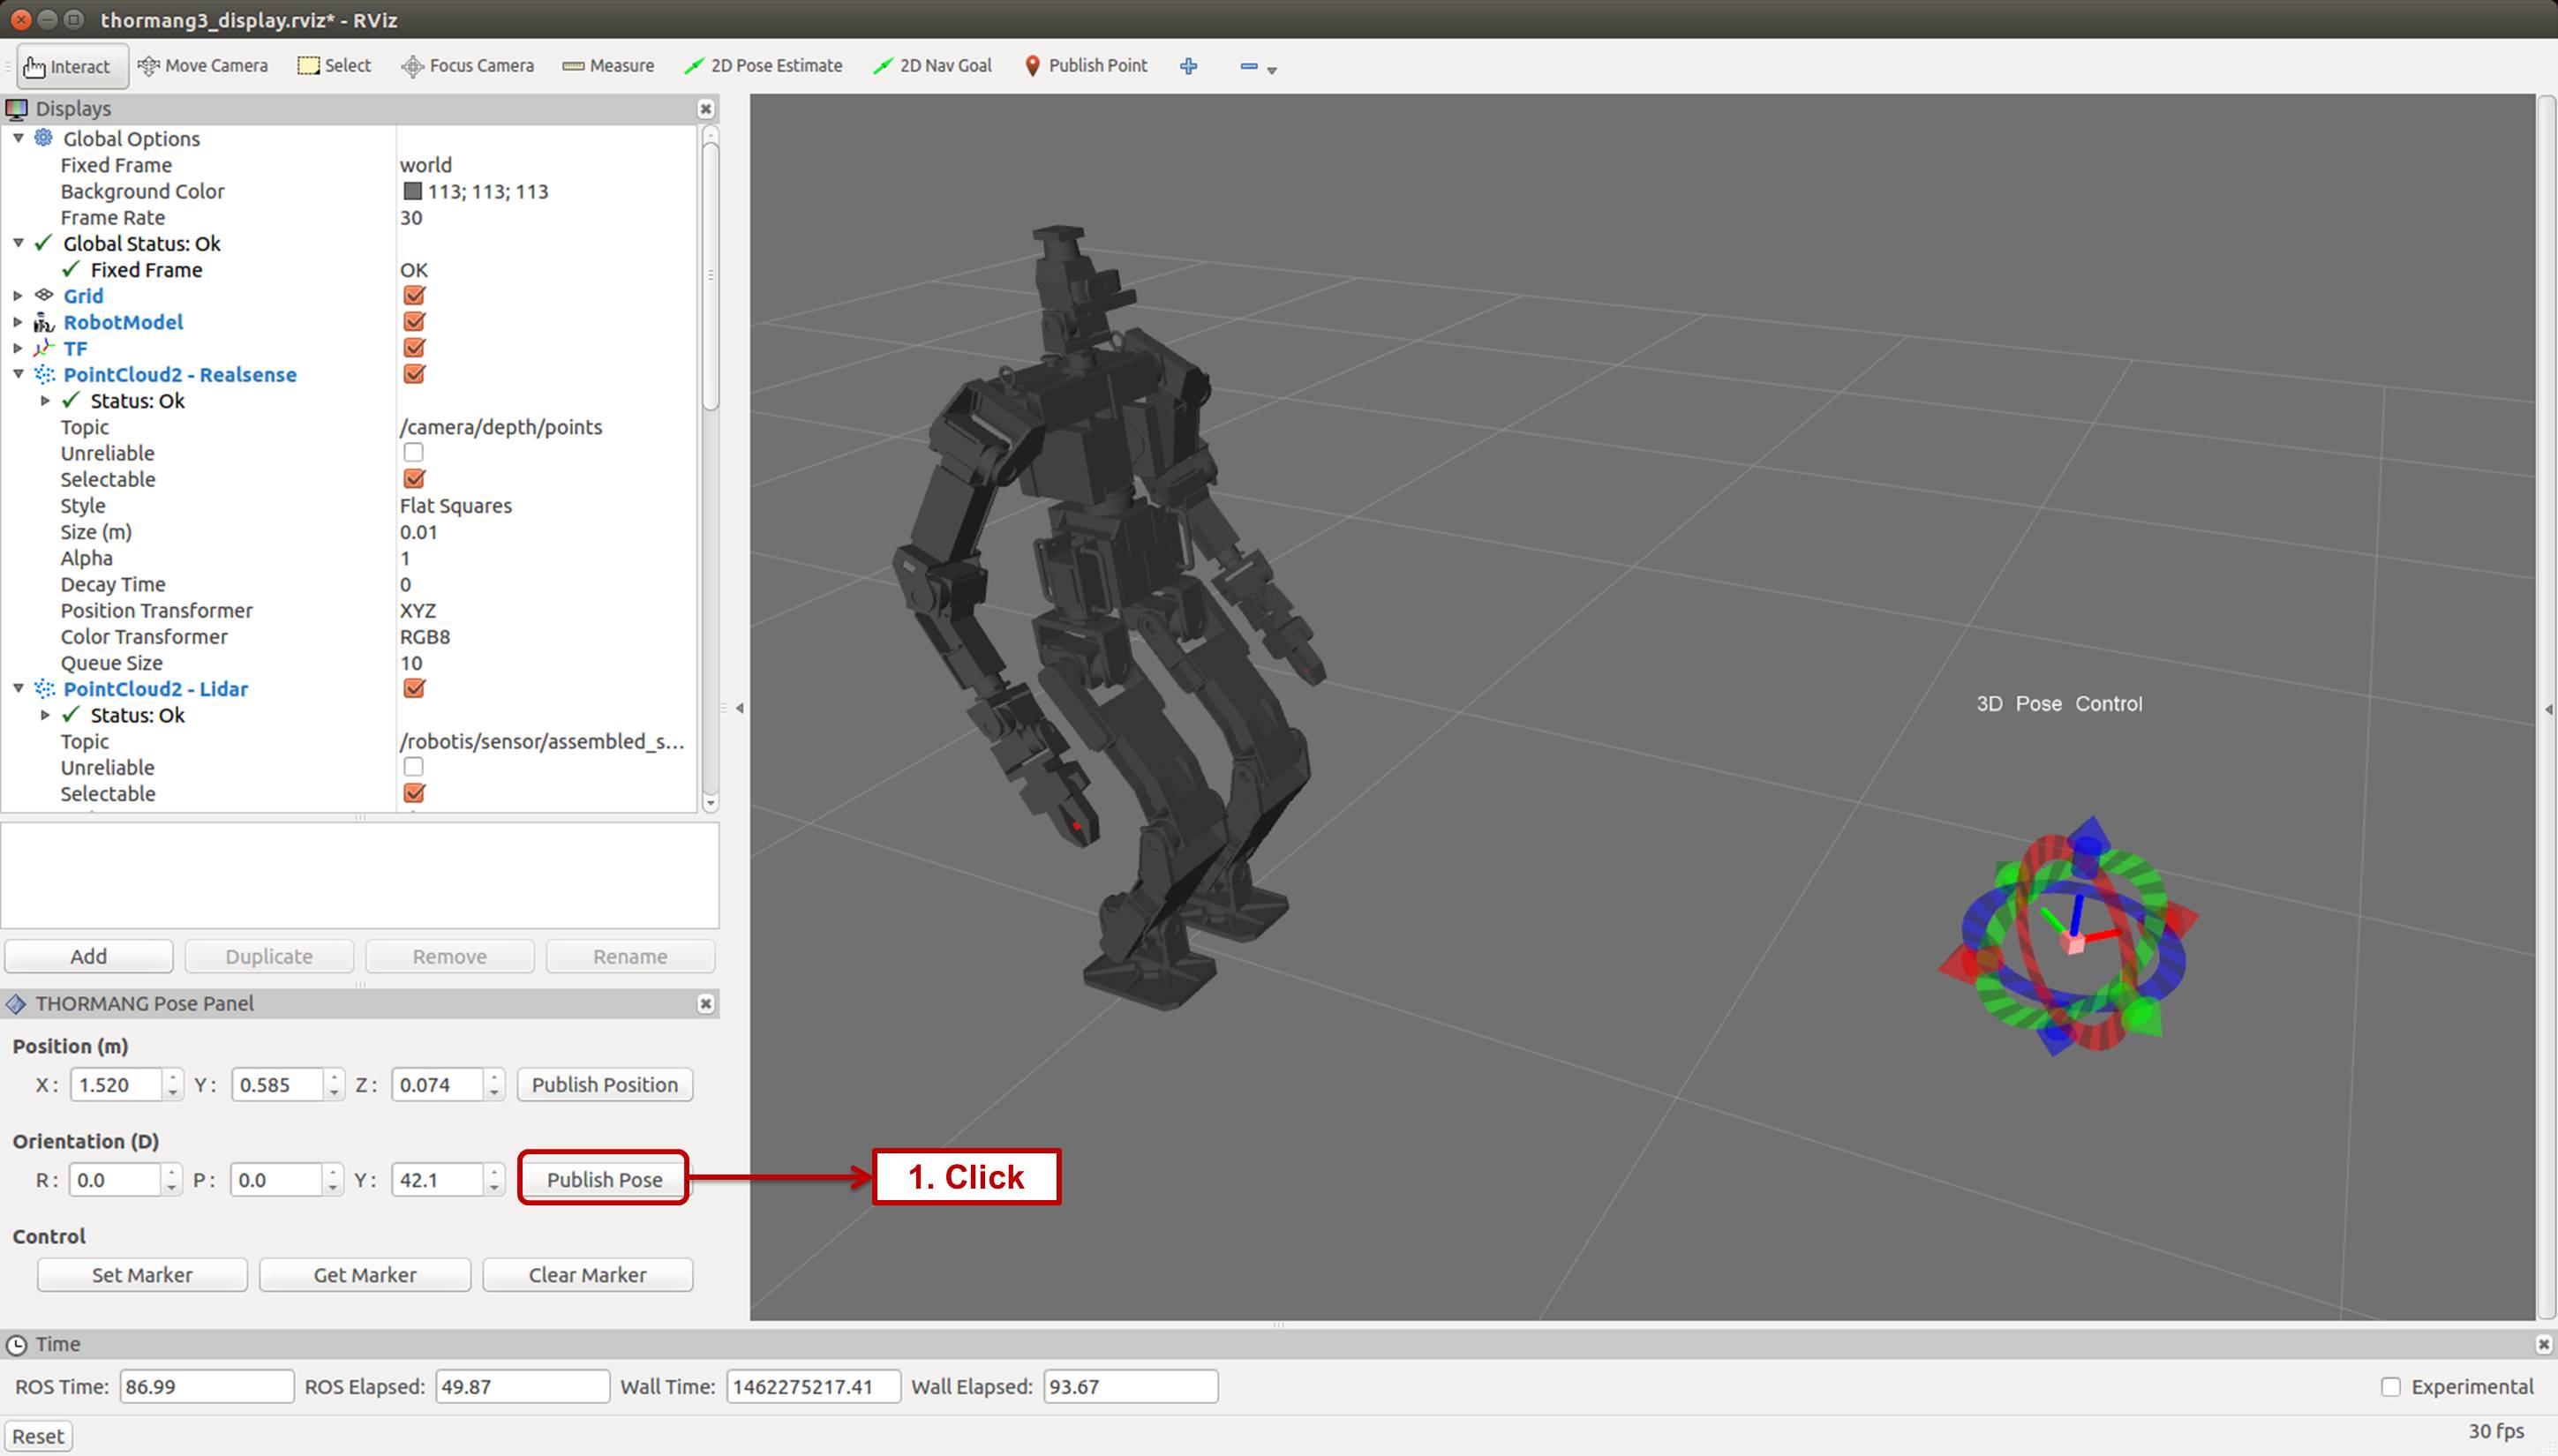
- Interactive Marker
- Click the
Publish Pointbutton on the Rviz window. - Click one of the THORMANG’s feet on the Rviz window.
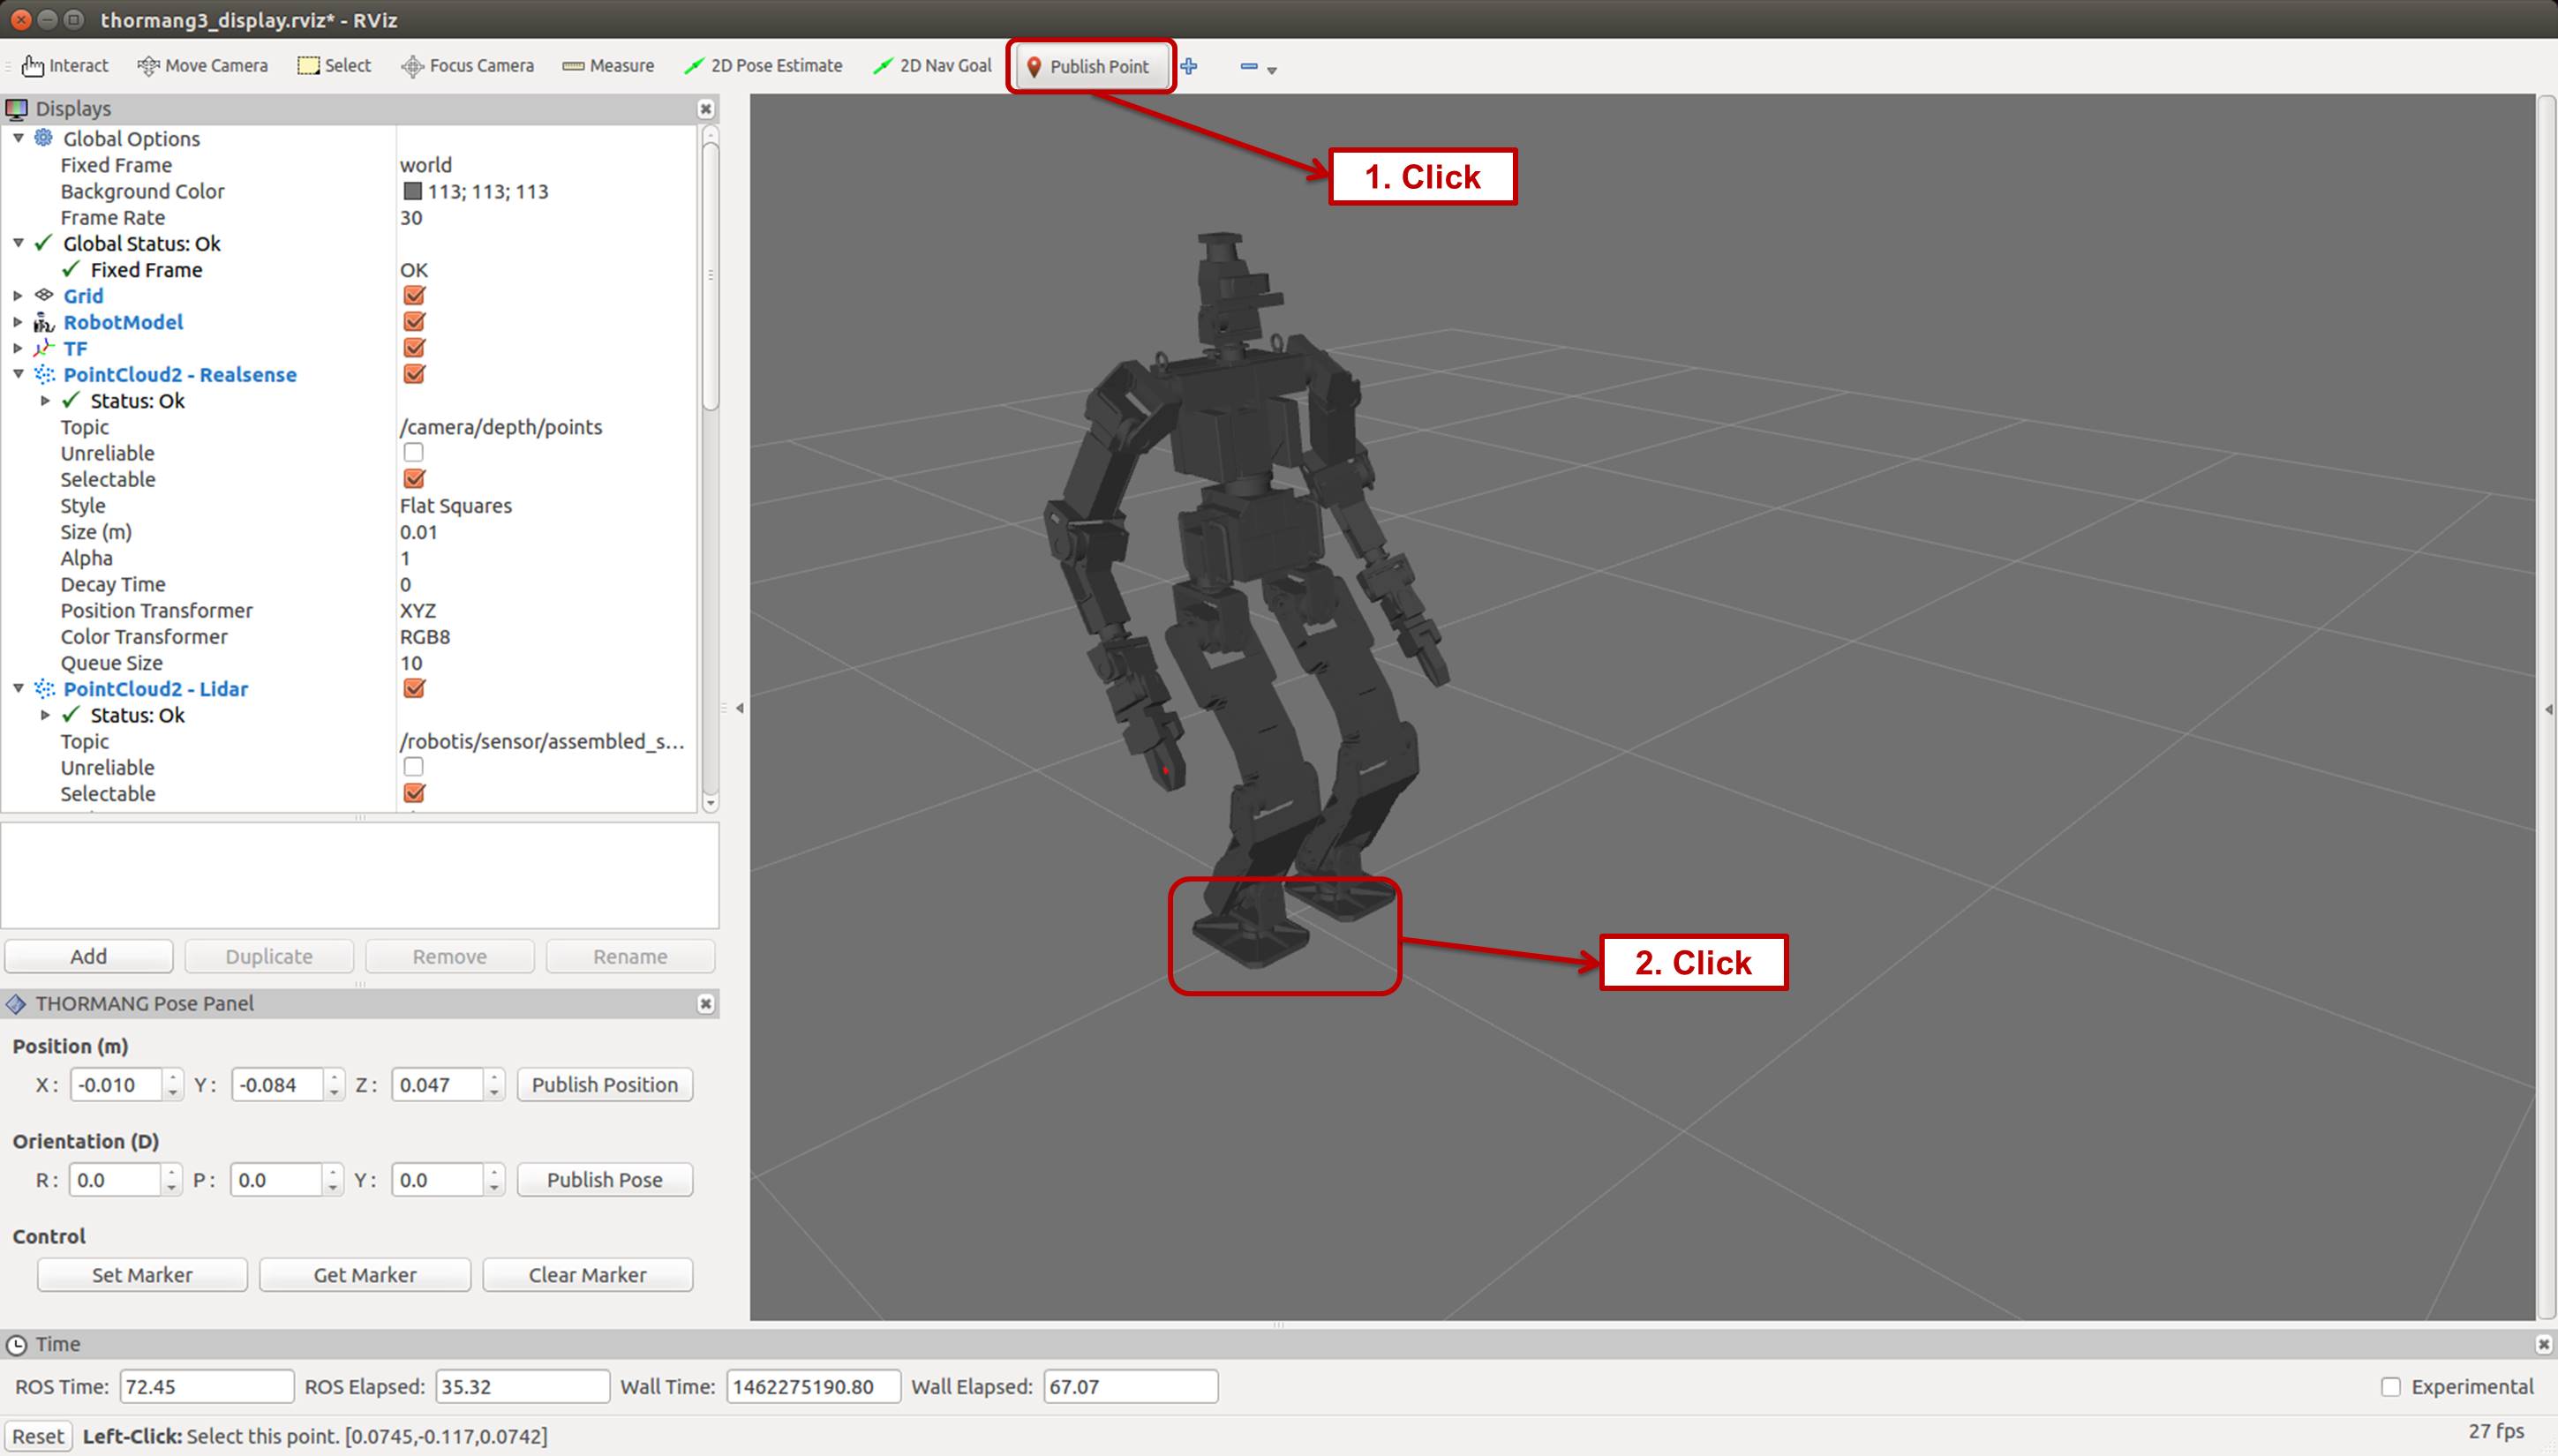
- Click
Set Markerbutton. - The Interactive Marker is activated on the Rviz window as below figure.
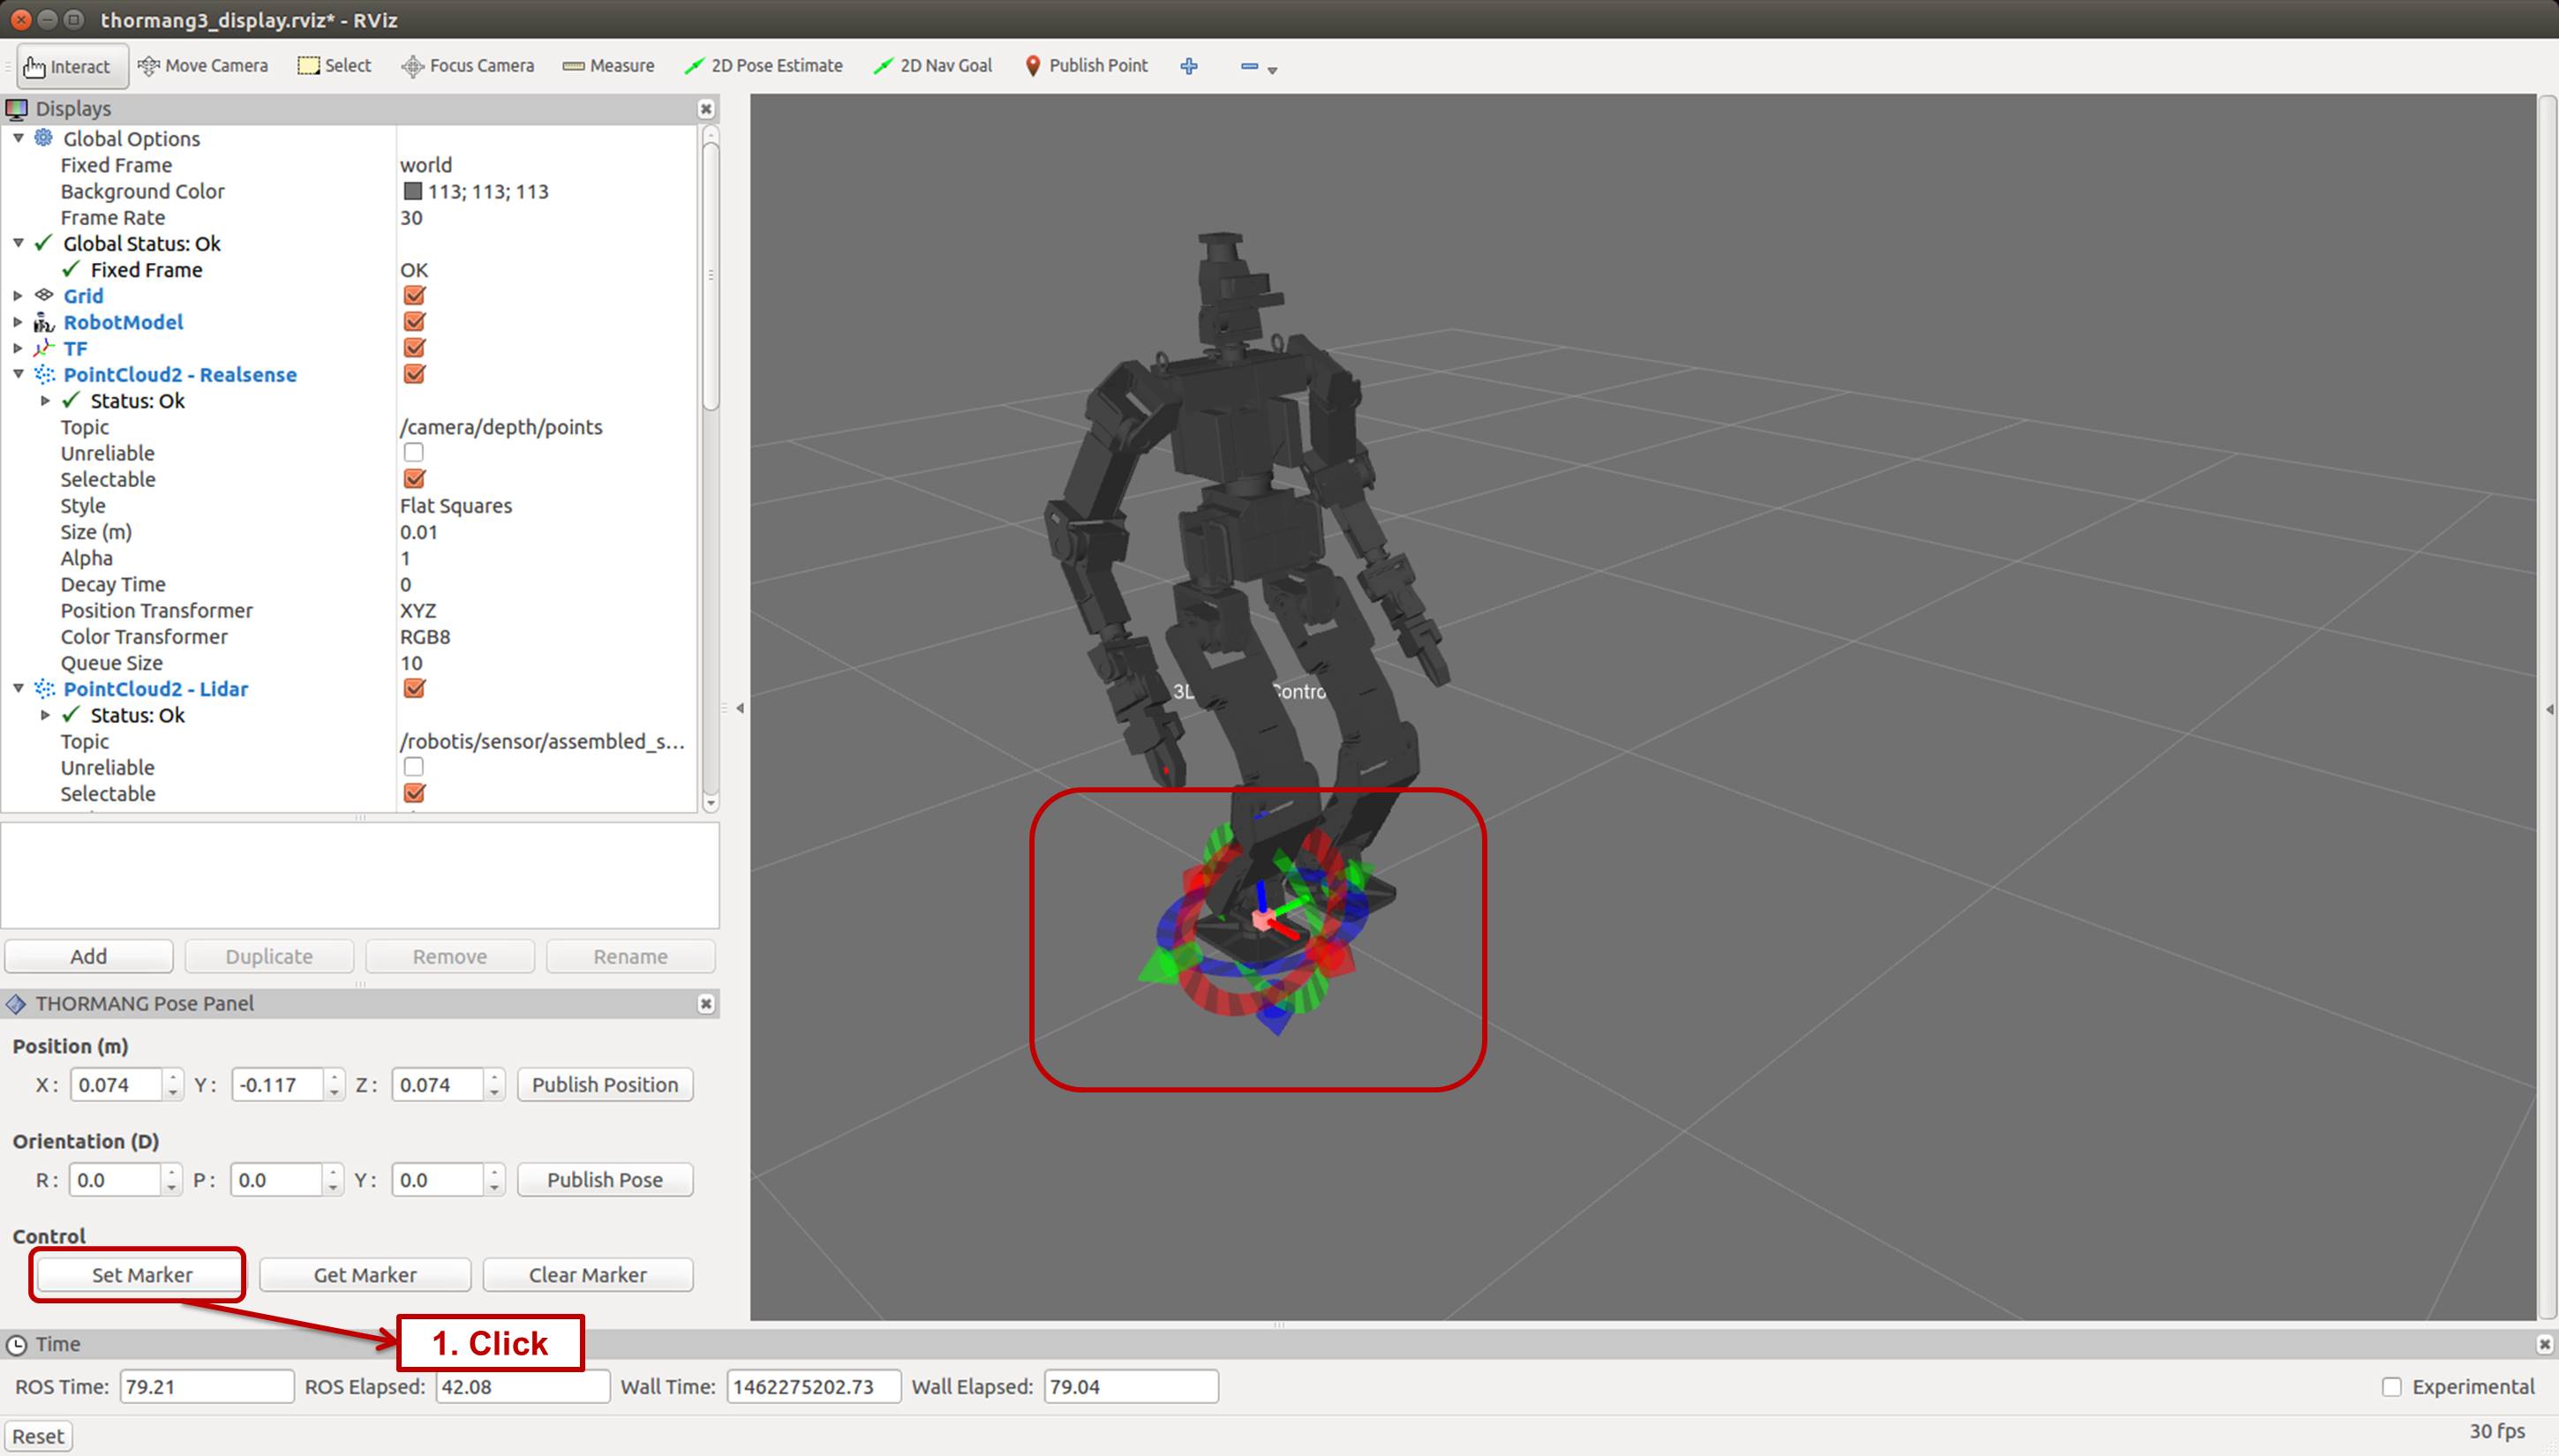
- Click the
- StepData Planning
- Move the Interative Marker and click
Publish Posebutton. Walkingtab of the thormang3_demo GUI should be selected ahead.
- After checking “Get Pose for Step” message from the GUI and activated
Planbutton, clickPlanbutton.
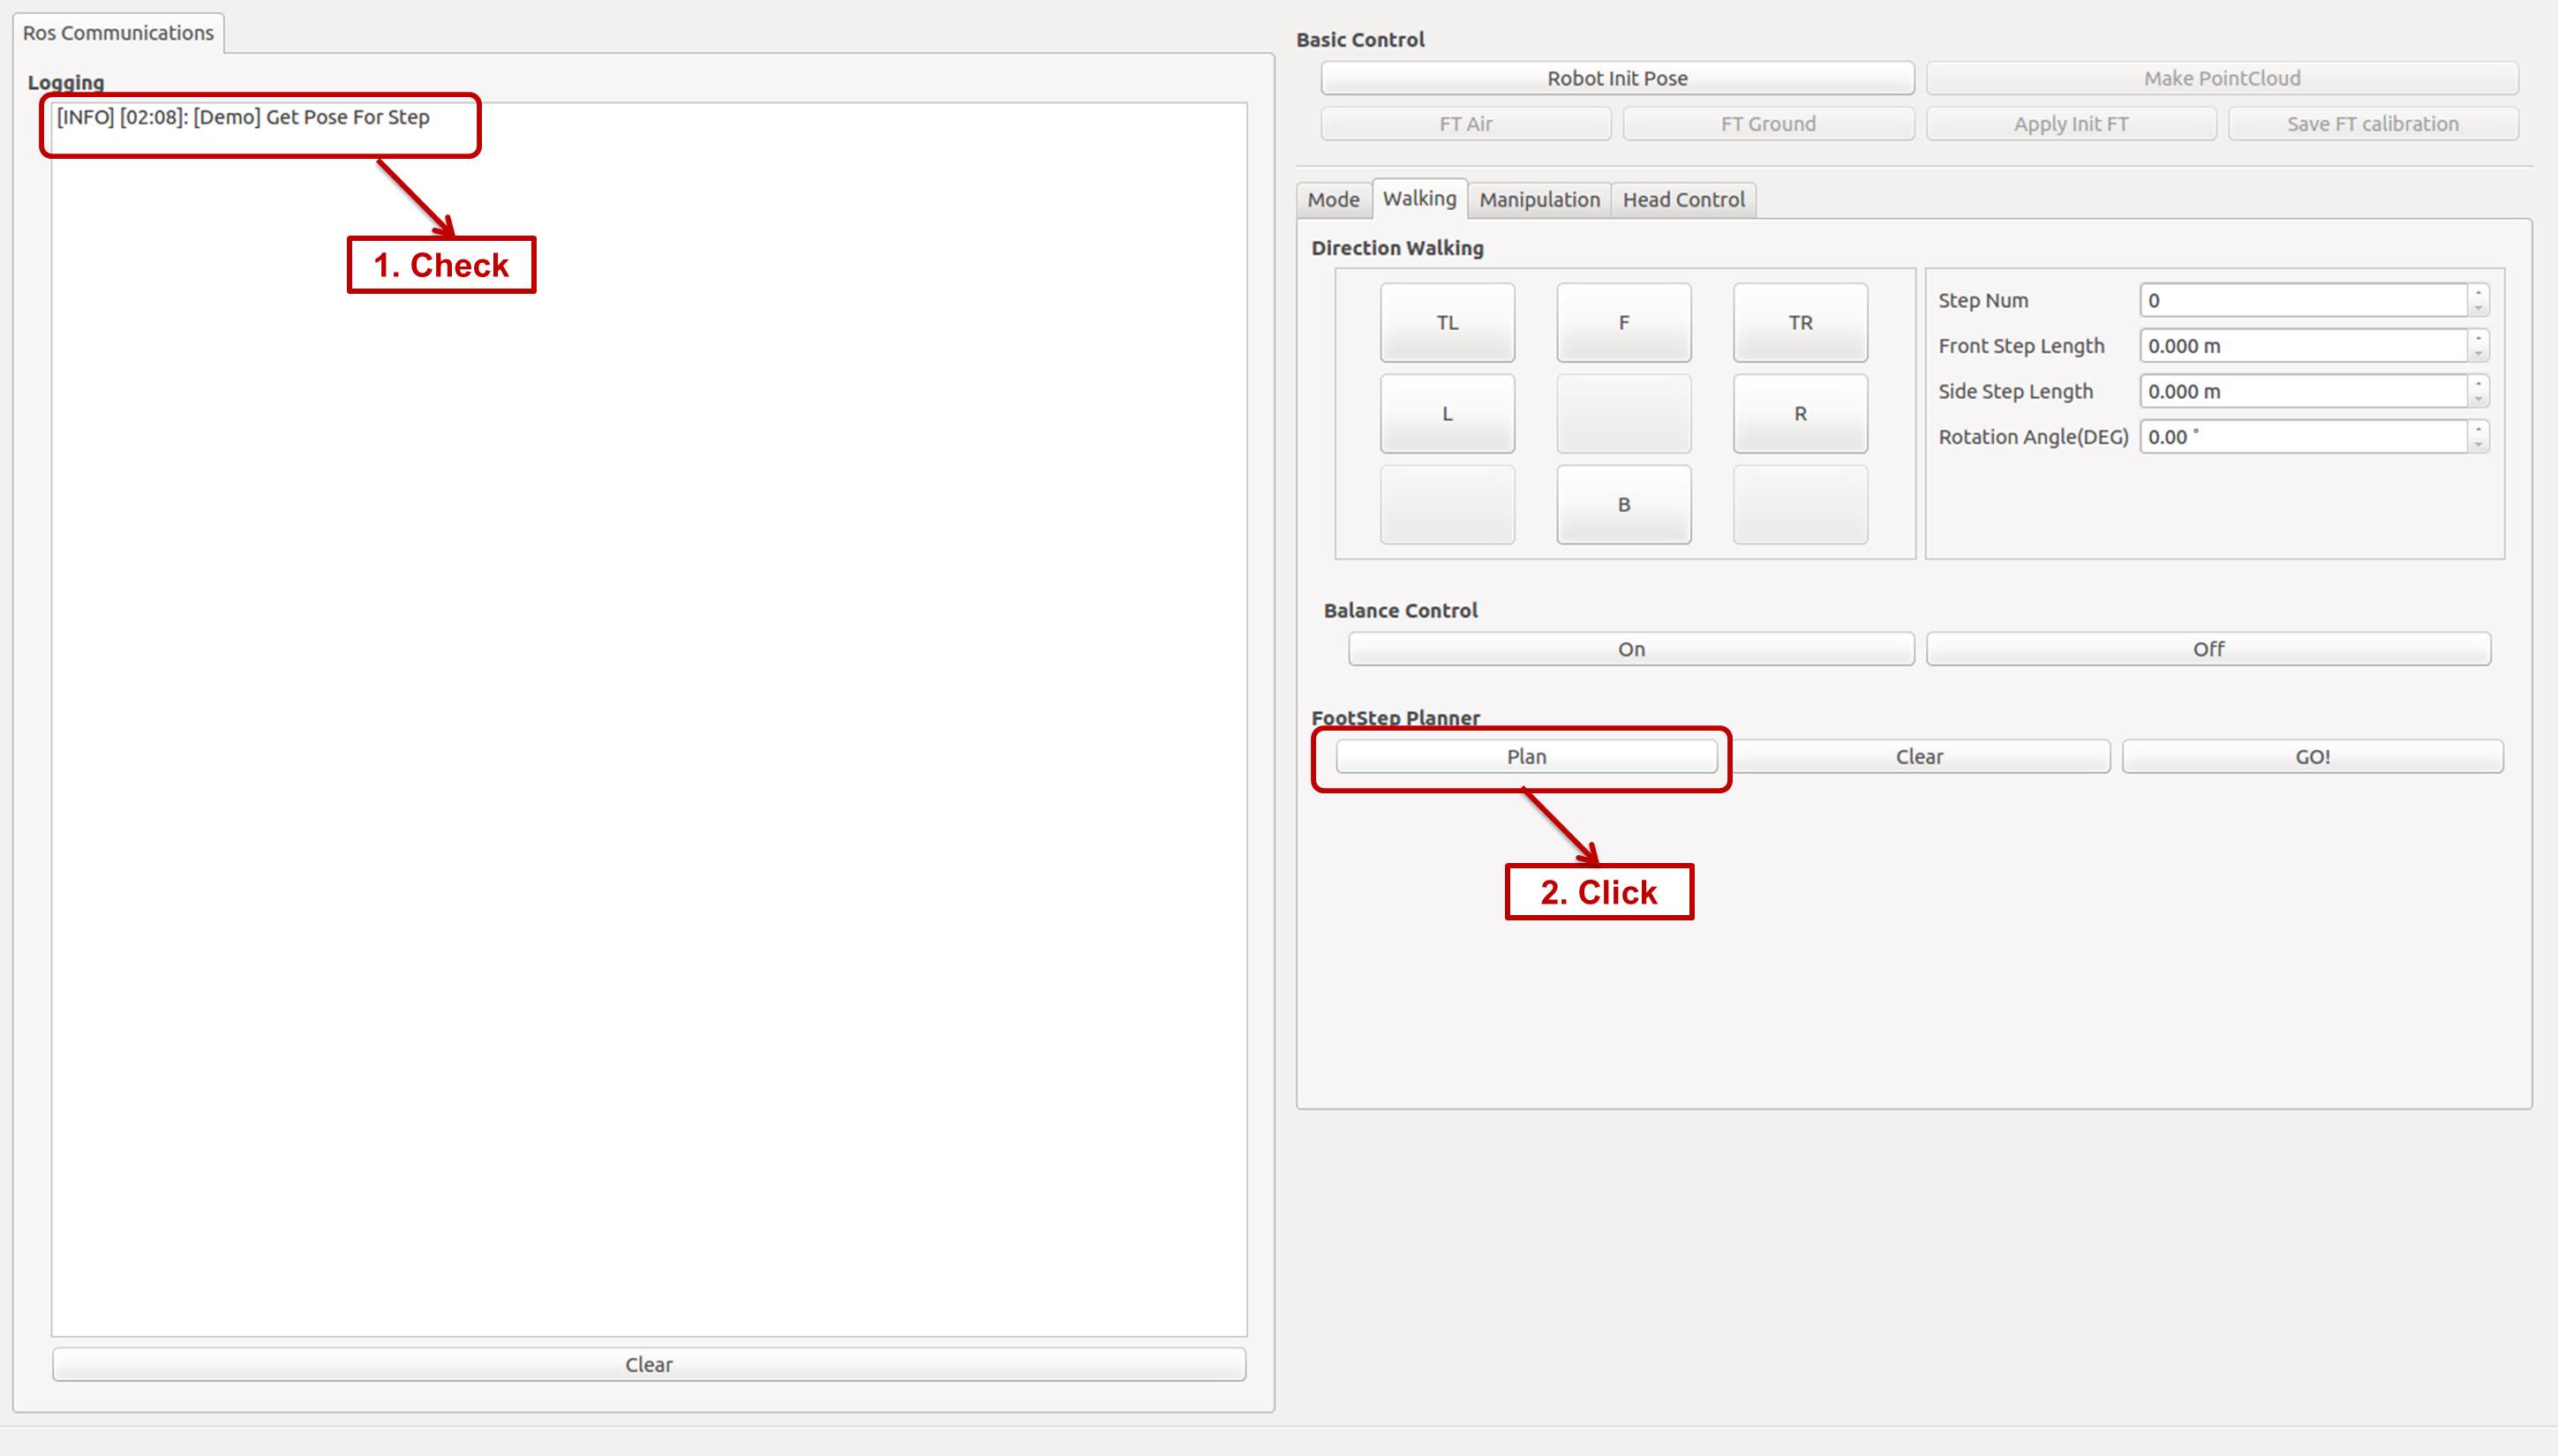
- When planning is completed, planned StepData can be seen on the Rviz GUI window.
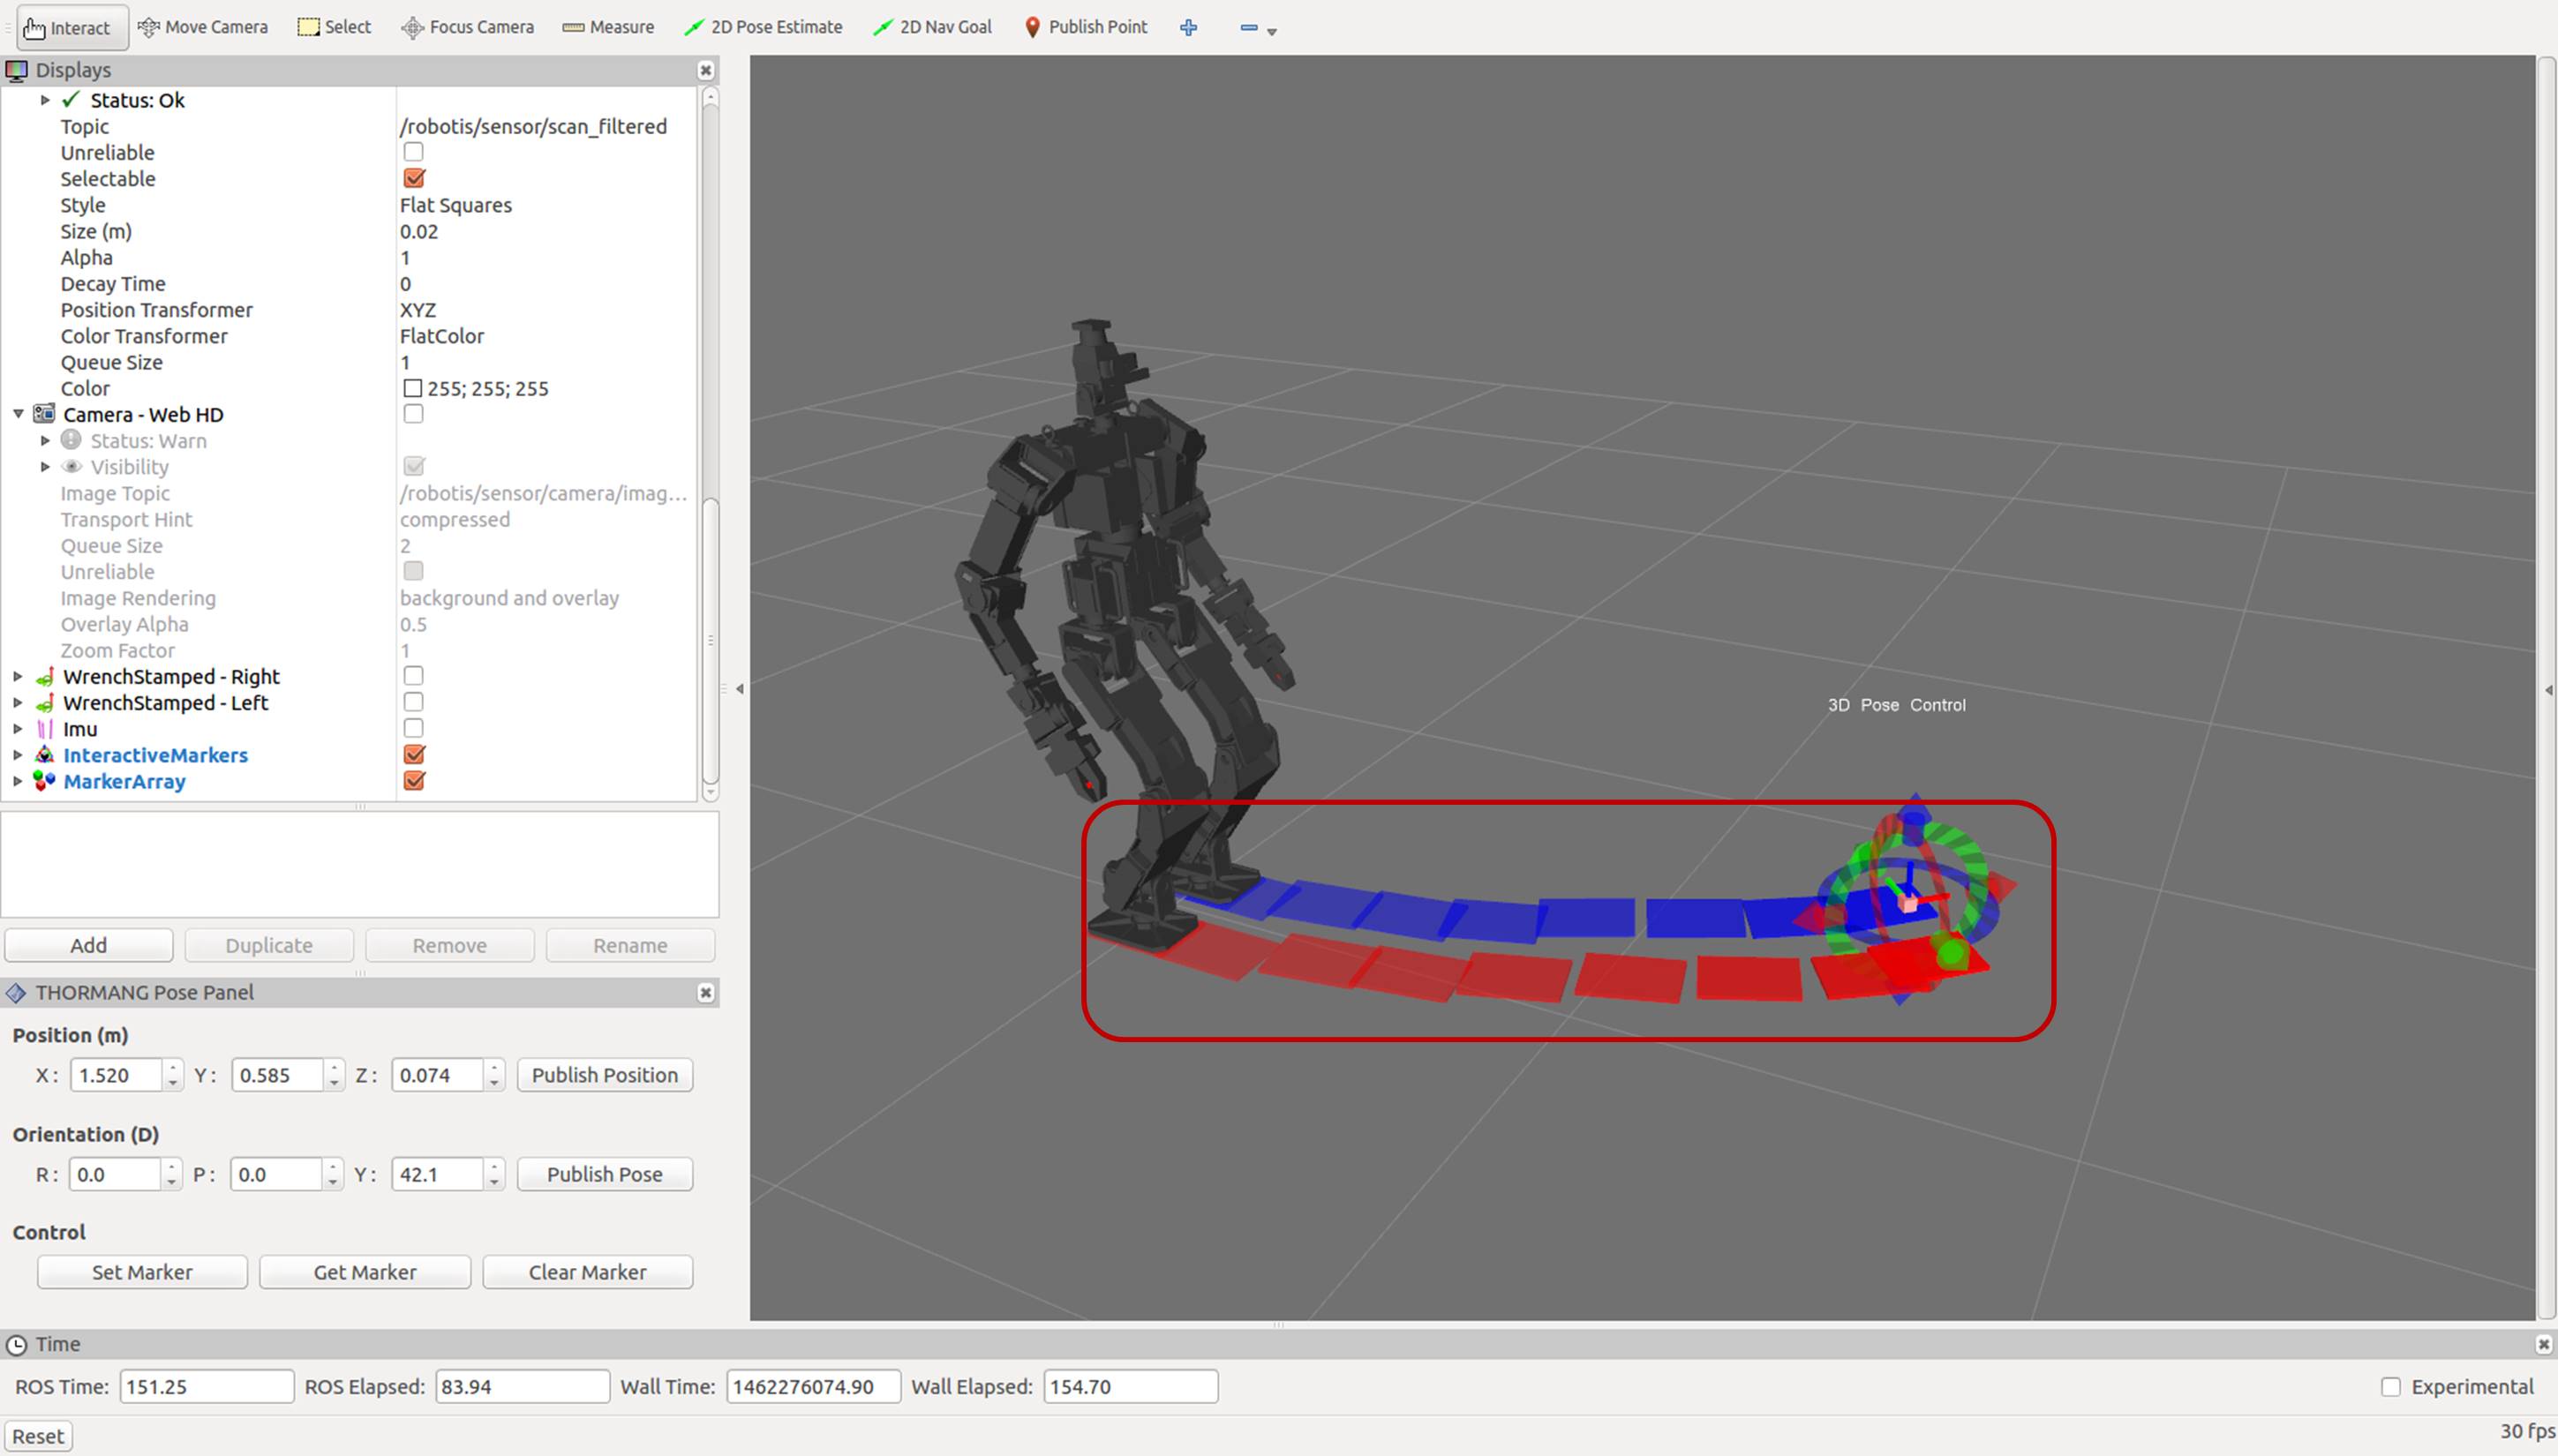
- Move the Interative Marker and click
- Start Walking
- Confirm planned StepData from the thormang3_demo GUI and click
GO!button.
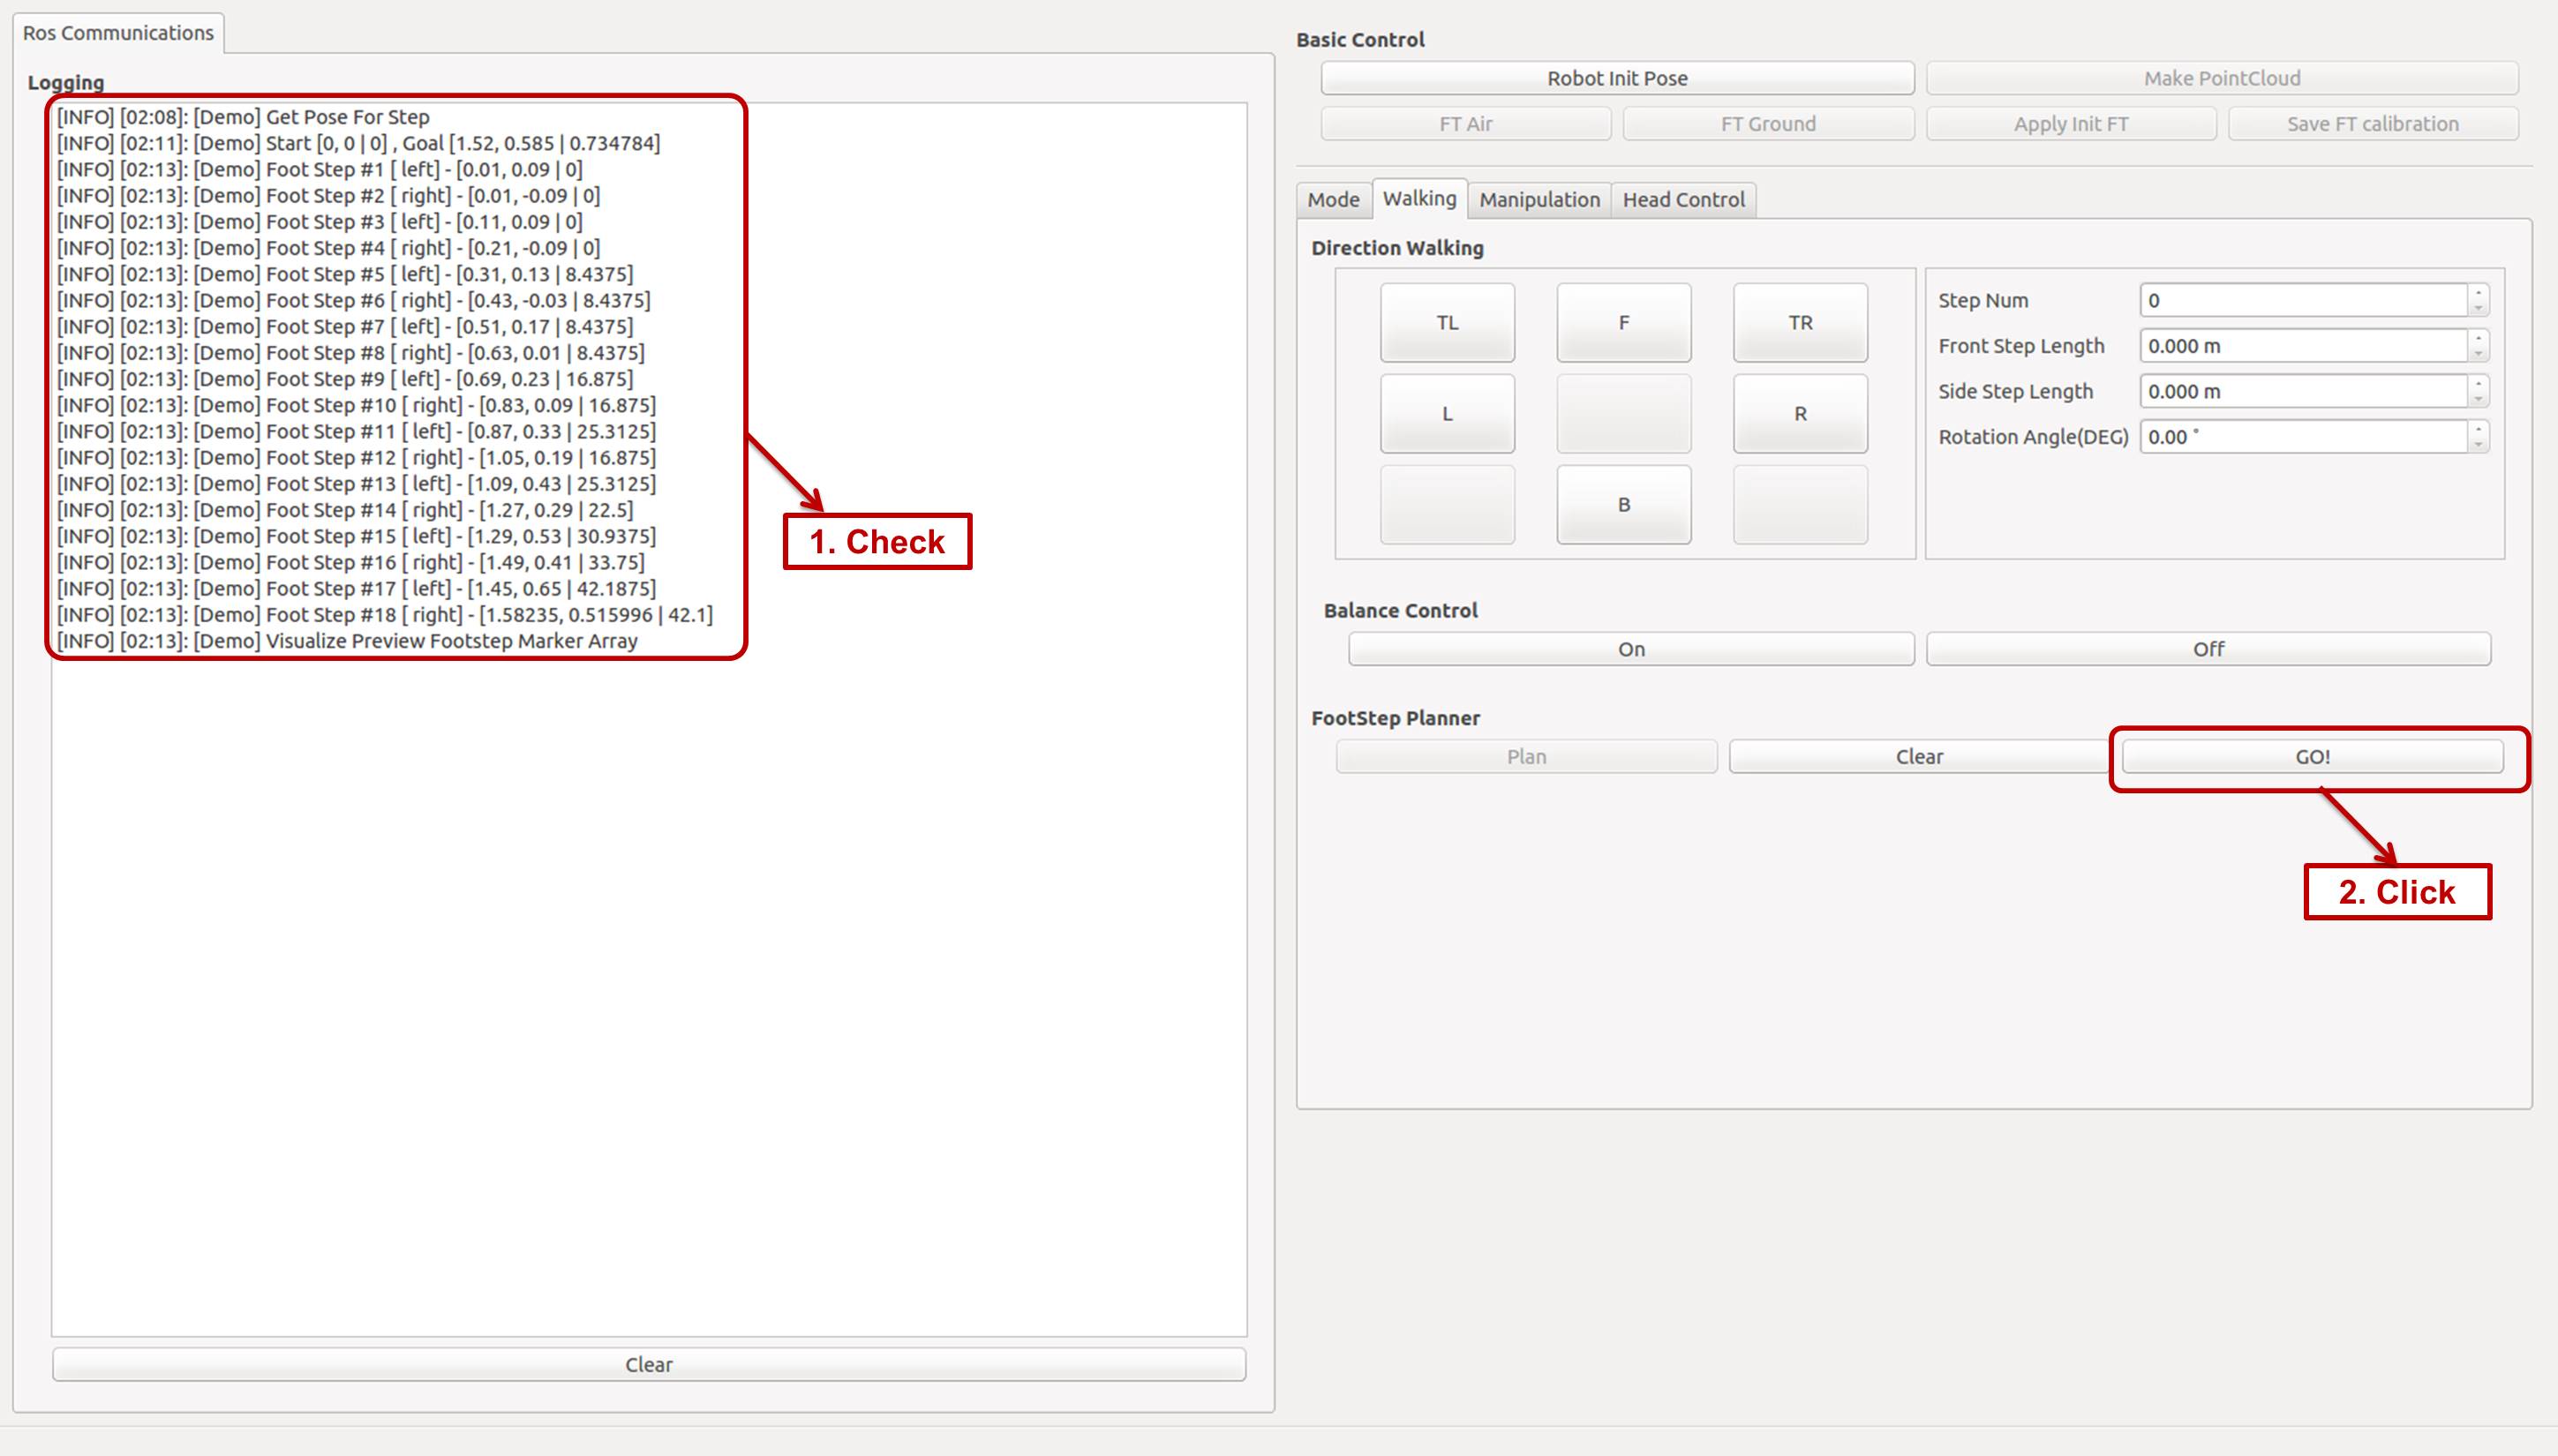
- Confirm planned StepData from the thormang3_demo GUI and click
Offset Tuner
Instruction about how to run the Thormang3 offset tuner program.
Execute in MPC
Execute the offset tuner server first (thormang3_manager should be terminated to run the offset tuner program).
# roslaunch thormang3_offset_tuner_server thormang3_offset_tuner_server.launch
Execute in OPC
Execute the offset tuner GUI program.
$ rosrun thormang3_offset_tuner_client thormang3_offset_tuner_client
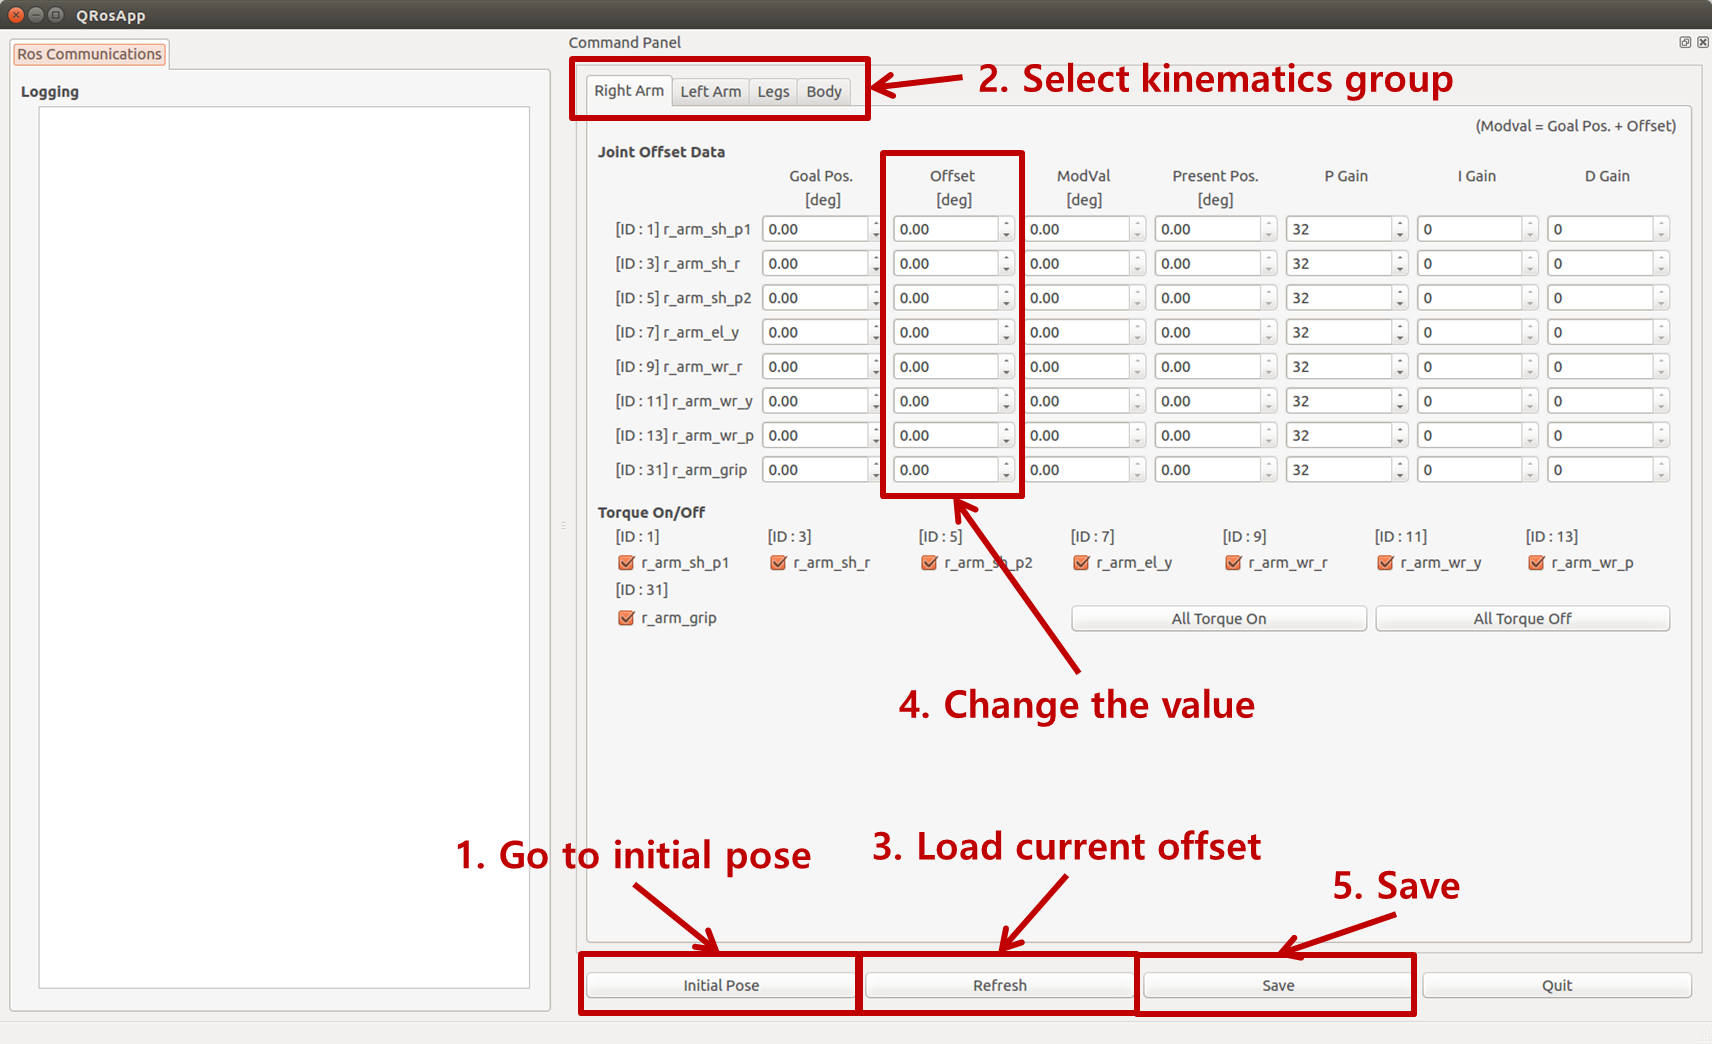
How to use GUI program
Tuner Client
Instruction about how to run the Thormang3 gain and offset tuner program.
Execute in MPC
This program works with thormang3_p_manager. User don’t have to run the server for this program.
# roslaunch thormang3_p_manager thormang_p_manager.launch
Execute in OPC
Execute the gain and offset tuner GUI program.
$ rosrun thormang3_tuner_client thormang3_tuner_client
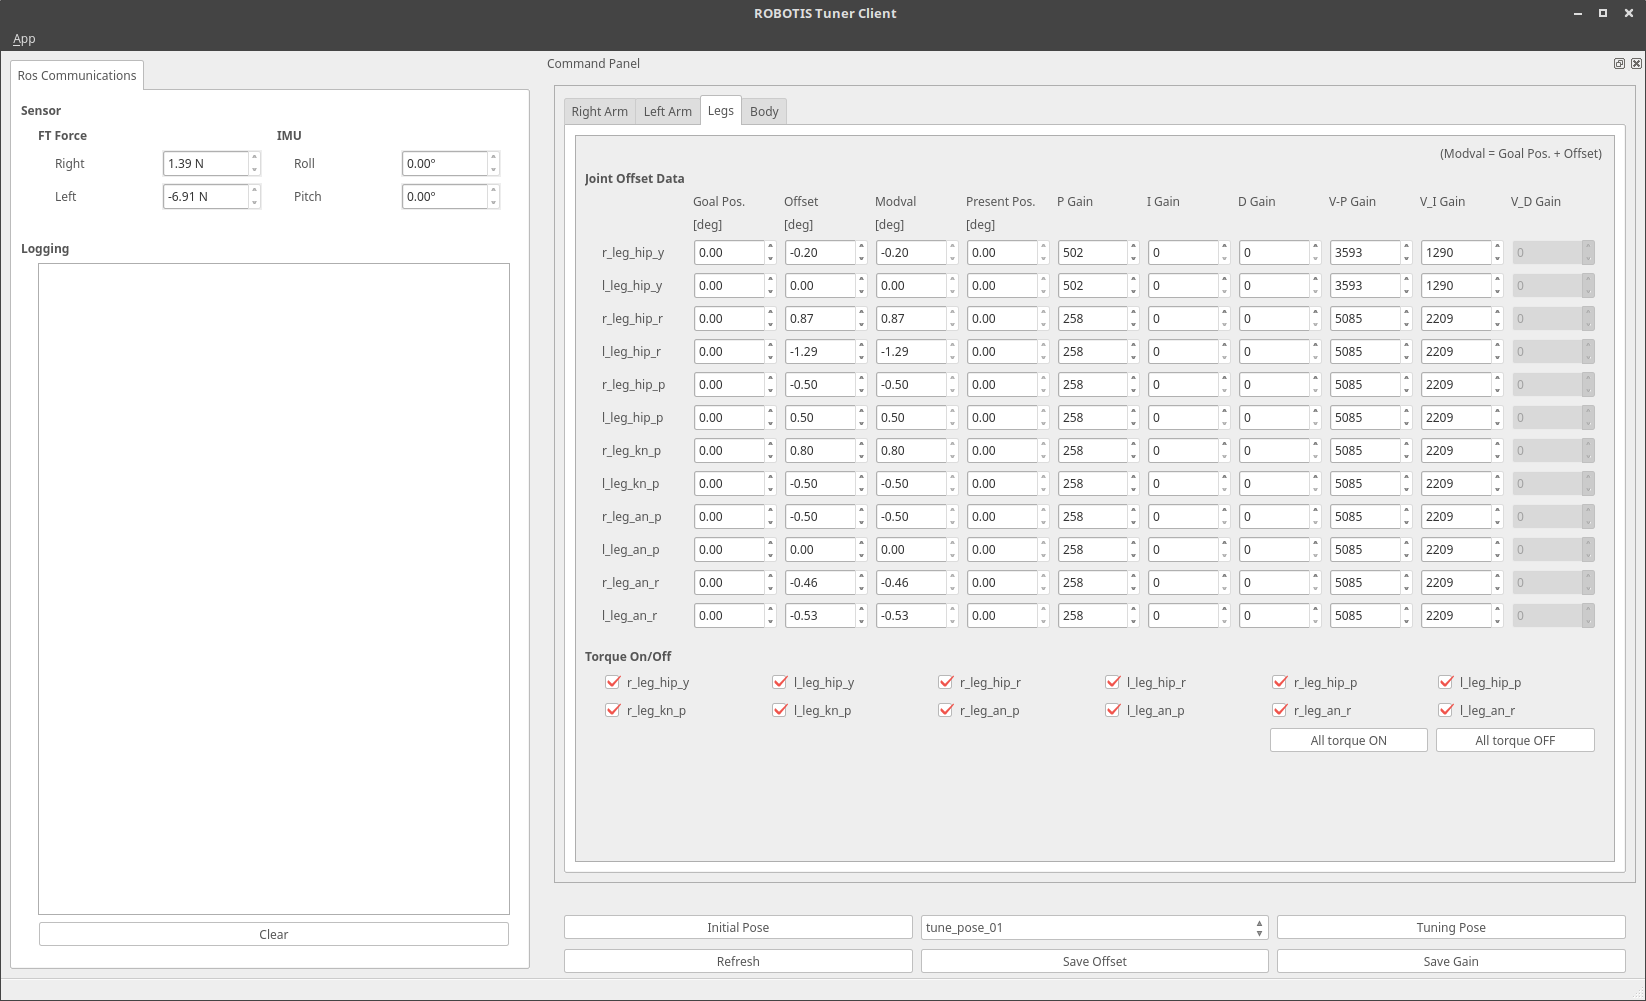
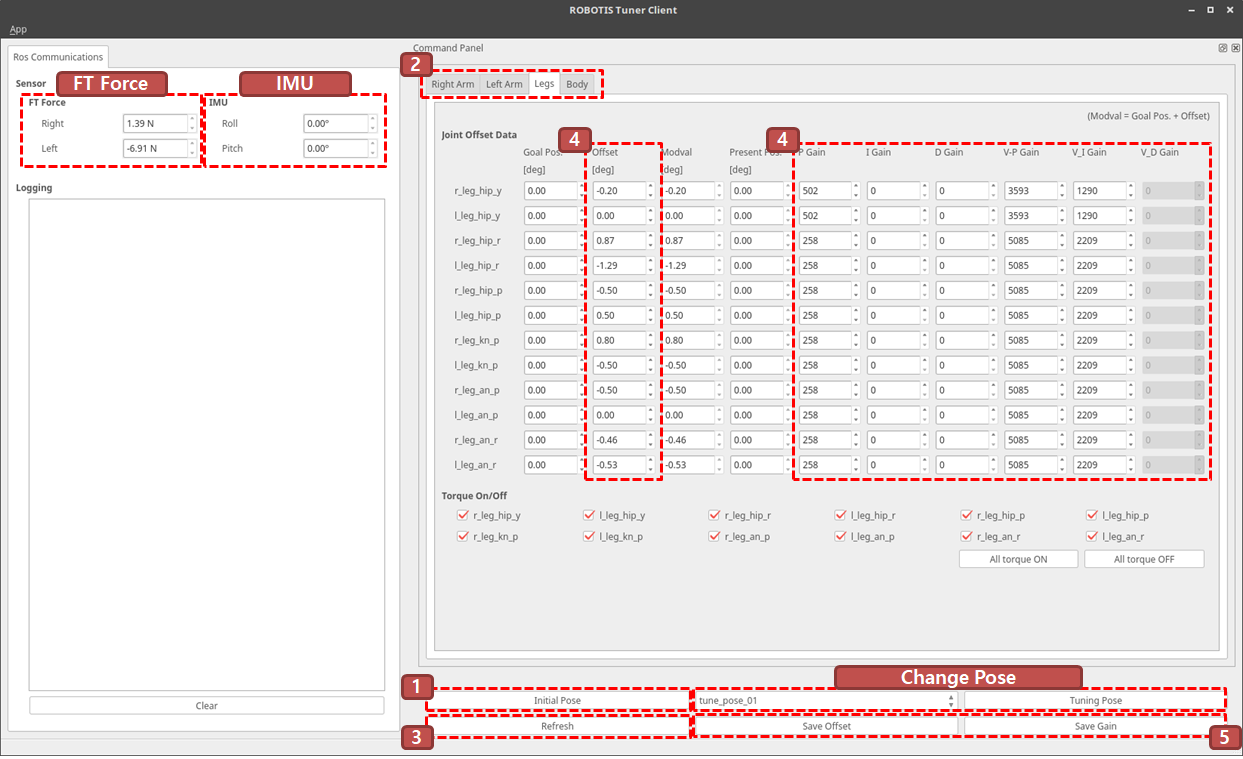
How to use GUI program
![]()
CAUTION : When you click initial pose or change module to the others, THORMANG3 may jump.
This should be done with THORMANG in the air.
- Go to initial pose : If user click this button, tuning_module in robotis_controller is activated and THORMANG3 goes to initial pose.
- Select kinematics group
- Load present status : goal position, offset, gain
- Change offset or gain
- Save the changed value to config file
- Sensors
- FT Force : Scaled force value in direction of Z
- IMU : Robot orientation(roll, pitch) from IMU
- Pose
- How to change pose
- select pose name
- click
tuning pose
- pose config file :
thormang3_tuning_module/data/tune_pose.yaml
- How to change pose