Introduction
Arduino IDE is OpenCR and OpenCM9.04 compatible development tool.
OpenCM IDE can be replaced with Arduino IDE, and it is recommended to use Arduino IDE if possible.
Arduino IDE allows users to apply DYNAMIXEL SDK and DYNMAIXEL Workbench when writing sketches.
Software Installation
DownloadArduino IDE
Install on Linux
USB Port Settings
For OpenCR
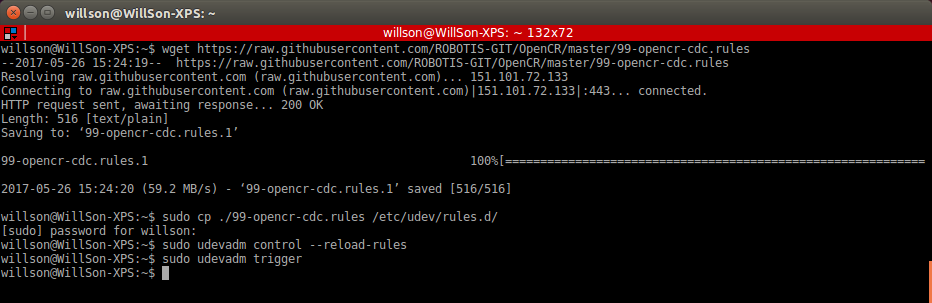
Make the OpenCR USB port be able to upload the Arduino IDE program without root permission.
$ wget https://raw.githubusercontent.com/ROBOTIS-GIT/OpenCR/master/99-opencr-cdc.rules
$ sudo cp ./99-opencr-cdc.rules /etc/udev/rules.d/
$ sudo udevadm control --reload-rules
$ sudo udevadm trigger
For OpenCM9.04
Make the OpenCM9.04 USB port be able to upload the Arduino IDE program without root permission.
wget https://raw.githubusercontent.com/ROBOTIS-GIT/OpenCM9.04/master/99-opencm-cdc.rules
sudo cp ./99-opencm-cdc.rules /etc/udev/rules.d/
sudo udevadm control --reload-rules
sudo udevadm trigger
Compiler Settings
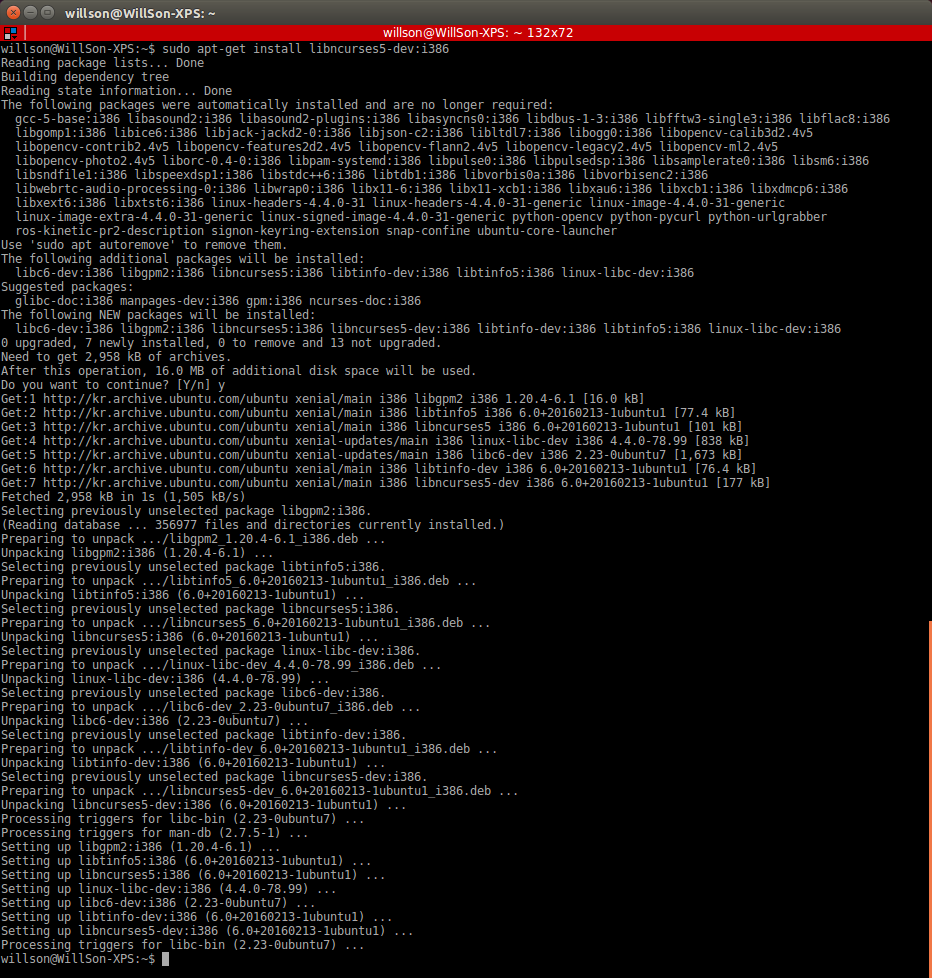
Since the OpenCR and OpenCM9.04 libraries are built for 32 bit platform, 64 bit PC needs the 32 bit compiler relevants for the ArduinoIDE.
$ sudo apt-get install libncurses5-dev:i386
Install Arduino IDE(Linux)
Download the latest version of Arduino IDE from the official arduino homepage, and install it. Currently, OpenCR and OpenCM9.04 will be compatible with the version 1.6.4 or later.
https://www.arduino.cc/en/Main/Software
Then, extract the downloaded file to the desired folder and execute the installation file from the terminal. In this case, the example shown below makes the folder tools in the user’s top folder (~/). This folder will act as the Arduino IDE folder.
$ cd ~/tools/arduino-1.8.3
$ ./install.sh
Set the file path of installed Arduino IDE as an absolute path named PATH in the bashrc file. Here recommends to use gedit editor. (Use another editor, if necessary.) Finally, source it to apply the changes.
$ gedit ~/.bashrc
$ export PATH=$PATH:$HOME/tools/arduino-1.8.3
$ source ~/.bashrc
Run Arduino IDE(Linux)
To run the Arduino IDE on Linux platform, type into the terminal as follows.
$ arduino
Porting to Arduino IDE(Linux)
Preferences
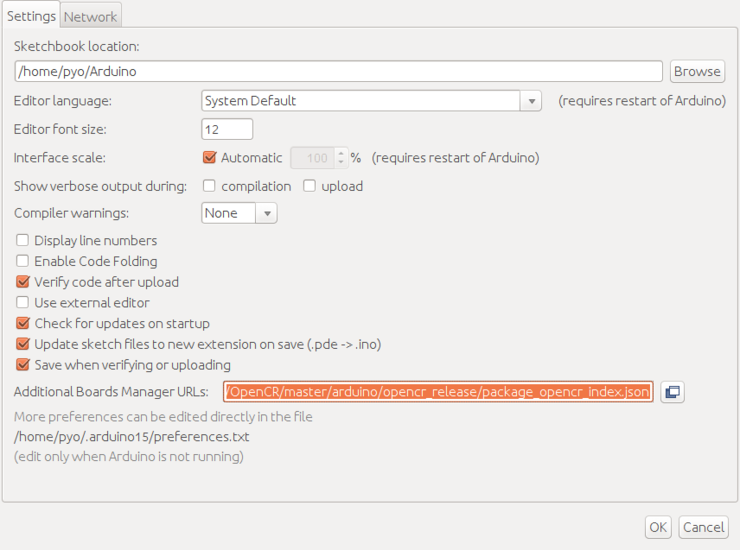
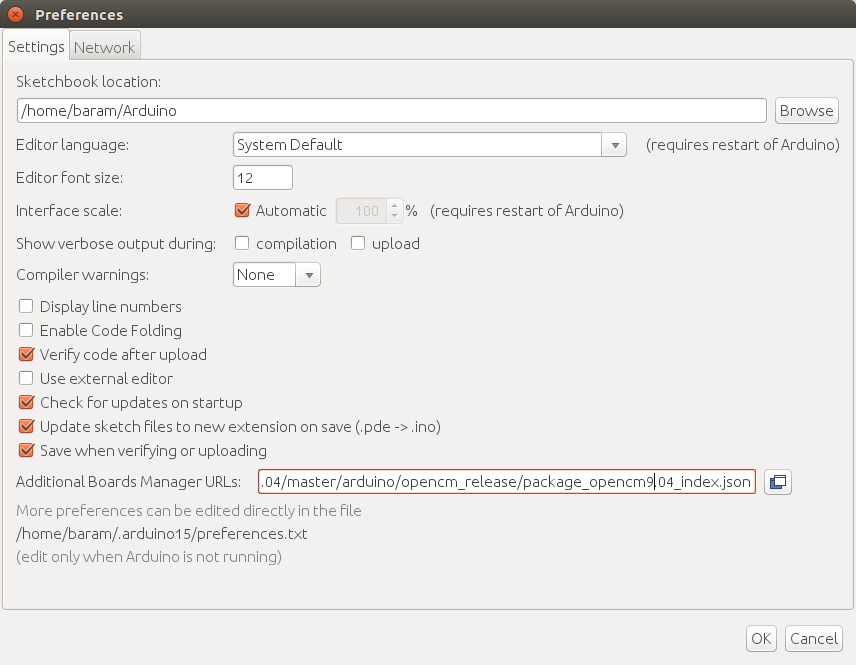
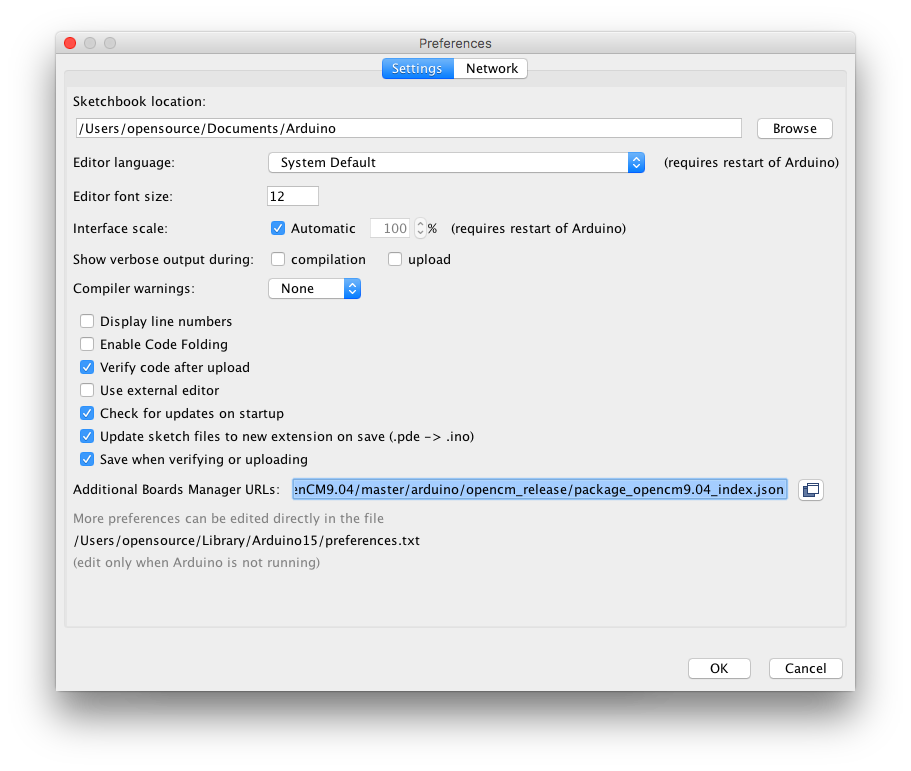
After Arduino IDE is run, click File → Preferences in the top menu of the IDE. When the Preferences window appears, copy and paste following link to the Additional Boards Manager URLs textbox.
Please select the appropriate file URL based on your board.
For OpenCR
https://raw.githubusercontent.com/ROBOTIS-GIT/OpenCR/master/arduino/opencr_release/package_opencr_index.json
For OpenCM9.04
https://raw.githubusercontent.com/ROBOTIS-GIT/OpenCM9.04/master/arduino/opencm_release/package_opencm9.04_index.json
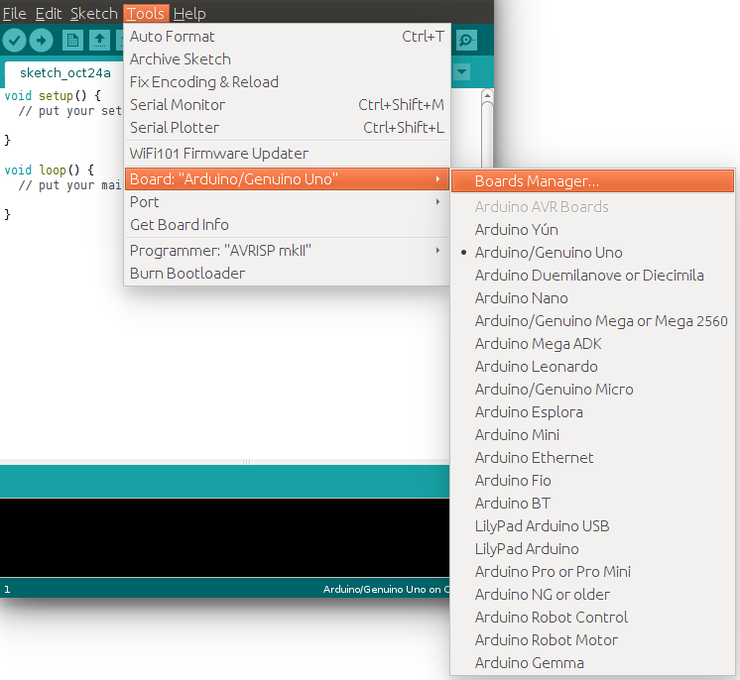
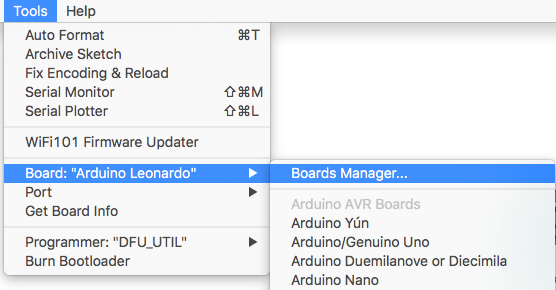
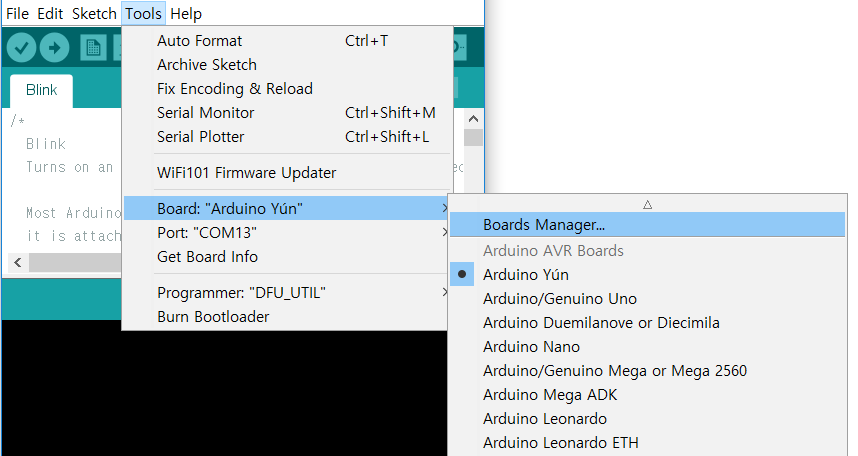
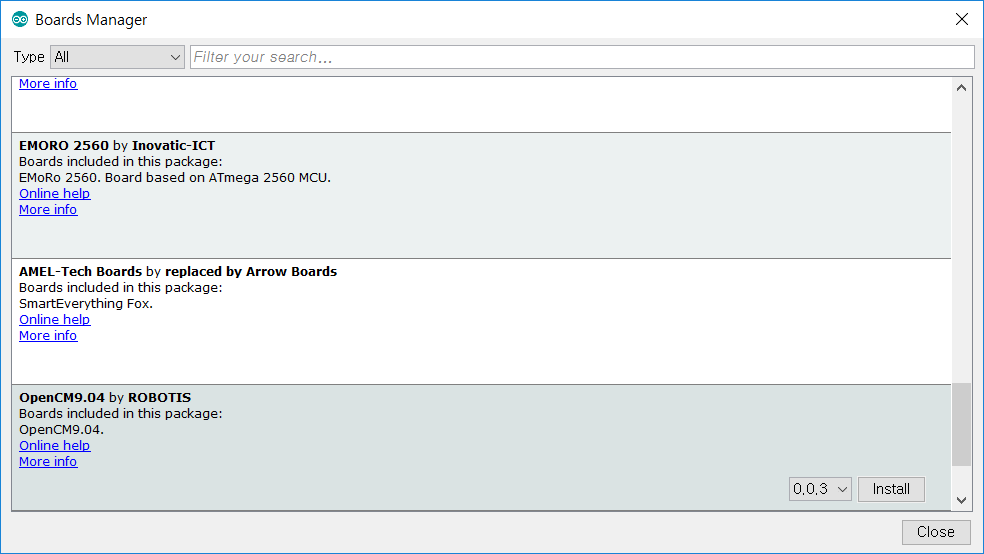
Install the board package via Boards Manager
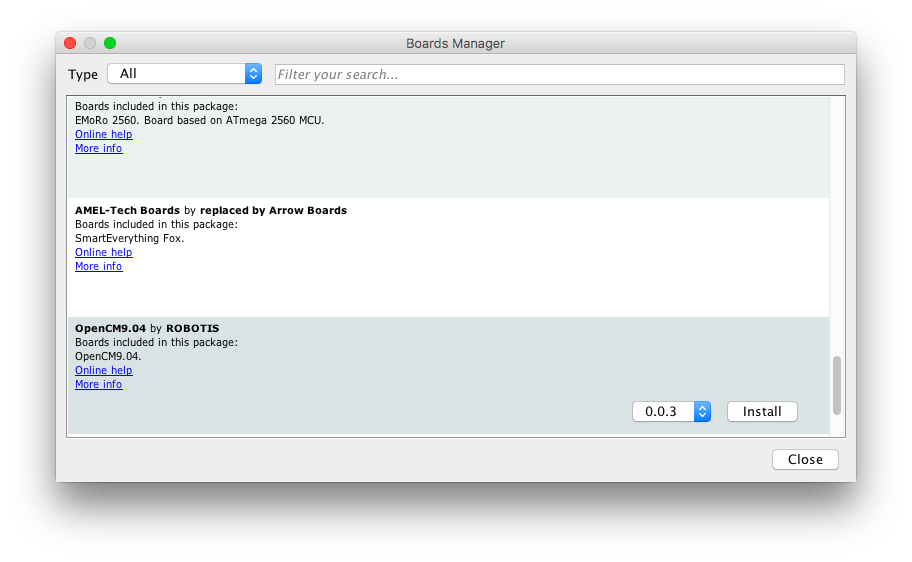
Click Tools → Board → Boards Manager. This step may take more than 20 minutes depending on the network status.
For OpenCR
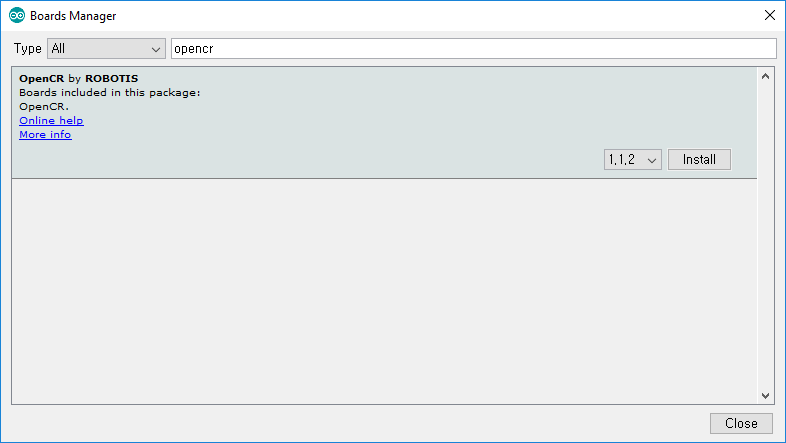
Type OpenCR into the textbox to find the OpenCR by ROBOTIS package. After it finds out, click Install.
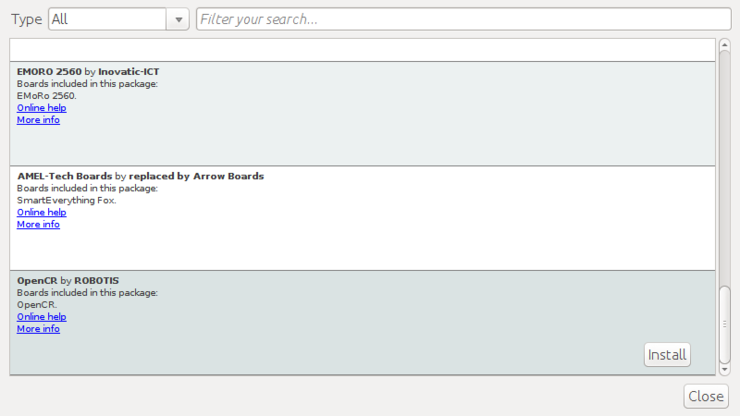
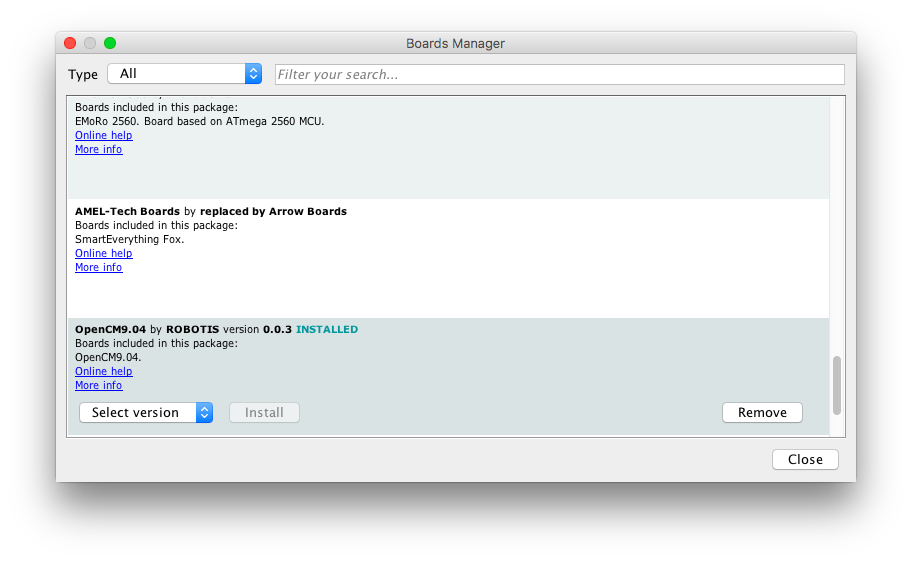
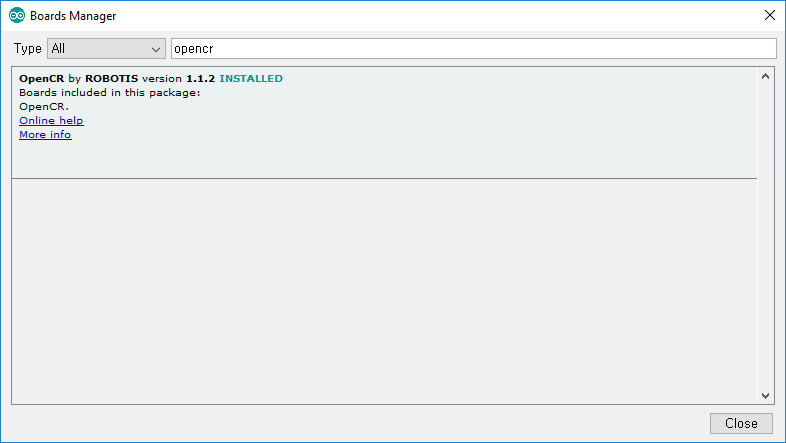
After the installation, “INSTALLED” will be appeared.
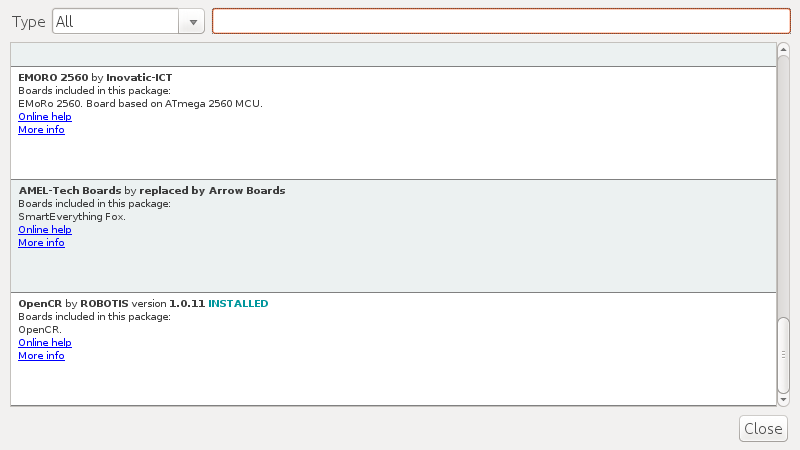
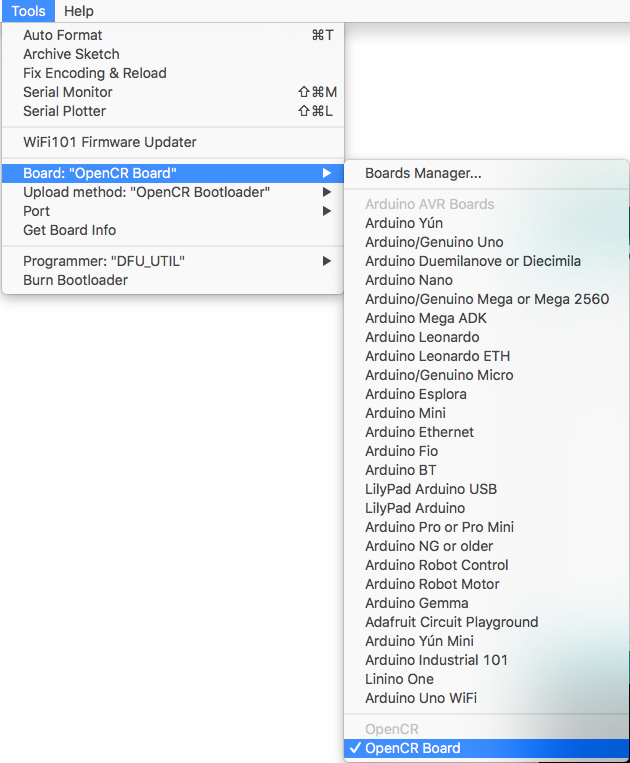
See if OpenCR Board is now on the list of Tools → Board. Click this to import the OpenCR Board source.
For OpenCM9.04
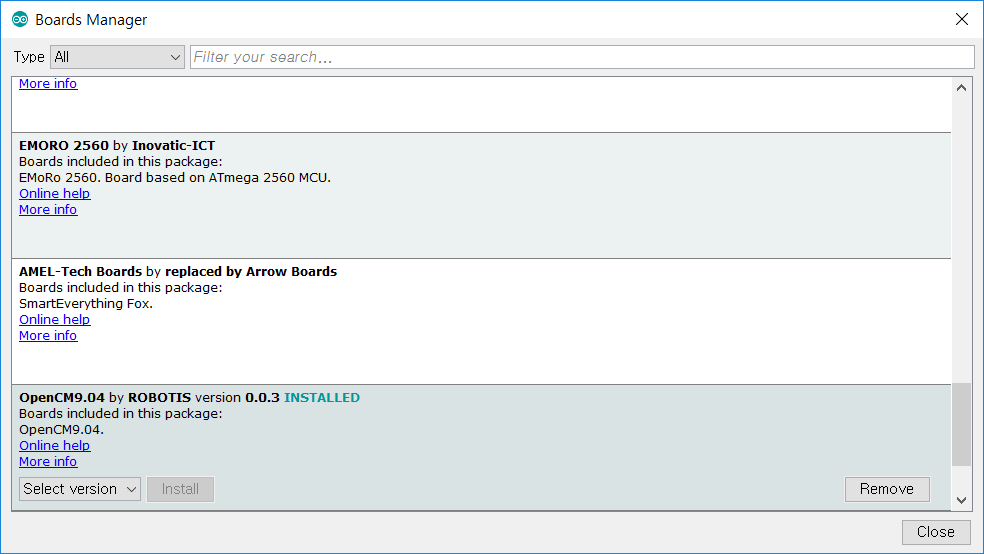
Type OpenCM9.04 into the textbox to find the OpenCM9.04 by ROBOTIS package. After it finds out, click Install.
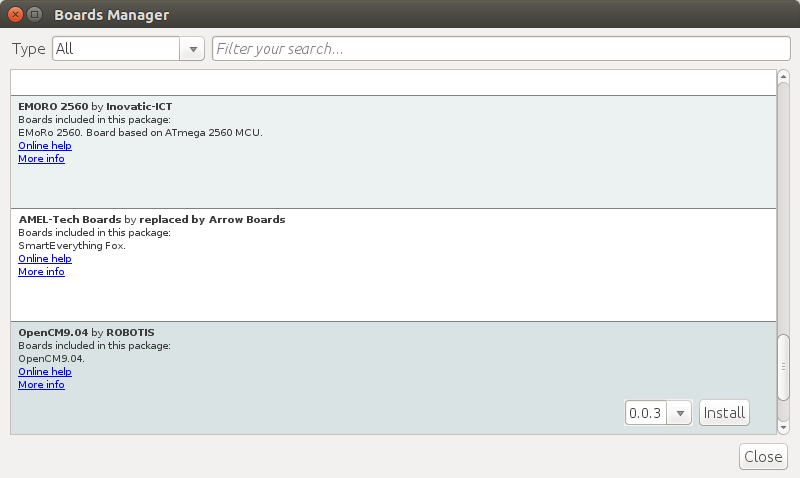
After the installation, “INSTALLED” will be appeared.
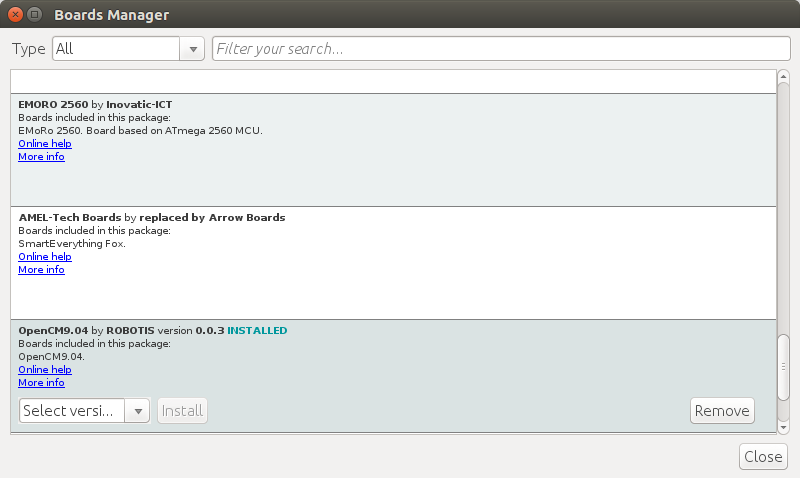
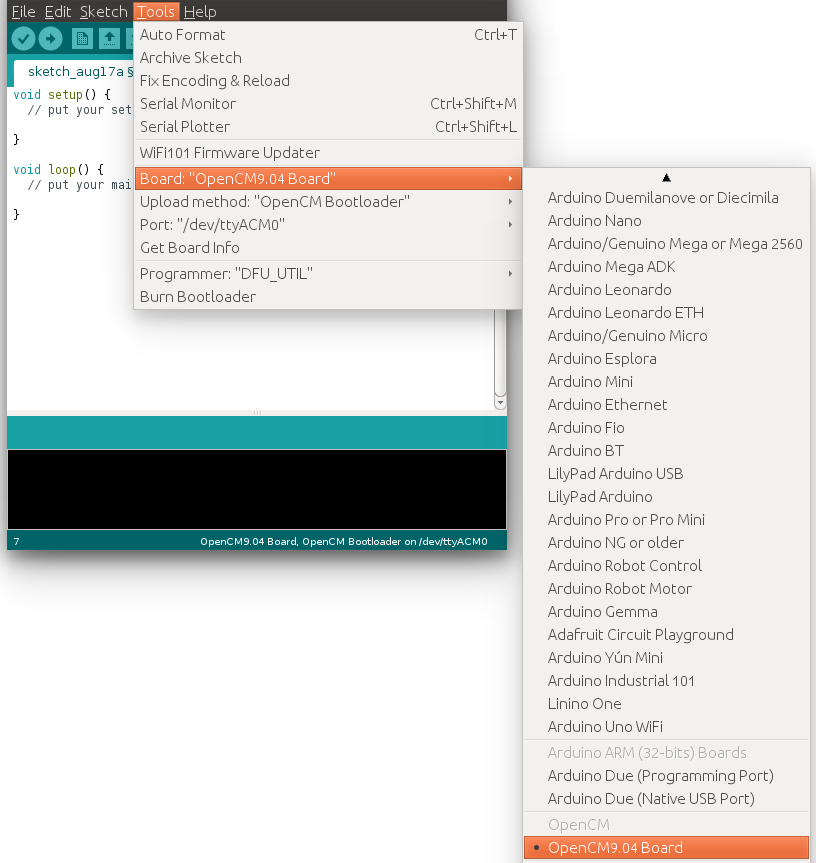
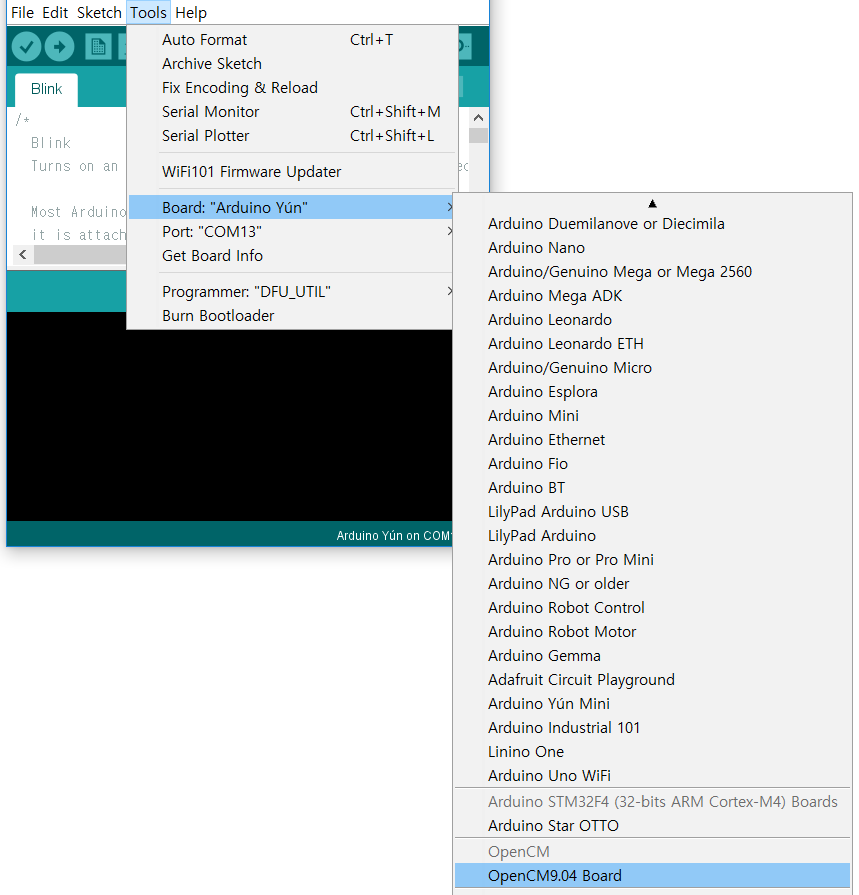
See if OpenCM9.04 Board is now on the list of Tools → Board. Click this to import the OpenCM9.04 Board source.
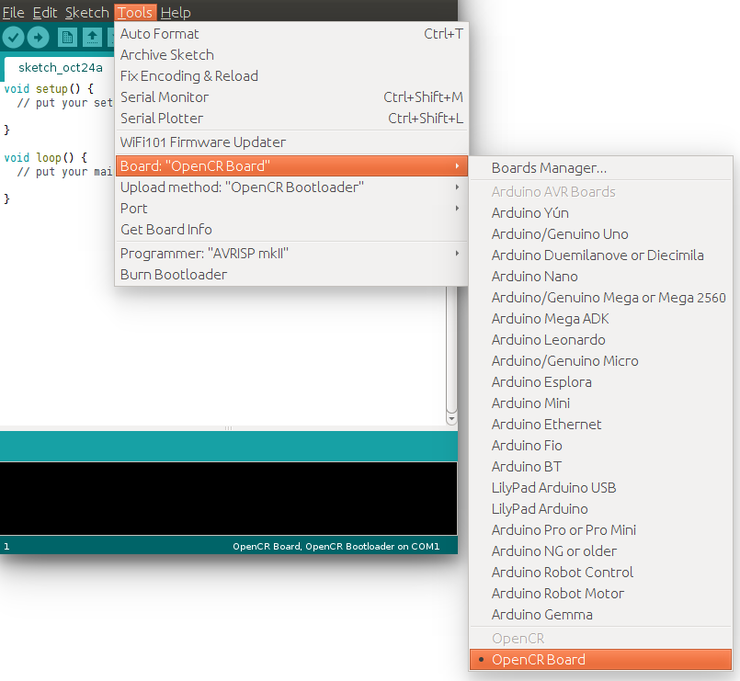
Port Setting
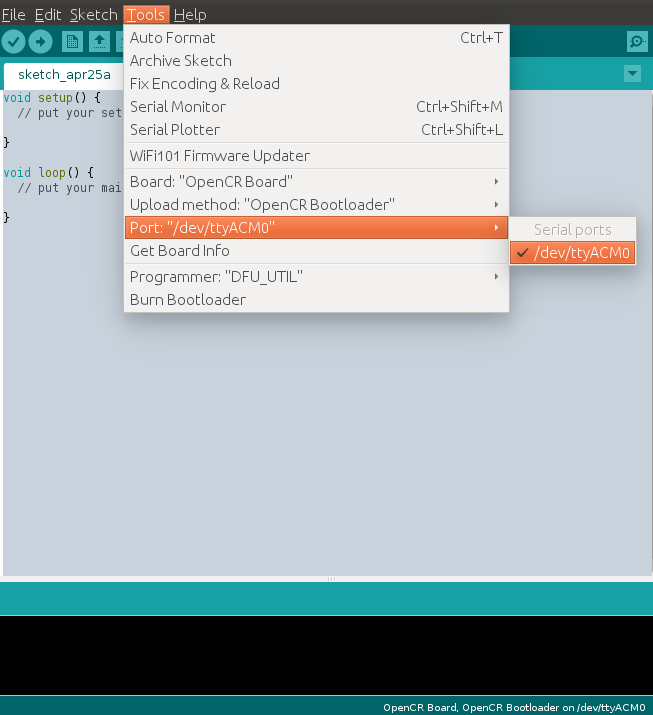
This step shows the port setting for the program uploads. The OpenCR/OpenCM9.04 should be connected to the PC via micro USB port.
Select Tools → Port → /dev/ttyACM0.
WARNING : The last digit value 0 in the string /dev/ttyACM0 might be different depend on the USB connection environment.
Remove Modemmanager
Only OpenCR requires this process. If you are using OpenCM9.04, please skip this section.
After programming with the Arduino IDE and uploading the program to the OpenCR, the OpenCR will be restarted and be reconnected.
At the same moment, the modem-related packages of the Linux will send the AT command to manage the device.
Thus indicates an connection error on the OpenCR, so this step should be done previously.
$ sudo apt-get purge modemmanager
Install on Mac
Install Arduino IDE(Mac)
Download the latest version of Arduino IDE from the official arduino homepage, and install it. Currently, OpenCR and OpenCM9.04 will be compatible with the version 1.6.4 or later.
DownloadArduino IDE
Run Arduino IDE(Mac)
To run the Arduino IDE on Mac platform, click the Arduino IDE icon as follows.

Porting to Arduino IDE(Mac)
Preferences
After Arduino IDE is run, click File → Preferences in the top menu of the IDE.
When the Preferences window appears, copy and paste following link to the Additional Boards Manager URLs textbox.
Please select the appropriate file URL based on your board.
For OpenCR
https://raw.githubusercontent.com/ROBOTIS-GIT/OpenCR/master/arduino/opencr_release/package_opencr_index.json

For OpenCM9.04
https://raw.githubusercontent.com/ROBOTIS-GIT/OpenCM9.04/master/arduino/opencm_release/package_opencm9.04_index.json
Install the board package via Boards Manager
Click Tools → Board → Boards Manager. This step may take more than 20 minutes depending on the network status.
For OpenCR
Type OpenCR into the textbox to find the OpenCR by ROBOTIS package. Install of the OpenCR package.
After the installation, “INSTALLED” will be appeared.
See if OpenCR Board is now on the list of Tools → Board. Click this to import the OpenCR Board source.
For OpenCM9.04
Type OpenCM9.04 into the textbox to find the OpenCM9.04 by ROBOTIS package. After it finds out, click Install.
After the installation, “INSTALLED” will be appeared.
See if OpenCM9.04 Board is now on the list of Tools → Board. Click this to import the OpenCM9.04 Board source.
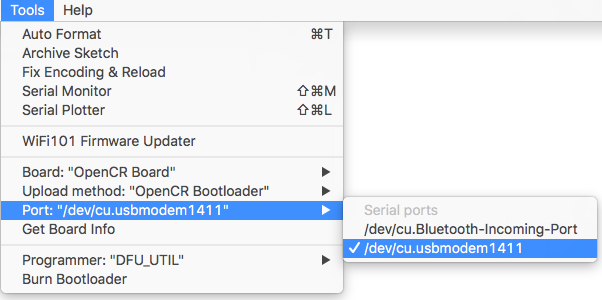
Port setting
This step shows the port setting for the program uploads. The OpenCR/OpenCM9.04 should be connected to the PC via micro USB port.
Select Tools → Port → /dev/cu.usbmodem1411
CAUTION : The value of /dev/cu.usbmodem1411 may be different depending on the environment connected to the PC.
Install on Windows
Install Driver
To use OpenCR and OpenCM9.04 micro USB port as a serial port in Windows, you need a USB CDC driver. You can install the USB driver provided by ST.
http://www.st.com/en/development-tools/stsw-stm32102.html
Install Arduino IDE(Windows)
Download the latest version of Arduino IDE from the official arduino homepage, and install it. Currently, OpenCR and OpenCM9.04 will be compatible with the version 1.6.4 or later.
DownloadArduino IDE
The Arduino IDE for Windows is available as an installation version and a compressed version, so you can install it using your preferred method.
Porting to Arduino IDE(Windows)
Preferences
After Arduino IDE is run, click File → Preferences in the top menu of the IDE.
When the Preferences window appears, copy and paste following link to the Additional Boards Manager URLs textbox.
Please select the appropriate file URL based on your board.
For OpenCR
https://raw.githubusercontent.com/ROBOTIS-GIT/OpenCR/master/arduino/opencr_release/package_opencr_index.json
For OpenCM9.04
https://raw.githubusercontent.com/ROBOTIS-GIT/OpenCM9.04/master/arduino/opencm_release/package_opencm9.04_index.json
Install the OpenCR package via Boards Manager
This step may take more than 20 minutes depending on the network status.
For OpenCR
Click Tools → Board → Boards Manager.
Type OpenCR into the textbox to find the OpenCR by ROBOTIS package. After it finds out, click Install.
After the installation, “INSTALLED” will be appeared.
See if OpenCR Board is now on the list of Tools → Board. Click this to import the OpenCR Board source.
For OpenCM9.04
Type OpenCM9.04 into the textbox to find the OpenCM9.04 by ROBOTIS package. After it finds out, click Install.
After the installation, “INSTALLED” will be appeared.
See if OpenCM9.04 Board is now on the list of Tools → Board. Click this to import the OpenCM9.04 Board source.
Port setting
This step shows the port setting for the program uploads. The OpenCR/OpenCM9.04 should be connected to the PC via micro USB port.
Select Tools → Port → COM1.
CAUTION : The value of COM1 may be different depending on the environment connected to the PC.
Library API
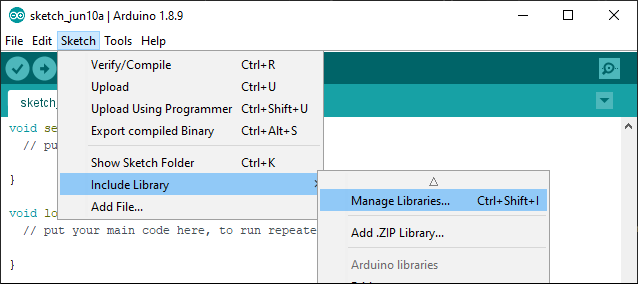
There are three ways to add libraries to the Arduino IDE.
- Using the Library Manager
- Importing a .zip Library
- Manual installation
Each way is described in detail in the Arduino Official Guide, so please refer to it if necessary.
Below is an example of using the Library Manager.
Search for DYNAMIXEL2Arduino from the Library Manager and install the library.

If the DYNAMIXEL2Arduino library has been successfully installed, useful examples to control DYNAMIXEL can be found under the DYNAMIXEL2Arduino category.
Dynamixel2Arduino Library
Dynamixel2Arduino Class
- begin()
- getPortBaud()
- ping()
- scan()
- getModelNumber()
- setID()
- setProtocol()
- setBaudrate()
- torqueOn()
- torqueOff()
- ledOn()
- ledOff()
- setOperatingMode()
- setGoalPosition()
- getPresentPosition()
- setGoalVelocity()
- getPresentVelocity()
- setGoalPWM()
- getPresentPWM()
- setGoalCurrent()
- getPresentCurrent()
- getTorqueEnableStat()
- readControlTableItem()
- writeControlTableItem()
Master Class
DYNAMIXEL2Arduino class inherits below public functions from the Master class.
Examples
OpenCM9.04 Examples
Advanced Users
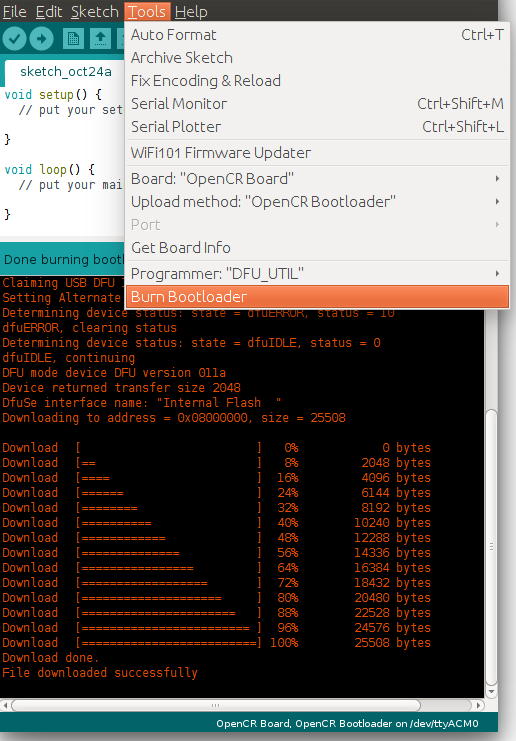
Writing Bootloader(OpenCR)
CAUTION : Perform Bootloader update only when the OpenCR bootloader has been updated. The product already has the default bootloader.
The STM32F7xx, which is used for the main MCU on the OpenCR board, supports DFU(Device Firmware Upgrade). This enables the built-in bootloader of the MCU by itself to boot the DFU protocol by using USB, primarily for the bootloader initialization, the recovery mode, and the bootloader update. The biggest advantage to let the users be able to use bootloader with USB but no other JTAG equipment. Write the firmware by using the DFU mode which is embedded in MCU without writing / debugging equipment, such as STLink.
Programmer Setting
Select Tools > DFU-UTIL.
Run DFU mode.
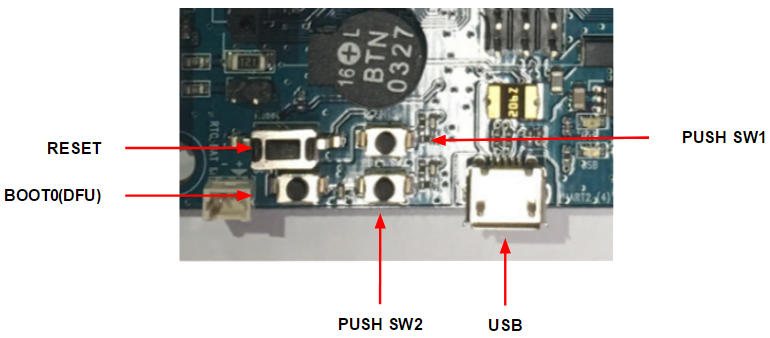
Press the Reset Button while the Boot Button is being pushed. This activates the DFU mode.
For Linux
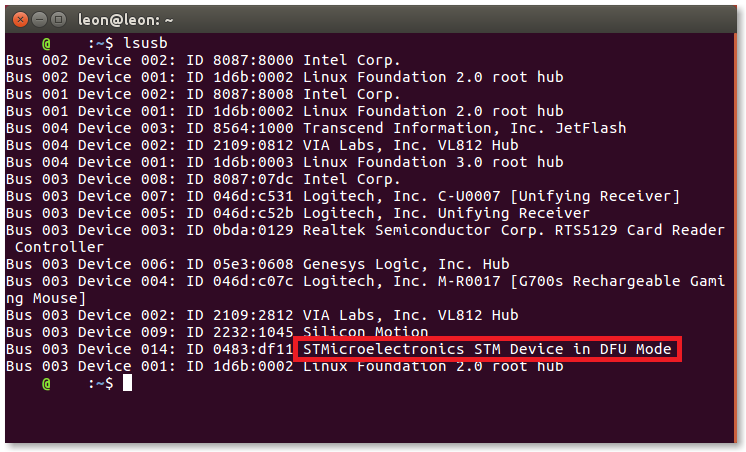
If you successfully entered to DFU mode, you will be able to find STMicroelectronics STM Device in DFU Mode text string when lsusb is entered in the terminal.
For Windows
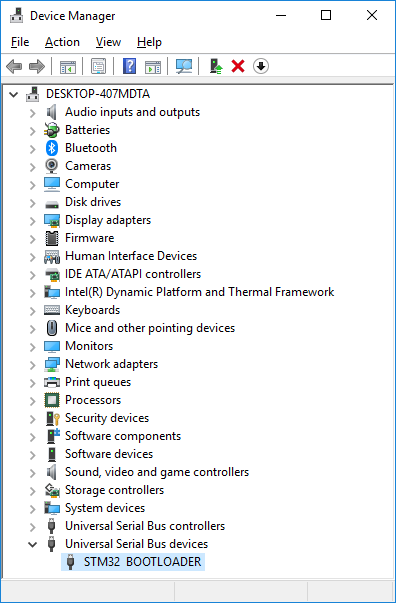
If you successfully entered to DFU mode, you will be able to find STM32 BOOTLOADER under the Universal Serial Bus devices in Device Manager.
Burn Bootloader
Click Tools > Burn Bootloader to burn the bootloader.