
Quick Start Guide
This step by step quick start guide for running OpenMANIPULATOR-X on ROSTM will guide you to operate the OpenMANIPULATOR-X for the first time.
In order to run this Quick Start Guide, you should be prepared with below items.
- OpenMANIPULATOR-X
- Communication Interface (Use either option you prefer)
- Option 1 : DYNAMIXEL Starter Set
- Option 2 : OpenCR1.0
- Power supply
- ROBOTIS SMPS 12V 5A PS-10 recommended (included in the DYNAMIXEL Starter Set)
NOTE
- OpenMANIPULATOR-X is operable as a standalone device without ROS when connected with an Arduino programmed OpenCR1.0.
-
Please select
Arduinoat the top of each page as below to find more details.
This step by step quick start guide for running OpenMANIPULATOR-X on ROSTM will guide you to operate the OpenMANIPULATOR-X for the first time.
In order to run this Quick Start Guide, you should be prepared with below items.
- OpenMANIPULATOR-X
- Communication Interface (Use either option you prefer)
- Option 1 : DYNAMIXEL Starter Set
- Option 2 : OpenCR1.0
- Power supply
- ROBOTIS SMPS 12V 5A PS-10 recommended (included in the DYNAMIXEL Starter Set)
NOTE
- OpenMANIPULATOR-X is operable as a standalone device without ROS when connected with a Arduino programmed OpenCR1.0.
-
Please select
Arduinoat the top of each page as below to find more details.
This step by step quick start guide for running OpenMANIPULATOR-X with Arduino will guide you to operate the OpenMANIPULATOR-X for the first time.
In order to run this Quick Start Guide, you should be prepared with below items.
- OpenMANIPULATOR-X
- Arduino Embedded Controller OpenCR1.0
- Power supply
- ROBOTIS SMPS 12V 5A PS-10 recommended
Setup
Docker Environment
This method provides an isolated environment with all dependencies pre-installed.
Install Docker and Docker Compose
Container Engine: Docker Engine
Follow the official Docker installation guide and complete the post-installation steps.
Required steps:
- Install Docker Engine using the repository method
- Add your user to the docker group
- Enable Docker to start on boot
- Verify installation with
docker run hello-world
Clone the Repository
$ git clone -b jazzy https://github.com/ROBOTIS-GIT/open_manipulator.git
$ cd open_manipulator
Container Management
The repository includes a container management script with the following commands:
# Show help
$ ./docker/container.sh help

# Start container
$ ./docker/container.sh start

# Enter the running container
$ ./docker/container.sh enter

# Stop and remove the container
$ ./docker/container.sh stop
WARNING: When stopping the container, you’ll be asked for confirmation as this will remove all unsaved data in the container.
Data Persistence
The container maps the following directories for data persistence:
./docker/workspace:/workspace- The workspace directory inside the docker folder is mapped to/workspaceinside the container
IMPORTANT: Data Persistence Rules:
- Data in
/workspaceinside the container is saved todocker/workspaceon your host - Container restart (using
docker restart) maintains all data - Container removal (using
container.sh stop) will remove all data except what’s in the mapped/workspacedirectory - Always save your work in the
/workspacedirectory to ensure it persists after container removal
Setup Complete: Docker environment is now ready! Please proceed to the next section to configure the Communication Interface.
This method provides an isolated environment with all dependencies pre-installed.
NOTE: Docker Environment is supported for ROS 2 Humble, but detailed manual documentation is provided starting from the Jazzy version. Please refer to the Jazzy Docker Environment for comprehensive setup instructions.
Install Docker and Docker Compose
Container Engine: Docker Engine
Follow the official Docker installation guide and complete the post-installation steps.
Required steps:
- Install Docker Engine using the repository method
- Add your user to the docker group
- Enable Docker to start on boot
- Verify installation with
docker run hello-world
Clone the Repository
$ git clone -b humble https://github.com/ROBOTIS-GIT/open_manipulator.git
$ cd open_manipulator
Container Management
Use Docker Compose to manage the container:
# Start container
$ docker compose up -d --build

# Stop and remove the container
$ docker compose down
NOTE: When stopping the container with docker compose down, all unsaved data in the container will be removed.
Data Persistence
The container maps the following directories for data persistence:
./docker/workspace:/workspace- The workspace directory inside the docker folder is mapped to/workspaceinside the container
IMPORTANT: Data Persistence Rules:
- Data in
/workspaceinside the container is saved todocker/workspaceon your host - Container restart maintains all data
- Container removal (using
docker compose down) will remove all data except what’s in the mapped/workspacedirectory - Always save your work in the
/workspacedirectory to ensure it persists after container removal
Setup Complete: Docker environment is now ready! Please proceed to the next section to configure the Communication Interface.
Docker Environment is not supported for ROS Noetic. Please use the Host Installation method below.
Not required.
Install Ubuntu on PC
NOTE: For ROS 2 Jazzy, we recommend using Docker for a more reliable and isolated development environment. Please refer to the Docker Environment section for Docker installation instructions.
Installing Ubuntu on a PC or laptop may differ by model. Please contact the manufacturer or community for more details.
ROS 2 Jazzy is supported on Ubuntu 24.04.
Please refer to the Ubuntu installation tutorial below.
Installing Ubuntu on a PC or laptop may differ by model. Please contact the manufacturer or community for more details.
ROS 2 Humble is supported on Ubuntu 22.04.
Please refer to the Ubuntu installation tutorial below.
Installing Ubuntu on a PC or laptop may differ by model. Please contact the manufacturer or community for more details.
ROS Noetic is supported on Ubuntu 20.04.
Please refer to the Ubuntu installation tutorial below.
WARNING : This Arduino instruction does not require ROS to operate OpenMANIPULATOR-X.
When operating with ROS, the PC becomes the main controller.
On the other hands, when operating with Arduino, the OpenCR becomes the main controller.
OpenMANIPULATOR-X is compatible with OpenCR. We offer API to easily control manipulator.
This API supports DYNAMIXEL, DYNAMIXEL-X including protocol 1.0 and 2.0. Furthermore, this code can be used for OpenMANIPULATOR Friends.
User can write the code in Arduino IDE and simulate or control using Processing GUI.
NOTE : Processing source code is tested in Processing v3.5.4.
- Install Arduino IDE and setup OpenCR developing environment.
-
Connect OpenCR to PC with a micro USB cable.
-
Run Arduino IDE and open the example.
Go toExamples>OpenManipulator>example>Chain>open_manipulator_chain.

-
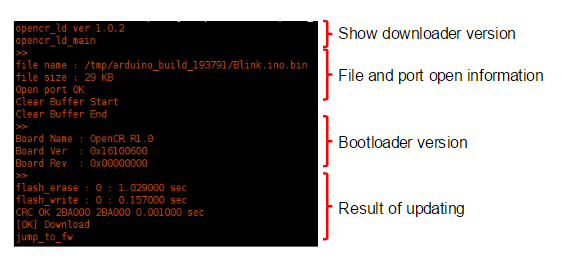
Upload the example to OpenCR.
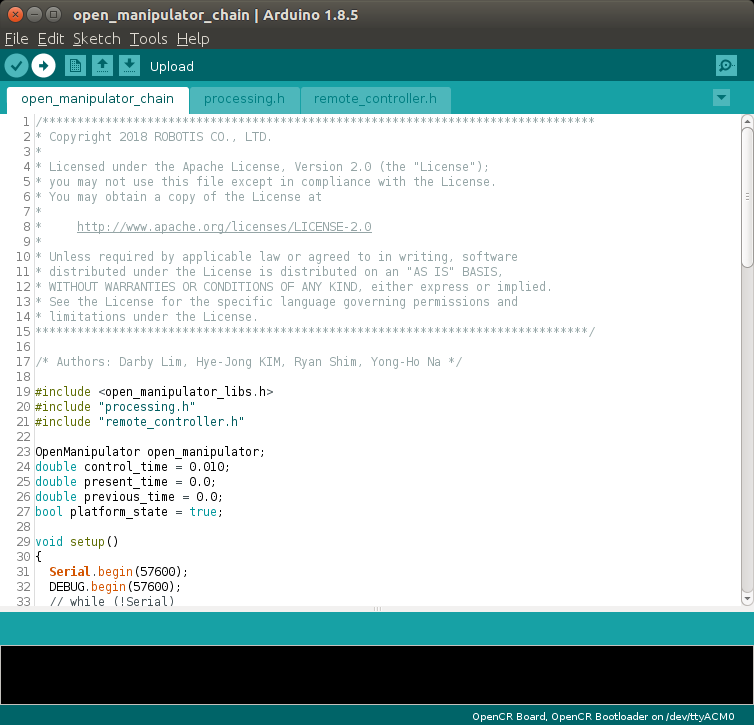
- When the upload is completed, the following message will be displayed in the output window.
FAQ
- If firmware upload fails, try uploading with the recovery mode. Below sequence activates the recovery mode of OpenCR. Under the recovery mode, the
STATUSled of [OpenCR] will blink periodically.- Hold down the
PUSH SW2button. - Press the
Resetbutton. - Release the
Resetbutton. - Release the
PUSH SW2button.
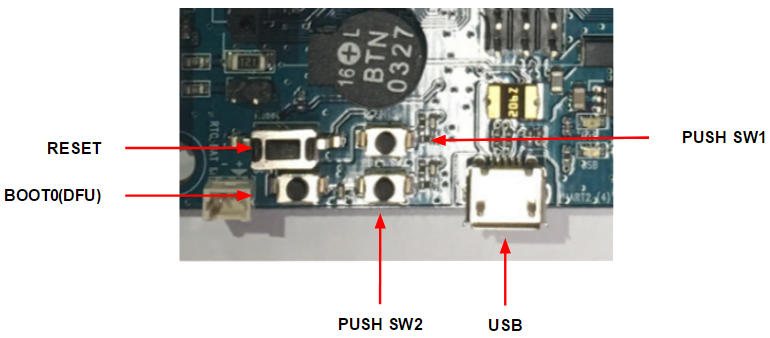
- Hold down the
WARNING
Please be aware that OpenCR board manager does not support Arduino IDE on ARM based SBC such as Raspberry Pi or NVidia Jetson.
Now let’s setup the Processing GUI tool for easier control of OpenMANIPULATOR-X.
-
Download and install the Processing.
NOTE : Processing source code is tested in Processing v3.5.4.
-
Launch Processing and go to
Tools>Add Tool...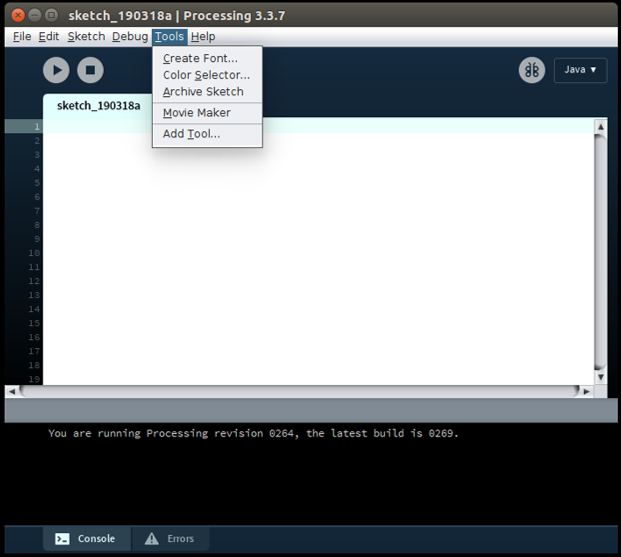
-
In the
Librariestab, search forControlP5and install it.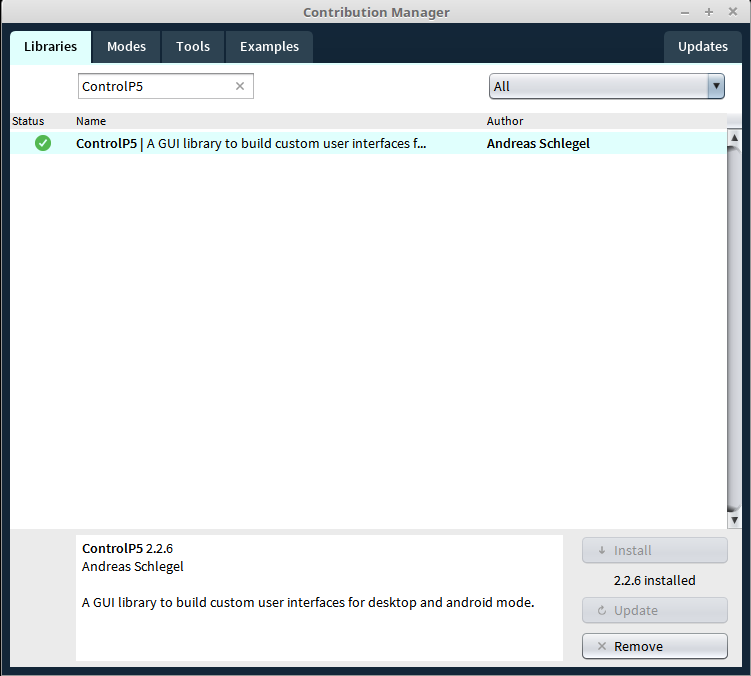
-
Download processing source code for OpenMANIPULATOR.
 Direct Download(Zip)
- or use Git tool
$ git clone https://github.com/ROBOTIS-GIT/open_manipulator_processing.git
Install ROS on PC
![]()
Please follow the official ROS 2 documentation to install the ROS 2 Jazzy.
For most Linux users, Debian package installation method is strongly recommended.
![]()
Please follow the official ROS 2 documentation to install the ROS 2 Humble.
For most Linux users, Debian package installation method is strongly recommended.
![]()
For beginners, it is strongly recommended to install ROS with the script provided in the below command.
$ sudo apt update
$ wget https://raw.githubusercontent.com/ROBOTIS-GIT/robotis_tools/master/install_ros_noetic.sh
$ chmod 755 ./install_ros_noetic.sh
$ bash ./install_ros_noetic.sh
 Click to expand : Manual ROS Installation
Please be aware that this manual installation takes a lot more time than installing with the script, but allows flexible choice of package installation. This instruction is not recommended for the beginners.
Below instruction is based on the official ROS Kinetic installation guide.
- Setup the sources.list
$ sudo sh -c 'echo "deb http://packages.ros.org/ros/ubuntu $(lsb_release -sc) main" > /etc/apt/sources.list.d/ros-latest.list' - Set up the keys
$ sudo apt install curl $ curl -s https://raw.githubusercontent.com/ros/rosdistro/master/ros.asc | sudo apt-key add - - Install ROS
$ sudo apt update $ sudo apt install ros-noetic-desktop-full - Dependencies for building packages
$ sudo apt install python3-rosdep python3-rosinstall python3-rosinstall-generator python3-wstool build-essential - Initialize rosdep
$ sudo rosdep init $ rosdep update - ROS Environment setup
Please do NOT enter below commands if you have installed ROS with the script file.
Theinstall_ros_noetic.shscript file automatically configures the basic ROS environment.$ sudo apt install git $ mkdir -p ~/catkin_ws/src $ catkin_init_workspace $ cd ~/catkin_ws && catkin_make $ echo "source /opt/ros/noetic/setup.bash" >> ~/.bashrc $ echo "source ~/catkin_ws/devel/setup.bash" >> ~/.bashrc $ echo "export ROS_MASTER_URI=http://localhost:11311" >> ~/.bashrc $ echo "export ROS_HOSTNAME=localhost" >> ~/.bashrc" $ source ~/.bashrc
Not required.
Install ROS Packages
Supported ROS Version: ROS 2 Jazzy
This package is compatible only with ROS 2 Jazzy. Ensure that ROS 2 Jazzy is properly installed.
USB Port Permissions
To enable communication with the hardware, add your user to the dialout group:
$ sudo usermod -aG dialout $USER
A login and logout are required.
Clone the Repository
$ mkdir -p ros2_ws/src
$ cd ~/ros2_ws/src
$ git clone -b jazzy https://github.com/ROBOTIS-GIT/DynamixelSDK.git && \
  git clone -b jazzy https://github.com/ROBOTIS-GIT/dynamixel_interfaces.git && \
  git clone -b jazzy https://github.com/ROBOTIS-GIT/dynamixel_hardware_interface.git && \
  git clone -b jazzy https://github.com/ROBOTIS-GIT/open_manipulator.git
Install ROS 2 Dependencies
$ cd ~/ros2_ws
$ sudo rosdep init
$ rosdep update
$ rosdep install --from-paths src -y --ignore-src
Build the Package
$ colcon build --symlink-install --cmake-args -DCMAKE_BUILD_TYPE=Release
Source the Workspace
$ source ~/ros2_ws/install/setup.bash
bashrc setting
Add the following to your ~/.bashrc for a convenient build alias:
$ echo "source /opt/ros/${ROS_DISTRO}/setup.bash" >> ~/.bashrc && \
  echo "source ~/ros2_ws/install/setup.bash" >> ~/.bashrc && \
  echo "alias cb='colcon build --symlink-install --cmake-args -DCMAKE_BUILD_TYPE=Release'" >> ~/.bashrc
$ source ~/.bashrc
Create and apply udev rules
$ ros2 run open_manipulator_bringup om_create_udev_rules
Install dependent packages for OpenMANIPULATOR-X. Run the following commands in a terminal window.
$ sudo apt install \
  ros-humble-ros2-control \
  ros-humble-moveit* \
  ros-humble-gazebo-ros2-control \
  ros-humble-ros2-controllers \
  ros-humble-controller-manager \
  ros-humble-position-controllers \
  ros-humble-joint-state-broadcaster \
  ros-humble-joint-trajectory-controller \
  ros-humble-gripper-controllers \
  ros-humble-hardware-interface \
  ros-humble-xacro
$ mkdir -p colcon_ws/src
$ cd ~/colcon_ws/src/
$ git clone -b humble https://github.com/ROBOTIS-GIT/DynamixelSDK.git
$ git clone -b humble https://github.com/ROBOTIS-GIT/open_manipulator.git
$ git clone -b humble https://github.com/ROBOTIS-GIT/dynamixel_hardware_interface.git
$ git clone -b humble https://github.com/ROBOTIS-GIT/dynamixel_interfaces.git
$ cd ~/colcon_ws && colcon build --symlink-install
Set the ROS environment for PC
$ echo 'source /usr/share/gazebo/setup.sh' >> ~/.bashrc
$ echo 'source ~/colcon_ws/install/local_setup.bash' >> ~/.bashrc
$ source ~/.bashrc
The following commands will download OpenMANIPULATOR-X package source codes and build them.
- Install dependent pacakges
$ source ~/.bashrc $ sudo apt-get install ros-noetic-ros-controllers ros-noetic-gazebo* ros-noetic-moveit* ros-noetic-industrial-core $ sudo apt install ros-noetic-dynamixel-sdk ros-noetic-dynamixel-workbench* $ sudo apt install ros-noetic-robotis-manipulator - Download and build OpenMANIPULATOR-X packages
$ cd ~/catkin_ws/src/
$ git clone -b noetic https://github.com/ROBOTIS-GIT/open_manipulator.git
$ git clone -b noetic https://github.com/ROBOTIS-GIT/open_manipulator_msgs.git
$ git clone -b noetic https://github.com/ROBOTIS-GIT/open_manipulator_simulations.git
$ git clone -b noetic https://github.com/ROBOTIS-GIT/open_manipulator_dependencies.git
$ cd ~/catkin_ws && catkin_make
Not required.
Communication Interface
There are two communication interface hardware options available for controlling the OpenMANIPULATOR-X. Please select one of the below options.
After completing this section, turn on the power switch and check if all DYNAMIXEL LED blink once.
Option 1(Recommended) : Use U2D2 as a communication interface
U2D2 Connection
Connect micro USB (connected to PC), DYNAMIXEL’s(OpenMANIPULATOR-X), and 12V Power to U2D2 and U2D2 power hub board as shown below.
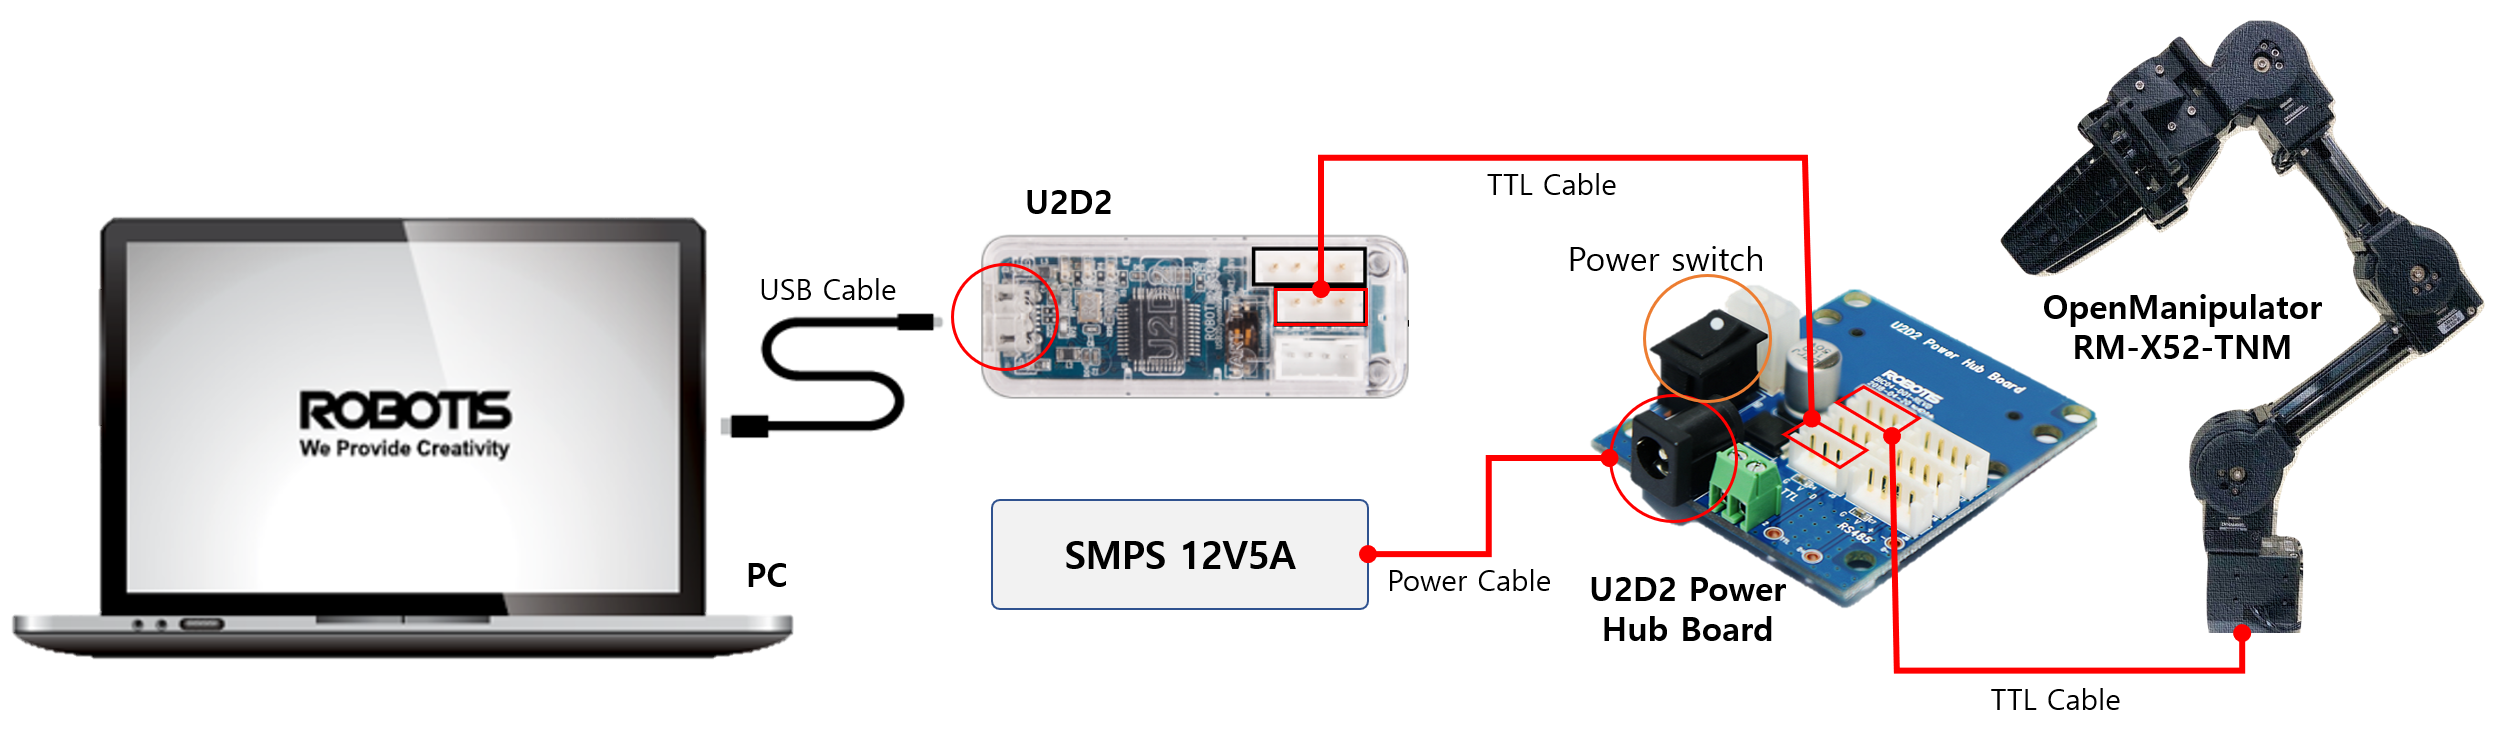
NOTE : Please refer to U2D2 e-Manual and U2D2 power hub board e-manual for detailed connection of U2D2 and U2D2 power hub board.
USB Latency Timer Setting
Option 1: Using Docker
If you are using the Docker environment, the USB latency timer setting is already configured. You can proceed directly to the next section.
Option 2: Host Installation
In Linux(Ubuntu platform) environment, USB latency time is set to 16ms by default. Follow the steps below to set the communication latency time to the lowest value (1ms) between DYNAMIXEL’s and PC connected via USB.
Open a terminal window and enter the following command to set usb latency time. The command below will set the USB latency to 1 ms.
TIP: You can open a new terminal window by pressing CTRL + ALT + T.
$ ros2 run open_manipulator_bringup om_create_udev_rules
TIP: If you would like to see the current latency, enter the following command in the terminal.
$ cat /sys/bus/usb-serial/devices/ttyUSB0/latency_timer
Option 2 : Use OpenCR as a communication interface
This section describes how to set up OpenCR as a communication board between ROS Packages of PC and DYNAMIXEL’s of OpenMANIPULATOR-X.
OpenCR Connection
Connect micro USB (connected to PC), DYNAMIXEL’s(OpenMANIPULATOR-X), and 12V Power to OpenCR as shown below.

Upload Source code
-
Set up the Arduino IDE for OpenCR (Instructions)
-
Connect OpenCR to the PC.
- Open the example from
File > Examples > OpenCR > 10.Etc > usb_to_dxl

Open the
usb to dxlexample. -
Upload the example to OpenCR.
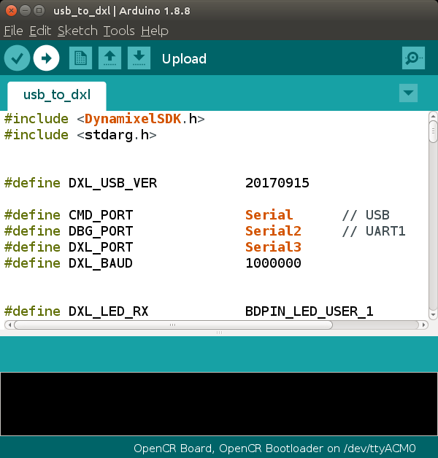
- When the upload is completed, the following comments are displayed in the log window.
FAQ
If upload fails, try with Recovery Mode
- Turn on the power of the OpenCR board.
- Hold down the
PUSH SW2button. - Press the
Resetbutton. - Release the
Resetbutton. - Release the
PUSH SW2button.
The STATUS LED should blink every 100ms after entering Recovery Mode successfully.
There are two communication interface hardware options available for controlling the OpenMANIPULATOR-X. Please select one of the below options.
After completing this section, turn on the power switch and check if all DYNAMIXEL LED blink once.
Option 1(Recommended) : Use U2D2 as a communication interface
U2D2 Connection
Connect micro USB (connected to PC), DYNAMIXEL’s(OpenMANIPULATOR-X), and 12V Power to U2D2 and U2D2 power hub board as shown below.
NOTE : Please refer to U2D2 e-Manual and U2D2 power hub board e-manual for detailed connection of U2D2 and U2D2 power hub board.
USB Latency Timer Setting
In Linux(Ubuntu platform) environment, USB latency time is set to 16ms by default. Follow the steps below to set the communication latency time to the lowest value (1ms) between DYNAMIXEL’s and PC connected via USB.
Open a terminal window and enter the following command to set usb latency time. The command below will set the USB latency to 1 ms.
TIP: You can open a new terminal window by pressing CTRL + ALT + T.
$ ros2 run open_manipulator_x_bringup create_udev_rules
TIP: If you would like to see the current latency, enter the following command in the terminal.
$ cat /sys/bus/usb-serial/devices/ttyUSB0/latency_timer
Option 2 : Use OpenCR as a communication interface
This section describes how to set up OpenCR as a communication board between ROS Packages of PC and DYNAMIXEL’s of OpenMANIPULATOR-X.
OpenCR Connection
Connect micro USB (connected to PC), DYNAMIXEL’s(OpenMANIPULATOR-X), and 12V Power to OpenCR as shown below.
Upload Source code
-
Set up the Arduino IDE for OpenCR (Instructions)
-
Connect OpenCR to the PC.
- Open the example from
File > Examples > OpenCR > 10.Etc > usb_to_dxl
Open the
usb to dxlexample. -
Upload the example to OpenCR.
- When the upload is completed, the following comments are displayed in the log window.
FAQ
If upload fails, try with Recovery Mode
- Turn on the power of the OpenCR board.
- Hold down the
PUSH SW2button. - Press the
Resetbutton. - Release the
Resetbutton. - Release the
PUSH SW2button.
The STATUS LED should blink every 100ms after entering Recovery Mode successfully.
There are two communication interface hardware options available for controlling the OpenMANIPULATOR-X. Please select one of the below options.
After completing this section, turn on the power switch and check if all DYNAMIXEL LED blink once.
Option 1(Recommended) : Use U2D2 as a communication interface
U2D2 Connection
Connect micro USB (connected to PC), DYNAMIXEL’s(OpenMANIPULATOR-X), and 12V Power to U2D2 and U2D2 power hub board as shown below.
NOTE : Please refer to U2D2 e-Manual and U2D2 power hub board e-manual for detailed connection of U2D2 and U2D2 power hub board.
USB Latency Timer Setting
In Linux(Ubuntu platform) environment, USB latency time is set to 16ms by default. Follow the steps below to set the communication latency time to the lowest value (1ms) between DYNAMIXEL’s and PC connected via USB.
Open a terminal window and run the roscore.
$ roscore
TIP: You can open a new terminal window by pressing ALT + CTRL + T.
While the roscore running, open a new terminal window and enter the following command to set usb latency time. The command below will set the USB latency to 1 ms.
$ rosrun open_manipulator_controller create_udev_rules
TIP: If you would like to see the current latency, enter the following command in the terminal.
$ cat /sys/bus/usb-serial/devices/ttyUSB0/latency_timer
Option 2 : Use OpenCR as a communication interface
This section describes how to set up OpenCR as a communication board between ROS Packages of PC and DYNAMIXEL’s of OpenMANIPULATOR-X.
If you want to operate OpenMANIPULATOR-X on embedded system (OpenCR) without ROS, please select the Arduino tab at the top of the page.
OpenCR Connection
Connect micro USB (connected to PC), DYNAMIXEL’s(OpenMANIPULATOR-X), and 12V Power to OpenCR as shown below.
Upload Source code
-
Set up the Arduino IDE for OpenCR (Instructions)
-
Connect OpenCR to the PC.
- Open the example from
File > Examples > OpenCR > 10.Etc > usb_to_dxl
Open the
usb to dxlexample. -
Upload the example to OpenCR.
- When the upload is completed, the following comments are displayed in the log window.
FAQ
If upload fails, try with Recovery Mode
- Turn on the power of the OpenCR board.
- Hold down the
PUSH SW2button. - Press the
Resetbutton. - Release the
Resetbutton. - Release the
PUSH SW2button.
The STATUS LED should blink every 100ms after entering Recovery Mode successfully.
Not required.