
Basic Operation
Please note that this instruction is written for the ROBOTIS official OpenMANIPULATOR-X package. If you are operating a home made OpenMANIPULATOR-X, make sure to configure each DYNAMIXEL as below before operating.
WARNING The gripper module(ID 15) requires Current based Position Control Mode. Please make sure your DYNAMIXEL model supports the required Operating Mode.
FAQ
- You can configure your DYNAMIXEL using DYNAMIXEL Wizard 2.0.
- After completing the Communication Interface section, use DYNAMIXEL Wizard 2.0 to configure the DYNAMIXEL.
Launch Controller
After running this section, software controller that controls the OpenMANIPULATOR-X will be launched and each joint of the OpenMANIPULATOR-X will be locked (Torque On).
Option 1: Using Docker
NOTE: If you are using the Docker environment, make sure you are inside the container before running these commands.
./docker/container.sh enter
- When operating with
U2D2
Close all terminal and enter the command below in each new terminal.$ ros2 launch open_manipulator_bringup open_manipulator_x.launch.py - When operating with
OpenCR
Close all terminal and enter the command below in the new terminal.$ ros2 launch open_manipulator_bringup open_manipulator_x.launch.py port_name:=/dev/ttyACM0
Option 2: Host Installation
- When operating with
U2D2
Close all terminal and enter the command below in each new terminal.$ ros2 launch open_manipulator_bringup open_manipulator_x.launch.py - When operating with
OpenCR
Close all terminal and enter the command below in the new terminal.$ ros2 launch open_manipulator_bringup open_manipulator_x.launch.py port_name:=/dev/ttyACM0
WARNING :
Please check each joint position before running OpenMANIPULATOR-X. If joints are set inappropriately, OpenMANIPULATOR-X might not start operating.
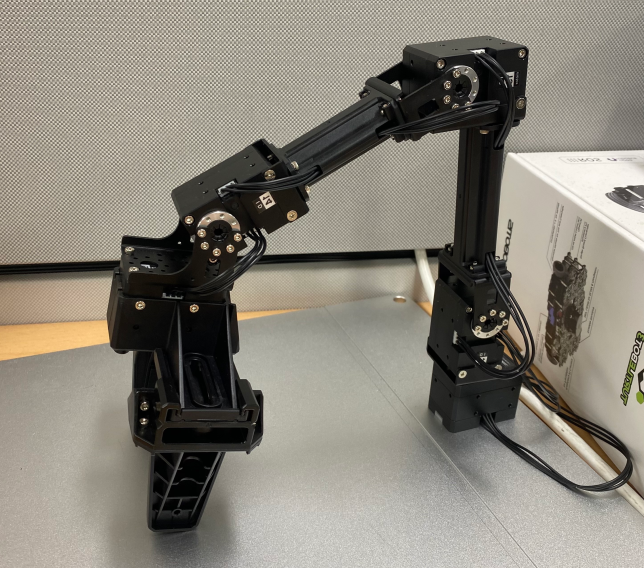
The picture of OpenMANIPULATOR-X below is showing you the ideal pose of OpenMANIPULATOR-X. Please adjust each joint to match the following picture when DYNAMIXEL torque is not enabled.
Launch result on the terminal will look like below.
$ ros2 launch open_manipulator_bringup open_manipulator_x.launch.py

[INFO] [launch]: All log files can be found below
[INFO] [launch]: Default logging verbosity is set to INFO
[INFO] [ros2_control_node-1]: process started with pid [507]
[INFO] [spawner-2]: process started with pid [508]
[INFO] [robot_state_publisher-3]: process started with pid [509]
[robot_state_publisher-3] [INFO] [1751511730.728706299] [robot_state_publisher]: Robot initialized
[ros2_control_node-1] [INFO] [1751511730.747902102] [controller_manager]: Using Steady (Monotonic) clock for triggering controller manager cycles.
[ros2_control_node-1] [INFO] [1751511730.750710518] [controller_manager]: Subscribing to '/robot_description' topic for robot description.
[ros2_control_node-1] [INFO] [1751511730.761789183] [controller_manager]: update rate is 100 Hz
[ros2_control_node-1] [INFO] [1751511730.761860000] [controller_manager]: Spawning controller_manager RT thread with scheduler priority: 50
[ros2_control_node-1] [INFO] [1751511730.761941839] [controller_manager]: Successful set up FIFO RT scheduling policy with priority 50.
[spawner-2] [INFO] [1751511730.877470892] [spawner_arm_controller]: waiting for service /controller_manager/list_controllers to become available...
[ros2_control_node-1] [INFO] [1751511730.884559092] [controller_manager]: Received robot description from topic.
[ros2_control_node-1] [INFO] [1751511730.888920790] [controller_manager]: Loading hardware 'OpenManipulatorXSystem'
[ros2_control_node-1] [INFO] [1751511730.893746698] [controller_manager]: Loaded hardware 'OpenManipulatorXSystem' from plugin 'dynamixel_hardware_interface/DynamixelHardware'
[ros2_control_node-1] [INFO] [1751511730.893797909] [controller_manager]: Initialize hardware 'OpenManipulatorXSystem'
[ros2_control_node-1] transmission_to_joint_matrix_
[ros2_control_node-1] [0][0] 1.000000, [0][1] 0.000000, [0][2] 0.000000, [0][3] 0.000000, [0][4] 0.000000,
[ros2_control_node-1] [1][0] 0.000000, [1][1] 1.000000, [1][2] 0.000000, [1][3] 0.000000, [1][4] 0.000000,
[ros2_control_node-1] [2][0] 0.000000, [2][1] 0.000000, [2][2] 1.000000, [2][3] 0.000000, [2][4] 0.000000,
[ros2_control_node-1] [3][0] 0.000000, [3][1] 0.000000, [3][2] 0.000000, [3][3] 1.000000, [3][4] 0.000000,
[ros2_control_node-1] [4][0] 0.000000, [4][1] 0.000000, [4][2] 0.000000, [4][3] 0.000000, [4][4] 1.000000,
[ros2_control_node-1] joint_to_transmission_matrix_
[ros2_control_node-1] [0][0] 1.000000, [0][1] 0.000000, [0][2] 0.000000, [0][3] 0.000000, [0][4] 0.000000,
[ros2_control_node-1] [1][0] 0.000000, [1][1] 1.000000, [1][2] 0.000000, [1][3] 0.000000, [1][4] 0.000000,
[ros2_control_node-1] [2][0] 0.000000, [2][1] 0.000000, [2][2] 1.000000, [2][3] 0.000000, [2][4] 0.000000,
[ros2_control_node-1] [3][0] 0.000000, [3][1] 0.000000, [3][2] 0.000000, [3][3] 1.000000, [3][4] 0.000000,
[ros2_control_node-1] [4][0] 0.000000, [4][1] 0.000000, [4][2] 0.000000, [4][3] 0.000000, [4][4] 1.000000,
[ros2_control_node-1] [INFO] [1751511730.893931204] [dynamixel_hardware_interface]: Torque will be disabled during initialization if it is enabled at initialization.
[ros2_control_node-1] [INFO] [1751511730.893939425] [dynamixel_hardware_interface]: port_name /dev/ttyUSB0 / baudrate 1000000
[ros2_control_node-1] Dynamixel Information File List.
[ros2_control_node-1] num: 220, name: omy_hat.model
[ros2_control_node-1] num: 230, name: omy_end.model
[ros2_control_node-1] num: 231, name: omy_end_rh_p12_rn.model
[ros2_control_node-1] num: 350, name: xl320.model
[ros2_control_node-1] num: 536, name: sensorxel_joy.model
[ros2_control_node-1] num: 537, name: ffw_g40_imu.model
[ros2_control_node-1] num: 600, name: sensorxel_joy.model
[ros2_control_node-1] num: 601, name: ffw_g10_led.model
[ros2_control_node-1] num: 602, name: ffw_g10_rcu.model
[ros2_control_node-1] num: 620, name: ffw_sg2_steer_1.model
[ros2_control_node-1] num: 621, name: ffw_sg2_steer_2.model
[ros2_control_node-1] num: 622, name: ffw_sg2_steer_3.model
[ros2_control_node-1] num: 623, name: ffw_sg2_drive_1.model
[ros2_control_node-1] num: 624, name: ffw_sg2_drive_2.model
[ros2_control_node-1] num: 625, name: ffw_sg2_drive_3.model
[ros2_control_node-1] num: 1000, name: xh430_w350.model
[ros2_control_node-1] num: 1001, name: xd430_t350.model
[ros2_control_node-1] num: 1010, name: xh430_w210.model
[ros2_control_node-1] num: 1011, name: xd430_t210.model
[ros2_control_node-1] num: 1020, name: xm430_w350.model
[ros2_control_node-1] num: 1030, name: xm430_w210.model
[ros2_control_node-1] num: 1040, name: xh430_v350.model
[ros2_control_node-1] num: 1050, name: xh430_v210.model
[ros2_control_node-1] num: 1060, name: xl430_w250.model
[ros2_control_node-1] num: 1070, name: xc430_w150.model
[ros2_control_node-1] num: 1070, name: xc430_w150.model
[ros2_control_node-1] num: 1080, name: xc430_w240.model
[ros2_control_node-1] num: 1080, name: xc430_w240.model
[ros2_control_node-1] num: 1090, name: 2xl430_w250.model
[ros2_control_node-1] num: 1100, name: xh540_w270.model
[ros2_control_node-1] num: 1101, name: xd540_t270.model
[ros2_control_node-1] num: 1110, name: xh540_w150.model
[ros2_control_node-1] num: 1111, name: xd540_t150.model
[ros2_control_node-1] num: 1120, name: xm540_w270.model
[ros2_control_node-1] num: 1130, name: xm540_w150.model
[ros2_control_node-1] num: 1140, name: xh540_v270.model
[ros2_control_node-1] num: 1150, name: xh540_v150.model
[ros2_control_node-1] num: 1160, name: 2xc430_w250.model
[ros2_control_node-1] num: 1170, name: xw540_t260.model
[ros2_control_node-1] num: 1180, name: xw540_t140.model
[ros2_control_node-1] num: 1190, name: xl330_m077.model
[ros2_control_node-1] num: 1200, name: xl330_m288.model
[ros2_control_node-1] num: 1210, name: xc330_t181.model
[ros2_control_node-1] num: 1220, name: xc330_t288.model
[ros2_control_node-1] num: 1230, name: xc330_m181.model
[ros2_control_node-1] num: 1240, name: xc330_m288.model
[ros2_control_node-1] num: 1270, name: xw430_t333.model
[ros2_control_node-1] num: 1310, name: xw540_h260.model
[ros2_control_node-1] num: 2000, name: ph42_020_s300.model
[ros2_control_node-1] num: 4000, name: ym070_210_m001.model
[ros2_control_node-1] num: 4020, name: ym070_210_r051.model
[ros2_control_node-1] num: 4030, name: ym070_210_r099.model
[ros2_control_node-1] num: 4050, name: ym070_210_a099.model
[ros2_control_node-1] num: 4120, name: ym080_230_m001.model
[ros2_control_node-1] num: 4130, name: ym080_230_b001.model
[ros2_control_node-1] num: 4140, name: ym080_230_r051.model
[ros2_control_node-1] num: 4150, name: ym080_230_r099.model
[ros2_control_node-1] num: 4170, name: ym080_230_a099.model
[ros2_control_node-1] num: 35074, name: rh_p12_rn.model
[ros2_control_node-1] [INFO] [1751511730.894147174] [dynamixel_hardware_interface]: $$$$$$$$$$$$$$$$$$$$$$$$$$$$$$$$$$$$$$$$
[ros2_control_node-1] [INFO] [1751511730.894151067] [dynamixel_hardware_interface]: $$$$$ Init Dxl Comm Port
[ros2_control_node-1] [INFO] [1751511730.894153757] [dynamixel_hardware_interface]: Revolute to Prismatic gripper conversion enabled.
[ros2_control_node-1] [INFO] [1751511730.894171984] [dynamixel_hardware_interface]: $$$$$ Init Items for type: controller
[ros2_control_node-1] [INFO] [1751511730.894174743] [dynamixel_hardware_interface]: $$$$$ Init Items for type: virtual_dxl
[ros2_control_node-1] Succeeded to open the port!
[ros2_control_node-1] Succeeded to change the [1000000] baudrate!
[ros2_control_node-1] [ID:011] Request ping      - Ping succeeded. Dynamixel model number : 1020
[ros2_control_node-1] [WARN] Model file '/root/ros2_ws/install/dynamixel_hardware_interface/share/dynamixel_hardware_interface/param/dxl_model/xm430_w350.model' doesn't contain torque_constant parameter. Using default value: 1.0
[ros2_control_node-1] [ID:012] Request ping      - Ping succeeded. Dynamixel model number : 1020
[ros2_control_node-1] [WARN] Model file '/root/ros2_ws/install/dynamixel_hardware_interface/share/dynamixel_hardware_interface/param/dxl_model/xm430_w350.model' doesn't contain torque_constant parameter. Using default value: 1.0
[ros2_control_node-1] [ID:013] Request ping      - Ping succeeded. Dynamixel model number : 1020
[ros2_control_node-1] [WARN] Model file '/root/ros2_ws/install/dynamixel_hardware_interface/share/dynamixel_hardware_interface/param/dxl_model/xm430_w350.model' doesn't contain torque_constant parameter. Using default value: 1.0
[ros2_control_node-1] [ID:014] Request ping      - Ping succeeded. Dynamixel model number : 1020
[ros2_control_node-1] [WARN] Model file '/root/ros2_ws/install/dynamixel_hardware_interface/share/dynamixel_hardware_interface/param/dxl_model/xm430_w350.model' doesn't contain torque_constant parameter. Using default value: 1.0
[ros2_control_node-1] [ID:015] Request ping      - Ping succeeded. Dynamixel model number : 1020
[ros2_control_node-1] [WARN] Model file '/root/ros2_ws/install/dynamixel_hardware_interface/share/dynamixel_hardware_interface/param/dxl_model/xm430_w350.model' doesn't contain torque_constant parameter. Using default value: 1.0
[ros2_control_node-1] [INFO] [1751511730.900250607] [dynamixel_hardware_interface]: Trying to connect to the communication port...
[ros2_control_node-1] [InitTorqueStates][ID:011] Current torque state: OFF
[ros2_control_node-1] [InitTorqueStates][ID:012] Current torque state: OFF
[ros2_control_node-1] [InitTorqueStates][ID:013] Current torque state: OFF
[ros2_control_node-1] [InitTorqueStates][ID:014] Current torque state: OFF
[ros2_control_node-1] [InitTorqueStates][ID:015] Current torque state: OFF
[ros2_control_node-1] [INFO] [1751511730.905232373] [dynamixel_hardware_interface]: $$$$$ Init Items for type: dxl
[ros2_control_node-1] [INFO] [1751511730.905347714] [dynamixel_hardware_interface]: [ID:11] item_name:Operating Mode     data:3
[ros2_control_node-1] [INFO] [1751511730.906187489] [dynamixel_hardware_interface]: [ID:11] item_name:Return Delay Time  data:0
[ros2_control_node-1] [INFO] [1751511730.907182981] [dynamixel_hardware_interface]: [ID:11] item_name:Position D Gain    data:100
[ros2_control_node-1] [INFO] [1751511730.908203072] [dynamixel_hardware_interface]: [ID:11] item_name:Position I Gain    data:100
[ros2_control_node-1] [INFO] [1751511730.909194354] [dynamixel_hardware_interface]: [ID:11] item_name:Position P Gain    data:800
[ros2_control_node-1] [INFO] [1751511730.910140678] [dynamixel_hardware_interface]: [ID:11] item_name:Drive Modedata:4
[ros2_control_node-1] [INFO] [1751511730.911139093] [dynamixel_hardware_interface]: [ID:11] item_name:Profile Velocity   data:20
[ros2_control_node-1] [INFO] [1751511730.912117370] [dynamixel_hardware_interface]: [ID:11] item_name:Profile Acceleration       data:10
[ros2_control_node-1] [INFO] [1751511730.913152937] [dynamixel_hardware_interface]: [ID:12] item_name:Operating Mode     data:3
[ros2_control_node-1] [INFO] [1751511730.914154019] [dynamixel_hardware_interface]: [ID:12] item_name:Return Delay Time  data:0
[ros2_control_node-1] [INFO] [1751511730.915441921] [dynamixel_hardware_interface]: [ID:12] item_name:Position D Gain    data:100
[ros2_control_node-1] [INFO] [1751511730.916190531] [dynamixel_hardware_interface]: [ID:12] item_name:Position I Gain    data:100
[ros2_control_node-1] [INFO] [1751511730.917392144] [dynamixel_hardware_interface]: [ID:12] item_name:Position P Gain    data:800
[ros2_control_node-1] [INFO] [1751511730.918170651] [dynamixel_hardware_interface]: [ID:12] item_name:Drive Modedata:4
[ros2_control_node-1] [INFO] [1751511730.919339480] [dynamixel_hardware_interface]: [ID:12] item_name:Profile Velocity   data:20
[ros2_control_node-1] [INFO] [1751511730.920219221] [dynamixel_hardware_interface]: [ID:12] item_name:Profile Acceleration       data:10
[ros2_control_node-1] [INFO] [1751511730.921832480] [dynamixel_hardware_interface]: [ID:13] item_name:Operating Mode     data:3
[ros2_control_node-1] [INFO] [1751511730.923520106] [dynamixel_hardware_interface]: [ID:13] item_name:Return Delay Time  data:0
[ros2_control_node-1] [INFO] [1751511730.924213100] [dynamixel_hardware_interface]: [ID:13] item_name:Position D Gain    data:100
[ros2_control_node-1] [INFO] [1751511730.925160103] [dynamixel_hardware_interface]: [ID:13] item_name:Position I Gain    data:100
[ros2_control_node-1] [INFO] [1751511730.926225284] [dynamixel_hardware_interface]: [ID:13] item_name:Position P Gain    data:800
[ros2_control_node-1] [INFO] [1751511730.927171515] [dynamixel_hardware_interface]: [ID:13] item_name:Drive Modedata:4
[ros2_control_node-1] [INFO] [1751511730.928279270] [dynamixel_hardware_interface]: [ID:13] item_name:Profile Velocity   data:20
[ros2_control_node-1] [INFO] [1751511730.929607782] [dynamixel_hardware_interface]: [ID:13] item_name:Profile Acceleration       data:10
[ros2_control_node-1] [INFO] [1751511730.930252442] [dynamixel_hardware_interface]: [ID:14] item_name:Operating Mode     data:3
[ros2_control_node-1] [INFO] [1751511730.931156296] [dynamixel_hardware_interface]: [ID:14] item_name:Return Delay Time  data:0
[ros2_control_node-1] [INFO] [1751511730.932183611] [dynamixel_hardware_interface]: [ID:14] item_name:Position D Gain    data:100
[ros2_control_node-1] [INFO] [1751511730.933156544] [dynamixel_hardware_interface]: [ID:14] item_name:Position I Gain    data:100
[ros2_control_node-1] [INFO] [1751511730.934184448] [dynamixel_hardware_interface]: [ID:14] item_name:Position P Gain    data:800
[ros2_control_node-1] [INFO] [1751511730.935138086] [dynamixel_hardware_interface]: [ID:14] item_name:Drive Modedata:4
[ros2_control_node-1] [INFO] [1751511730.936149154] [dynamixel_hardware_interface]: [ID:14] item_name:Profile Velocity   data:20
[ros2_control_node-1] [INFO] [1751511730.937148882] [dynamixel_hardware_interface]: [ID:14] item_name:Profile Acceleration       data:10
[ros2_control_node-1] [INFO] [1751511730.938194626] [dynamixel_hardware_interface]: [ID:15] item_name:Operating Mode     data:5
[ros2_control_node-1] [INFO] [1751511730.939251278] [dynamixel_hardware_interface]: [ID:15] item_name:Goal Current       data:200
[ros2_control_node-1] [INFO] [1751511730.940347115] [dynamixel_hardware_interface]: [ID:15] item_name:Return Delay Time  data:0
[ros2_control_node-1] [INFO] [1751511730.941168094] [dynamixel_hardware_interface]: [ID:15] item_name:Drive Modedata:4
[ros2_control_node-1] [INFO] [1751511730.942196843] [dynamixel_hardware_interface]: [ID:15] item_name:Profile Velocity   data:20
[ros2_control_node-1] [INFO] [1751511730.943168462] [dynamixel_hardware_interface]: [ID:15] item_name:Profile Acceleration       data:10
[ros2_control_node-1] [INFO] [1751511730.944137719] [dynamixel_hardware_interface]: $$$$$ Init Items for type: sensor
[ros2_control_node-1] [INFO] [1751511730.944197533] [dynamixel_hardware_interface]: $$$$$ Init Dxl Read Items
[ros2_control_node-1] Dynamixel Read Type : sync read
[ros2_control_node-1] ID : 11, 12, 13, 14, 15,
[ros2_control_node-1] Read items :      Present Position        Present Velocity        Present Current
[ros2_control_node-1] set fast sync read (indirect addr) : addr 634, size 10
[ros2_control_node-1] FastSyncRead handler set up successfully.
[ros2_control_node-1] Success to set SyncRead handler using indirect address
[ros2_control_node-1] [INFO] [1751511730.995224936] [dynamixel_hardware_interface]: $$$$$ Init Dxl Write Items
[ros2_control_node-1] Dynamixel Write Type : sync write
[ros2_control_node-1] ID : 11, 12, 13, 14, 15,
[ros2_control_node-1] Write items :     Goal Position
[ros2_control_node-1] set sync write (indirect addr) : addr 224, size 4
[ros2_control_node-1] Success to set SyncWrite handler using indirect address
[ros2_control_node-1] [INFO] [1751511731.020262878] [controller_manager]: Successful initialization of hardware 'OpenManipulatorXSystem'
[ros2_control_node-1] [INFO] [1751511731.020618988] [resource_manager]: 'configure' hardware 'OpenManipulatorXSystem'
[ros2_control_node-1] [INFO] [1751511731.020631268] [resource_manager]: Successful 'configure' of hardware 'OpenManipulatorXSystem'
[ros2_control_node-1] [INFO] [1751511731.020641833] [resource_manager]: 'activate' hardware 'OpenManipulatorXSystem'
[ros2_control_node-1] [INFO] [1751511731.022185727] [dynamixel_hardware_interface]: Sync joint state to command (joint: joint1, position, -0.0659612 <- position, -0.0659612
[ros2_control_node-1] [INFO] [1751511731.022225647] [dynamixel_hardware_interface]: Sync joint state to command (joint: joint2, position, -2.0632 <- position, -2.0632
[ros2_control_node-1] [INFO] [1751511731.022240619] [dynamixel_hardware_interface]: Sync joint state to command (joint: joint3, position, 1.48408 <- position, 1.48408
[ros2_control_node-1] [INFO] [1751511731.022253290] [dynamixel_hardware_interface]: Sync joint state to command (joint: joint4, position, 0.658399 <- position, 0.658399
[ros2_control_node-1] [INFO] [1751511731.022265799] [dynamixel_hardware_interface]: Sync joint state to command (joint: gripper_left_joint, position, -0.00975459 <- position, -0.00975459
[ros2_control_node-1] [INFO] [1751511731.022335076] [dynamixel_hardware_interface]: Enabling torque for Dynamixels
[ros2_control_node-1] [ID:011] Torque ON
[ros2_control_node-1] [ID:012] Torque ON
[ros2_control_node-1] [ID:013] Torque ON
[ros2_control_node-1] [ID:014] Torque ON
[ros2_control_node-1] [ID:015] Torque ON
[ros2_control_node-1] [INFO] [1751511731.027148696] [dynamixel_hardware_interface]: Dynamixel Hardware Start!
[ros2_control_node-1] [INFO] [1751511731.027197173] [resource_manager]: Successful 'activate' of hardware 'OpenManipulatorXSystem'
[ros2_control_node-1] [INFO] [1751511731.027289507] [controller_manager]: Resource Manager has been successfully initialized. Starting Controller Manager services...
[ros2_control_node-1] [INFO] [1751511731.131317160] [controller_manager]: Loading controller : 'arm_controller' of type 'joint_trajectory_controller/JointTrajectoryController'
[ros2_control_node-1] [INFO] [1751511731.131411607] [controller_manager]: Loading controller 'arm_controller'
[ros2_control_node-1] [INFO] [1751511731.138269320] [controller_manager]: Controller 'arm_controller' node arguments: --ros-args --params-file /tmp/launch_params_6_4c_95z --params-file /root/ros2_ws/install/open_manipulator_bringup/share/open_manipulator_bringup/config/open_manipulator_x/hardware_controller_manager.yaml
[spawner-2] [INFO] [1751511731.166336939] [spawner_arm_controller]: Loaded arm_controller
[ros2_control_node-1] [INFO] [1751511731.167789273] [controller_manager]: Configuring controller: 'arm_controller'
[ros2_control_node-1] [INFO] [1751511731.168277922] [arm_controller]: No specific joint names are used for command interfaces. Using 'joints' parameter.
[ros2_control_node-1] [INFO] [1751511731.168374878] [arm_controller]: Command interfaces are [position] and state interfaces are [position velocity].
[ros2_control_node-1] [INFO] [1751511731.168456153] [arm_controller]: Using 'splines' interpolation method.
[ros2_control_node-1] [INFO] [1751511731.177301345] [arm_controller]: Goals with partial set of joints are allowed
[ros2_control_node-1] [INFO] [1751511731.177343642] [arm_controller]: Action status changes will be monitored at 20.00 Hz.
[ros2_control_node-1] [INFO] [1751511731.186044591] [controller_manager]: Activating controllers: [ arm_controller ]
[ros2_control_node-1] [INFO] [1751511731.195066882] [controller_manager]: Successfully switched controllers!
[spawner-2] [INFO] [1751511731.207877250] [spawner_arm_controller]: Configured and activated arm_controller
[ros2_control_node-1] [INFO] [1751511731.209499839] [controller_manager]: Loading controller : 'gripper_controller' of type 'position_controllers/GripperActionController'
[ros2_control_node-1] [INFO] [1751511731.209555286] [controller_manager]: Loading controller 'gripper_controller'
[ros2_control_node-1] [INFO] [1751511731.212216025] [controller_manager]: Controller 'gripper_controller' node arguments: --ros-args --params-file /tmp/launch_params_6_4c_95z --params-file /root/ros2_ws/install/open_manipulator_bringup/share/open_manipulator_bringup/config/open_manipulator_x/hardware_controller_manager.yaml
[ros2_control_node-1] [WARN] [1751511731.226791266] [gripper_controller]: [Deprecated]: the `position_controllers/GripperActionController` and `effort_controllers::GripperActionController` controllers are replaced by 'parallel_gripper_controllers/GripperActionController' controller
[spawner-2] [INFO] [1751511731.236574535] [spawner_arm_controller]: Loaded gripper_controller
[ros2_control_node-1] [INFO] [1751511731.237004610] [controller_manager]: Configuring controller: 'gripper_controller'
[ros2_control_node-1] [INFO] [1751511731.237095162] [gripper_controller]: Action status changes will be monitored at 20.000000 Hz.
[ros2_control_node-1] [INFO] [1751511731.245319729] [controller_manager]: Activating controllers: [ gripper_controller ]
[ros2_control_node-1] [INFO] [1751511731.259740129] [controller_manager]: Successfully switched controllers!
[spawner-2] [INFO] [1751511731.266792295] [spawner_arm_controller]: Configured and activated gripper_controller
[ros2_control_node-1] [INFO] [1751511731.268632209] [controller_manager]: Loading controller : 'joint_state_broadcaster' of type 'joint_state_broadcaster/JointStateBroadcaster'
[ros2_control_node-1] [INFO] [1751511731.268729088] [controller_manager]: Loading controller 'joint_state_broadcaster'
[ros2_control_node-1] [INFO] [1751511731.272768326] [controller_manager]: Controller 'joint_state_broadcaster' node arguments: --ros-args --params-file /tmp/launch_params_6_4c_95z --params-file /root/ros2_ws/install/open_manipulator_bringup/share/open_manipulator_bringup/config/open_manipulator_x/hardware_controller_manager.yaml
[spawner-2] [INFO] [1751511731.297833178] [spawner_arm_controller]: Loaded joint_state_broadcaster
[ros2_control_node-1] [INFO] [1751511731.298434771] [controller_manager]: Configuring controller: 'joint_state_broadcaster'
[ros2_control_node-1] [INFO] [1751511731.298554879] [joint_state_broadcaster]: 'joints' or 'interfaces' parameter is empty. All available state interfaces will be published
[ros2_control_node-1] [INFO] [1751511731.316553372] [controller_manager]: Activating controllers: [ joint_state_broadcaster ]
[ros2_control_node-1] [INFO] [1751511731.324710178] [controller_manager]: Successfully switched controllers!
[spawner-2] [INFO] [1751511731.338744310] [spawner_arm_controller]: Configured and activated joint_state_broadcaster
[INFO] [spawner-2]: process has finished cleanly [pid 508]
[INFO] [joint_trajectory_executor-4]: process started with pid [569]
[joint_trajectory_executor-4] [INFO] [1751511731.696890011] [joint_trajectory_executor]: Waiting for action server...
[joint_trajectory_executor-4] [INFO] [1751511731.697313456] [joint_trajectory_executor]: Action server available
[joint_trajectory_executor-4] [INFO] [1751511731.697640734] [joint_trajectory_executor]: Using action topic: /arm_controller/follow_joint_trajectory
[joint_trajectory_executor-4] [INFO] [1751511731.697971862] [joint_trajectory_executor]: Using joint states topic: /joint_states
[joint_trajectory_executor-4] [INFO] [1751511731.698562007] [joint_trajectory_executor]: Moving to step 0 target positions
[joint_trajectory_executor-4] [INFO] [1751511731.700120844] [joint_trajectory_executor]: Sending goal...
[ros2_control_node-1] [INFO] [1751511731.700814287] [arm_controller]: Received new action goal
[ros2_control_node-1] [INFO] [1751511731.700872911] [arm_controller]: Accepted new action goal
[joint_trajectory_executor-4] [INFO] [1751511731.701565531] [joint_trajectory_executor]: Goal accepted :)
[joint_trajectory_executor-4] [INFO] [1751511734.495847960] [joint_trajectory_executor]: 🎯 Step 0 completed!
[joint_trajectory_executor-4] [INFO] [1751511734.504799146] [joint_trajectory_executor]: All steps completed!
[INFO] [joint_trajectory_executor-4]: process has finished cleanly [pid 569]
[ros2_control_node-1] [INFO] [1751511734.694509356] [arm_controller]: Goal reached, success!
TIP:
- If you can’t load DYNAMIXEL, please check firmware to use ROBOTIS software (DYNAMIXEL Wizard 2.0)
After running this section, software controller that controls the OpenMANIPULAOTR-X will be launched and each joint of the OpenMANIPULATOR-X will be locked (Torque On).
- When operating with
U2D2
Close all terminal and enter the command below in each new terminal.$ ros2 launch open_manipulator_x_bringup hardware.launch.py - When operating with
OpenCR
Close all terminal and enter the command below in the new terminal.$ ros2 launch open_manipulator_x_bringup hardware.launch.py port_name:=/dev/ttyACM0
WARNING :
Please check each joint position before running OpenMANIPULATOR-X. If joints are set inappropriately, OpenMANIPULATOR-X might not start operating.
The picture of OpenMANIPULATOR-X below is showing you the ideal pose of OpenMANIPULATOR-X. Please adjust each joints along with the following picture when DYNAMIXEL torque is not enabled.
Launch result on the terminal will look like below.
$ ros2 launch open_manipulator_x_bringup hardware.launch.py

[INFO] [launch]: All log files can be found below /home/open_manipulator_x/.ros/log/2024-12-10-16-13-03-846807-open_manipulator_x-3063
[INFO] [launch]: Default logging verbosity is set to INFO
[INFO] [ros2_control_node-1]: process started with pid [3066]
[INFO] [robot_state_publisher-2]: process started with pid [3068]
[INFO] [spawner-3]: process started with pid [3070]
[robot_state_publisher-2] [INFO] [1733814784.140348781] [robot_state_publisher]: got segment dummy_mimic_fix
[robot_state_publisher-2] [INFO] [1733814784.140441706] [robot_state_publisher]: got segment end_effector_link
[robot_state_publisher-2] [INFO] [1733814784.140450447] [robot_state_publisher]: got segment gripper_left_link
[robot_state_publisher-2] [INFO] [1733814784.140455005] [robot_state_publisher]: got segment gripper_right_link
[robot_state_publisher-2] [INFO] [1733814784.140459339] [robot_state_publisher]: got segment link1
[robot_state_publisher-2] [INFO] [1733814784.140463495] [robot_state_publisher]: got segment link2
[robot_state_publisher-2] [INFO] [1733814784.140467530] [robot_state_publisher]: got segment link3
[robot_state_publisher-2] [INFO] [1733814784.140471673] [robot_state_publisher]: got segment link4
[robot_state_publisher-2] [INFO] [1733814784.140475662] [robot_state_publisher]: got segment link5
[robot_state_publisher-2] [INFO] [1733814784.140479440] [robot_state_publisher]: got segment world
[ros2_control_node-1] [WARN] [1733814784.150297704] [controller_manager]: [Deprecated] Passing the robot description parameter directly to the control_manager node is deprecated. Use '~/robot_description' topic from 'robot_state_publisher' instead.
[ros2_control_node-1] [INFO] [1733814784.150762238] [resource_manager]: Loading hardware 'OpenManipulatorXSystem'
[ros2_control_node-1] [INFO] [1733814784.163256190] [resource_manager]: Initialize hardware 'OpenManipulatorXSystem'
[ros2_control_node-1] transmission_to_joint_matrix_
[ros2_control_node-1] [0][0] 1.000000, [0][1] 0.000000, [0][2] 0.000000, [0][3] 0.000000, [0][4] 0.000000,
[ros2_control_node-1] [1][0] 0.000000, [1][1] 1.000000, [1][2] 0.000000, [1][3] 0.000000, [1][4] 0.000000,
[ros2_control_node-1] [2][0] 0.000000, [2][1] 0.000000, [2][2] 1.000000, [2][3] 0.000000, [2][4] 0.000000,
[ros2_control_node-1] [3][0] 0.000000, [3][1] 0.000000, [3][2] 0.000000, [3][3] 1.000000, [3][4] 0.000000,
[ros2_control_node-1] [4][0] 0.000000, [4][1] 0.000000, [4][2] 0.000000, [4][3] 0.000000, [4][4] 1.000000,
[ros2_control_node-1] [5][0] 0.000000, [5][1] 0.000000, [5][2] 0.000000, [5][3] 0.000000, [5][4] 0.000000,
[ros2_control_node-1] joint_to_transmission_matrix_
[ros2_control_node-1] [0][0] 1.000000, [0][1] 0.000000, [0][2] 0.000000, [0][3] 0.000000, [0][4] 0.000000, [0][5] 0.000000,
[ros2_control_node-1] [1][0] 0.000000, [1][1] 1.000000, [1][2] 0.000000, [1][3] 0.000000, [1][4] 0.000000, [1][5] 0.000000,
[ros2_control_node-1] [2][0] 0.000000, [2][1] 0.000000, [2][2] 1.000000, [2][3] 0.000000, [2][4] 0.000000, [2][5] 0.000000,
[ros2_control_node-1] [3][0] 0.000000, [3][1] 0.000000, [3][2] 0.000000, [3][3] 1.000000, [3][4] 0.000000, [3][5] 0.000000,
[ros2_control_node-1] [4][0] 0.000000, [4][1] 0.000000, [4][2] 0.000000, [4][3] 0.000000, [4][4] 1.000000, [4][5] 0.000000,
[ros2_control_node-1] [INFO] [1733814784.164000125] [dynamixel_hardware_interface]: port_name /dev/ttyUSB0 / baudrate 1000000
[ros2_control_node-1] Dynamixel Information File List.
[ros2_control_node-1] num: 1000, name: xh430_w350.model
[ros2_control_node-1] num: 1020, name: xm430_w350.model
[ros2_control_node-1] num: 1060, name: xl430_w250.model
[ros2_control_node-1] num: 1080, name: xc430_w240.model
[ros2_control_node-1] num: 1100, name: xh540_w270.model
[ros2_control_node-1] num: 1160, name: 2xc430_w250.model
[ros2_control_node-1] num: 4000, name: ym070_210_m001.model
[ros2_control_node-1] num: 4020, name: ym070_210_r051.model
[ros2_control_node-1] num: 4030, name: ym070_210_r099.model
[ros2_control_node-1] num: 4050, name: ym070_210_a099.model
[ros2_control_node-1] num: 4120, name: ym080_230_m001.model
[ros2_control_node-1] num: 4140, name: ym080_230_r051.model
[ros2_control_node-1] num: 4150, name: ym080_230_r099.model
[ros2_control_node-1] num: 4170, name: ym080_230_a099.model
[ros2_control_node-1] num: 35074, name: rh_p12_rn.model
[ros2_control_node-1] [INFO] [1733814784.165060244] [dynamixel_hardware_interface]: $$$$$$$$$$$$$$$$$$$$$$$$$$$$$$$$$$$$$$$$
[ros2_control_node-1] [INFO] [1733814784.165085781] [dynamixel_hardware_interface]: $$$$$ Init Dxl Comm Port
[ros2_control_node-1] [INFO] [1733814784.165119953] [dynamixel_hardware_interface]: Revolute to Prismatic gripper conversion enabled.
[ros2_control_node-1] Succeeded to open the port!
[ros2_control_node-1] Succeeded to change the [1000000] baudrate!
[ros2_control_node-1] [ID:011] Request ping	 - Ping succeeded. Dynamixel model number : 1020
[ros2_control_node-1] [ID:012] Request ping	 - Ping succeeded. Dynamixel model number : 1020
[ros2_control_node-1] [ID:013] Request ping	 - Ping succeeded. Dynamixel model number : 1020
[ros2_control_node-1] [ID:014] Request ping	 - Ping succeeded. Dynamixel model number : 1020
[ros2_control_node-1] [ID:015] Request ping	 - Ping succeeded. Dynamixel model number : 1020
[ros2_control_node-1] [INFO] [1733814784.172855510] [dynamixel_hardware_interface]: Trying to connect to the communication port...
[ros2_control_node-1] [INFO] [1733814784.172904554] [dynamixel_hardware_interface]: $$$$$ Init Dxl Items
[ros2_control_node-1] [INFO] [1733814784.174263837] [dynamixel_hardware_interface]: [ID:11] item_name:Drive Mode	data:0
[ros2_control_node-1] [INFO] [1733814784.175202777] [dynamixel_hardware_interface]: [ID:11] item_name:Position D Gain	data:100
[ros2_control_node-1] [INFO] [1733814784.176189566] [dynamixel_hardware_interface]: [ID:11] item_name:Position I Gain	data:100
[ros2_control_node-1] [INFO] [1733814784.177218657] [dynamixel_hardware_interface]: [ID:11] item_name:Position P Gain	data:800
[ros2_control_node-1] [INFO] [1733814784.178201814] [dynamixel_hardware_interface]: [ID:12] item_name:Drive Mode	data:0
[ros2_control_node-1] [INFO] [1733814784.179188157] [dynamixel_hardware_interface]: [ID:12] item_name:Position D Gain	data:100
[ros2_control_node-1] [INFO] [1733814784.180215312] [dynamixel_hardware_interface]: [ID:12] item_name:Position I Gain	data:100
[ros2_control_node-1] [INFO] [1733814784.181209639] [dynamixel_hardware_interface]: [ID:12] item_name:Position P Gain	data:800
[ros2_control_node-1] [INFO] [1733814784.182195348] [dynamixel_hardware_interface]: [ID:13] item_name:Drive Mode	data:0
[ros2_control_node-1] [INFO] [1733814784.183204690] [dynamixel_hardware_interface]: [ID:13] item_name:Position D Gain	data:100
[ros2_control_node-1] [INFO] [1733814784.184192489] [dynamixel_hardware_interface]: [ID:13] item_name:Position I Gain	data:100
[ros2_control_node-1] [INFO] [1733814784.185186500] [dynamixel_hardware_interface]: [ID:13] item_name:Position P Gain	data:800
[ros2_control_node-1] [INFO] [1733814784.186251591] [dynamixel_hardware_interface]: [ID:14] item_name:Drive Mode	data:0
[ros2_control_node-1] [INFO] [1733814784.187186969] [dynamixel_hardware_interface]: [ID:14] item_name:Position D Gain	data:100
[ros2_control_node-1] [INFO] [1733814784.188187523] [dynamixel_hardware_interface]: [ID:14] item_name:Position I Gain	data:100
[ros2_control_node-1] [INFO] [1733814784.189248186] [dynamixel_hardware_interface]: [ID:14] item_name:Position P Gain	data:800
[ros2_control_node-1] [INFO] [1733814784.189281693] [dynamixel_hardware_interface]: $$$$$ Init Dxl Read Items
[ros2_control_node-1] Dynamixel Read Type : sync read
[ros2_control_node-1] ID : 11, 12, 13, 14, 15,
[ros2_control_node-1] Read items : 	Present Position	Present VelocityPresent Current	Torque Enable	Present Input Voltage
[ros2_control_node-1] set sync read (indirect addr) : addr 224, size 13
[ros2_control_node-1] Success to set SyncRead handler using indirect address
[ros2_control_node-1] [INFO] [1733814784.255333410] [dynamixel_hardware_interface]: $$$$$ Init Dxl Write Items
[ros2_control_node-1] Dynamixel Write Type : sync write
[ros2_control_node-1] ID : 11, 12, 13, 14, 15,
[ros2_control_node-1] Write items : 	Goal Position
[ros2_control_node-1] set sync write (indirect addr) : addr 634, size 4
[ros2_control_node-1] Success to set SyncWrite handler using indirect address
[ros2_control_node-1] [INFO] [1733814784.285087764] [resource_manager]: Successful initialization of hardware 'OpenManipulatorXSystem'
[ros2_control_node-1] [INFO] [1733814784.285623329] [resource_manager]: 'configure' hardware 'OpenManipulatorXSystem'
[ros2_control_node-1] [INFO] [1733814784.285649762] [resource_manager]: Successful 'configure' of hardware 'OpenManipulatorXSystem'
[ros2_control_node-1] [INFO] [1733814784.285677277] [resource_manager]: 'activate' hardware 'OpenManipulatorXSystem'
[ros2_control_node-1] [INFO] [1733814784.288399302] [dynamixel_hardware_interface]: Sync joint state to command (position, 3.25354 <- position, 3.25354
[ros2_control_node-1] [INFO] [1733814784.288484144] [dynamixel_hardware_interface]: Sync joint state to command (position, -22.5879 <- position, -22.5879
[ros2_control_node-1] [INFO] [1733814784.288522542] [dynamixel_hardware_interface]: Sync joint state to command (position, 48.5393 <- position, 48.5393
[ros2_control_node-1] [INFO] [1733814784.288556311] [dynamixel_hardware_interface]: Sync joint state to command (position, 59.4431 <- position, 59.4431
[ros2_control_node-1] [INFO] [1733814784.288587808] [dynamixel_hardware_interface]: Sync joint state to command (position, 1.08561 <- position, 1.08561
[ros2_control_node-1] [INFO] [1733814784.288619773] [dynamixel_hardware_interface]: Sync joint state to command (position, 0 <- position, 0
[spawner-3] [INFO] [1733814784.344387122] [spawner_joint_state_broadcaster]: waiting for service /controller_manager/list_controllers to become available...
[ros2_control_node-1] [ID:011] Torque ON
[ros2_control_node-1] [ID:012] Torque ON
[ros2_control_node-1] [ID:013] Torque ON
[ros2_control_node-1] [ID:014] Torque ON
[ros2_control_node-1] [ID:015] Torque ON
[ros2_control_node-1] [INFO] [1733814784.794363518] [dynamixel_hardware_interface]: Dynamixel Hardware Start!
[ros2_control_node-1] [INFO] [1733814784.794583503] [resource_manager]: Successful 'activate' of hardware 'OpenManipulatorXSystem'
[ros2_control_node-1] [INFO] [1733814784.844187956] [controller_manager]: update rate is 1000 Hz
[ros2_control_node-1] [INFO] [1733814784.844239126] [controller_manager]: Spawning controller_manager RT thread with scheduler priority: 50
[ros2_control_node-1] [WARN] [1733814784.847602761] [controller_manager]: No real-time kernel detected on this system. See [https://control.ros.org/master/doc/ros2_control/controller_manager/doc/userdoc.html] for details on how to enable realtime scheduling.
[ros2_control_node-1] [INFO] [1733814784.864748196] [controller_manager]: Loading controller 'joint_state_broadcaster'
[spawner-3] [INFO] [1733814784.872066996] [spawner_joint_state_broadcaster]: Loaded joint_state_broadcaster
[ros2_control_node-1] [INFO] [1733814784.872576377] [controller_manager]: Configuring controller 'joint_state_broadcaster'
[ros2_control_node-1] [INFO] [1733814784.872671446] [joint_state_broadcaster]: 'joints' or 'interfaces' parameter is empty. All available state interfaces will be published
[spawner-3] [INFO] [1733814784.890559256] [spawner_joint_state_broadcaster]: Configured and activated joint_state_broadcaster
[INFO] [spawner-3]: process has finished cleanly [pid 3070]
[INFO] [spawner-4]: process started with pid [3114]
[INFO] [spawner-5]: process started with pid [3116]
[ros2_control_node-1] [INFO] [1733814785.561511632] [controller_manager]: Loading controller 'arm_controller'
[ros2_control_node-1] [WARN] [1733814785.574916138] [arm_controller]: [Deprecated]: "allow_nonzero_velocity_at_trajectory_end" is set to true. The default behavior will change to false.
[ros2_control_node-1] [INFO] [1733814785.576633589] [controller_manager]: Loading controller 'gripper_controller'
[spawner-5] [INFO] [1733814785.598697696] [spawner_arm_controller]: Loaded arm_controller
[ros2_control_node-1] [INFO] [1733814785.599380288] [controller_manager]: Configuring controller 'arm_controller'
[ros2_control_node-1] [INFO] [1733814785.599545696] [arm_controller]: No specific joint names are used for command interfaces. Using 'joints' parameter.
[ros2_control_node-1] [INFO] [1733814785.599572347] [arm_controller]: Command interfaces are [position] and state interfaces are [position velocity].
[ros2_control_node-1] [INFO] [1733814785.599598355] [arm_controller]: Using 'splines' interpolation method.
[spawner-4] [INFO] [1733814785.600233495] [spawner_gripper_controller]: Loaded gripper_controller
[ros2_control_node-1] [INFO] [1733814785.600325312] [arm_controller]: Controller state will be published at 200.00 Hz.
[ros2_control_node-1] [INFO] [1733814785.605748626] [arm_controller]: Action status changes will be monitored at 20.00 Hz.
[ros2_control_node-1] [INFO] [1733814785.609463352] [controller_manager]: Configuring controller 'gripper_controller'
[ros2_control_node-1] [INFO] [1733814785.609542143] [gripper_controller]: Action status changes will be monitored at 20Hz.
[spawner-5] [INFO] [1733814785.619695267] [spawner_arm_controller]: Configured and activated arm_controller
[spawner-4] [INFO] [1733814785.626031382] [spawner_gripper_controller]: Configured and activated gripper_controller
[INFO] [spawner-4]: process has finished cleanly [pid 3114]
[INFO] [spawner-5]: process has finished cleanly [pid 3116]
TIP:
- If you can’t load DYNAMIXEL, please check firmware to use ROBOTIS software (DYNAMIXEL Wizard 2.0)
After running this section, software controller that controls the OpenMANIPULAOTR-X will be launched and each joint of the OpenMANIPULATOR-X will be locked (Torque On).
- When operating with
U2D2
Close all terminal and enter the command below in the new terminal.$ roslaunch open_manipulator_controller open_manipulator_controller.launch - When operating with
OpenCR
Close all terminal and enter the command below in the new terminal.$ roslaunch open_manipulator_controller open_manipulator_controller.launch usb_port:=/dev/ttyACM0 baud_rate:=1000000
WARNING :
Please check each joint position before running OpenMANIPULATOR-X. If joints are set inappropriately, OpenMANIPULATOR-X might not start operating.
The picture of OpenMANIPULATOR-X below is showing you the ideal pose of OpenMANIPULATOR-X. Please adjust each joints along with the following picture when DYNAMIXEL torque is not enabled.
Launch result on the terminal will look like below.
SUMMARY
========

PARAMETERS
 * /open_manipulator_controller/control_period: 0.01
 * /open_manipulator_controller/using_platform: True
 * /rosdistro: noetic
 * /rosversion: 1.15.9

NODES
  /
    open_manipulator_controller (open_manipulator_controller/open_manipulator_controller)

auto-starting new master
process[master]: started with pid [5454]
ROS_MASTER_URI=http://localhost:11311

setting /run_id to da579122-f0fa-11eb-9d7a-0790f3842b2b
process[rosout-1]: started with pid [5464]
started core service [/rosout]
process[open_manipulator_controller-2]: started with pid [5467]
port_name and baud_rate are set to /dev/ttyUSB0, 1000000
Joint Dynamixel ID : 11, Model Name : XM430-W350
Joint Dynamixel ID : 12, Model Name : XM430-W350
Joint Dynamixel ID : 13, Model Name : XM430-W350
Joint Dynamixel ID : 14, Model Name : XM430-W350
Gripper Dynamixel ID : 15, Model Name :XM430-W350
[INFO] Succeeded to init /open_manipulator_controller
WARNING :
Please check each joint position before running OpenMANIPULATOR-X. It might stop operation because of joint position out of range.
The picture on the below is showing you the ideal pose of OpenMANIPULATOR-X. Please adjust each joints along with the following picture when DYNAMIXEL torque isn’t enabled.
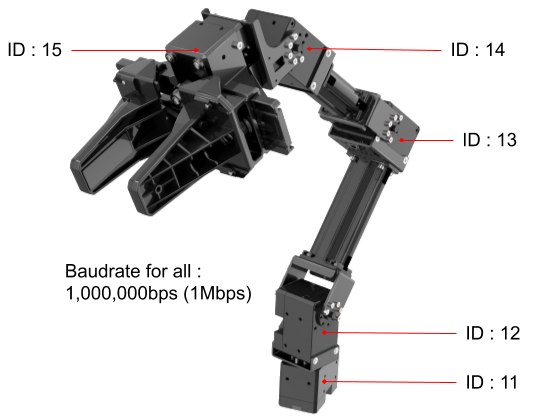
WARNING : Please refer to below default DYNAMIXEL configuration for OpenMANIPULATOR-X chain if you have a custom manipulator.
| Joint | ID | Baudrate |
|---|---|---|
| 1 | 11 | 1 Mbps |
| 2 | 12 | 1 Mbps |
| 3 | 13 | 1 Mbps |
| 4 | 14 | 1 Mbps |
| Gripper | 15 | 1 Mbps |
WARNING : OpenCR 1.0 must be connected to OpenMANIPULATOR-X before launching Processing.
Press Reset Button of OpenCR 1.0 to enable torque for OpenMANIPULATOR-X.
-
Connect OpenCR to PC with a micro USB cable, and connect OpenMANIPULATOR-X to OpenCR, then supply 12V Power to OpenCR as shown below.
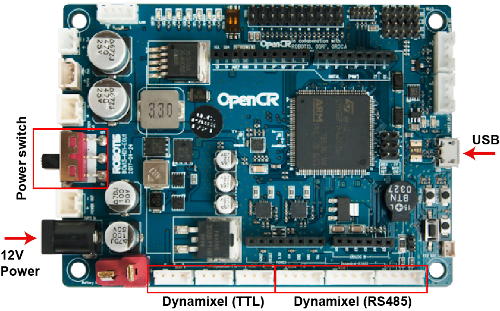

-
Turn on the OpenCR 1.0 power switch.
-
Press the
Reset Buttonof OpenCR 1.0 and check if OpenMANIPULATOR-X is torque enabled(stiff joints). -
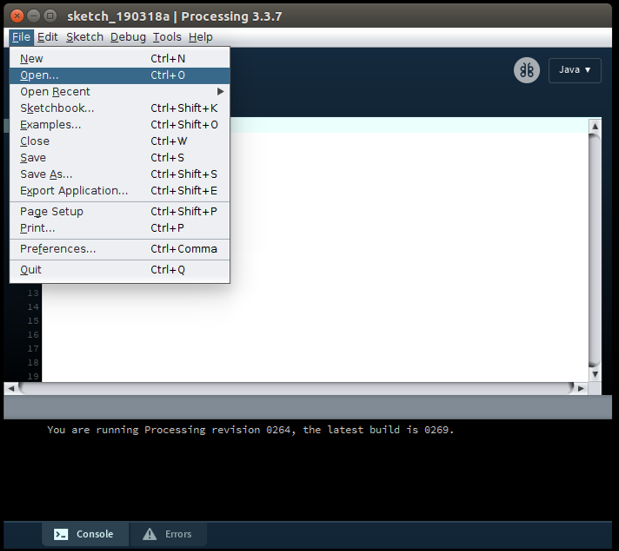
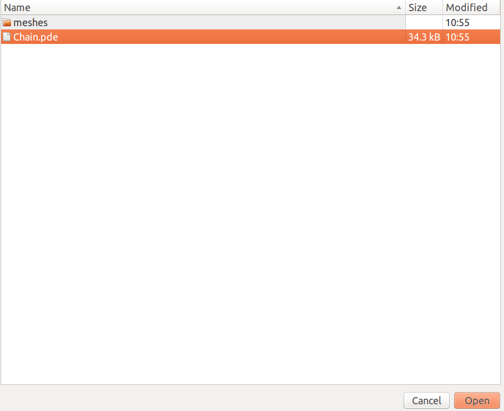
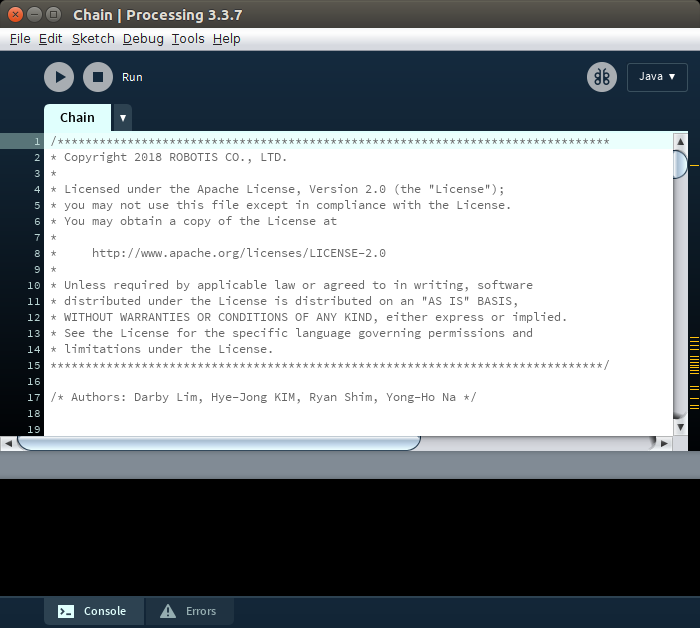
Open the downloaded processing file in Processing IDE :
open_manipulator_processing>Chain>Chain.pde.
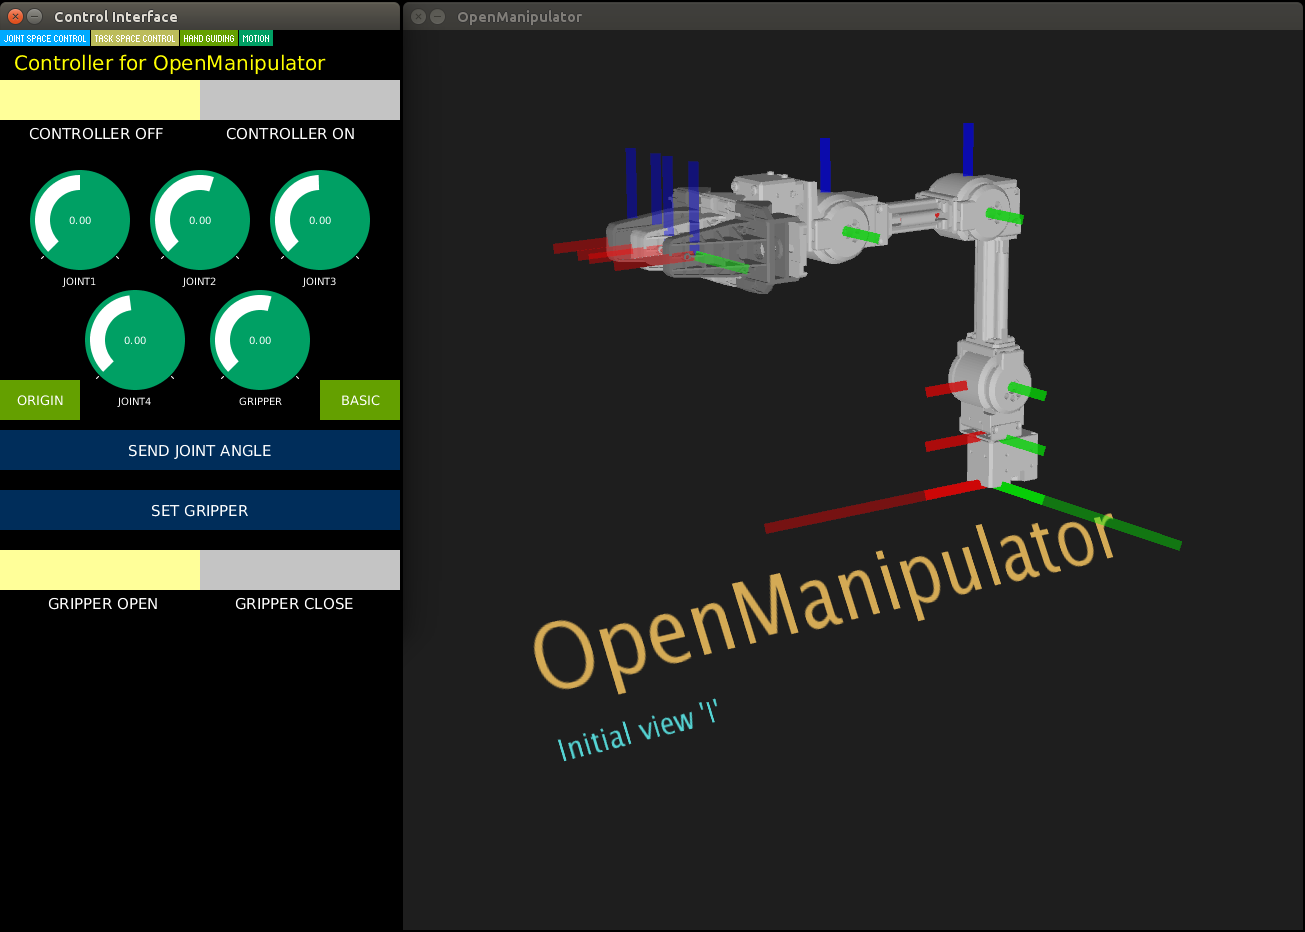
-
Run the processing source code, and the following graphical GUI will be displayed.
FAQ
If the processing console displays an error message and the GUI does not run normally, check the following:
- Check if ControlP5 is properly installed.
- Check if the graphics driver is installed properly.
- Check if the Java library is properly installed.
Keyboard Teleoperation
Option 1: Using Docker
NOTE:
If you are using the Docker environment, make sure you are inside the container before running these commands. Use ./docker/container.sh enter to enter the container.
Open a terminal and enter below command.
$ ros2 run open_manipulator_teleop open_manipulator_x_teleop
Option 2: Host Installation
Open a terminal and enter below command.
$ ros2 run open_manipulator_teleop open_manipulator_x_teleop
You will see the interface below in the terminal window after a successful launch, and you can now easily control the OpenMANIPULATOR-X using the keyboard.
[INFO] [1751512149.624709736] [keyboard_controller]: Waiting for /joint_states...
[INFO] [1751512149.625639191] [keyboard_controller]: Waiting for initial joint states...
[INFO] [1751512149.626929914] [keyboard_controller]: Received joint states: [-0.05982525065917969, -0.9157865293212891, 0.8517752421836835, 0.0], Gripper: 0.0
[INFO] [1751512149.627527555] [keyboard_controller]: Ready to receive keyboard input!
[INFO] [1751512149.628048894] [keyboard_controller]: Use 1/q, 2/w, 3/e, 4/r for joints 1-4, o/p for gripper. Press ESC to exit.
Open a terminal and execute the servo launch file below; MoveIt Servo provides real-time, smooth, and responsive control for robotic manipulators in joint or Cartesian space.
$ ros2 launch open_manipulator_x_moveit_config servo.launch.py
Open another terminal and enter below command.
$ ros2 run open_manipulator_x_teleop open_manipulator_x_teleop
You will see the interface below in the terminal window after a successful launch, and you can now easily control the OM-X using the keyboard.
[INFO] [1732776371.215661501] [servo_keyboard_input]: SUCCESS TO CONNECT SERVO START SERVER
[INFO] [1732776371.216112752] [servo_keyboard_input]: SUCCESS TO CONNECT SERVO STOP SERVER
[INFO] [1732776371.216172872] [servo_keyboard_input]: call 'moveit_servo' start srv.
[INFO] [1732776371.283417067] [servo_keyboard_input]: SUCCESS to start 'moveit_servo'
Reading from keyboard
---------------------------
Joint Control Keys:
  1/q: Joint1 +/-
  2/w: Joint2 +/-
  3/e: Joint3 +/-
  4/r: Joint4 +/-
Use o|p to open/close the gripper.
'ESC' to quit.
Open another terminal and enter below command.
$ roslaunch open_manipulator_teleop open_manipulator_teleop_keyboard.launch
You will see below interface on the terminal window after a successful launch.
  ---------------------------
  Control Your OpenMANIPULATOR-X!
  ---------------------------
  w : increase x axis in task space
  s : decrease x axis in task space
  a : increase y axis in task space
  d : decrease y axis in task space
  z : increase z axis in task space
  x : decrease z axis in task space

  y : increase joint 1 angle
  h : decrease joint 1 angle
  u : increase joint 2 angle
  j : decrease joint 2 angle
  i : increase joint 3 angle
  k : decrease joint 3 angle
  o : increase joint 4 angle
  l : decrease joint 4 angle

  g : gripper open
  f : gripper close

  1 : init pose
  2 : home pose

  q to quit
  ---------------------------
  Present Joint Angle J1: 0.000 J2: 0.000 J3: 0.000 J4: 0.000
  Present Kinematics Position X: 0.000 Y: 0.000 Z: 0.000
  ---------------------------
Not supported.