Operation
GUI Program
NOTE:
- Make sure ROS 2 Jazzy dependencies are installed before performing these instructions
- Install ROS Packages
- Docker installation is recommended for ROS 2 Jazzy
- If you are using the Docker environment, make sure you are inside the container before running these commands. Use
./docker/container.sh enterto enter the container.
Launch the GUI program for OpenMANIPULATOR-X with ROS 2 Jazzy.
Terminal 1 - Launch the hardware controller:
$ ros2 launch open_manipulator_bringup open_manipulator_x.launch.py
Terminal 2 - Launch MoveIt configuration:
$ ros2 launch open_manipulator_moveit_config open_manipulator_x_moveit.launch.py
Terminal 3 - Launch the GUI program:
$ ros2 launch open_manipulator_gui open_manipulator_x_gui.launch.py
-
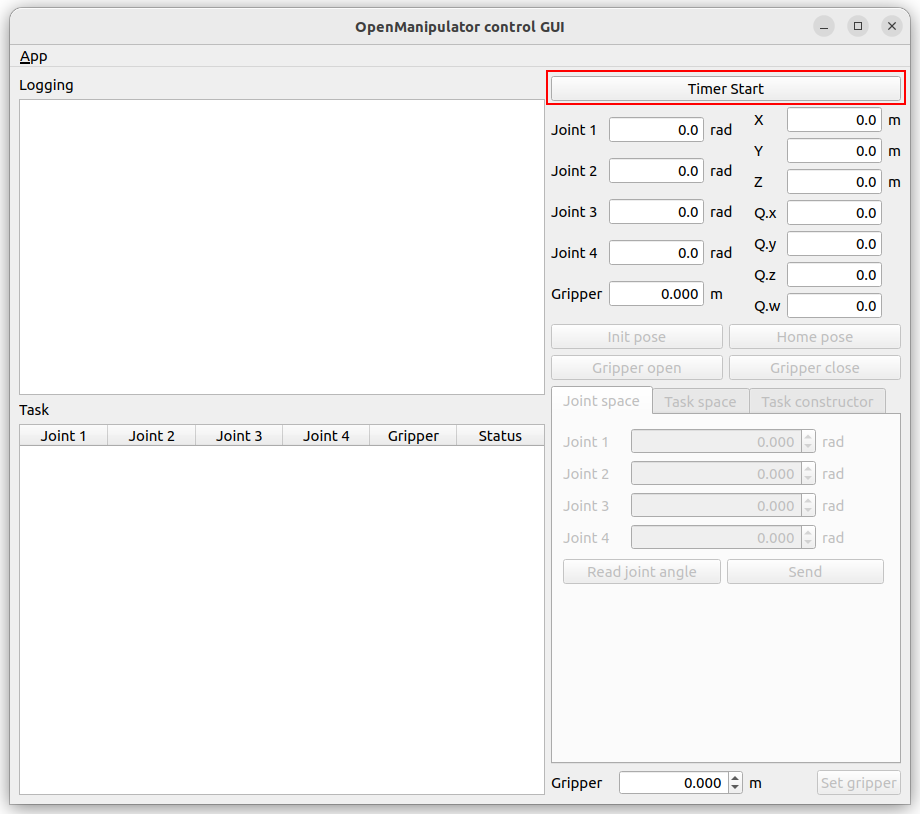
Click the
Timer Startbutton.
-
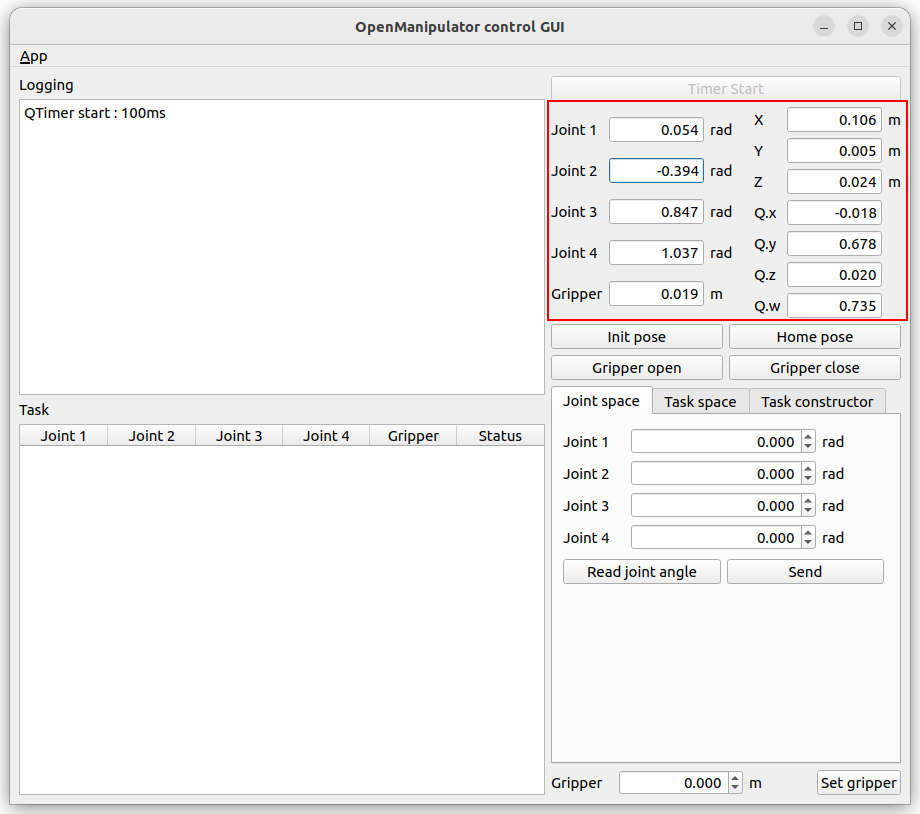
Check the status of OpenMANIPULATOR-X.
-
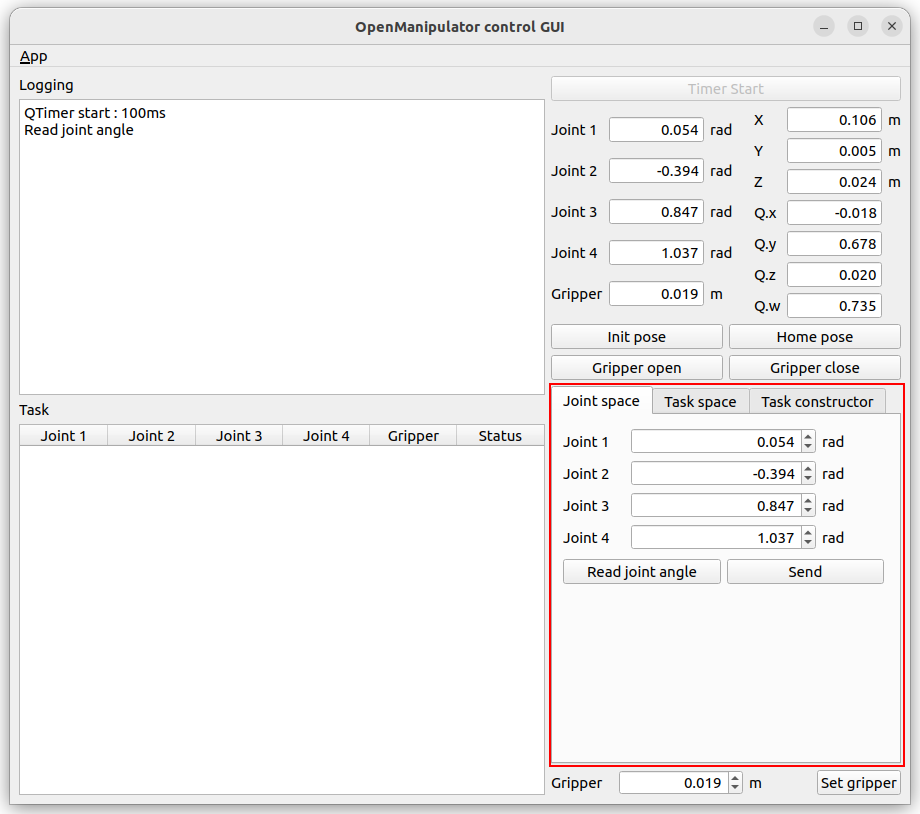
To manipulate OpenMANIPULATOR-X in the joint space, enter the joint angles and total time for the trajectory. Then click the
sendbutton to start the motion.
-
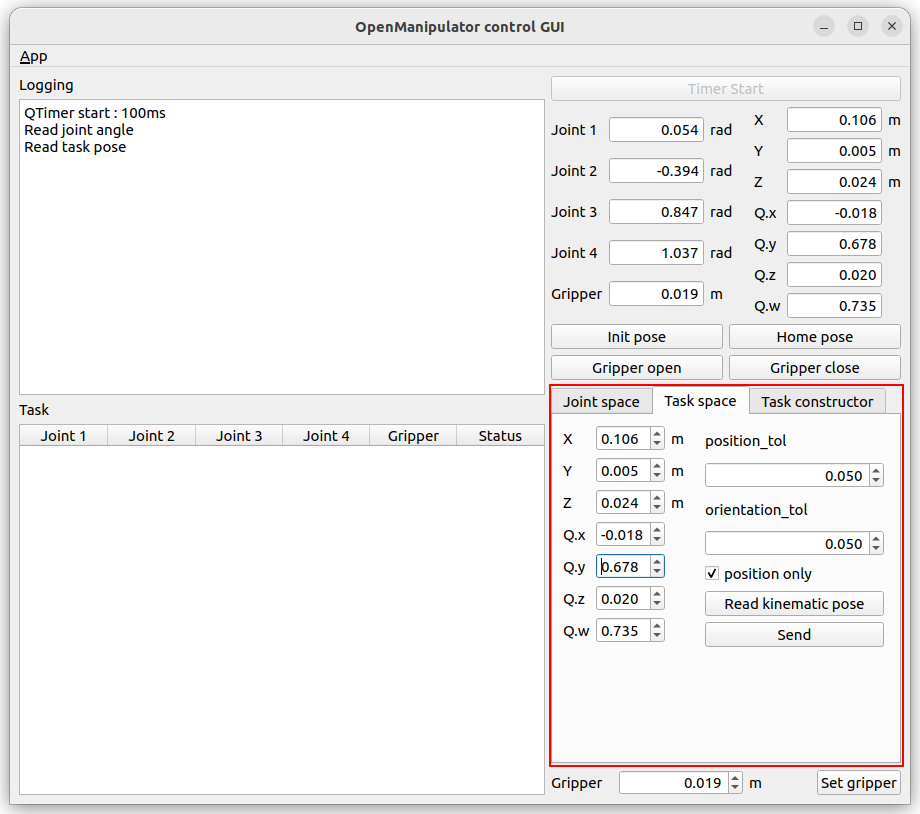
To manipulate OpenMANIPULATOR-X in the task space, enter the kinematics pose of the OpenMANIPULATOR-X end-effector(tool) in the task space. Then click the
sendbutton to start the motion.
-
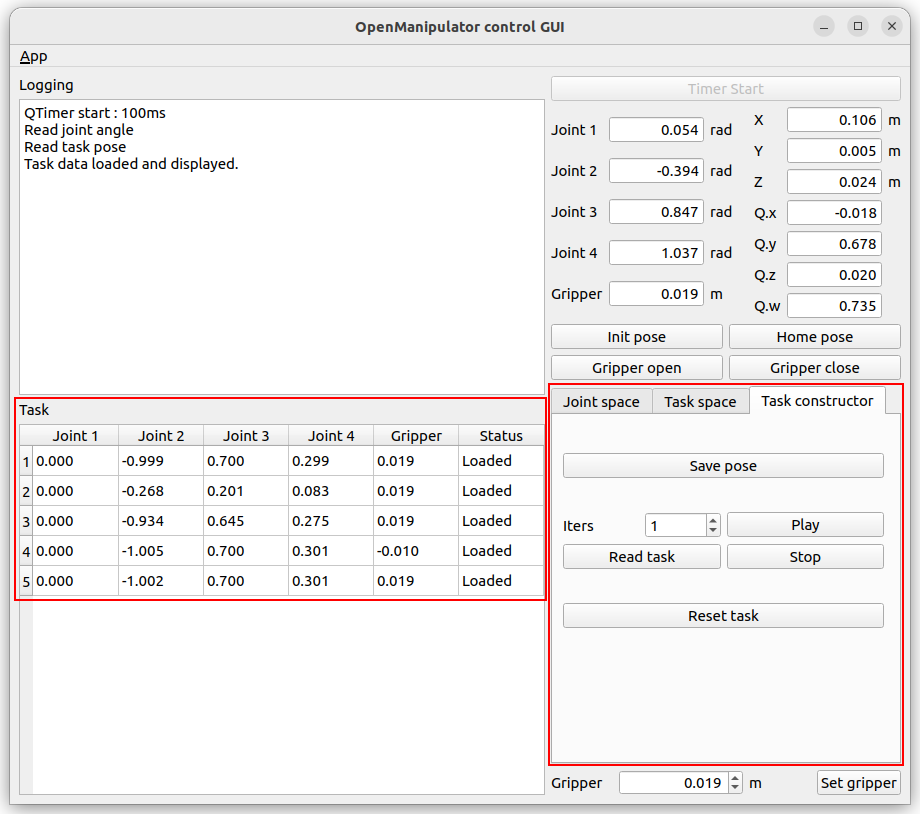
Create a task constructor with OpenMANIPULATOR-X.
7.1. Click theRead taskbutton to prepare for saving tasks.
(You can create or modify the pre-saved joint values in the robot_joint_log.csv file. The file’s load path can be checked in the terminal when the GUI node is launched.)
7.2. Adjust the manipulator’s posture and save it by clickingSave pose.
7.3. Save multiple postures to complete the preparation.
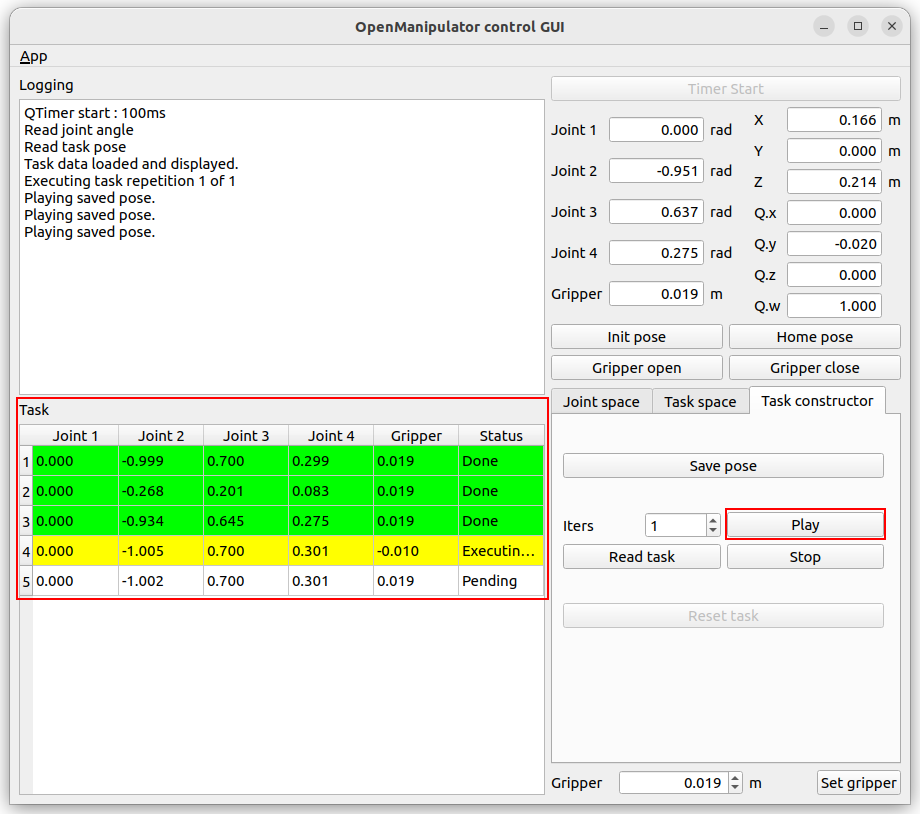
Press the Play button to make the manipulator move sequentially according to the saved tasks. Completed tasks will have their status changed to Done
The GUI will provide an interface for controlling the manipulator.
NOTE:
- This instructions are supposed to be running on PC with ROS packages installed in. Please run the instructions below on your PC ROS packages installed in.
- Make sure to run the OpenMANIPULATOR-X controller instructions before running the GUI Program.
- Before Launch the GUI program, the OpenMANIPULATOR-X Controller must be running on another terminal. Plus, launch moveit_core using this command in the new terminal.
$ ros2 launch open_manipulator_x_moveit_config moveit_core.launch.py - Launch the GUI program.
$ ros2 launch open_manipulator_x_gui open_manipulator_x_gui.launch.py -
Click the
Timer Startbutton.

-
Check the status of OpenMANIPULATOR-X.

-
To manipulate OpenMANIPULATOR-X in the joint space, enter the joint angles and total time for the trajectory. Then click the
sendbutton to start the motion.

-
To manipulate OpenMANIPULATOR-X in the task space, enter the kinematics pose of the OpenMANIPULATOR-X end-effector(tool) in the task space. Then click the
sendbutton to start the motion.

- Create a task constructor with OpenMANIPULATOR-X.
7.1. Click theRead taskbutton to prepare for saving tasks.
(You can create or modify the pre-saved joint values in the robot_joint_log.csv file. The file’s load path can be checked in the terminal when the GUI node is launched.)
7.2. Adjust the manipulator’s posture and save it by clickingSave pose.
7.3. Save multiple postures to complete the preparation.

Press the Play button to make the manipulator move sequentially according to the saved tasks. Completed tasks will have their status changed to Done

NOTE:
- This instructions are supposed to be running on PC with ROS packages installed in. Please run the instructions below on your PC ROS packages installed in.
- Make sure to run the OpenMANIPULATOR-X controller instructions before running the GUI Program.
- Launch the GUI program. The OpenMANIPULATOR-X Controller must be running on another terminal.
$ roslaunch open_manipulator_control_gui open_manipulator_control_gui.launch -
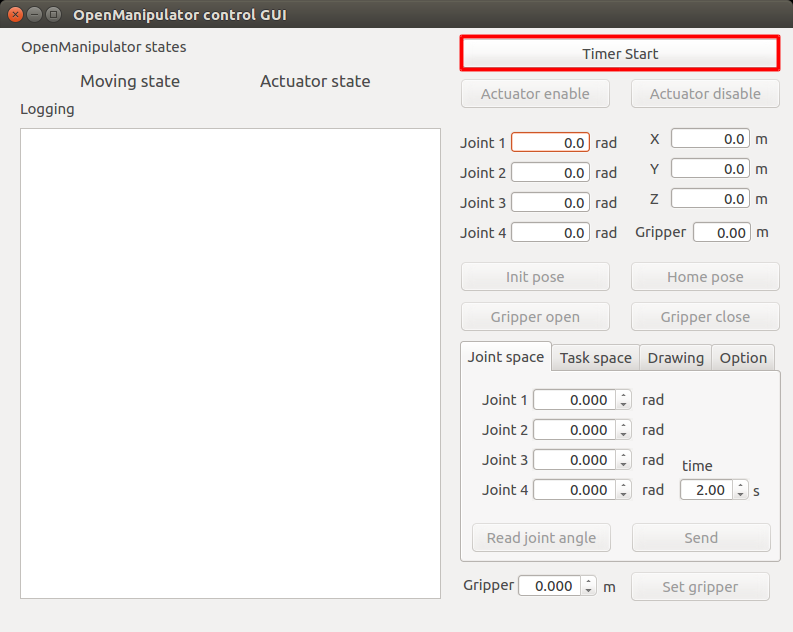
Click the
Timer Startbutton.
-
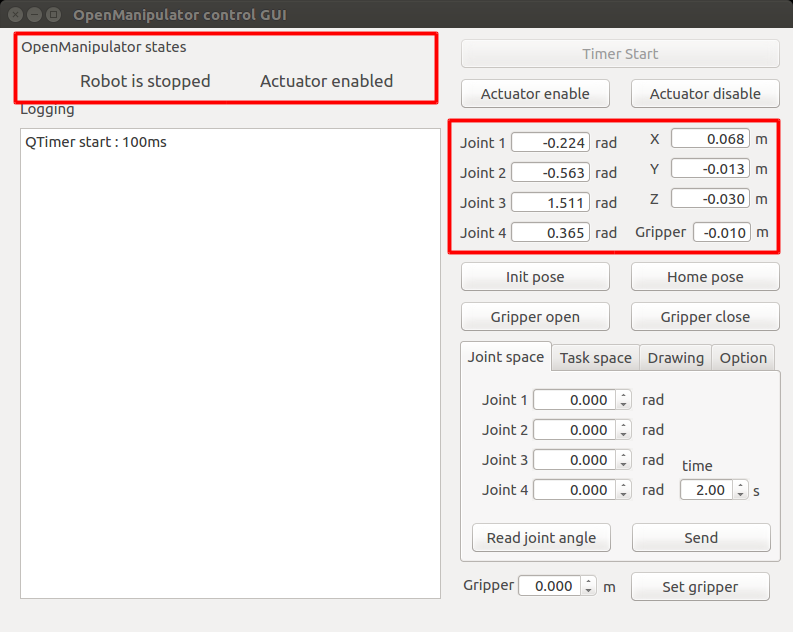
Check the status of OpenMANIPULATOR-X.
-
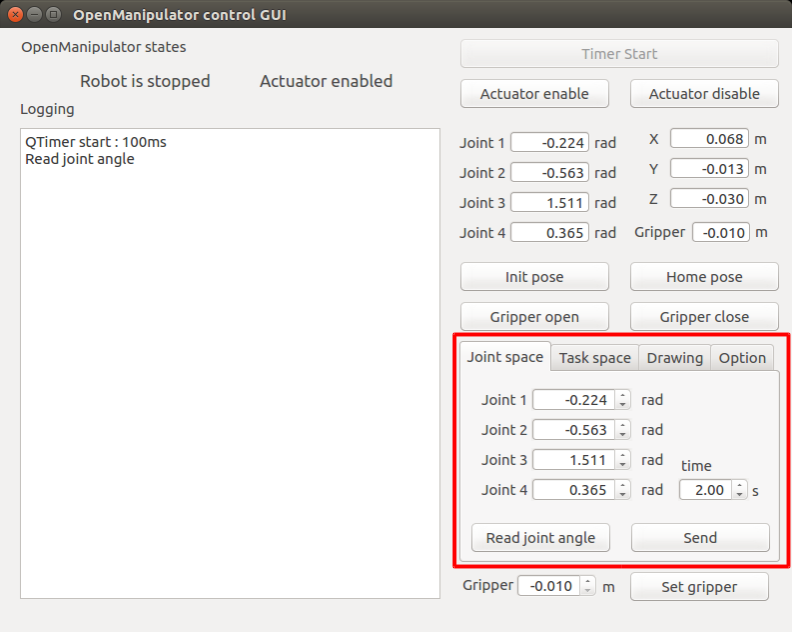
To manipulate OpenMANIPULATOR-X in the joint space, enter the joint angles and total time for the trajectory. Then click the
sendbutton to start the motion.
-
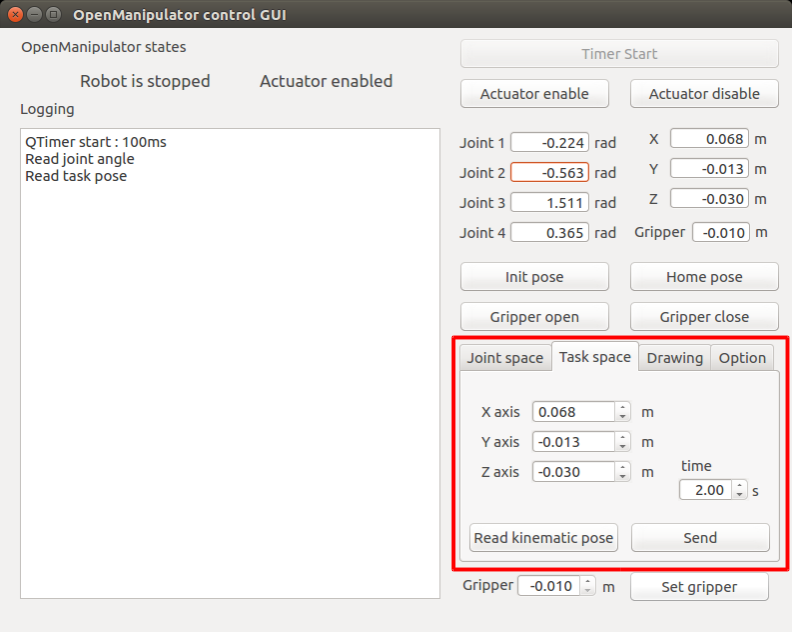
To manipulate OpenMANIPULATOR-X in the task space, enter the kinematics pose of the OpenMANIPULATOR-X end-effector(tool) in the task space and the total time for the trajectory. Then click the
sendbutton to start the motion.
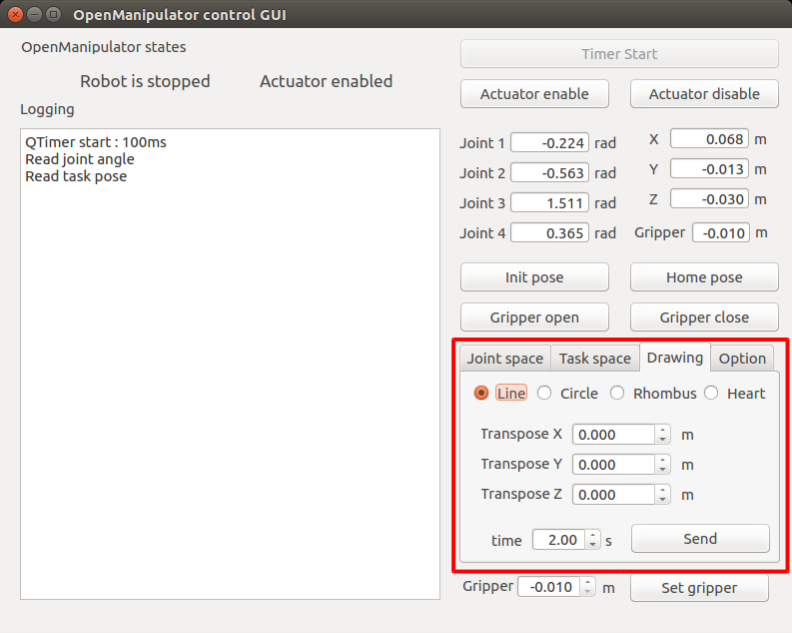
- To create a drawing trajectory with OpenMANIPULATOR-X, choose the drawing trajectory type(line, circle, rhombus, heart). And enter the parameters according to the drawing trajectory type and the total time of the drawing trajectory. Then click the
sendbutton to start drawing.
- The GUI for Arduino example is provided with the Processing.
- Please refer to the Launch Controller in the Basic Operation section.
Control Interface
NOTE: Upload OpenCR example source code to OpenCR before run processing source code.
-
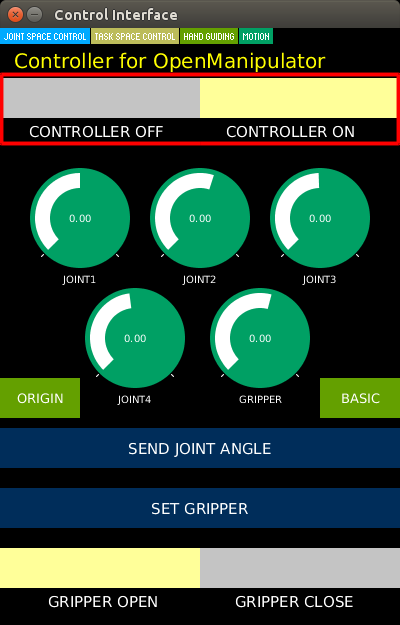
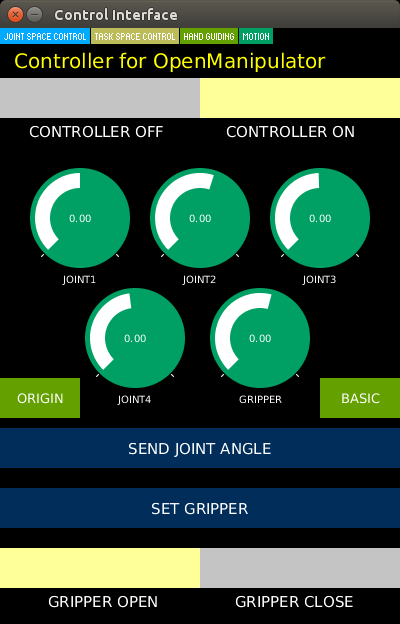
To manipulate the OpenMANIPULATOR, click the toggle button to
CONTROLLER ON.
-
The user can manipulate the OpenMANIPULATOR-X in the joint space.
Set the joint angles. Then click theSEND JOINT ANGLEbutton. And set the gripper parameter. Then click theSET GRIPPERbutton.
-
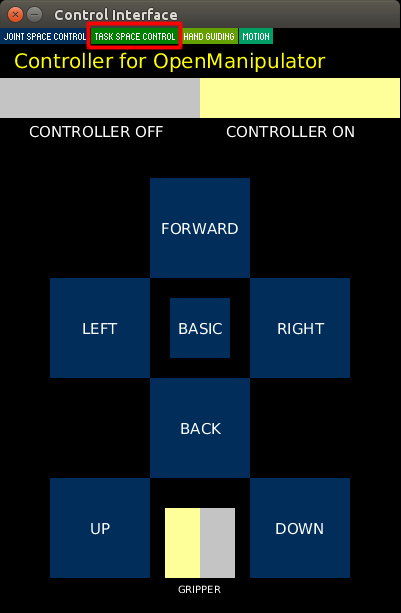
The user can manipulate the OpenMANIPULATOR-X in the task space.
Click theTASK SPACE CONTROLbutton to change the tab.
Click the desired direction button to manipulate the OpenMANIPULATOR.
Hand Guiding
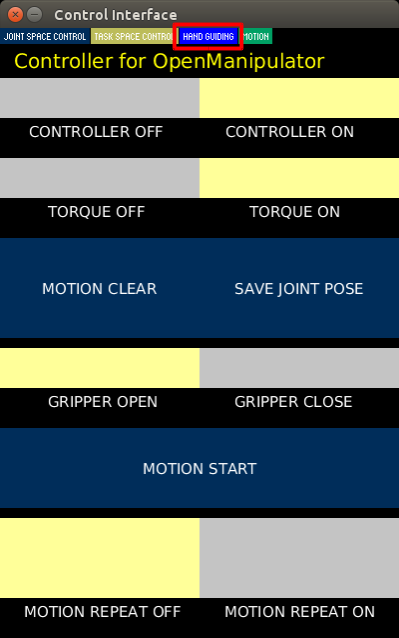
The user can make the demonstration using hand guiding function.
- Click the
HAND GUIDINGbutton to change the tab. - Holds the OpenMANIPULATOR-X by hand and click the toggle button to
TORQUE OFF. - Move the OpenMANIPULATOR-X to the desired pose by hand.
- Click the
SAVE JOINT POSEto save the present pose. - Repeat step 3 and 4 to create the demonstration.
- Click the toggle button to
TORQUE ON - Click the
MOTION STARTbutton to start the saved poses.
Click the toggle button to MOTION REPEAT ON if you want to repeat the demonstration.
The total time of the trajectory between saved poses is the same as 2 seconds.
Teleoperation
NOTE:
If you are using the Docker environment, make sure you are inside the container before running these commands. Use ./docker/container.sh enter to enter the container.
Terminal 1 - Launch the hardware controller:
$ ros2 launch open_manipulator_bringup open_manipulator_x.launch.py
Terminal 2 - Launch teleoperation:
$ ros2 run open_manipulator_teleop open_manipulator_x_teleop
You will see the interface below in the terminal window after a successful launch, and you can now easily control the OpenMANIPULATOR-X using the keyboard.
[INFO] [1751512149.624709736] [keyboard_controller]: Waiting for /joint_states...
[INFO] [1751512149.625639191] [keyboard_controller]: Waiting for initial joint states...
[INFO] [1751512149.626929914] [keyboard_controller]: Received joint states: [-0.05982525065917969, -0.9157865293212891, 0.8517752421836835, 0.0], Gripper: 0.0
[INFO] [1751512149.627527555] [keyboard_controller]: Ready to receive keyboard input!
[INFO] [1751512149.627527555] [keyboard_controller]: Use 1/q, 2/w, 3/e, 4/r for joints 1-4, o/p for gripper. Press ESC to exit.
NOTE:
- Make sure ROS dependencies are installed before performing these instructions - Install ROS Packages
- Make sure to run OpenMANIPULATOR-X controller instructions before use of the instruction
Keyboard
TIP: Terminal can be found with the Ubuntu search icon on the top left corner of the screen. Shortcut key for Terminal is Ctrl+Alt+t.
Open a terminal and execute the servo launch file below; MoveIt Servo provides real-time, smooth, and responsive control for robotic manipulators in joint or Cartesian space.
$ ros2 launch open_manipulator_x_moveit_config servo.launch.py
Open another terminal and enter below command.
$ ros2 run open_manipulator_x_teleop open_manipulator_x_teleop
You will see the interface below in the terminal window after a successful launch, and you can now easily control the OM-X using the keyboard.
[INFO] [1732776371.215661501] [servo_keyboard_input]: SUCCESS TO CONNECT SERVO START SERVER
[INFO] [1732776371.216112752] [servo_keyboard_input]: SUCCESS TO CONNECT SERVO STOP SERVER
[INFO] [1732776371.216172872] [servo_keyboard_input]: call 'moveit_servo' start srv.
[INFO] [1732776371.283417067] [servo_keyboard_input]: SUCCESS to start 'moveit_servo'
Reading from keyboard
---------------------------
Joint Control Keys:
  1/q: Joint1 +/-
  2/w: Joint2 +/-
  3/e: Joint3 +/-
  4/r: Joint4 +/-
Use o|p to open/close the gripper.
'ESC' to quit.
NOTE:
- Make sure ROS dependencies are installed before performing these instructions - Install ROS Packages
- Make sure to run OpenMANIPULATOR-X controller instructions before use of the instruction
Keyboard
TIP: Terminal can be found with the Ubuntu search icon on the top left corner of the screen. Shortcut key for Terminal is Ctrl+Alt+t.
- Launch
open_manipulator_teleop_keyboardnode for simple teleoperation test using the keyboard.
The OpenMANIPULATOR-X Controller must be running on another terminal.$ roslaunch open_manipulator_teleop open_manipulator_teleop_keyboard.launch - If the node is successfully launched, the following instruction will appear in the terminal window.
  ---------------------------
  Control Your OpenMANIPULATOR-X!
  ---------------------------
  w : increase x axis in task space
  s : decrease x axis in task space
  a : increase y axis in task space
  d : decrease y axis in task space
  z : increase z axis in task space
  x : decrease z axis in task space

  y : increase joint 1 angle
  h : decrease joint 1 angle
  u : increase joint 2 angle
  j : decrease joint 2 angle
  i : increase joint 3 angle
  k : decrease joint 3 angle
  o : increase joint 4 angle
  l : decrease joint 4 angle

  g : gripper open
  f : gripper close

  1 : init pose
  2 : home pose

  q to quit
  ---------------------------
  Present Joint Angle J1: 0.000 J2: 0.000 J3: 0.000 J4: 0.000
  Present Kinematics Position X: 0.000 Y: 0.000 Z: 0.000
  ---------------------------
RC-100
Not supported.
PS4 Joystick
Install packages for teleoperation using PS4 joystick.
$ sudo apt-get install ros-kinetic-joy ros-kinetic-joystick-drivers ros-kinetic-teleop-twist-joy
$ sudo pip install ds4drv
Connect PS4 joystick to the PC via Bluetooth using the following command
$ sudo ds4drv
Enter pairing mode with PS4 by pressing and holding Playstation button + share button for 10 sec. If the light on PS4 turns blue, enter the following commands in terminal and control OpenMANIPULATOR-X.
$ export ROS_NAMESPACE=/open_manipulator
$ roslaunch teleop_twist_joy teleop.launch
$ roslaunch open_manipulator_teleop open_manipulator_teleop_joystick.launch
XBOX 360 Joystick
Install packages for teleoperation using XBOX 360 joystick.
$ sudo apt-get install xboxdrv ros-kinetic-joy ros-kinetic-joystick-drivers ros-kinetic-teleop-twist-joy
Connect XBOX 360 joystick to the PC with wireless adapter or USB cable, and launch teleoperation packages for XBOX 360 joystick.
$ sudo xboxdrv --silent
$ export ROS_NAMESPACE=/open_manipulator
$ roslaunch teleop_twist_joy teleop.launch
$ roslaunch open_manipulator_teleop open_manipulator_teleop_joystick.launch
Keyboard
Not supported.
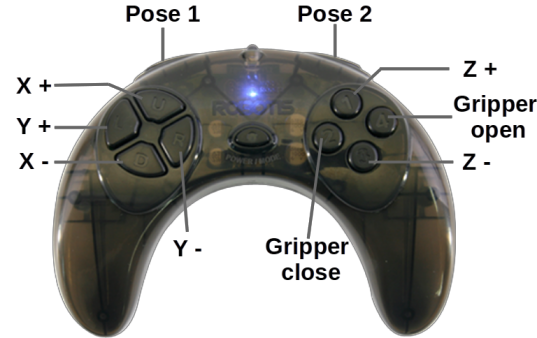
RC-100
The settings for ROBOTIS RC-100B controller is included in the OpenCR firmware for OpenMANIPULATOR.
This controller can be paired with BT-410 Bluetooth module.
PS4 Joystick
Not supported.
XBOX 360 Joystick
Not supported.


