
ROBOTIS ROS Packages
ROBOTIS OP3
ROBOTIS ROS Modules
Motion Module
op3_action_module
Overview
op3_action_module manages OP3 actions.
This module is compiled as a libary so that it can be loaded in the op3_manager.
Actions contain all joint angles required for each time frame to define a complete motion.
Getting started
- Download & Build
Reference : Installing ROBOTIS ROS Package
- Usage
The Action Module is used in the form of a library in the manager to call actions to have the OP3 execute.Reference : Creating new robot manager
ROS API
-
Subscribed Topics
/robotis/action/page_num(std_msgs/msg/Int32)
The page number of the action to run with the Module.
- 1 ~ 255 : play action
- -1 : stop action
- -2 : brake action/robotis/action/start_action(op3_action_module_msgs/msg/StartAction)
Messages that contain a page number will cause that action to be played and any specified joint name and angles will be applied to the action execution result. -
Published Topics
/robotis/status(robotis_controller_msgs/msg/StatusMsg)
Message that describes the current status of action_module./robotis/movement_done(std_msgs/msg/String)
Message published after the robot has finished its movement.
- action : action finished
- action_failed : action failed -
Services
/robotis/action/is_running(op3_action_module_msgs/srv/IsRunning)
Service that checks whether an action is running or not.
Parameters
/action file path(string, default : “op3_action_module/data/motion_4095.bin”)
File path that indicates the location of action libraries for OP3.
op3_base_module
Overview
op3_base_module is the module managing the initial default posture.
This module is compiled as a library to be used in op3_manager.
Getting started
- Download & Build
Reference : Installing ROBOTIS ROS Package
- Usage
The Base Module is used in the manager in the form of library.Reference : Creating new robot manager
ROS API
-
Subscribed Topics
/robotis/base/ini_pose(std_msgs/msg/String)
Sending a message on this topic will have OP3 move to it’s initial default posture. (This command is will still execute even when the base module is inactive). -
Published Topics
/robotis/enable_ctrl_module(std_msgs/msg/String)
This message activatesop3_base_moduleand has the OP3 move to it’s initial posture./robotis/status(robotis_controller_msgs/msg/StatusMsg)
This message publishes the status of theop3_base_module.
Data
-
Init posture
-
data file path : /op3_base_module/data/ini_pose.yaml
-
YAML format
- mov_time : Estimated time to move to target points (in seconds)
- via_num : Number of waypoints
- via_time : Estimated time between waypoints (as an array)
- via_pose : Angle of every joint for each waypoint (in degrees, as an array)
- tar_pose : Target joint angles for initial posture
op3_head_control_module
Overview
Controls the OP3’s head movement. This module is compiled to a library to be used in op3_manager.
Getting started
- Download & Build
Reference : Installing ROBOTIS ROS Package
- Usage
The Head Module is used in the manager in the form of library.Reference : Creating new robot manager
ROS API
-
Subscribed Topics
/robotis/head_control/scan_command(std_msgs/msg/String)
Publishing a message on this topic will request a “looking around” head motion to scan the environment./robotis/head_control/set_joint_states(sensor_msgs/msg/JointState)
Head joints will rotate to match angles written in messages published to this topic./robotis/head_control/set_joint_states_offset(sensor_msgs/msg/JointState)
Head joints will adjust their current angles according to offset values written in messages published to this topic. -
Published Topics
/robotis/status(robotis_controller_msgs/msg/StatusMsg)
This message notifies the status of head_control_module.
op3_walking_module
Overview
This module controls the OP3’s walking state. This module is compiled as a library to be used in op3_manager.
Getting started
- Download & Build
Reference : Installing ROBOTIS ROS Package
- Usage
The Walking Module is used in the manager in the form of library.
Reference : Creating new robot manager
ROS API
-
Subscribed Topics
/robotis/walking/command(std_msgs/msg/String)
Messages on this topic request starts and stops for walking./robotis/walking/set_params(op3_walking_module_msgs/msg/WalkingParam)
Messages on this topic set necessary parameters for walking. For details, refer to WalkingParam.msg. -
Published Topics
/robotis/status(robotis_controller_msgs/msg/StatusMsg)
This topic publishes the current status of the op3_walking_module. -
Services
/robotis/walking/get_params(op3_walking_module_msgs/msg/GetWalkingParam)
This service reads walking parameters.
Parameters
/walking_param_path(string, default : “op3_walking_module/config/param.yaml”)
File path that indicates the location of walking parameters.
Data
-
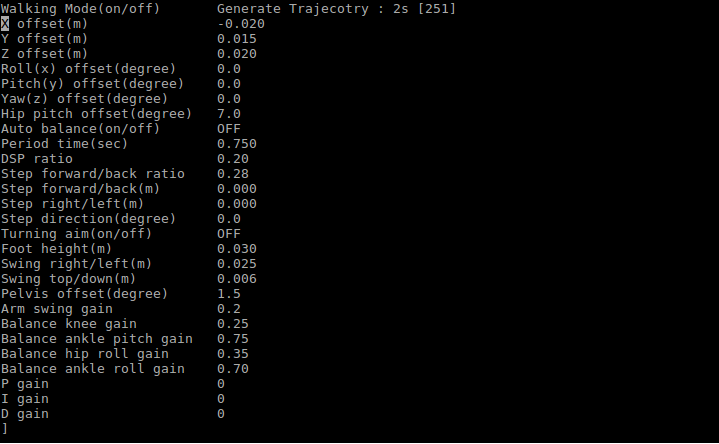
Walking parameters
-
data file path : /op3_walking_module/config/param.yaml
-
YAML format
-
x_offset: offset in the x-direction (front and back) [m]
-
y_offset: offset in the y-direction (left and right) [m]
-
z_offset: offset in the z-direction (up and down) [m]

-
roll_offset: roll offset (x-coordinate) [degree]
-
pitch_offset: pitch offset (y-coordinate) [degree]

-
yaw_offset: yaw offset (z-coordinate) [degree]
-
hip_pitch_offset: pitch offset (y-coordinate) at the hip level. Values are for DYNAMIXEL position values for hip pitch joints. [degree]
-
period_time: Time required for ROBOTIS-OP3 to complete two full steps (left and right foot) [ms]
-
dsp_ratio: Time ratio of the period when both feet are touching the ground to the period of time with only one foot on the ground in each walking cycle.
-
foot_height: foot elevation during walk [m]
-
swing_right_left: swing to either left or right during walk [m]

-
swing_top_down: up and down body swing during walk [m]
-
pelvis_offset: roll offset (x-coordinate) at the pelvis level. Values are for DYNAMIXEL position values for hip roll joints [degree]
-
arm_swing_gain: Arm swing gain with respect to Step forward/back. If the left foot moves forward then the right arm swings.
-
balance_hip_roll_gain: Gain with respect to the gyroscope roll
-
balance_knee_gain: Gain with respect to the gyroscope pitch
-
balance_ankle_roll_gain: Gain with respect to the gyroscope roll
-
balance_ankle_pitch_gain: Gain with respect to the gyroscope pitch
-
p_gain: not yet implemented
-
i_gain: not yet implemented
-
d_gain: not yet implemented
-
op3_direct_control_module
Overview
This module allows for direct control over OP3 joints.
Getting started
- Download & Build
Reference : Installing ROBOTIS ROS Package
- Usage
The Direct Control Module is used in the form of lib in the manager.Reference : Creating new robot manager
ROS API
-
Subscribed Topics
/robotis/direct_control/set_joint_states(sensor_msgs/msg/JointState)
Listens for messages that include parameters and joint information for the joint the user wants to move. -
Published Topics
/robotis/status(robotis_controller_msgs/msg/StatusMsg)
Message that describes the current status of the action_module.
Parameters
/robotis/direct_control/default_moving_time(double, default : 0.5)
minimum time to move to target position
/robotis/direct_control/default_moving_angle(double, default : 30)
angular movement speed per second for moving to target position
/robotis/direct_control/check_collision(bool, default : true)
enable pseudo self-collision checking
op3_tuning_module
Overview
This module is used for motion tuning and gain adjustment.
Getting started
- Download & Build
Reference : Installing ROBOTIS ROS Package
- Usage
The Tuning Module is used in the form of lib in the manager.Reference : Creating new robot manager
ROS API
-
Subscribed Topics
/robotis/tuning_module/tuning_pose(std_msgs/msg/String)
Listens for messages to change the posture for gain tuning/robotis/tuning_module/joint_offset_data(op3_tuning_module_msgs/msg/JointOffsetData)
Listens for messages used to change the offset of joints/robotis/tuning_module/joint_gain_data(op3_tuning_module_msgs/msg/JointOffsetData)
Listens for messages used to change joint gains/robotis/tuning_module/torque_enable(op3_tuning_module_msgs/msg/JointTorqueOnOffArray)
Listens for messages to enable or disable torque to joints/robotis/tuning_module/command(std_msgs/msg/String)
Listens for command messages to save gains or offsets -
Published Topics
/robotis/status(robotis_controller_msgs/msg/StatusMsg)
Describes the current status of the action_module./robotis/enable_ctrl_module(std_msgs/msg/String)
Messages publishing updates for motion module changes from the robotis_controller/robotis/sync_write_item([robotis_controller_msgs/msg/SyncWriteItem]{: .popup})
Messages to sync write directly to DYNAMIXELs using robotis_controller/robotis/enable_offset(std_msgs/msg/Bool)
Messages for turning on / off offsets in robotis_controller -
Service Server
/robotis/tuning_module/get_present_joint_offset_data(op3_tuning_module_msgs/msg/GetPresentJointOffsetData)
Service to request joint state information, including offset -
Service Client
/robotis/set_present_ctrl_modules(robotis_controller_msgs/msg/SetModule)
Service for changing the motion module of robotis_controller/robotis/load_offset(robotis_controller_msgs/msg/LoadOffset)
Service to apply new offsets to robotis_controller
Parameters
offset_file_path(string, default : ~/data/tune_pose.yaml)
This path indicates the location of the file that contains the offset data for each joint.
init_file_path(string, default : ~/data/offset.yaml)
This path indicates the location of the file that contains initialization information for each joint
Sensor Module
open_cr_module
Overview
This module provides OpenCR sensor and IO interface control for Gyro, Acceleration, Button and LED functions.
Reference : OPENCR
Getting started
- Download & Build
Reference : Installing ROBOTIS ROS Package
Usage
The Sensor Module is used in the manager in the form of library.
Reference : Creating new robot manager
ROS API
-
Published Topics
/robotis/status(robotis_controller_msgs/msg/StatusMsg)
This message contains the current status of the open_cr_module./robotis/open_cr/imu(sensor_msgs/msg/Imu)
This message contains current IMU data from the OpenCR./robotis/open_cr/button(std_msgs/msg/String)
This message contains the status of the buttons connected to the OpenCR GPIO.
OP3 Manager
Overview
op3_manager package controls the ROBOTIS Framework on the ROBOTIS OP3.
Refer to the below link to create a new robot manager.
Reference : Creating new robot manager
Getting started
Download & Build
Reference : Installing ROBOTIS ROS Package
Run
Execute the program with a .launch file in order to load ROS parameters.
The command should be executed under the root account to configure the correct Tread attributes.
op3_manager has direct control over ROBOTIS-OP3, other control programs such as op3_walking_tuner and op3_action_editor should not be running.
Before executing the op3_manager launch file, other programs should be terminated.
$ sudo bash
[sudo] password for robotis:
# ros2 launch op3_manager op3_manager.launch.py
ROS API
Parameters
launch parameters
gazebo (bool, default: false)
Whether to run the program in gazebo mode.
gazebo_robot_name (string, default: “”)
Configure the robot name for the joint_state topic when running in gazebo mode.
ex) If op3 is the gazebo_robot_name, /op3/joint_states will be the joint state node.
offset_file_path (string, default: “”)
This path indicates the location of the file that contains offset data of each joint and initial posture data for offset adjustment.
robot_file_path (string, default: “”)
This path indicates the location of the .robot file that contain robot description data.
init_file_path (string, default: “”)
This path indicates the location of the file that contains initialization information for each joint.
device_name (string, default: “/dev/ttyUSB0”)
This port is used to communicate with the OpenCR that manages the DYNAMIXEL power supply.
baud_rate (int, default: “2000000”)
This baud rate is used to communicate with the OpenCR that manages the DYNAMIXEL power supply.
Modules
Motion Modules
- op3_action_module : This manages all joint actions.
- op3_base_module : This module manages initial posture and basic functions.
- op3_head_control_module : This module controls the OP3’s head.
- op3_walking_module : This module controls walking.
- op3_direct_control_module : This module controls ROBOTIS-OP3 joints directly.
- op3_tuning_module : This module is used to tune the gain and offset.
Sensor Module
- open_cr_module : This module is required to use the OpenCR as a sensor.
Source
Structure of the op3_manager:
- Initialize with Robot file (
.robot)and Joint initialize file (.yaml). - Apply offset file(
.yaml). - Add modules (each module manages calculation for control or sensor related functions).
- Initiate timer in the controller.
- According to the frequency stated in the
.robotfile, exchange data with DYNAMIXEL and OpenCR.
...

// initialize robot
if (controller->initialize(g_robot_file, g_init_file) == false)
{
  ROS_ERROR("ROBOTIS Controller Initialize Fail!");
  return -1;
}

// load offset
if (g_offset_file != "")
  controller->loadOffset(g_offset_file);

sleep(1);

/* Add Sensor Module */
controller->addSensorModule((SensorModule*) OpenCRModule::getInstance());

/* Add Motion Module */
controller->addMotionModule((MotionModule*) ActionModule::getInstance());
controller->addMotionModule((MotionModule*) BaseModule::getInstance());
controller->addMotionModule((MotionModule*) HeadControlModule::getInstance());
controller->addMotionModule((MotionModule*) WalkingModule::getInstance());

// start timer
controller->startTimer();

...
Others
op3_balance_control
Overview
op3_balance_control is a library for balance control.
This library is used to improve walking performance.
Currently, this library is not implemented because of sensor requirements (ft & IMU).
op3_localization
Overview
op3_localization is a ros node for localization.
This node publishes TF data from /world to /body_link.
ROS API
Subscribed Topics
/robotis/pelvis_pose(geometry_msgs/msg/PoseStamped)
This topic will receive the body_link pose from /world.
/robotis/pelvis_pose_reset(std_msgs/msg/String)
This topic will reset the body_link pose to default value.
ROBOTIS OP3 msgs
Module msgs
op3_action_module_msgs
Overview
The followings are Messages and Services used for the op3_action_module.
ROS Message Type
ROS Service Type
op3_walking_module_msgs
Overview
Messages and Services used in the op3_walking_module
ROS Message Type
ROS Service Type
op3_tuning_module_msgs
Overview
Messages and Services used in the op3_tuning_module
ROS Message Type
ROS Service Type
Tool msgs
op3_offset_tuner_msgs
Overview
The following Messages and Services are used for the op3_offset_tuner_server and the op3_offset_tuner_client.
ROS Message Type
ROS Service Type
ROBOTIS OP3 Demo
ball_detector
Overview
This chapter explain ball detecting package for ROBOTIS OP3’s vision demonstration.
The package utilizes the OpenCV library in order to search for a ball with a specific color.
Getting started
Download & Build
Reference : Installing ROBOTIS ROS Package
Run
- Launch with usb_cam package
Execute the program with a.launchfile in order to load ROS parameters.$ ros2 launch op3_ball_detector ball_detector_from_usb_cam.launch.pyReference :
usb_cam
Reference : The following software must be pre-installed to use theusb_campackage.
$ sudo apt-get install v4l-utils
ROS API
Subscribed Topics
~/enable(std_msgs/msg/Bool)
OP3 will start searching for a ball when a True message, and stop when a False message is published to this topic.
~/image_in(sensor_msgs/msg/Image)
The message in this topic contains camera input image for ball searching.
~/cameraInfo_in(sensor_msgs/msg/CameraInfo)
The message in this topic contains camera information for the corresponding input image.
Published Topics
~/image_out(sensor_msgs/msg/Image)
The message in this topic contains an output image after the ball searching process.
~/camera_info(sensor_msgs/msg/CameraInfo)
The message in this topic contains camera information for the output image.
~/circle_set(ball_detector/circleSetStamped)
Detected ball information
header(std_msgs/msg/Header) : Header informationcircles(geometry_msgs/msg/Point) : Count of detected ballsxX coordinate of the center of ball in the image coordinate systemyY coordinate of the center of ball in the image coordinate systemzRadius of the detected ball
Parameters
/yaml_path(string, default : “”)
The path of the yaml file that saves parameters.
/gaussian_blur_size(int, default : )
/gaussian_blur_sigma(double, default : )
/canny_edge_th(double, default : )
/hough_accum_resolution(double, default : )
/min_circle_dist(double, default : )
/hough_accum_th(double, default : )
/min_radius, /max_radius(int, default : )
Minimum and maximum radius of the ball to detect
Reference : HSV color
/filter_h_min, /filter_h_max(int, default : )
Minimum and maximum value of H filter in HSV color representation
/filter_s_min, /filter_s_max(int, default : )
Minimum and maximum value of S filter in HSV color representation
/filter_v_min, /filter_v_max(int, default : )
Minimum and maximum value of V filter in HSV color representation
/use_second_filter(bool, default : )
Enable second color filter
/filter_debug(bool, default : )
Enable output image for debugging
How to change the parameters
Reference : How to use ball detector
using the .yaml
- ball_detector_params.yaml
gaussian_blur_size: 7
gaussian_blur_sigma: 2
canny_edge_th: 100
hough_accum_resolution: 1
min_circle_dist: 100
hough_accum_th: 28
min_radius: 20
max_radius: 300
filter_h_min: 350
filter_h_max: 15
filter_s_min: 200
filter_s_max: 255
filter_v_min: 60
filter_v_max: 255
use_second_filter: false
filter2_h_min: 30
filter2_h_max: 355
filter2_s_min: 0
filter2_s_max: 40
filter2_v_min: 200
filter2_v_max: 255
ellipse_size: 2
filter_debug: false
using the dynamic_reconfigure
op3_demo
Overview
The included basic demonstrations for OP3 are playing soccer, vision based face tracking and a sequence of various simple actions.
Getting started
Download & Build
Reference : Installing ROBOTIS ROS Package
Run
- Execute
.launchfile to initiate demonstration$ ros2 launch op3_demo demo.launch.xml - With a successful launch of the program, OP3 will announce that it is ready for the demonstration.
Usage
Reference : How to execute Default Demo
- Button Functions
From the left, the buttons are Mode, Start, User and Reset.- Mode button
- short press : In Ready Mode, mode button switches to the next demo (soccer > vision > action)
- long press : While playing a demo, press and hold the mode button to return to Demo Ready Mode.
- Start button
- short press : Play selected demo from Ready Mode. If a demo is running, the start button will pause or resume the demo.
- User button
-
Additional button provided for user defined features, not used by the included demos.
- Reset button
- Pressing the Reset button will cut off the power to all connected DYNAMIXEL actuators in the OP3.
- Mode button
ROS API
The ROS APIs used in each demo will be explained in their corresponding sections.
Subscribed Topics
/robotis/open_cr/button(std_msgs/msg/String)
Messages in this topic are used to process button control.
Published Topics
/robotis/base/ini_pose(std_msgs/msg/String)
Messages in this topic are used for the initial posture of ROBOTIS-OP3.
/robotis/sync_write_item(std_msgs/msg/String)
Messages to this topic are used to sync write included data to the ROBOTIS-OP3.
ex) LED controls
/play_sound_file(std_msgs/msg/String)
Messages to this topic must contain the path a voice file to use for verbal announcement.
Demos
The following is the list of available demonstrations.
Soccer Demo
OP3 will search for a colored ball and play with it.
Vision Demo
OP3 will detect faces and follow them.
[Action Demo](#action
OP3 will play a sequence of pre-defined actions while speaking.
ROBOTIS OP3 Common
op3_description
Overview
ROBOTIS OP3 URDF Model
Make a URDF Model
Package
doc : documentation for ROBOTIS OP3 joint & link information
launch : launch file to execute Rviz
stl : STL files of ROBOTIS OP3 parts
src : ROS node for Rviz to publish imaginary gripper joint
urdf : urdf & xacro files for Thormang3 model
op3_gazebo
Overview
ROBOTIS OP3 Gazebo Simulation
Gazebo with ROS
Package
config : ROS controller for gazebo
launch : launch files to execute gazebo simulation
worlds : simulation environments
ROBOTIS OP3 Tools
op3_action_editor
Overview
This section explains how to create and edit action file used in the op3_action_module of ROBOTIS-OP3.
Action File
An action file contains ROBOTIS-OP3’s poses and time data. The action file is written as binary file so users can read its contents with op3_action_editor. ROBOTIS currently provides a default action file with source code. It is located in “op3_action_module/data” directory.
The action file contains 256 pages. Each page can store up to 7 stages (or steps) of action data. The default action file does not use all pages and users can add their own actions by writing them on an empty page.
Getting started
Download & Build
Reference : Installing ROBOTIS ROS Package
Run
Run the executor file.
op3_action_editor has direct control over ROBOTIS-OP3, other control programs such as op3_manager, op3_offset_tuner and op3_walking_tuner should not be running.
$ ros2 run op3_action_editor executor.py
UI
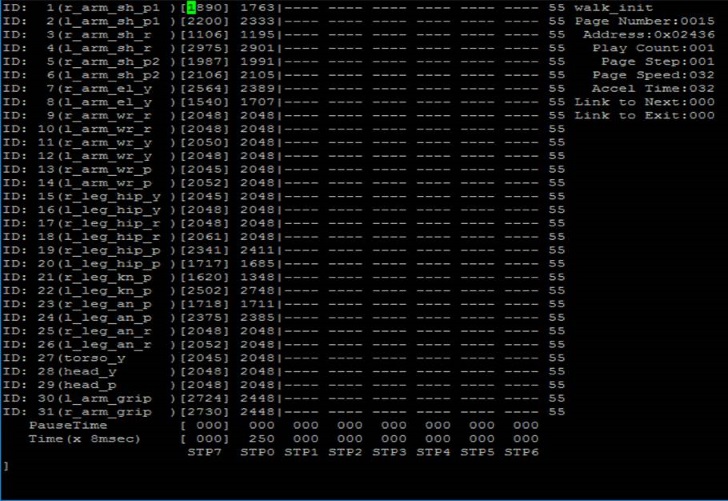
Page number: Page number is the listed page number for the current action. If the user wants to create a new action pose, they can use any empty page.
Page title: ROBOTIS recommends adding a page title when creating a new action on an empty page.
Current position: The current position describes the position of the DYNAMIXEL servos in the OP3. This data is represented by STP7 in op3_action_editor. Sometimes the position may be displayed as —- in op3_action_editor. This means the position of the DYNAMIXEL has not been read (or torque is off).
If user turns a DYNAMIXEL off, current position cannot be read until turn it back on.
User can turn off the torque to specific DYNAMIXELs. This is very convenient when acquiring position values directly from DYNAMIXELs for a new robot posture instead of calculating those values. To do that, turn off the torque of desired DYNAMIXEL, then move the robot to the desired posture by hand until and turn the torque back on. The robot will remain at the current posture and the user can read position values from the corresponding DYNAMIXEL.
Steps or stages: Each page can store up to 7 steps, from STP0 to STP6. However, some actions may require more than 7 stages to perform completely. This can be resolved by simply using multiple pages and linking them with Next: Next indicates whether to continue an action on a different page. To continue actions, just list the page number where the action is to be continued. Number 0 indicates that action does not continue onto another page (default value). Linked page do not have to be in numerical order.
Play Count: Play Count is the number of times the action on the page is to be played.
Exit: There might be some cases when an action has to be stopped. In these cases, the robot may be in an unstable position. Exit is much like “Next”, but is used to define an action to help the OP3 return to a stable pose if an action is exited during execution. If “Exit” is 0, it means that there are no linked exit page (default value).
Tip: When calling an action requires multiple pages, ROBOTIS strongly suggests the user to call the action from the starting page. For example, clap starts at page 7 and ends at page 8. This means you should call page 7 when calling clap. Calling the page 8 may cause unexpected behavior from the robot.
STP7: “STP7” column is the current position of connected DYNAMIXELs. “—-“ means that torque has been disabled or the servo is not connected.
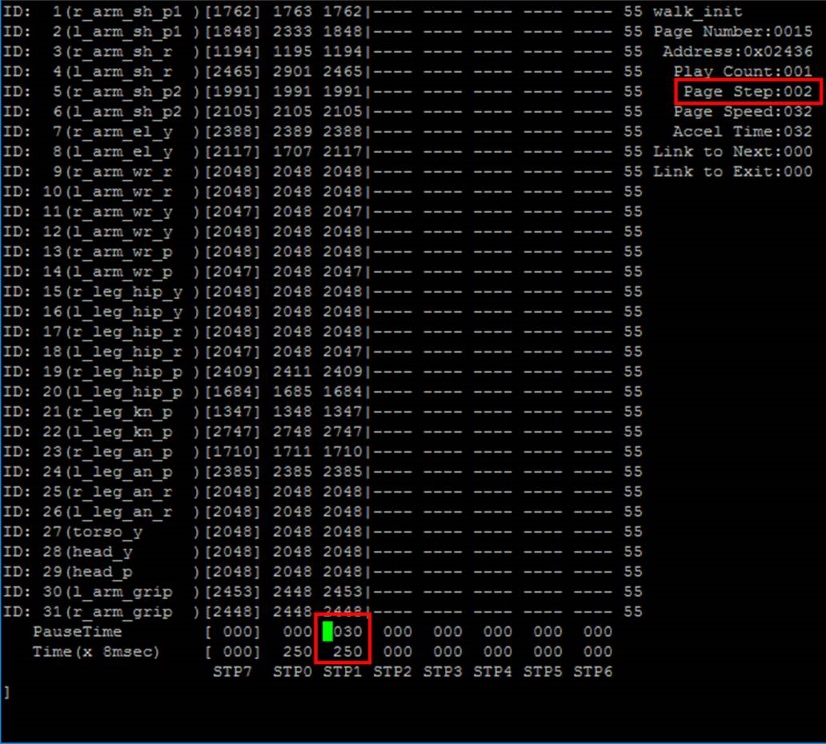
PauseTime: “PauseTime” is the pause duration period for motion playback for the step STP[x].
Time(x 8msec) : “Time” is the time period for ROBOTIS-OP3 to complete the step STP[x]. Each time unit is 8ms of real time.
It is strongly advised that when testing newly-created or edited actions, there should be small incremental changes in position, speed/time, and pause values for the sake of ROBOTIS-OP3’s stability.
The Contents of The Default Action File
The below table shows the contents of the default action file.
| page number | page title | brief description of page | number of pages |
|---|---|---|---|
| 1 | walki_init | Initial standing pose | 1 |
| 2 | hello | Greeting | 1 |
| 3 | thank_you | Thank you | 1 |
| 4 | yes | Yes | 1 |
| 5 | no | No | 1 |
| 6 | fighting | Fighting | 1 |
| 7 | clap | Clap | 2 |
| 9 | S_H_RE | Ready for shaking hands | 1 |
| 10 | S_H | Shaking hands | 1 |
| 11 | S_H_END | Move to initial pose from ready pose for shaking hands | 1 |
| 12 | scanning | looking around | 1 |
| 13 | ceremony | ceremony | 1 |
Basic Command of Action Editor
The following command list can also be seen inside the action editor by typing ‘help’
exit: exits the program.
re: refreshes the screen.
b: moves to the previous page.
n: moves to the next page.
page [index]: moves to the [index] page. Typing page 5 outputs data from page 5 on screen.
list: outputs a list of pages.
new: initializes current page by clearing all actuator position data.
copy [index]: copies data from page [index] to current page. For example if you are on page 5 and want to copy page 9 then type copy 9.
set [value]: sets position value on the chosen actuator. For example If you want ID19 (head pan) to have a value of 512 then using the keyboard’s directional keys place the cursor on ID19 and type set 512.
save: saves any changes you’ve made. The saved motion file motion_4096.bin can be found at “op3_action_module/data”
play: plays motion(s) of current page.
name: changes the name of the current page. You can view the name of the page at the top right portion of the screen. For example, page 2 is titled hello; to change the name type name and press the “ENTER” key. “name:” will appear at the bottom of the screen. Input the desired name for the page, good for instance, and press the “ENTER” key again.
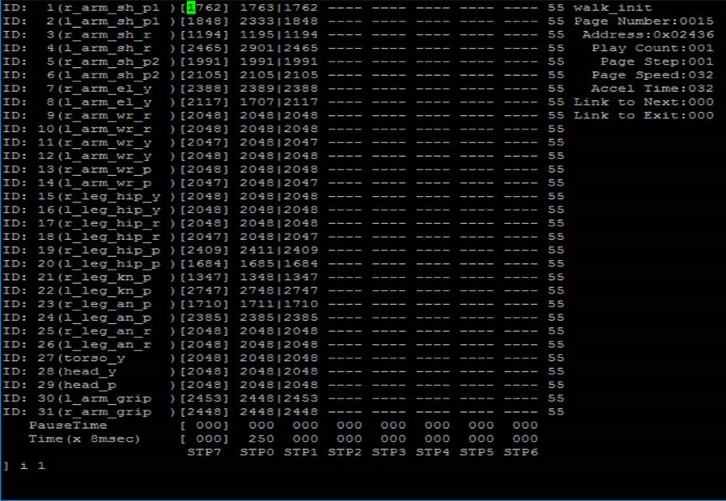
i: inserts data from STP7 to STP0. Moves data from STP[x] to STP[x + 1] if any.
i [index]: inserts data from STP7 to STP[index]. Moves data from STP[index] to STP[index + 1] if any.
m [index] [index2]: moves data from [index2] to [index].
d [index]: deletes data from STP[index]. Moves data from STP[index] to STP[index - 1].
on/off: turns on/off torque for all connected DYNAMIXELs.
on/off [index1] [index2] [index3] : turns torque on/off from ID[index1] ID[index2] ID[index3]. For example off 20 releases torque from ID20. Notice that STP7 for ID20 will read [—-]. Typing on 20 turns torque from ID20 on again and the screen outputs the current position data of ID20.
Example Action editing with op3_action_editor
- Run the op3_action_editor
-
Find the page where the “walking_init page” is by typing “list”
-
Exit the list and go to any blank page by typing “page [x]”(for example, page 15).
-
Copy page 1 to page [x].
- Go to “walking_init” pose by typing “play”
-
Turn off the torque of ID 2, 4 and 8 by typing “off 2 4 8”

-
After getting the desired pose turn torque on again by typing on, insert the pose to step 1 by typing “i 1”
-
Edit “Pause Time”, “Time” of STP1 and “Page Step” as shown below.
- Type “play” and check the ROBOTIS-OP3’s action
op3_gui_demo
Overview
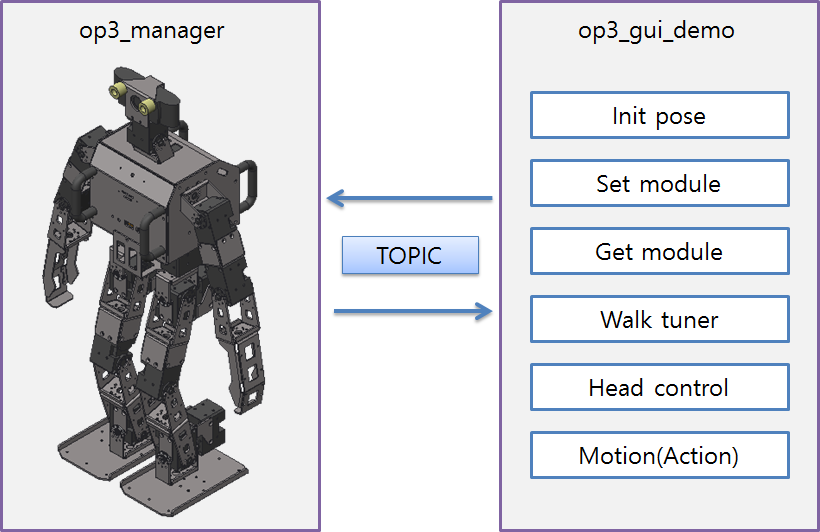
op3_gui_demo is a GUI application to control ROBOTIS-OP3.
Within this program, the user can adjust module settings, walking tuner, head joint control and play actions.
Getting started
Download & Build
Reference : Installing ROBOTIS ROS Package
Run
Execute the launch file.
$ ros2 launch op3_gui_demo op3_demo.launch.py
UI
Usage
Reference : How to execute GUI program
ROS API
Subscribed Topics
/robotis/status(std_msgs/msg/String)
This message describes the current status of the ROBOTIS-OP3.
/robotis/present_joint_ctrl_modules(robotis_controller_msgs/msg/JointCtrlModule)
This message reports which module is currently in use on the ROBOTIS-OP3.
/robotis/head_control/present_joint_states(sensor_msgs/msg/JointState)
This message reports present angles for each joint.
Published Topics
/robotis/base/ini_pose(std_msgs/msg/String)
This message will instruct the ROBOTIS-OP3 to move to the initial posture.
/robotis/enable_ctrl_module(std_msgs/msg/String)
This message notifies framework to activate a specific module for ROBOTIS-OP3.
/robotis/sync_write_item(std_msgs/msg/String)
This message contains data to be written to ROBOTIS-OP3 with the Sync Write command.
ex) LED control
/robotis/head_control/set_joint_states_offset(sensor_msgs/msg/JointState)
This message controls head joints.
/play_sound_file(std_msgs/msg/String)
This message contains the path of voice files for speaking.
/robotis/walking/command"(std_msgs/msg/String)
This message commands walking module of ROBOTIS-OP3.
/robotis/walking/set_params"(op3_walking_module_msgs/msg/WalkingParam)
This message configures walking parameters of the walking module.
/robotis/action/page_num(std_msgs/msg/Int32)
This message transfers page number to action_module to play actions.
Services
/robotis/get_present_joint_ctrl_modules(robotis_controller_msgs/msg/GetJointModule)
This service acquires which module is currently in use on the ROBOTIS-OP3.
/robotis/walking/get_params(op3_walking_module_msgs/msg/GetWalkingParam)
This service acquires walking parameters.
Parameters
/demo_config(string, default : “/op3_gui_demo/config/demo_config.yaml”)
This yaml file saves joint names, available modules, list of module preset button.
op3_tuner_client
Overview
A GUI Node that can adjust the offset and gain of the ROBOTIS-OP3.
It is used with the op3_manager.
Getting started
Download & Build
Reference : Installing ROBOTIS ROS Package
Run
$ ros2 launch op3_tuner_client op3_tuner_client.launch.xml
Usage
Reference : How to use tuner client
ROS API
Published Topics
/robotis/tuning_module/tuning_pose(std_msgs/msg/String)
Message that is used to change the posture for gain tuning
/robotis/tuning_module/joint_offset_data(op3_tuning_module_msgs/msg/JointOffsetData)
Message used to change the joint offset
/robotis/tuning_module/joint_gain_data(op3_tuning_module_msgs/msg/JointOffsetData)
Message used to change the joint gain
/robotis/tuning_module/torque_enable(op3_tuning_module_msgs/msg/JointTorqueOnOffArray)
Message used to enable/disable the torque of joints
/robotis/tuning_module/command(std_msgs/msg/String)
Message to execute commands (ex. save gain, save offset)
Services
/robotis/tuning_module/get_present_joint_offset_data(op3_tuning_module_msgs/msg/GetPresentJointOffsetData)
Service used to get the joint states including offset
op3_offset_tuner_server
Overview
ROBOTIS-OP3 Offset Tuner Node
Data related to the Offset can be Tuned, Loaded and Saved.
It is used with the op3_offset_tuner_client.
Getting started
Download & Build
Reference : Installing ROBOTIS ROS Package
Run
Execute the launch file to start offset tuner server.
op3_offset_tuner_server has direct control over ROBOTIS-OP3, other control programs such as op3_manager, op3_action_editor and op3_walking_tuner should not be running.
$ ros2 launch op3_offset_tuner_server op3_offset_tuner_server.launch.xml
Usage
Reference : How to use offset tuner
ROS API
Subscribed Topics
-
/robotis/base/send_tra(std_msgs/msg/String)
The topic for specifying the start and end of trajectory following. -
/robotis/offset_tuner/joint_offset_data(op3_offset_tuner_msgs/msg/JointOffsetData)
The topic for updating joint offset related parameters. -
/robotis/offset_tuner/torque_enable(op3_offset_tuner_msgs/msg/JointTorqueOnOffArray)
The topic for updating Torque enable/disable command for joints. -
/robotis/offset_tuner/command(std_msgs/msg/String)
The topic transfers command to the op3_offset_tuner_client.
- “save” : Saves current offset to yaml
- “ini_pose” : Take the initial posture for offset tuning
Services
robotis/offset_tuner/get_present_joint_offset_data(op3_offset_tuner_msgs/msg/GetPresentJointOffsetData)
The service obtains current offset data from the op3_offset_tuner_client.
Parameters
/offset_path(string, default : “”)
The yaml file path to save offsets.
/robot_file_path(string, default : “”)
This path indicates the location of .robot file that contains robot description data.
/init_file_path(string, default : “”)
This path indicates the location of the file that contains initialization information of each joint.
op3_offset_tuner_client
Overview
The GUI Node that can adjust offset values for ROBOTIS-OP3.
It is used with the op3_offset_tuner_server.
Getting started
Download & Build
Reference : Installing ROBOTIS ROS Package
Run
$ rosrun op3_offset_tuner_client op3_offset_tuner_client
Usage
Reference : How to use offset tuner
ROS API
Published Topics
/robotis/offset_tuner/joint_offset_data(op3_offset_tuner_msgs/msg/JointOffsetData)
The topic specifies Joint offset data
/robotis/offset_tuner/torque_enable(op3_offset_tuner_msgs/msg/JointTorqueOnOffArray)
The topic executes the Torque on/off command for each DYNAMIXEL
/robotis/offset_tuner/command(std_msgs/msg/String)
The topic executes other utility commands (save, initial posture, etc).
Services
/robotis/offset_tuner/get_present_joint_offset_data(op3_offset_tuner_msgs/msg/GetPresentJointOffsetData)
The service obtains saved joint offset values
ROBOTIS ROS Packages
ROBOTIS OP3
ROBOTIS ROS Modules
Motion Module
op3_action_module
Overview
op3_action_module manages OP3 actions.
This module is compiled as a libary so that it can be loaded from the op3_manager.
Action contains all joint angles per each time frame.
Getting started
- Download & Build
Reference : Installing ROBOTIS ROS Package
- Usage
Motion Module is used in the form of lib in the manager.Reference : Creating new robot manager
ROS API
-
Subscribed Topics
/robotis/action/page_num(std_msgs/Int32)
The page number of action to run in the Module.
1 ~ 255 : play action
-1 : stop action
-2 : brake action -
Published Topics
/robotis/status(robotis_controller_msgs/StatusMsg)
Message that describes status of action_module. -
Services
/robotis/action/is_running(op3_action_module_msgs/IsRunning)
Service that checks whether the action is running or not.
Parameters
/action file path(string, default : “op3_action_module/data/motion_4095.bin”)
File path that indicates the location of action libraries for OP3.
op3_base_module
Overview
op3_base_module is a module for initial posture.
This module is compiled to a library to be used in op3_manager.
Getting started
- Download & Build
Reference : Installing ROBOTIS ROS Package
- Usage
The Motion Module is used in the manager in the form of library.Reference : Creating new robot manager
ROS API
-
Subscribed Topics
/robotis/base/ini_pose(std_msgs/String)
This message will have OP3 to take the initial posture(This command is effective even when the base module is inactive). -
Published Topics
/robotis/enable_ctrl_module(std_msgs/String)
This message activatesop3_base_moduleto take the initial posture./robotis/status(robotis_controller_msgs/StatusMsg)
This message notifies the status ofop3_base_module.
Data
-
Init posture
-
data file path : /op3_base_module/data/ini_pose.yaml
-
YAML format
- mov_time : Estimated time to move to target points(unit in second)
- via_num : Number of waypoints
- via_time : Estimated time between waypoints(array structure)
- via_pose : Angle of every joint for each waypoint(unit in degree, array structure)
- tar_pose : Target joint angles for initial posture
op3_head_control_module
Overview
This chapter explains the module to control OP3’s head.
This module is compiled to a library to be used in op3_manager.
Getting started
- Download & Build
Reference : Installing ROBOTIS ROS Package
- Usage
The Motion Module is used in the manager in the form of library.Reference : Creating new robot manager
ROS API
-
Subscribed Topics
/robotis/head_control/scan_command(std_msgs/String)
This message will request a looking around head motion to scan the environment./robotis/head_control/set_joint_states(sensor_msgs/JointState)
Head joints will rotate to corresponding angles written in the message./robotis/head_control/set_joint_states_offset(sensor_msgs/JointState)
Head joints will adjust angles by offset values written in the message. -
Published Topics
/robotis/status(robotis_controller_msgs/StatusMsg)
This message notifies the status of head_control_module.
op3_walking_module
Overview
This chapter explains the module to control OP3 walking.
This module is compiled to a library to be used in op3_manager.
Getting started
- Download & Build
Reference : Installing ROBOTIS ROS Package
- Usage
The Motion Module is used in the manager in the form of library.
Reference : Creating new robot manager
ROS API
-
Subscribed Topics
/robotis/walking/command(std_msgs/String)
This message requests start and stop for walking./robotis/walking/set_params(op3_walking_module_msgs/WalkingParam)
This message sets necessary parameters for walking. For details, refer to WalkingParam.msg. -
Published Topics
/robotis/status(robotis_controller_msgs/StatusMsg)
This message notifies the status of op3_walking_module. -
Services
/robotis/walking/get_params(op3_walking_module_msgs/GetWalkingParam)
This service acquires walking parameters.
Parameters
/walking_param_path(string, default : “op3_walking_module/config/param.yaml”)
File path that indicates the location of the walking parameters.
Data
-
Walking parameters
-
data file path : /op3_walking_module/config/param.yaml
-
YAML format
-
x_offset: offset in the x-direction (front and back) [m]
-
y_offset: offset in the y-direction (left and right) [m]
-
z_offset: offset in the z-direction (up and down) [m]
-
roll_offset: roll offset (x-coordinate) [degree]
-
pitch_offset: pitch offset (y-coordinate) [degree]
-
yaw_offset: yaw offset (z-coordinate) [degree]
-
hip_pitch_offset: pitch offset (y-coordinate) at the hip level. Values are for DYNAMIXEL position values for hip pitch joints. [degree]
-
period_time: Time required for ROBOTIS-OP3 to complete two full steps (left and right foot) [ms]
-
dsp_ratio: Time ratio of the period when both feet are touching the ground to the period of walking cycle.
-
foot_height: foot elevation during walk [m]
-
swing_right_left: swing to either left or right during walk [m]
-
swing_top_down: up and down body swing during walk [m]
-
pelvis_offset: roll offset (x-coordinate) at the pelvis level. Values are for DYNAMIXEL position values for hip roll joints [degree]
-
arm_swing_gain: Arm swing gain with respect to Step forward/back. If the left foot moves forward then the right arm swings.
-
balance_hip_roll_gain: Gain with respect to the gyroscope roll
-
balance_knee_gain: Gain with respect to the gyroscope pitch
-
balance_ankle_roll_gain: Gain with respect to the gyroscope roll
-
balance_ankle_pitch_gain: Gain with respect to the gyroscope pitch
-
p_gain: not yet implemented
-
i_gain: not yet implemented
-
d_gain: not yet implemented
-
op3_online_walking_module
Overview
This chapter explains the module to control OP3’s walking.
This module is compiled to a library to be used in op3_manager.
Online walking algorithm is described in this book (Introduction to Humanoid Robotics).
Getting started
- Download & Build
Reference : Installing ROBOTIS ROS Package
- Usage
The Motion Module is used in the manager in the form of library.
Reference : Creating new robot manager
ROS API
-
Subscribed Topics
/robotis/online_walking/reset_body(std_msgs/Bool)
This message will reset the body pose to default value./robotis/online_walking/goal_joint_pose
(op3_online_walking_module_msgs/JointPose)
This message will set desired pose in joint space./robotis/online_walking/goal_kinematics_pose
(op3_online_walking_module_msgs/KinematicsPose)
This message will set desired pose in task space./robotis/online_walking/foot_step_command
(op3_online_walking_module_msgs/FootStepCommand)
This message will set walking command./robotis/online_walking/foot_step_command
(op3_online_walking_module_msgs/FootStepCommand)
This message will execute desired walking performance./robotis/online_walking/walking_param
(op3_online_walking_module_msgs/WalkingParam)
This message will set walking parameter./robotis/online_walking/body_offset
(geometry_msgs/Pose)
This message will set desired body offset./robotis/online_walking/foot_distance
(std_msgs/Float64)
This message will set desired foot distance between left and right foot./robotis/online_walking/footsteps_2d
(op3_online_walking_module_msgs/Step2DArray)
This message will set desired foot step from foot step generator. -
Published Topics
/robotis/status(robotis_controller_msgs/StatusMsg)
This message notifies the status of head_control_module./robotis/movement_done(std_msgs/String)
This message notifies the end of movement./robotis/pelvis_pose(geometry_msgs/PoseStamped)
This message send desired pelvis pose for localization. -
Service Server
/robotis/online_walking/get_joint_pose
(op3_online_walking_module_msgs/GetJointPose)
This service is used to get current desired joint pose./robotis/online_walking/get_kinematics_pose
(op3_online_walking_module_msgs/GetKinematicsPose)
This service is used to get current desired kinematics pose. -
Service Client
/robotis/online_walking/get_preview_matrix
(op3_online_walking_module_msgs/GetPreviewMatrix)
This service is used to calculate matrix for online walking.
op3_direct_control_module
Overview
This chapter explains the module to control the joints of ROBOTIS-OP3 directly.
Getting started
- Download & Build
Reference : Installing ROBOTIS ROS Package
- Usage
Motion Module is used in the form of lib in the manager.Reference : Creating new robot manager
ROS API
-
Subscribed Topics
/robotis/direct_control/set_joint_states(sensor_msgs/JointState)
Message that include the joint value user want to move. -
Published Topics
/robotis/status(robotis_controller_msgs/StatusMsg)
Message that describes status of action_module.
Parameters
/robotis/direct_control/default_moving_time(double, default : 0.5)
minimum time to move to target position
/robotis/direct_control/default_moving_angle(double, default : 30)
angle moving to target position per 1 sec
/robotis/direct_control/check_collision(bool, default : true)
enable of pseudo self-collision checking
op3_tuning_module
Overview
This chapter explains the module used for offset and gain adjustment.
Getting started
- Download & Build
Reference : Installing ROBOTIS ROS Package
- Usage
Motion Module is used in the form of lib in the manager.Reference : Creating new robot manager
ROS API
-
Subscribed Topics
/robotis/tuning_module/tuning_pose(std_msgs/String)
Message that is used to change the posture for tuning a gain
/robotis/tuning_module/joint_offset_data(op3_tuning_module_msgs/JointOffsetData)
Message used to change the offset
/robotis/tuning_module/joint_gain_data(op3_tuning_module_msgs/JointOffsetData)
Message used to change the gain
/robotis/tuning_module/torque_enable(op3_tuning_module_msgs/JointTorqueOnOffArray)
Message used to en/disable the torque of joints
/robotis/tuning_module/command(std_msgs/String)
Message for command(ex. save gain, save offset) -
Published Topics
/robotis/status(robotis_controller_msgs/StatusMsg)
Message that describes status of action_module.
/robotis/enable_ctrl_module(std_msgs/String)
Message for changing a motion module of robotis_controller
/robotis/sync_write_item([robotis_controller_msgs/SyncWriteItem]{: .popup})
Message for sync write with dynamixel in robotis_controller
/robotis/enable_offset(std_msgs/Bool)
Messages for turning on / off offsets in robotis_controller -
Service Server
/robotis/tuning_module/get_present_joint_offset_data(op3_tuning_module_msgs/GetPresentJointOffsetData)
Service used to notify joint states including offset -
Service Client
/robotis/set_present_ctrl_modules(robotis_controller_msgs/SetModule)
Service for changing a motion module of robotis_controller
/robotis/load_offset(robotis_controller_msgs/LoadOffset)
Service used to apply the new offset in robotis_controller
Parameters
offset_file_path(string, default : ~/data/tune_pose.yaml)
This path indicates the location of the file that contains offset data of each joint.
init_file_path(string, default : ~/data/offset.yaml)
This path indicates the location of the file that contains initialization information of each joint
Sensor Module
open_cr_module
Overview
This chapter introduces the module that utilizes OpenCR as sensor and IO interface. This module provides Gyro, Acceleration, Button and LED functions.
Reference : OPENCR
Getting started
- Download & Build
Reference : Installing ROBOTIS ROS Package
Usage
The Sensor Module is used in the manager in the form of library.
Reference : Creating new robot manager
ROS API
-
Published Topics
/robotis/status(robotis_controller_msgs/StatusMsg)
This message notifies the status of open_cr_module./robotis/open_cr/imu(sensor_msgs/Imu)
This message contains IMU data from OpenCR./robotis/open_cr/button(std_msgs/String)
This message notifies the status of the button connected to OpenCR GPIO.
OP3 Manager
Overview
op3_manager package applies ROBOTIS Framework to ROBOTIS OP3.
Refer to the below link to create a new robot manager.
Reference : Creating new robot manager
Getting started
Download & Build
Reference : Installing ROBOTIS ROS Package
Run
Execute the program with a .launch file in order to load ROS parameters.
The command should be executed under the root account to configure the attribute of Thread.
op3_manager has a direct control over ROBOTIS-OP3, therefore other control programs such as op3_walking_tuner and op3_action_editor should not be running.
Before executing the op3_manager launch file, other programs should be terminated.
$ sudo bash
[sudo] password for robotis:
# roslaunch op3_manager op3_manager.launch
ROS API
Parameters
launch parameters
gazebo (bool, default: false)
Configure whether to run the program in gazebo mode.
gazebo_robot_name (string, default: “”)
Configure the robot name for joint_state topic name when running in gazebo mode.
ex) If op3 is the gazebo_robot_name, /op3/joint_states will be subscribed.
offset_file_path (string, default: “”)
This path indicates the location of the file that contains offset data of each joint and initial posture data for offset adjustment.
robot_file_path (string, default: “”)
This path indicates the location of .robot file that contains robot description data.
init_file_path (string, default: “”)
This path indicates the location of the file that contains initialization information of each joint.
device_name (string, default: “/dev/ttyUSB0”)
This port name is used to open the communication port of OpenCR that manages DYNAMIXEL power supply.
baud_rate (int, default: “2000000”)
This baud rate is used to open the communication port of OpenCR that manages DYNAMIXEL power supply.
Modules
This chapter explains various modules in op3_manager.
Actual control is processed within each modules.
Motion Module
- op3_action_module : This manages every joint actions.
- op3_base_module : This module manages initial posture and basic functions.
- op3_head_control_module : This module controls OP3 head.
- op3_walking_module : This module controls walking.
- op3_online_walking_module : This module controls upgraded walking.
- op3_direct_control_module : This module controls ROBOTIS-OP3 directly.
- op3_tuning_module : This module is used to tune the gain and offset.
Sensor Module
- open_cr_module : This module is required to use OpenCR as a sensor.
Source
Structure of op3_manager
- Initialize with Robot file(
.robot)and Joint initialize file (.yaml). - Apply offset file(
.yaml). - Add modules(each module manages calculation for control or sensor related functions).
- Initiate timer in the controller.
- According to the frequency stated in the
.robotfile, exchange data with DYNAMIXEL and OpenCR.
...

// initialize robot
if (controller->initialize(g_robot_file, g_init_file) == false)
{
  ROS_ERROR("ROBOTIS Controller Initialize Fail!");
  return -1;
}

// load offset
if (g_offset_file != "")
  controller->loadOffset(g_offset_file);

sleep(1);

/* Add Sensor Module */
controller->addSensorModule((SensorModule*) OpenCRModule::getInstance());

/* Add Motion Module */
controller->addMotionModule((MotionModule*) ActionModule::getInstance());
controller->addMotionModule((MotionModule*) BaseModule::getInstance());
controller->addMotionModule((MotionModule*) HeadControlModule::getInstance());
controller->addMotionModule((MotionModule*) WalkingModule::getInstance());

// start timer
controller->startTimer();

...
Others
op3_balance_control
Overview
op3_balance_control is a library for balance control.
This library is used to improve walking performance.
Currently, this library is not implemented because of sensors (ft & IMU).
We will update how to used is library.
op3_localization
Overview
op3_localization is ros node for localization.
This node publish TF data from /world to /body_link.
ROS API
Subscribed Topics
/robotis/pelvis_pose(geometry_msgs/PoseStamped)
This message will set the body_link pose from /world.
/robotis/pelvis_pose_reset(std_msgs/String)
This message will reset the body_link pose to default value.
op3_optimization
Overview
op3_optimization is ros node for online walking pattern generation.
ROS API
Service Server
/robotis/get_preview_matrix(op3_online_walking_module_msgs/GetPreviewMatrix)
This service will return preview control matrix for online walking pattern generation.
ROBOTIS OP3 msgs
Module msgs
op3_action_module_msgs
Overview
The followings are Messages and Services used for the op3_action_module.
ROS Message Type
ROS Service Type
op3_walking_module_msgs
Overview
Messages and Services used in the op3_walking_module
ROS Message Type
ROS Service Type
op3_online_walking_module_msgs
Overview
Messages and Services used in the op3_online_walking_module
ROS Message Type
- FootStepArray.msg
- FootStepCommand.msg
- JointPose.msg
- KinematicsPose.msg
- PreviewRequest.msg
- PreviewResponse.msg
- Step2D.msg
- Step2DArray.msg
- WalkingParam.msg
ROS Service Type
op3_tuning_module_msgs
Overview
Messages and Services used in the op3_tuning_module
ROS Message Type
ROS Service Type
Tool msgs
op3_offset_tuner_msgs
Overview
The following are Messages and Service used for the op3_offset_tuner_server and the op3_offset_tuner_client.
ROS Message Type
ROS Service Type
ROBOTIS OP3 Demo
ball_detector
Overview
This chapter explain ball detecting package for ROBOTIS OP3’s vision demonstration.
The package utilizes OpenCV library in order to search for a ball with a specific color.
Getting started
Download & Build
Reference : Installing ROBOTIS ROS Package
Run
- Standalone
Execute the program with a.launchfile in order to load ROS parameters of ball_detector.$ roslaunch op3_ball_detector ball_detector.launch - Launch with usb_cam package
Execute the program with a.launchfile in order to load ROS parameters.$ roslaunch op3_ball_detector ball_detector_from_usb_cam.launchReference :
usb_cam
Reference : The following software must be pre-installed to useusb_campackage.
$ sudo apt-get install v4l-utils
ROS API
Subscribed Topics
~/enable(std_msgs/Bool)
OP3 will start searching for a ball with a True message, and stop with a False message.
~/image_in(sensor_msgs/Image)
The message in this topic contains camera input image for ball searching.
~/cameraInfo_in(sensor_msgs/CameraInfo)
The message in this topic contains camera information of the corresponding input image.
Published Topics
~/image_out(sensor_msgs/Image)
The message in this topic contains an output image after the ball searching process.
~/camera_info(sensor_msgs/CameraInfo)
The message in this topic contains camera information of the output image.
~/circle_set(ball_detector/circleSetStamped)
Detected ball information
header(std_msgs/Header) : Header informationcircles(geometry_msgs/Point) : Detecetd ballsxX coordinate of the center of ball in the image coordinate systemyY coordinate of the center of ball in the image coordinate systemzRadius of the detected ball
Parameters
/yaml_path(string, default : “”)
The path of the yaml file that saves parameters.
/gaussian_blur_size(int, default : )
/gaussian_blur_sigma(double, default : )
/canny_edge_th(double, default : )
/hough_accum_resolution(double, default : )
/min_circle_dist(double, default : )
/hough_accum_th(double, default : )
/min_radius, /max_radius(int, default : )
Minimum and maximum radius of the ball to detect
/filter_h_min, /filter_h_max(int, default : )
Minimum and maximum value of H filter in HSV color representation
Reference : HSV color
/filter_s_min, /filter_s_max(int, default : )
Minimum and maximum value of S filter in HSV color representation
/filter_v_min, /filter_v_max(int, default : )
Minimum and maximum value of V filter in HSV color representation
/use_second_filter(bool, default : )
Enable second color filter
/filter_debug(bool, default : )
Enable output image for debugging
How to change the parameters
Reference : How to use ball detector
using the .yaml
- ball_detector_params.yaml
 gaussian_blur_size: 7
 gaussian_blur_sigma: 2
 canny_edge_th: 100
 hough_accum_resolution: 1
 min_circle_dist: 100
 hough_accum_th: 28
 min_radius: 20
 max_radius: 300
 filter_h_min: 350
 filter_h_max: 15
 filter_s_min: 200
 filter_s_max: 255
 filter_v_min: 60
 filter_v_max: 255
 use_second_filter: false
 filter2_h_min: 30
 filter2_h_max: 355
 filter2_s_min: 0
 filter2_s_max: 40
 filter2_v_min: 200
 filter2_v_max: 255
 ellipse_size: 2
 filter_debug: false
using the dynamic_reconfigure
op3_demo
Overview
Basic demonstrations of OP3 are playing soccer, vision and sequence of various actions.
Playing soccer and action sequence are originated from OP2.
Face detection and tracking will be demonstrated for vision.
Getting started
Download & Build
Reference : Installing ROBOTIS ROS Package
Run
- Execute
.launchfile to initiate demonstration$ roslaunch op3_demo demo.launch - With a successful launch of the program, OP3 will announce that it is ready for the demonstration.
Usage
Reference : How to execute Default Demo
- Button Functions
From the left, each button is assigned for Mode, Start, User and Reset.- Mode button
- short press : In Ready Mode, mode button switches to the next demo(soccer > vision > action)
- long press : While playing a specific demo, press and hold the mode button to return to demo Ready Mode.
- Start button
- short press : Play selected demo from Ready Mode. If demo is running, start button will pause or resume demo.
-
User button
- Reset button
- Reset button will cut off the power to all DYNAMIXEL.
- Mode button
ROS API
ROS APIs used in each demo will be explained in corresponding wiki pages.
Subscribed Topics
/robotis/open_cr/button"(std_msgs/String)
The message in this topic is used to process button control.
Published Topics
/robotis/base/ini_pose(std_msgs/String)
The message in this topic is used for initial posture of ROBOTIS-OP3.
/robotis/sync_write_item(std_msgs/String)
This topic has a message to sync write data on ROBOTIS-OP3
ex) LED controls
/play_sound_file(std_msgs/String)
The message in this topic contains path of the voice file for verbal announcement.
Demos
The followings are the list of available demonstration.
Buttons on the back of ROBOTIS-OP3 can be used to select and play demo.
Soccer Demo
OP3 will search for a colored ball selected by the user and play with it.
Vision Demo
OP3 will detect face and trace it.
Action Demo
OP3 will play sequence of pre-defined actions while speaking.
ROBOTIS OP3 Common
op3_description
Overview
ROBOTIS OP3 URDF Model
Make a URDF Model
Package
doc : document for ROBOTIS OP3 joint & link information
launch : launch file to execute Rviz
stl : STL files of ROBOTIS OP3’s each parts
src : ROS node for Rviz to publish imaginary gripper joint
urdf : urdf & xacro files for Thormang3 model
op3_gazebo
Overview
ROBOTIS OP3 Gazebo Simulation
Gazebo with ROS
Package
config : ROS controller for gazebo
launch : launch files to execute gazebo simulation
worlds : simulation environments
ROBOTIS OP3 Tools
op3_action_editor
Overview
ROBOTIS-OP3 Action Editor Node
This chapter explains how to create and edit action file used in the op3_action_module of ROBOTIS-OP3.
Action File
The action file contains ROBOTIS-OP3’s poses and time data. The current position describes positions of DYNAMIXEL which converted from actual DYNAMIXEL resolution to 4,095 resolution. The action file is written as binary file so users can read its contents with op3_action_editor. ROBOTIS currently provides a default action file with source code. It is located in “op3_action_module/data” directory.
The action file contains 256 pages. Each page can store up to 7 stages (or steps) of action data. The default action file does not use all pages and user can add own actions by writing them on the empty page.
Getting started
Download & Build
Reference : Installing ROBOTIS ROS Package
Run
Execute the launch file.
op3_action_editor has a direct control over ROBOTIS-OP3, therefore other control programs such as op3_manager, op3_offset_tuner and op3_walking_tuner should not be running.
Before executing the op3_action_editor launch file, other programs should be terminated.
$ roslaunch op3_action_editor op3_action_editor.launch
UI
Page number: Page number is the listed page number. If user wants to create a new action poses, user can use any empty page.
Page title: ROBOTIS recommends user to use a page title when creating a new action on an empty page.
Current position: The current position describes position of DYNAMIXEL which converted from actual DYNAMIXEL resolution to 4,095 resolution. This data is represented by STP7 in op3_action_editor. Sometimes the position may be read as —- in op3_action_editor. This means position of DYNAMIXEL has not been read (or torque is off).
If user turns DYNAMIXEL off, current position cannot be read until turn it back on.
User can turn off the torque of specific DYNAMIXEL. This is very convenient when acquiring position values directly from DYNAMIXEL for a new robot posture instead of calculating those values. To do that, turn off the torque of desired DYNAMIXEL, then make a posture and hold the robot joint by hand until turn the torque back on. The robot will be remaining at current posture and user can read position values of corresponding DYNAMIXEL.
Steps or stages: Each page can store up to 7 steps, from STP0 to STP6. However, some actions may be required more than 7 stages to perform completely. This can be resolved by simply using multiple pages and link them with
Next: Next indicates whether to continue action on a different page. To continue actions, just list the page number where the action is to be continued. Number 0 indicates that action does not continue onto another page (default value). Linking page does not have to have the numerical order.
Play Count: Play Count is the number of times the action of the page is to be played.
Exit: There might be some cases when an action has to be stopped. In these cases, the robot may be in unstable position. Exit is much like “Next”, so “Exit” should be linked to a page where ROBOTIS-OP3 can return to a stable pose. If “Exit” is 0, it means that there is no linked exit page (default value).
Tip: When calling an action requires multiple pages, ROBOTIS strongly suggests user to call the action from the starting page. For example, clap starts at page 7 and ends at page 8. This means you should call page 7 when calling clap. Calling the page 8 may cause unexpected behavior of the robot.
STP7: “STP7” column is the current position of DYNAMIXEL which converted to 4,095 resolution from its original resolution. “—-“ means that torque has been released.
PauseTime: “PauseTime” is the pause duration period for motion playback for step STP[x].
Time(x 8msec) : “Time” is the time period for ROBOTIS-OP3 to complete step STP[x]. Each time unit account for 8ms of time.
It is strongly advised that when user tests user’s own newly-created or edited actions, there should be small incremental changes in position, speed/time, and pause values for the sake of ROBOTIS-OP3’s stability.
The Contents of The Default Action File
The below table shows the contents of the default action file.
| page number | page title | brief description of page | number of pages |
|---|---|---|---|
| 1 | walki_init | initial standing pose | 1 |
| 2 | hello | greeting | 1 |
| 3 | thank_you | Thank you | 1 |
| 4 | yes | yes | 1 |
| 5 | no | no | 1 |
| 6 | fighting | fighting | 1 |
| 7 | clap | clap | 2 |
| 9 | S_H_RE | ready for shaking hands | 1 |
| 10 | S_H | shaking hands | 1 |
| 11 | S_H_END | move to initialpose fram ready pose for shaking hands | 1 |
| 12 | scanning | looking around | 1 |
| 13 | ceremony | ceremony | 1 |
Basic Command of Action Editor
After typing “help”, the commend list will appear as shown below.
exit: exits the program.
re: refreshes the screen.
b: moves to the previous page.
n: moves to the next page.
page [index]: moves to the [index] page. For example typing page 5 outputs data from page 5 on screen.
list: outputs a list of pages.
new: initializes current page by clearing all actuator position data.
copy [index]: copies data from page [index] to current page. For example if you are on page 5 and want to copy page 9 then type copy 9.
set [value]: sets position value on chosen actuator. For example If you want ID19 (head pan) to have a value of 512 then using the keyboard’s directional keys place the cursor on ID19 and type set 512.
save: saves any changes you’ve made. the saved motion file (motion_4096.bin can be found at “op3_action_module/data”)
play: plays motion(s) of current page.
name: changes the name of the current page. You can view the name of the page at the top right portion of the screen. For example, page 2 is titled hello; to change the name type name and press the “ENTER” key. “name:” will appear at the bottom of the screen. Input the desired name for the page, good for instance, and press the “ENTER” key again.
i: inserts data from STP7 to STP0. Moves data from STP[x] to STP[x + 1] if any.
i [index]: inserts data from STP7 to STP[index]. Moves data from STP[index] to STP[index + 1] if any.
m [index] [index2]: moves data from [index2] to [index].
d [index]: deletes data from STP[index]. Moves data from STP[index] to STP[index - 1].
on/off: turns on/off torque from all DYNAMIXEL.
on/off [index1] [index2] [index3] : turns torque on/off from ID[index1] ID[index2] ID[index3]. For example off 20 releases torque from ID20. Notice that STP7 for ID20 will read [—-]. Typing on 20 turns torque from ID20 on again and the screen outputs the current position data of ID20.
Example Action editing with op3_action_editor
- Run the op3_action_editor
-
Find the page where the “walking_init page” is by typing “list”
-
Exit the list and go to any blank page by typing “page [x]”(for example, page 15).
-
And copy the page 1 to page [x].
- Go to “walking_init” pose by typing “play”
-
Turn off the torque of ID 2, 4 and 8 by typing “off 2 4 8”
-
After getting the desired pose turn torque on again by simple typing on. And insert the pose to step 1 by typing “i 1”
-
Edit “Pause Time”, “Time” of STP1 and “Page Step” as shown below.
- Type “play” and check the ROBOTIS-OP3’s action
op3_gui_demo
Overview
op3_gui_demo is a GUI software to control ROBOTIS-OP3.
Within this program, user can perform module settings, walking tuner, head joint control and play actions.
Getting started
Download & Build
Reference : Installing ROBOTIS ROS Package
Run
Execute the launch file.
$ roslaunch op3_gui_demo op3_demo.launch
UI
Usage
Reference : How to execute GUI program
ROS API
Subscribed Topics
/robotis/status(std_msgs/String)
This message describes status of ROBOTIS-OP3.
/robotis/present_joint_ctrl_modules(robotis_controller_msgs/JointCtrlModule)
This message reports which module is currently in use for ROBOTIS-OP3.
/robotis/head_control/present_joint_states(sensor_msgs/JointState)
This message reports present angles for each joint.
Published Topics
/robotis/base/ini_pose(std_msgs/String)
This message will have ROBOTIS-OP3 to take the initial posture.
/robotis/enable_ctrl_module(std_msgs/String)
This message notifies framework to activate a specific module for ROBOTIS-OP3.
/robotis/sync_write_item(std_msgs/String)
This message contains data to be written to ROBOTIS-OP3 with the Sync Write command.
ex) LED control
/robotis/head_control/set_joint_states_offset(sensor_msgs/JointState)
This message controls head joints.
/play_sound_file(std_msgs/String)
This message contains the path of voice files for speaking.
/robotis/walking/command"(std_msgs/String)
This message commands walking module of ROBOTIS-OP3.
/robotis/walking/set_params"(op3_walking_module_msgs/WalkingParam)
This message configures walking parameters of the walking module.
/robotis/action/page_num(std_msgs/Int32)
This message transfers page number to action_module to play actions.
Services
/robotis/get_present_joint_ctrl_modules(robotis_controller_msgs/GetJointModule)
This service acquires which module is currently in use for ROBOTIS-OP3.
/robotis/walking/get_params(op3_walking_module_msgs/GetWalkingParam)
This service acquires walking parameters.
Parameters
/demo_config(string, default : “/op3_gui_demo/config/demo_config.yaml”)
This yaml file saves joint names, available modules, list of module preset button.
op3_tuner_client
Overview
The GUI Node that can adjust offset and gain of ROBOTIS-OP3.
It is used with the op3_manager.
Getting started
Download & Build
Reference : Installing ROBOTIS ROS Package
Run
$ roslaunch op3_tuner_client op3_tuner_client.launch
Usage
Reference : How to use tuner client
ROS API
Published Topics
/robotis/tuning_module/tuning_pose(std_msgs/String)
Message that is used to change the posture for tuning a gain
/robotis/tuning_module/joint_offset_data(op3_tuning_module_msgs/JointOffsetData)
Message used to change the offset
/robotis/tuning_module/joint_gain_data(op3_tuning_module_msgs/JointOffsetData)
Message used to change the gain
/robotis/tuning_module/torque_enable(op3_tuning_module_msgs/JointTorqueOnOffArray)
Message used to en/disable the torque of joints
/robotis/tuning_module/command(std_msgs/String)
Message for command(ex. save gain, save offset)
Services
/robotis/tuning_module/get_present_joint_offset_data(op3_tuning_module_msgs/GetPresentJointOffsetData)
Service used to get the joint states including offset
op3_offset_tuner_server
Overview
ROBOTIS-OP3 Offset Tuner Node
Data related to the Offset can be Tuned, Loaded and Saved.
It is used with the op3_offset_tuner_client.
Getting started
Download & Build
Reference : Installing ROBOTIS ROS Package
Run
Execute the launch file to start offset tuner server.
op3_offset_tuner_server has a direct control over ROBOTIS-OP3, therefore other control programs such as op3_manager, op3_action_editor and op3_walking_tuner should not be running.
Before executing the op3_offset_tuner_server launch file, other programs should be terminated.
$ roslaunch op3_offset_tuner_server op3_offset_tuner_server.launch
Usage
Reference : How to use offset tuner
ROS API
Subscribed Topics
-
/robotis/base/send_tra(std_msgs/String)
The topic informs the start and end of trajectory following. -
/robotis/offset_tuner/joint_offset_data(op3_offset_tuner_msgs/JointOffsetData)
The topic updates joint offset related parameters. -
/robotis/offset_tuner/torque_enable(op3_offset_tuner_msgs/JointTorqueOnOffArray)
The topic transfers Torque enable/disable command for joints. -
/robotis/offset_tuner/command(std_msgs/String)
The topic transfers command to the op3_offset_tuner_client.
- “save” : Saves current offset to yaml
- “ini_pose” : Take the initial posture for offset tuning
Services
robotis/offset_tuner/get_present_joint_offset_data(op3_offset_tuner_msgs/GetPresentJointOffsetData)
The service obtains current offset data from the op3_offset_tuner_client.
Parameters
/offset_path(string, default : “”)
The yaml file path to save offsets.
/robot_file_path(string, default : “”)
This path indicates the location of .robot file that contains robot description data.
/init_file_path(string, default : “”)
This path indicates the location of the file that contains initialization information of each joint.
op3_offset_tuner_client
Overview
The GUI Node that can adjust offset of ROBOTIS-OP3.
It is used with the op3_offset_tuner_server.
Getting started
Download & Build
Reference : Installing ROBOTIS ROS Package
Run
$ rosrun op3_offset_tuner_client op3_offset_tuner_client
Usage
Reference : How to use offset tuner
ROS API
Published Topics
/robotis/offset_tuner/joint_offset_data(op3_offset_tuner_msgs/JointOffsetData)
The topic transfers Joint offset
/robotis/offset_tuner/torque_enable(op3_offset_tuner_msgs/JointTorqueOnOffArray)
The topic executes Torque on/off command
/robotis/offset_tuner/command(std_msgs/String)
The topic transfers other commands(save, initial posture, etc).
Services
/robotis/offset_tuner/get_present_joint_offset_data(op3_offset_tuner_msgs/GetPresentJointOffsetData)
The service obtains saved joint offset
op3_walking_tuner
Overview
This Node tunes walking parameters of ROBOTIS-OP3.
Walking tuner function is included in the op3_gui_demo.
op3_walking_tuner runs on a terminal window while op3_gui_demo creates its own GUI window.
Getting started
Download & Build
Reference : Installing ROBOTIS ROS Package
Reference :
libncurses5-devmust be pre-installed in order to buildop3_walking_tuner.$ sudo apt install libncurses5-dev
Run
Execute the launch file.
op3_walking_tuner has a direct control over ROBOTIS-OP3, therefore other control programs such as op3_manager, op3_action_editor and op3_offset_tuner_server should not be running.
Before executing the op3_walking_tuner launch file, other programs should be terminated.
$ roslaunch op3_walking_tuner op3_walking_tuner.launch
UI
Usage
Please refer to How to use walking tuner.