
References
Setting Video Streaming on ROBOTIS ENGINEER App
-
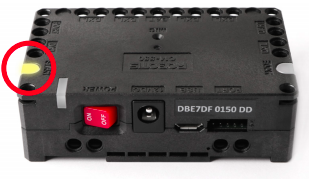
Turn on the controller and wait for the Raspberry Pi to boot up.
NOTE: After about 70 seconds, the User LED will turn yellow with a beep sound.
-
Select Wi-Fi settings on the device where the app is installed..
-
Select Robotis_Rpi_XXXX in the network list.
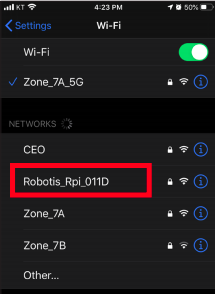
NOTE: XXXX is 4 digit MAC address of your controller.
-
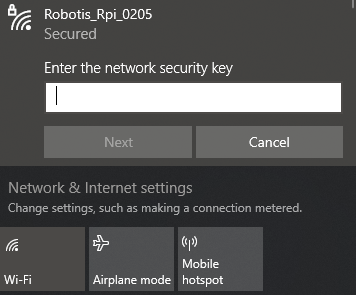
Enter
robotis0to connect, when password input window appears.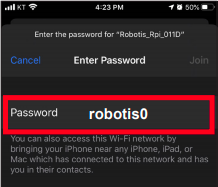
-
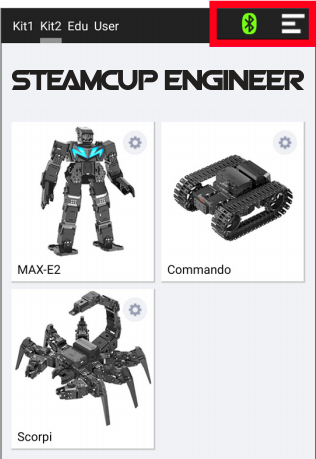
Run the ENGINEER app and tap the Bluetooth icon in the top right corner to connect to the controller. Check if the icon turns green to confirm that Bluetooth is connected.
-
If running the streaming service by selecting MAX-E2 or Commando, witch has the streaming function, one can control the robot by using the streaming function as shown below.

Selecting MAX-E2 or Commando.
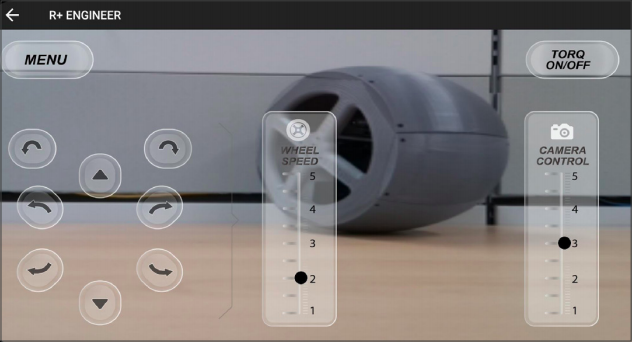
Video Streaming with the app.
Raspberry Pi Update and Recovery
Raspberry Pi Update
Update your Raspberry Pi Zero 2 W to add new features for Engineer Kit2.
WARNING
- If you are using Raspberry Pi Zero W, do not follow Raspberry Pi Update instruction, but follow [Raspberry Pi Recovery] instruction.
-
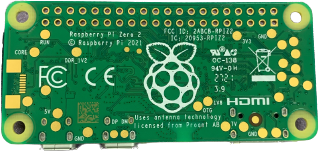
Check the name of board on the back side of your Raspberry Pi Zero board.
- Download
dxl.rtsat your PC.Download: dxl.rts
-
Turn on the controller and wait for the Raspberry Pi Zero 2 W to boot up.
NOTE: After about 70 seconds, the User LED will turn yellow with a beep sound.
-
After bootup, search your WIFI and connect to
Robotis_Rpi_XXXX(XXXX is 4 digit MAC address of your controller) orRobotis_RpiAP.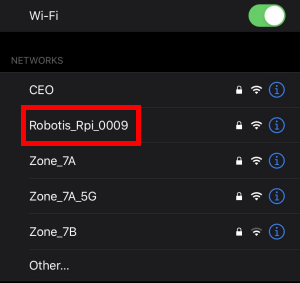
NOTE: If Password is requested, type the followings:
Account: pi
Password: robotis0
-
Open the File Explore (Windows 10 Short Key:
Win+E) from your PC.
-
Type \\raspberrypi.local, and
robotisfolder appears.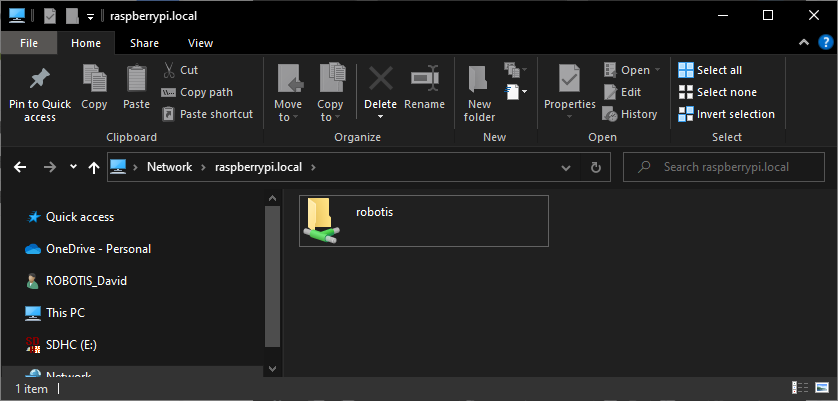
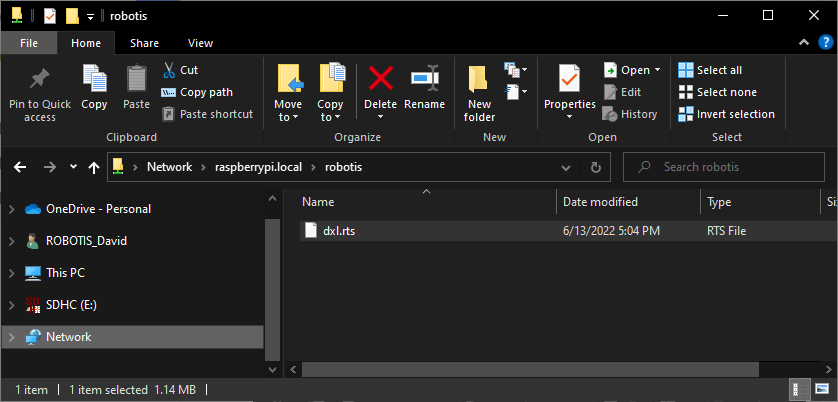
-
Access to the
robotisfolder, and drop the downloadeddxl.rtsfile to the folder.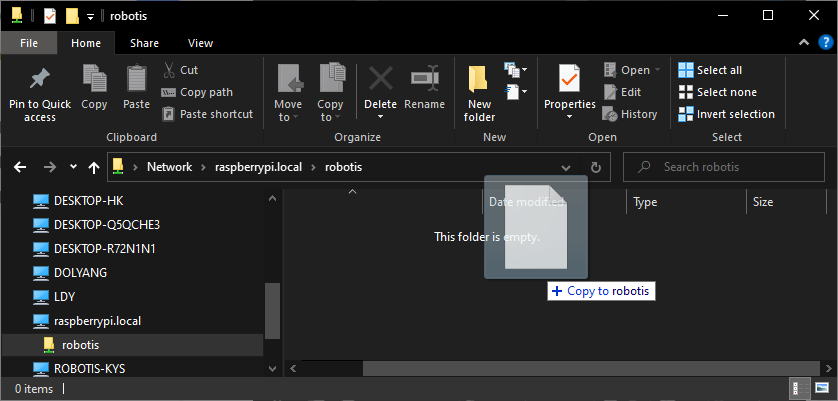
NOTE: If Password is requested, type the followings:
Account: pi
Password: robotis0 -
Update will begin after rebooting the Raspberry Pi Zero 2 W. Reboot can be done by simply turning on and off the board.
NOTE: Once the update is complete, copied
dxl.rtsfile will be automatically deleted.
Raspberry Pi Recovery
If Raspberry Pi won’t boot or isn’t functioning properly, see the following instructions.
- Download Compressed Raspbian Image for ENGINEER Kit2 according to the version of your Raspberry Pi Zero (Either Zero W or Zero 2W)
- Raspberry Pi Zero W: Release.zip
- Raspberry Pi Zero 2W: rpi_zero_w_image_v2_0.zip
NOTE: See the version of Raspberry Pi at the rear of your board.
-
Unpack the downloaded zip file. zipped .img file will be extracted at your current path.
-
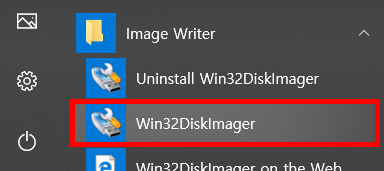
After unpacking the file, you are required to write .img to a SD card that is inserted to the Raspberry Pi using a image writer, such as Win32 Disk Imager.
-
Run the image writer from your PC. (In this instruction, Win32 Disk Imager is used.)
-
Select the file you extracted earlier.
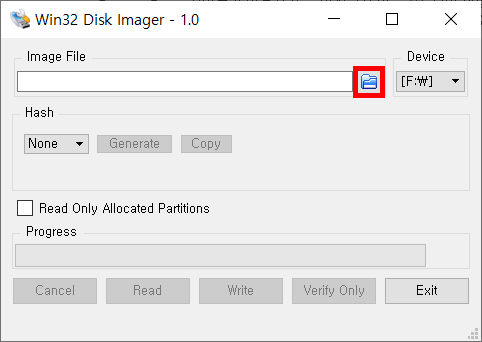
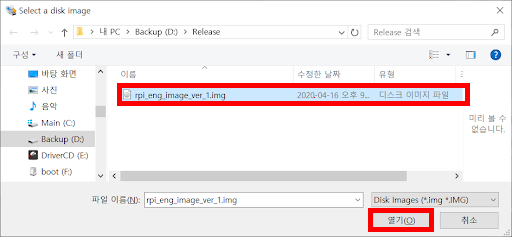
-
Select the device where the SD card is occupied.
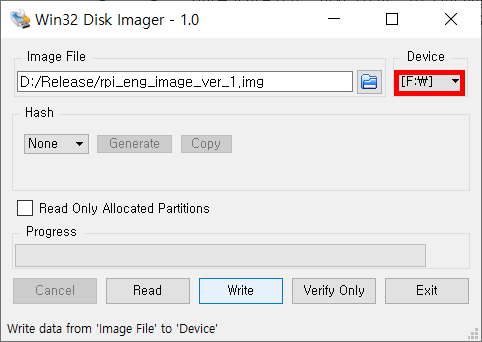
-
Click Write and wait for the write to complete.
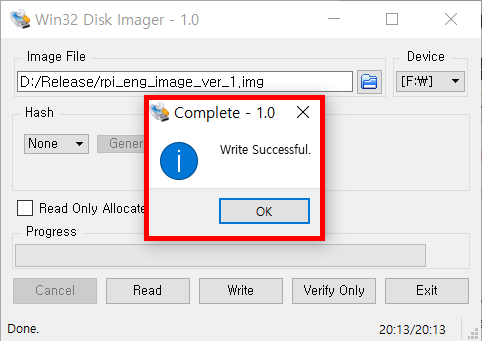
-
Exit the imager and eject the SD card.
-
Insert the SD card to a SD card slot of the Raspberry Pi Zero that on CM-550.
-
Wait for the Raspberry Pi booting up. The booting will proceed around 3 times with a beep sound every booting.
NOTE: The booting takes about 3 minutes.
-
In order to check if the booting is successfully completed, scan the wifi address with your phone. From the network list, you will see the item Robotis_Rpi_xxxx (CM-550’s Mac address).
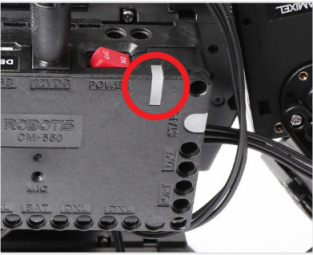
NOTE: Mac address is marked on the CM-550 next to the power button.
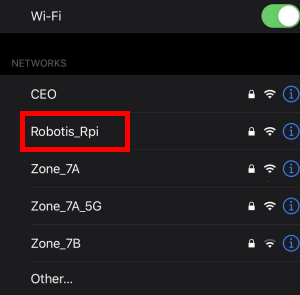
Wifi scan result before the Raspbian complete update.
Wifi scan result after the Raspbian complete update.
-
Enter
robotis0to connect, when password input window appears.
BLE Signal Setting
The Bluetooth communication could be unstable if the signal strength of BLE slave module in the CM-550 is weak or interfered.
The BLE signal strength can be adjusted by R+ Manager 2.0 in this case.
Please refer to the method to adjust CM-550 BLE signal strength for various situations.
| My CM-550 | Other CM-550 | BLE Signal Strength |
|---|---|---|
| Unstable Link | Stable Link | Increase |
| Unstable Link | Unstable Link | Increase |
| Stable Link | Unstable Link | Decrease |
| Stable Link | Stable Link | No Change |
- If communication is unstable when using one CM-550 controller in the room, the signal strength might be weak. Increase the BLE signal strength.
- If communication is unstable when using multiple CM-550 controllers in the room, BLE signals could interrupt each other. Increase the BLE signal strength of the unstable CM-550 or decrease the BLE signal strength of other stable CM-550.
- If all CM-550 in the room are stable, Maintain the BLE signal strength.
NOTE : The BLE signal strength and noise may differ by environment and the number of devices nearby.
-
Turn off the BT-410 master or BT-410 Dongle that is paired to CM-550 BLE.
(BLE signal strength cannot be configured while CM-550 BLE is connected to the paired device) - Connect the USB cable from PC to CM-550 (5V USB will automatically turn on the controller even if the power switch is off).
- Wait until the
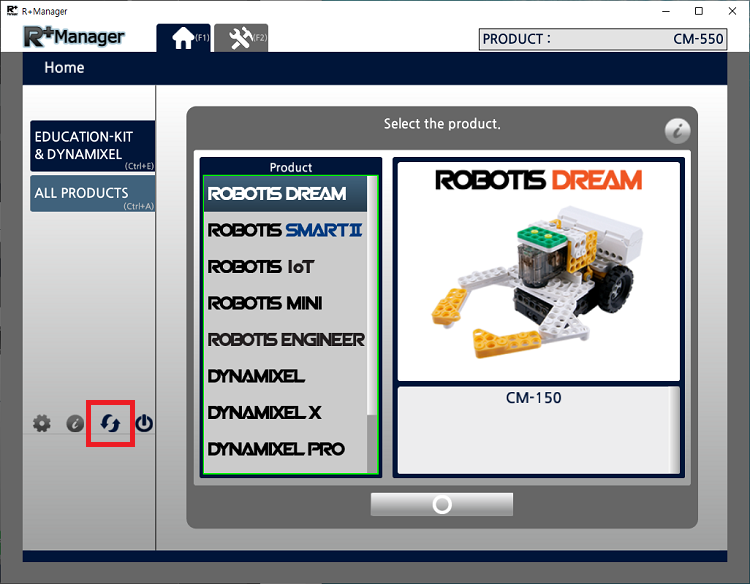
MODEbutton of CM-550 flickers every second. - Run R+ Manager 2.0.
-
Click the
Check for Updatesbutton to install the latest updates.
-
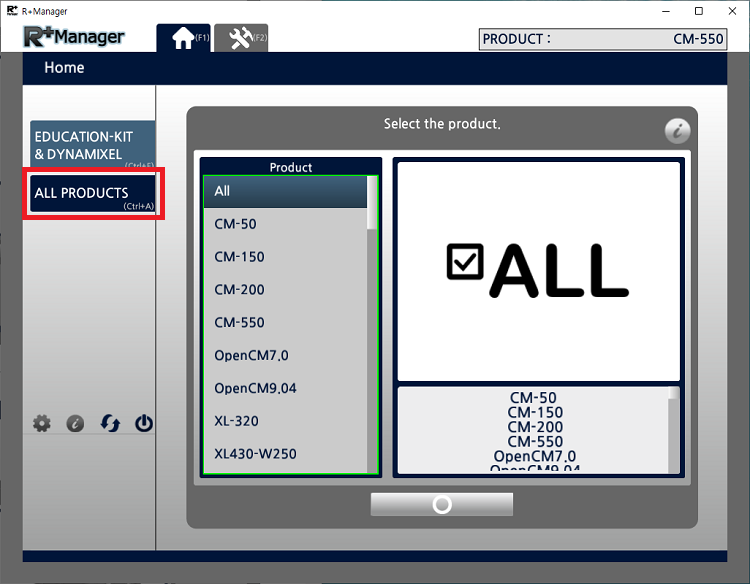
Go to
ALL PRODUCTStab or use shortcut key(Ctrl+A).
-
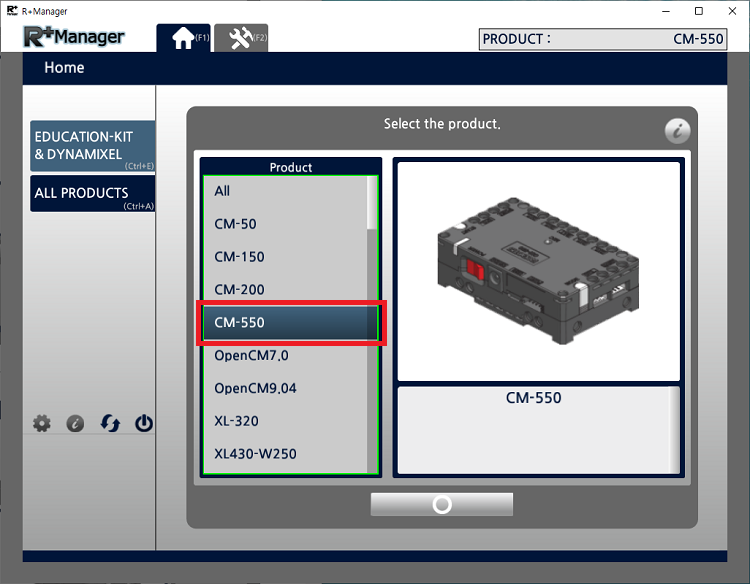
Select
CM-550from the product list.
-
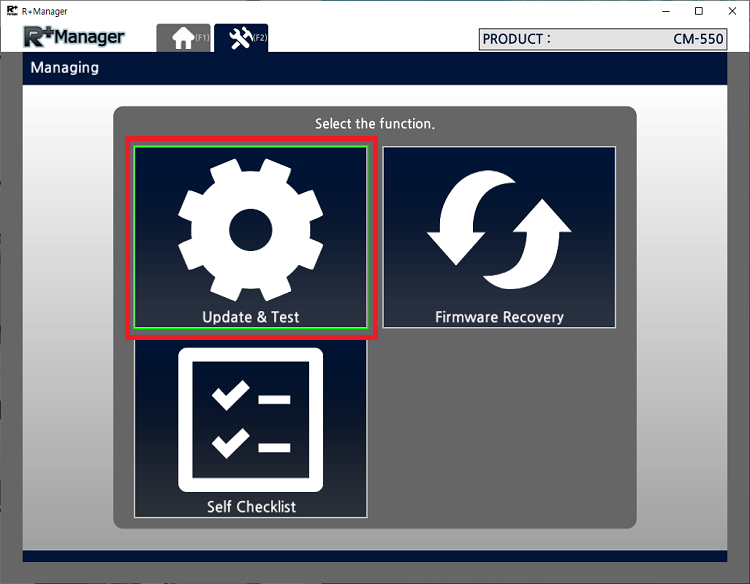
Click
Update & Testbutton.
-
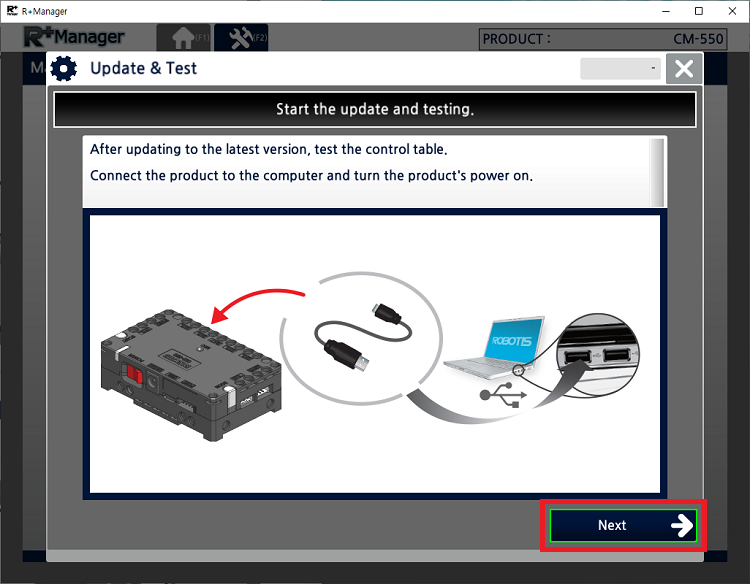
Click
Nextbutton.
-
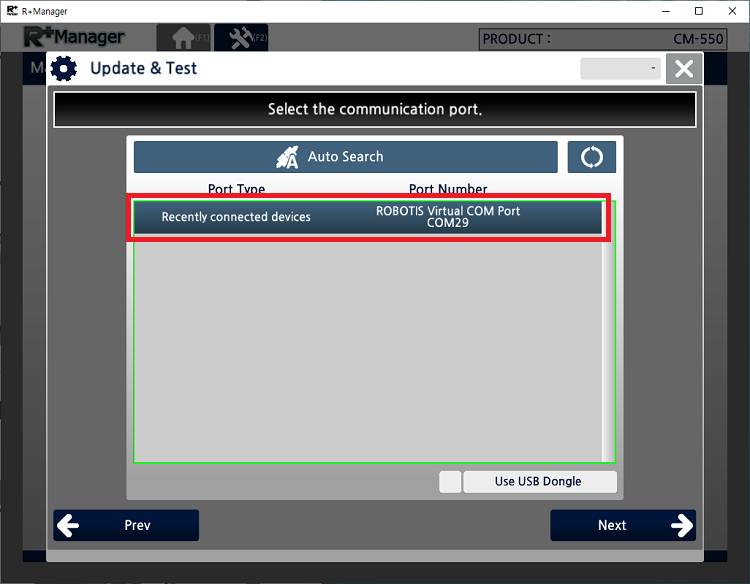
Select the port where the controller is connected to.
-
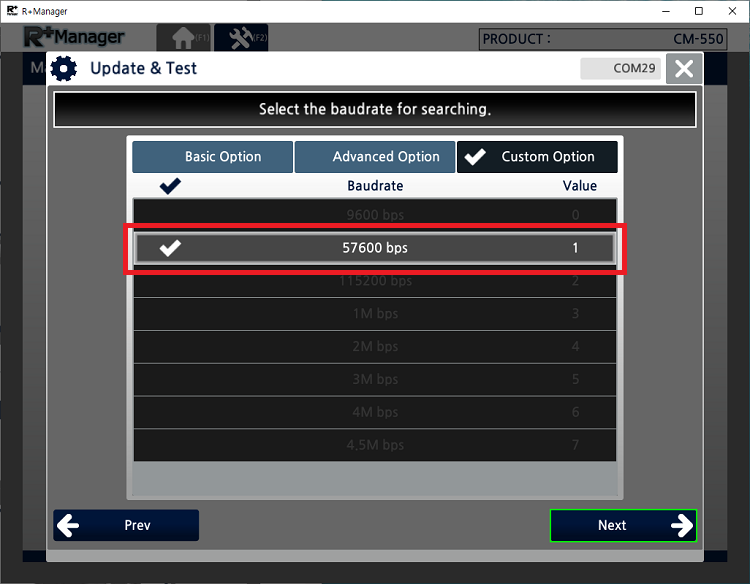
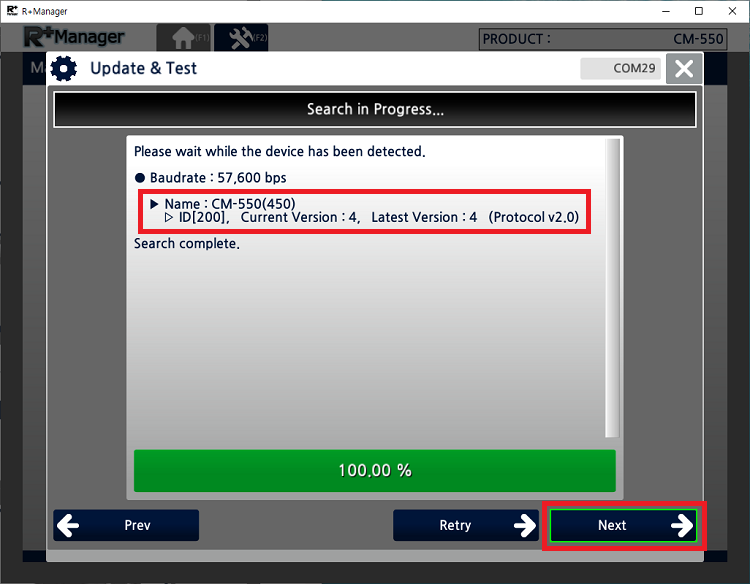
Confirm the Baudrate (The default baudrate is fixed to 57600 bps).
-
Once CM-550 controller is detected, click
Next.
-
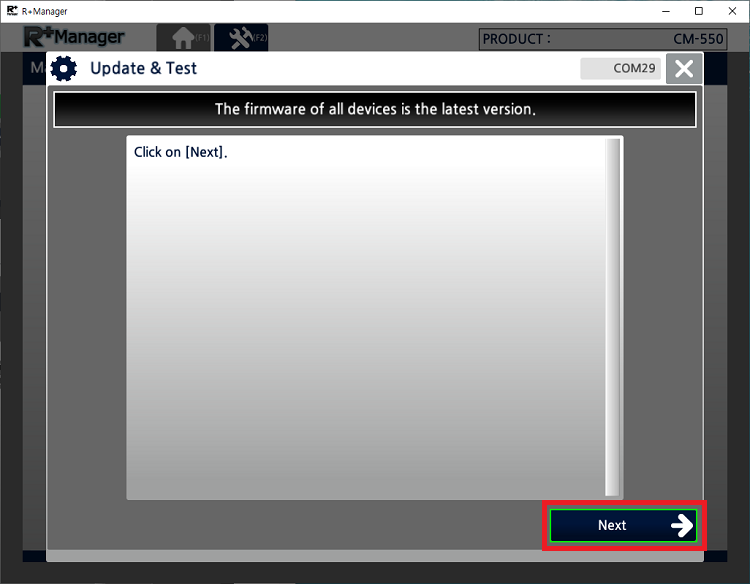
If the controller has the latest firmware, click
Next, or else follow the update instruction on the screen to download the latest firmware.
-
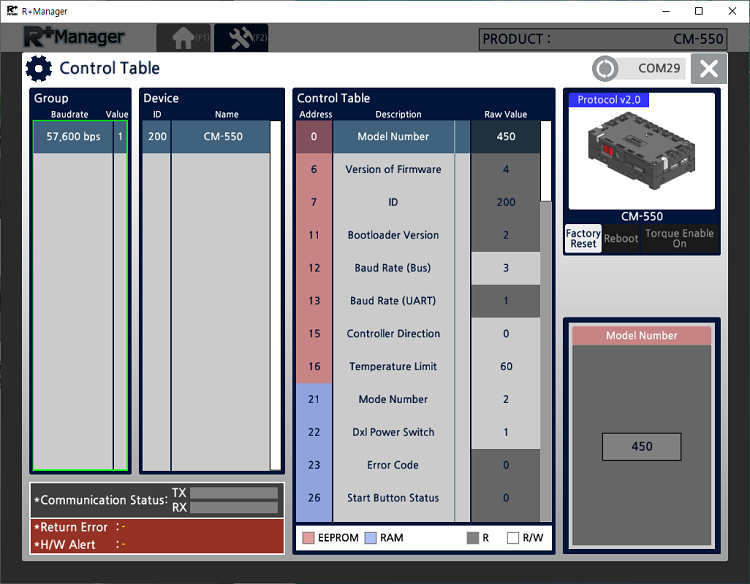
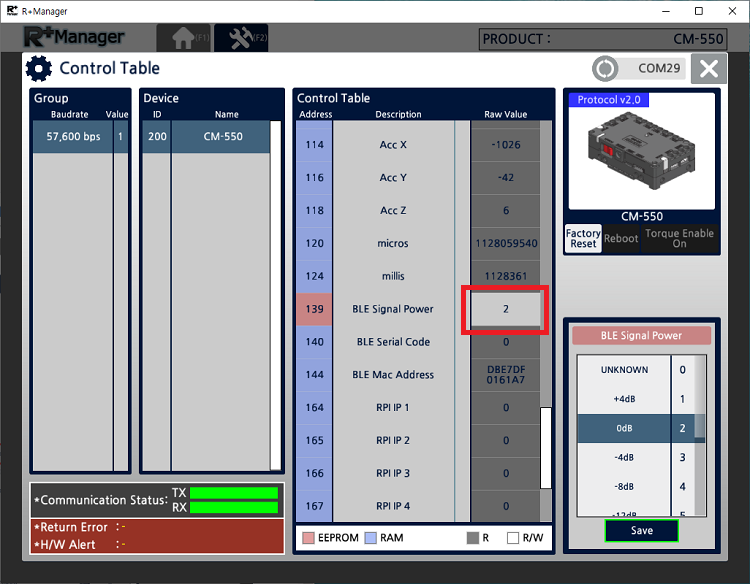
Upon the successful connection, below control table will appear on the screen.
-
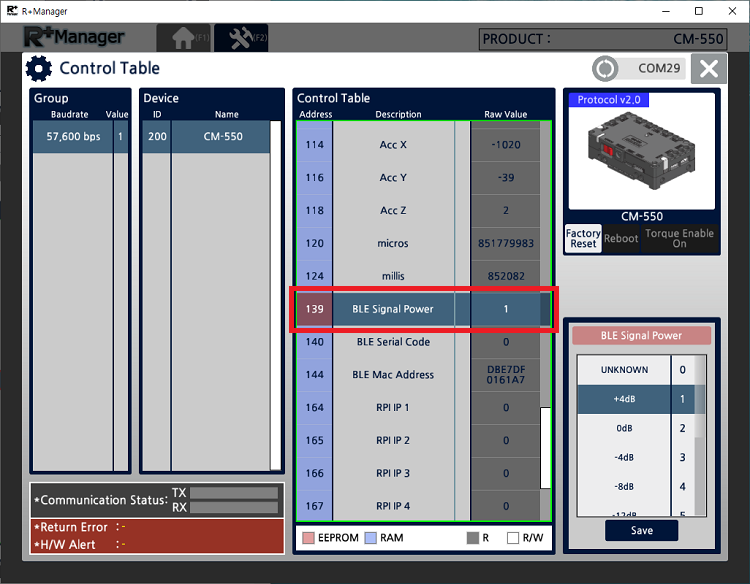
Scroll down until to find
BLE Signal Powerin the address139.
-
Select the
BLE Signal Poweron the right section of the control table and clickSavebutton.
The bigger value will increase the signal strength.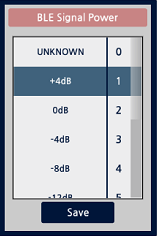
If the value of
BLE Signal Poweris marked onUNKNOWN(0), please go back to step 1 and check if BT-410 Master or BT-410 Dongle module is turned off. - Confirm the changed
BLE Signal Powervalue.
Setting Up the Robot
Check DYNAMIXEL Assembly
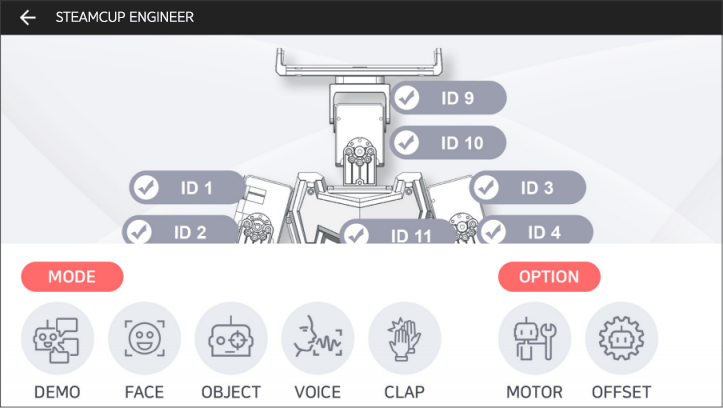
This function checks DYNAMIXEL ID and status of the ROBOTIS ENGINEER Kit.
-
Launch the robot example from the main screen, and select
MOTORfrom the option menu.
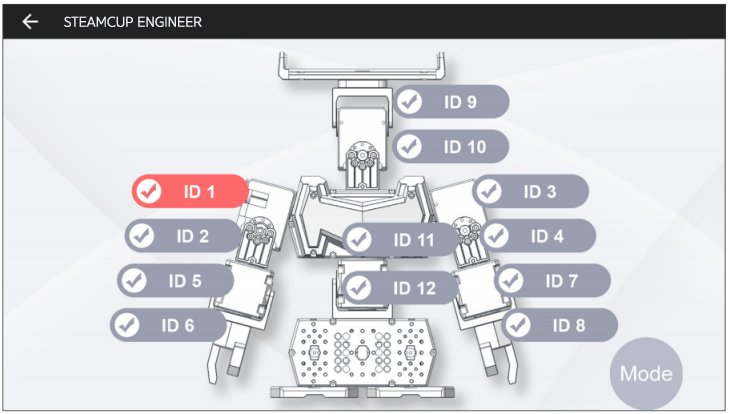
-
Select the joint ID from the screen. Check if the selected joint flinches while LED is turned on.
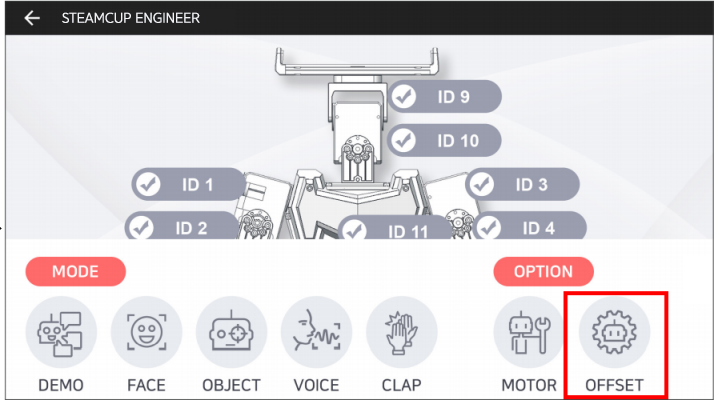
DYNAMIXEL Offset
This function is used to adjust the pose of robot by calibrating offset values of DYNAMIXEL used in the ROBOTIS ENGINEERING KIT. Configured offset value will be saved in each DYNAMIXEL’s.
Please perform offset adjustment with a thorough understanding as it may cause unstable motions or hardware damages when improperly configured.
-
Launch the robot example from the main screen, and select
OFFSETfrom the option menu.
-
Select the joint ID to adjust offset from the screen and adjust menu will appear.
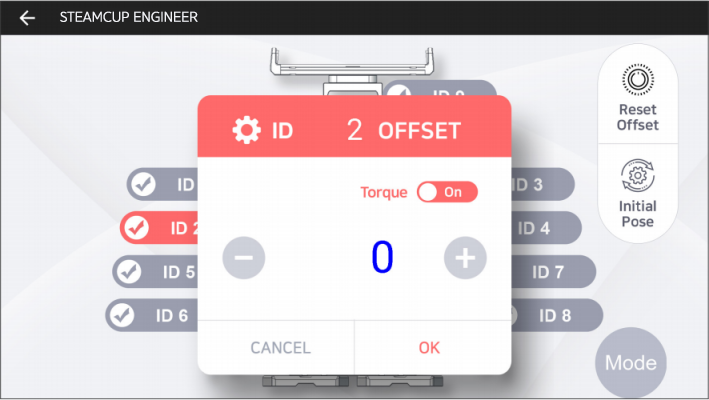
+ / -: Increase / Decrease the offset value.Torque On / Off: Toggle the torque of the selected joint.OK / CANCEL: Save / Cancel the changes in offset value.
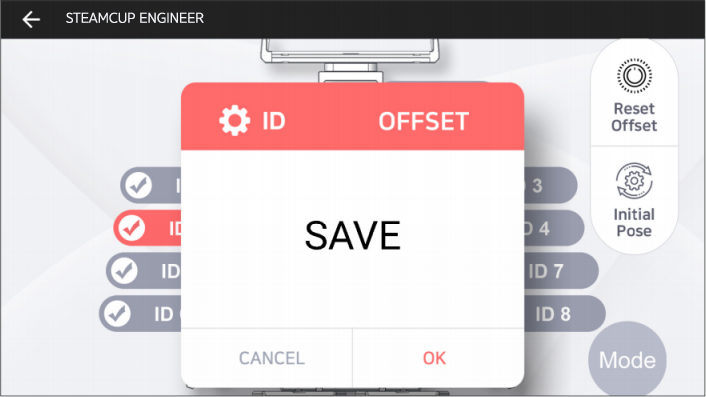
-
Select
OKto save the offset value. The confirmation message will appear.
SelectOKonce again to save the offset value to robot.
-
Below buttons will reset or reload offset values of each joint.
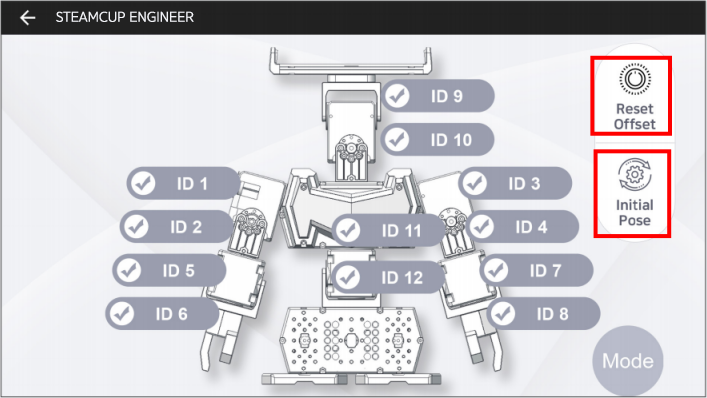
Reset Offset: When selected, the confirmation window will appear. Select [OK] to reset the offset value of all joint.Initial Pose: This button will reload the saved offset value. Incorrectly configured offset may be recovered with this button.
Controller and DYNAMIXEL Reset
To reset, redownload the programming code to the controller, which will set the configuration of the robot to the factory status. Note that, if you make your own custom robot, the set configuration might differ depending on your application.
- To donwload robot examples, see Download Examples and select the preferable option (Download from PC using R+Task 3.0 recommended).
Self Checklist
- Why the robot does not turn on?
Please check the battery level and connection.
- How can I check the battery level?
Please refer to Battery Level Check section.
- I keep hearing the alarm from the robot.
If the battery level is too low, battery warning alarm sounds. Please refer to Charging Battery section.
- The robot motion seems awkward.
The robot may not assembled properly. Please check the robot assembly and Check DYNAMIXEL Assembly section.
- The robot turns on with the adapter, but not with the battery.
Please check the Fuse on the bottom of CM-550 controller. Please refer to Fuse Replacement section.
How to initialize the controller and DYNAMIXEL
Charging Battery
CAUTION
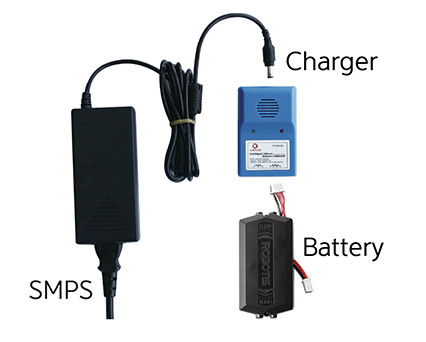
- The provided battery must be charged with the provided charger(LBC-10) in the kit.
- Please power the charger before connecting the battery.
- Please fully charge the battery prior to first use.
-
Get the rechargeable battery in the kit.
-
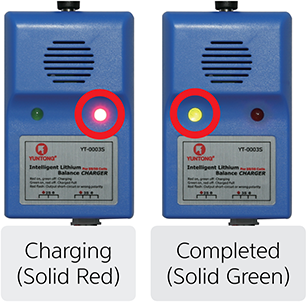
Connect the battery to the charger as shown below.
-
When fully charged, the LED will emit a solid green light.
-
The robot and controller can also be powered by the SMPS without the battery.
-
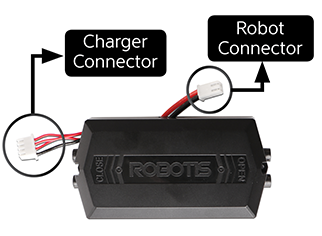
The battery has separate connectors for the charger and the robot. Please disconnect the
Robot Connectorfrom the robot when charging the battery.
Battery Level Check
Current battery life can be verified by the color of the LED located on the CM-550.
- Blue : 70% ~ 100%
- Green : 30% ~ 70%
- Red : Under 30% (Low voltage alarm)
NOTE : The Power LED will blink when Bluetooth connection is disconnected.
CAUTION : Please disconnect the battery from the charger when charging is completed. Please do not charge the battery while operating the robot.
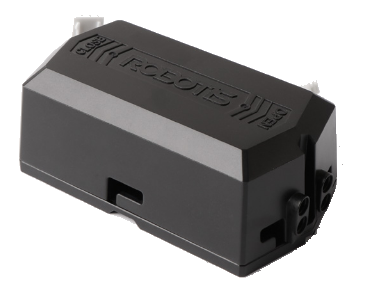
Fuse Replacement
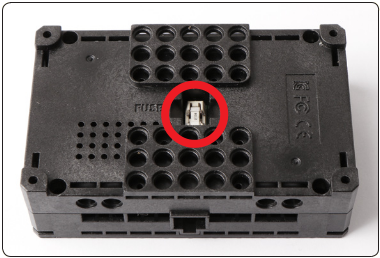
The fuse in CM-550 protects hardware from unexpected excessive current.
If CM-550 can be turned on with the SMPS, but not with the battery, please check the fuse and replace it if necessary.
DANGER : Disconnect any power sources(SMPS, battery, USB) from CM-550 before replacing the fuse.
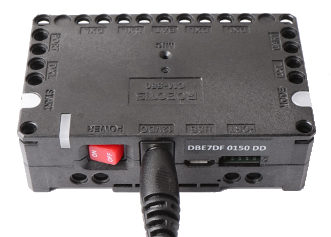
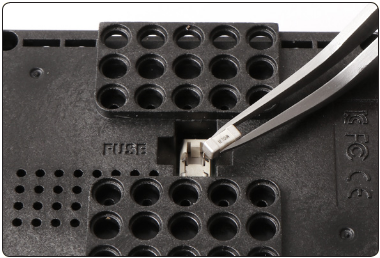
Disconnect power source from CM-550 and replace the fuse on the bottom of CM-550.
Drawings
Download 3D printing files (STL) from the following table.
NOTE: When printing out 3D model files, it is recommended to use under 10 % infill density, in order to decrease the weight of the robot.
| Model | Download |
|---|---|
| Parts List | ENG2_3D_Printing_Parts_List |
| MAX-E2 | 1. MAX-E2_STL.zip |
| Commando | 2. COMMANDO_STL.zip |
| Scorpi | 3. SCORPI_STL.zip |
| AutoBot (Additional Eaxmples) | 4. AUTOBOT_STL.zip |
| Strider (Additional Eaxmples) | 5. STRIDER_STL.zip |
Please also checkout ROBOTIS Download Center for software applications, 3D/2D CAD, and other useful resources!