
Examples
ArmMonitor
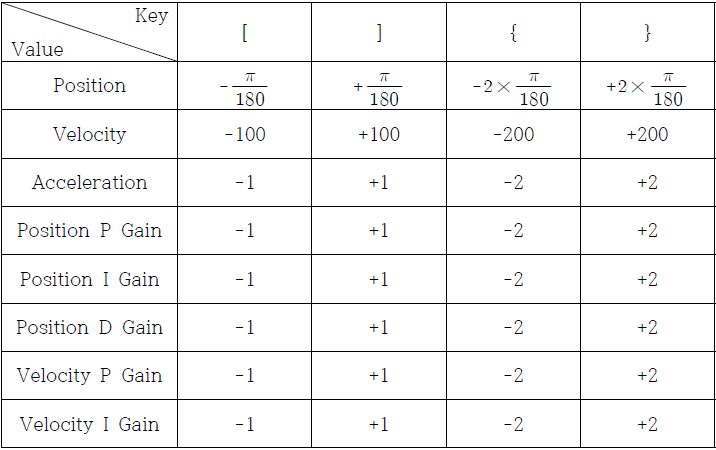
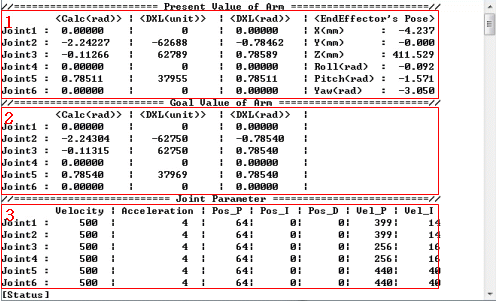
ArmMonitor allows viewing of a joint current position, target position, end effector’s pose, and joint parameters (Velocity, Acceleration, Position P, I, D Gain, Velocity P, I Gain). Change the values from the table below to see changes.
- Joint’s values table
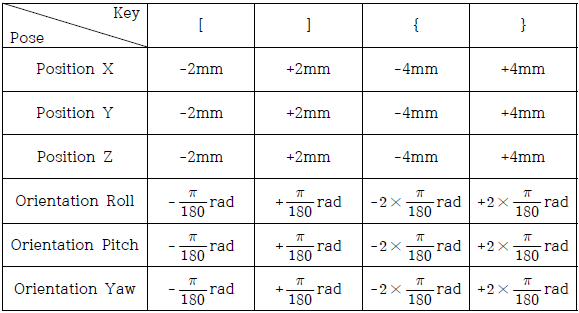
Note that a press of [, { key denote decrease by shown units and }, ] denote increase by shown units.
How to Use ArmMonitor
ArmMonitor01
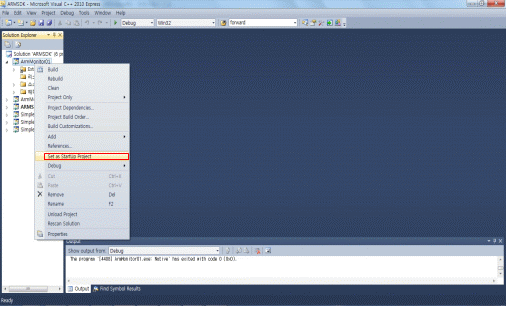
- To start ArmMonitor01, create a new project; once created press the Ctrl + F5 keys to run.
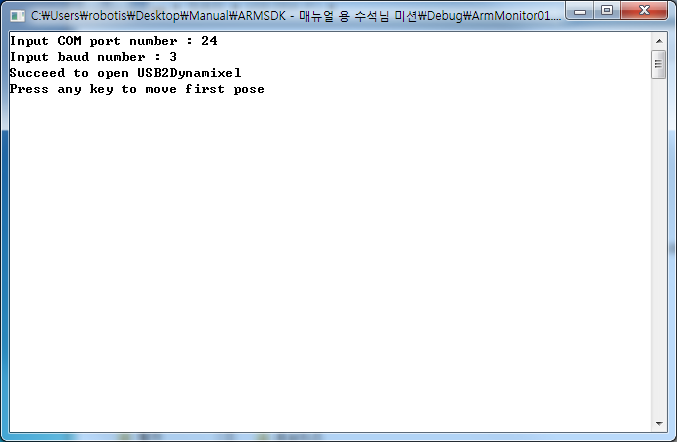
You will need to enter the COM port number and baud rate. Simply enter the values and “Succeed to open USB2DYNAMIXEL” should appear onscreen followed by “Press any key to move first pose.” Use the keyboard to move the arm.
The following table is a list of baud rate values and its corresponding speed; Robotis Manipulator default value is 3 (1Mbps).
The following table is a list of baud rate values and its corresponding speed; Robotis Manipulator default value is 3 (1Mbps).
| Baudrate Number | baudrate |
|---|---|
| 0 | 2,400 bps |
| 1 | 57,600 bps |
| 2 | 115,200 bps |
| 3 | 1,000,000 bps |
| 4 | 2,000,000 bps |
| 5 | 3,000,000 bps |
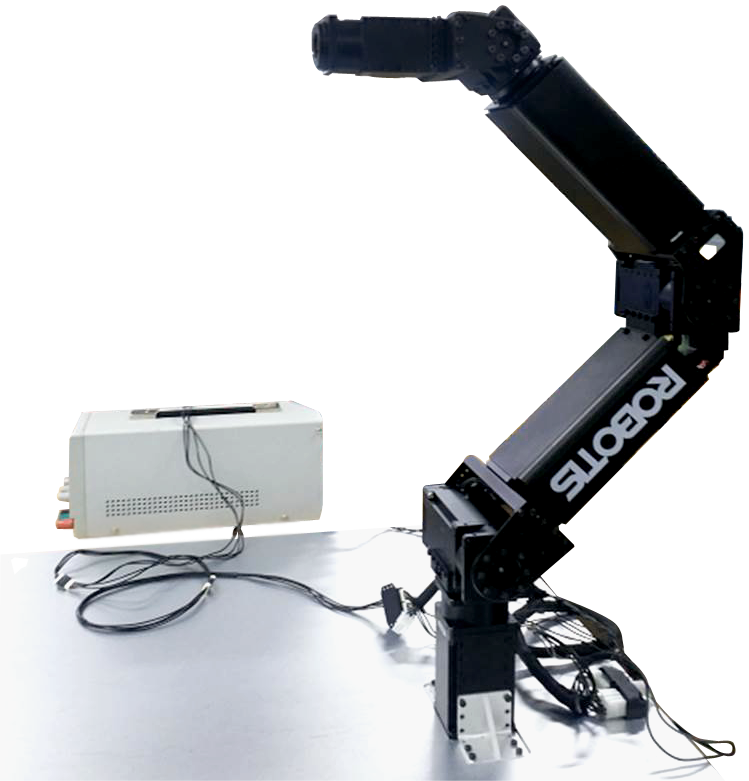
The photo below is the arm in its “arrival” pose.
- Press the Ctrl + F5 keys simultaneously and the screen should appears like the picture above
- From ArmMonitor01 change the joint’s target position and joint parameter to move the arm.
- Use the directional keys to move cursor. Use the ‘[’ ‘{’ keys to lower values and ‘]’ ‘}’ to increase.
- From the picture (from the screen output) with the red area with “1” it shows the joints current pose (Present Value) and end effector’s pose.
- The red area with “2” shows the target pose (Goal Value) for all joints.
- The red area with “3” shows the parameters of all joints (Velocity, Acceleration, Position P Gain, I Gain, D Gain, Velocity P Gain, I Gain).
- Values from joints 2 and 3, Calc<rad> and DYNAMIXEL<rad>, show on the red ares with “1” and “2” due to difference between point of origin and DH Configuration.
- Calc<rad> is the calculated angle from DH and DYNAMIXEL<rad> from the servo’s. The cursor and only control Goal Value Joint Parameter.
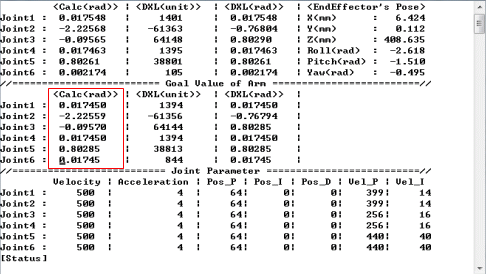
The Goal Value of Arm의 Calc<rad> value (enclosed by the red frame) can be increased with the‘]’ key. The unit is (π/180)rad.
After adjusting the joint, check if the Manipulator follows.
ArmMonitor02
ArmMonitor02 allows direct control of the end effector. Control the end effector is done by ComputeIK function where it moves each joint to its solution position (rad).
- EndEffector pose table
To setup and run ArmMonitor02 follow the same procedure as in ArmMonitor01.
As in ArmMonitor01 you will be asked to enter COM port number and baud rate. You should also see “Succeed to open USB2DYNAMIXEL” followed by “Press any key to move first pose.” The arm moves to its initial pose.

The photo below is the arm in its “arrival” pose.

The different values of the end effector depicted from the red areas with “1” and “2” (from the screen output image above) is due to the difference of DYNAMIXEL Pro’s Goal Position and Present Position values (gear backlash) and DH with the point of origin. ”1” shows the end effector’s pose via calculations from kinematics and “2” the actual pose.
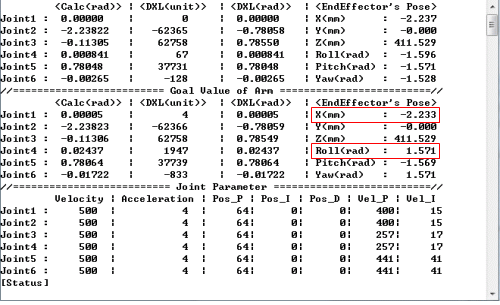
Press the ] key to increase the end effector’s pose value by (π/180)rad ; X increases by 2mm. Visually verify arm movement every time when changing position.
Arm Monitor Source Description
cmd_process.cpp
-
void DrawPage(void)
printf("//======================== Present Value of Arm =======================//\n");
printf(" <Calc(rad)> | <DXL(unit)> | <DXL(rad)> | <EndEffector's Pose> \n");
printf("Joint1 : | | | X(mm) : \n");
printf("Joint2 : | | | Y(mm) : \n");
printf("Joint3 : | | | Z(mm) : \n");
printf("Joint4 : | | | Roll(rad) : \n");
printf("Joint5 : | | | Pitch(rad) : \n");
printf("Joint6 : | | | Yaw(rad) : \n");
printf("//========================= Goal Value of Arm =========================//\n");
printf(" <Calc(rad)> | <DXL(unit)> | <DXL(rad)> | \n");
printf("Joint1 : | | | \n");
printf("Joint2 : | | | \n");
printf("Joint3 : | | | \n");
printf("Joint4 : | | | \n");
printf("Joint5 : | | | \n");
printf("Joint6 : | | | \n");
printf("//========================== Joint Parameter ==========================//\n");
printf(" Velocity | Acceleration | Pos_P | Pos_I | Pos_D | Vel_P | Vel_I \n");
printf("Joint1 : | | | | | | \n");
printf("Joint2 : | | | | | | \n");
printf("Joint3 : | | | | | | \n");
printf("Joint4 : | | | | | | \n");
printf("Joint5 : | | | | | | \n");
printf("Joint6 : | | | | | | \n");
printf("[Status] \n");
GotoCursur(GOAL_JOINT1_ROW, CALC_ANGLE_RAD_COL);
the above is DrawPage code for ArmMonitor.
-
voidGotoCursur(int row, int col)
COORD pos={col, row};
SetConsoleCursorPosition(GetStdHandle(STD_OUTPUT_HANDLE), pos);
This allows the cursor to jump between rows and columns.
These 4 functions allows the directional keys to control cursor location.
- void MoveUpCursor()
- void MoveDownCursor()
- void MoveLeftCursor()
-
void MoveRightCursor()
-
void UpDownValue(int dir)
giOldRow = giRow;
giOldCol = giCol;
GotoCursur(STATUS_ROW, STATUS_COL);
printf(" ");
if(giRow <= GOAL_JOINT6_ROW)
UpDownGoalValue(dir);
else if((giRow > GOAL_JOINT6_ROW) && (giRow <= PARAMETER_JOINT6_ROW))
UpDownJointParameter(dir);
WriteValue();
GotoCursur(giOldRow, giOldCol);
giRow = giOldRow;
giCol = giOldCol;
UpDownValue allows cursor to increase/decrease values.
-
void initialize(void)
initialize() function described below.gpArmComm = new Pro_Arm_Comm_Win()gpArmComm is a class of Pro_Arm_Comm_Win. Pro_Arm_Comm_Win includes ID and baud num-related aspects.
gpArmComm->DXL_Set_Init_Param(Port, Baud)Sets Port Number Baudrate from pointer
- gpRobotisArm->AddJoint
- double LinkLength
- double LinkTwist
- double JointOffset
- double JointAngle
- double MaxAngleInRad
- double MinAngleInRad
- int MaxAngleValue
- int MinAngleValue
- double MaxAngleLimitInRad
- double MinAngleLimitInRad
- unsigned int Dynamixel_ID
Input each joint’s DH joint parameters.
gpArmComm->Arm_ID_Setup(gpRobotisArm->GetArmIDList())From AddJoint rearrange ID List.
gpArmKinematics = new Kinematics(gpRobotisArm)gpRobotisArm->AddJoint (RobotInfo Class) generates Kinematics Class.
gpArmKinematics->SetMaximumNumberOfIterationsForIK(60)This function calculates the IK’s max number of iterations. In this case 60.
gpArmKinematics->SetConvergenceCondition(0.001, 5.0)Sets convergence for IK. 1st value to determine solution; second value maximum allowed.
gvdGoalCalculationAngleRad.resize(gpRobotisArm->GetRobotInfo()->size())Setup target pose value (rad).
gvdRealCalculationAngleRad.resize(gpRobotisArm->GetRobotInfo()->size())Current pose value (rad).
gvdGoalDynamixelAngleRad.resize(gpRobotisArm->GetRobotInfo()->size())Target joint’s position value (rad)
gvdRealDynamixelAngleRad.resize(gpRobotisArm->GetRobotInfo()->size())Actual joint’s position value (rad).
gviGoalDynamixelAngleUnit.resize(gpRobotisArm->GetRobotInfo()->size())Actual joint’s target position value (value).
gviRealDynamixelAngleUnit.resize(gpRobotisArm->GetRobotInfo()->size())Actual joint’s position value.(value).
gviPositionPGain.resize(gpRobotisArm->GetRobotInfo()->size())Position P Gain value.
gviPositionIGain.resize(gpRobotisArm->GetRobotInfo()->size())Position I Gain value.
gviPositionDGain.resize(gpRobotisArm->GetRobotInfo()->size())Position D Gain value.
gviVelocityPGain.resize(gpRobotisArm->GetRobotInfo()->size())Velocity P Gain value.
gviVelocityIGain.resize(gpRobotisArm->GetRobotInfo()->size())Velocity I Gain value.
gviDynamixelVelocity.resize(gpRobotisArm->GetRobotInfo()->size())Velocity value.
gviDynamixelAcceleration.resize(gpRobotisArm->GetRobotInfo()->size())Acceleration value
gvdGoalCalculationAngleRad = gpArmKinematics->GetCurrentAngle();
gvdRealCalculationAngleRad = gpArmKinematics->GetCurrentAngle();
From gpArmKinematics (mCurrentAngle) current pose value initialize gvdGoal CalculationAngleInRad and gvdRealCalculationAngleInRad.
gvdAngleGapCalcandDynamixelRad.resize(gpRobotisArm->GetRobotInfo()->size());
gvdAngleGapCalcandDynamixelRad<< 0.0, ML_PI_2 - 6.4831 * ML_PI/ 180.0, ML_PI_4 + 6.4831 * ML_PI/ 180.0, 0.0, 0.0, 0.0;
This function has been introduced due to the differences between point of origin and actual joints’ point of origin from the DH Configuration. Once the size of angle adjustment has been assigned per joint enter the difference between point of origin and the joint actual point of origin.
gvdGoalDynamixelAngleRad<<0.0, ML_PI/4.0, -ML_PI/4.0, 0.0, -ML_PI/4.0,0.0;GoalDynamixelAngleRad is the initial pose default values.
gviPositionPGain.fill(DEFAULT_POSITION_P_GAIN);
gviPositionIGain.fill(DEFAULT_POSITION_I_GAIN);
gviPositionDGain.fill(DEFAULT_POSITION_D_GAIN);
Position P, I, D Gain functions. Default P gain value is 64; I and D Gain are 0. The .fill contains every joint’s PID values individually.
gpArmComm->Arm_Torque_On();This function gets initialized before moving the arm to its initial pose.
gpArmComm->Arm_Set_Position_PID_Gain(DEFAULT_POSITION_P_GAIN,DEFAULT_POSITION_I_GAIN,DEFAULT_POSITION_D_GAIN);Sets the manipulator joints’ PID gain values..
gpArmTrajectory = new TrajectoryGenerator(gpArmKinematics)
gpArmTrajectory->Set_P2P(gvdRealDynamixelAngleRad-gvdAngleGapCalcandDynamixelRad,gvdGoalDynamixelAngleRad-gvdAngleGapCalcandDynamixelRad,5.0, 1.0);
The generated Kinematics, StartPose, EndPose, TotalTime, AccelTime get inputted into the trajectory. Trajectory is generated via P2P. The StartPose is the current pose and EndPose is ArmMonitor’s initial pose. TotalTime is 5.0sec where AccelTime is 1.0sec. For more information on trajectory generation, please go to 4.2 How to Program and 6.3 MotionEngine’s Trajectory Generator.
gpMotionPlayer = new MotionPlay(gpArmKinematics, gpArmTrajectory);MotionPlay’s CurrentTime, ElapsedTime get initialized and setp up MotionProfile. These are required variables for kinematics and trajectory’s motion.
gpMotionPlayer->Set_Time_Period(5);Motion’s time period in 5msec.
_tempMotionTimer.Start();
gvdGoalCalculationAngleRad = gpMotionPlayer->NextStep(&ErrorStatus);
gvdGoalDynamixelAngleRad = gvdGoalCalculationAngleRad + gvdAngleGapCalcandDynamixelRad;
gviGoalDynamixelAngleUnit = gpRobotisArm->Rad2Value(gvdGoalDynamixelAngleRad);
CommResult = gpArmComm->Arm_Set_JointPosition(gviGoalDynamixelAngleUnit);
gvdGoalCalculationAngleRad = gpMotionPlayer->NextStep(&ErrorStatus);
gvdGoalDynamixelAngleRad = gvdGoalCalculationAngleRad + gvdAngleGapCalcandDynamixelRad;
_tempMotionTimer.Stop();
_tempMotionTimer.Wait(Period ㅡ _tempMotionTimer.GetElapsedTime());
The functions above have set motion time periods where functions are performed via while loop during their duration.
First, the set Control Time Period gets matched._tempMotionTimer.Start(); ... ... _tempMotionTimer.Stop(); _tempMotionTimer.Wait(Period ㅡ _tempMotionTimer.GetElapsedTime());Measure elapsed start and stop time then subtract its difference with elapsed calculated time in set Control Time Period(5msec in this case).
The target pose from the current step obtained from the algorithm below.gvdGoalCalculationAngleRad = gpMotionPlayer->NextStep(&ErrorStatus); gvdGoalDynamixelAngleRad = gvdGoalCalculationAngleRad + gvdAngleGapCalcandDynamixelRad; gviGoalDynamixelAngleUnit = gpRobotisArm->Rad2Value(gvdGoalDynamixelAngleRad); CommResult = gpArmComm->Arm_Set_JointPosition(gviGoalDynamixelAngleUnit); gvdGoalCalculationAngleRad = gpMotionPlayer->NextStep(&ErrorStatus); gvdGoalDynamixelAngleRad = gvdGoalCalculationAngleRad + gvdAngleGapCalcandDynamixelRad;First, NextStep gets the current step’s target angles, which are from the D-H Configuration. However, the actual DYNAMIXEL PRO start point and the D-H Configuration’s differ.
This difference is taken into account and each joint Goal Position Value is set again with Rad2Value, the resulting Arm_Set_JointPosition moves the manipulator.
If successful, the manipulator’s communications Arm_Set_JointPosition returns a value of 1.gvdRealDynamixelAngleRad = gpRobotisArm->Value2Rad(gviRealDynamixelAngleUnit); gvdRealCalculationAngleRad = gvdRealDynamixelAngleRad - gvdAngleGapCalcandDynamixelRad;After motion is complete it print’s the joint’s actual pose(rad) and calculated pose(rad).
gpArmKinematics->Forward(gvdRealCalculationAngleRad, &gRealPose);
gpArmKinematics->Forward(gvdGoalCalculationAngleRad, &gGoalPose);
Factor’s current angle and goal angle to Forward Kinematics. The end effectot’s actual and goal pose (gRealPose, gGoalPose) can be assigned.
gpArmComm->Arm_Set_JointAcceleration(DEFAULT_JOINT_ACCELERATION);
gviDynamixelAcceleration.fill(DEFAULT_JOINT_ACCELERATION);
Sets every joint’s acceleration value individually. DEFAULT_JOINT_ACCELERATION has 4 values
gpArmComm->Arm_Set_JointVelocity(DEFAULT_JOINT_VELOCITY);
gviDynamixelVelocity.fill(DEFAULT_JOINT_VELOCITY);
Sets every joint’s velocity value individually. DEFAULT_JOINT_VELOCITY 9000 values.
void UpDownGoalValue(int dir);
void UpDownJointParameter(int dir);
void UpDownValue(int dir);
UpdownGoalValue allows change in goal pose, UpDownJointParameter allows changes to joint’s parameters (Velocity, Acceleration, Position P, I, D Gain, Velocity P, I Gain). UpDownValue combines both functions.
Simple P to P
WARNING : Product may move fast with this example. When testing this example keep a safe distance while able to cut power off in case of undesired operation.
Simple P to P is the end effector’s move point (from P1 to P2).
How to Use Simple P to P
To start Simple P to P follow the same procedure for ArmMonitor. Then press the Ctrl + F5 keys to run.
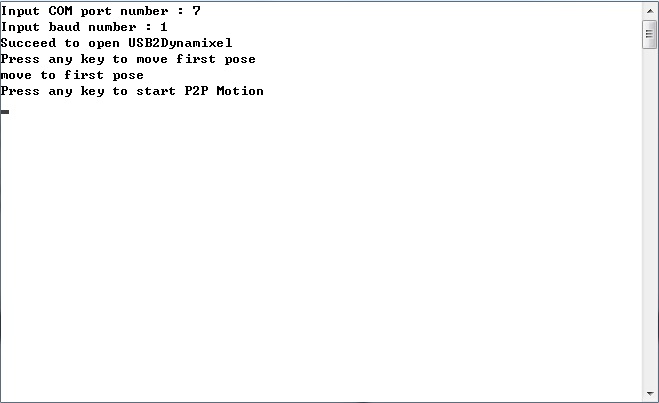
You will be asked for COM port number and baud rate.
If succeeded then you will see a ‘Succeed to open USB2DYNAMIXEL’ followed by ‘Press any key to move first pose.’ Press a key to move the arm to its initial pose.
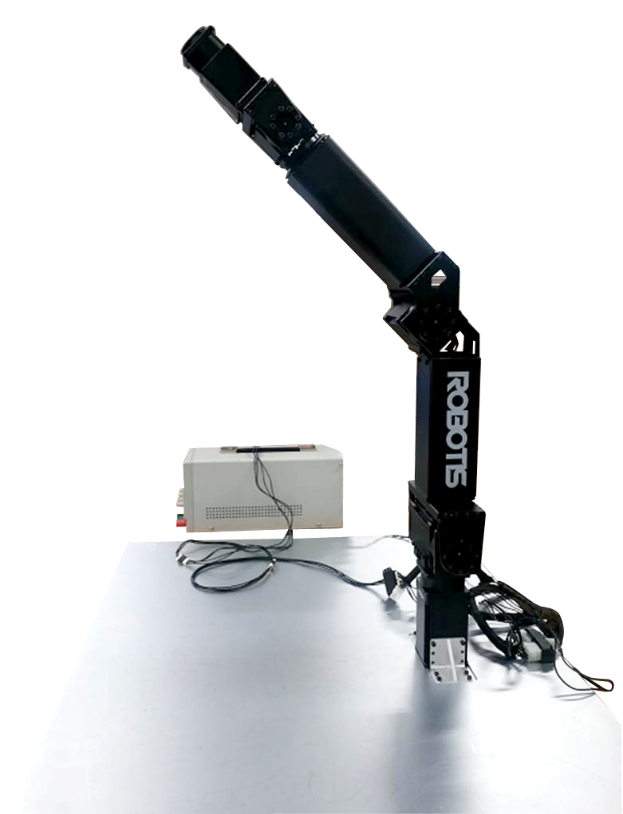
Then press a key to begin P2P Motion. The photo below is the arm in its initial pose.
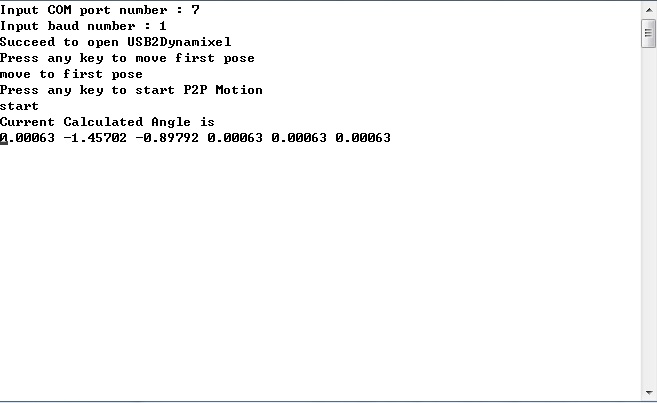
Simple P to P displays the joints’ pose(rad). In Simple P to P prssing the ‘p’ or ‘P’ will cause motion to pause. Press the ESC key to end.
Simple P to P Source Description
vecd P1, P2;
P1.resize(RobotisArm.GetRobotInfo()->size());
P2.resize(RobotisArm.GetRobotInfo()->size());
P1, P2 sets every joint’s position.
P1.fill(0.0);
P1 -= gvdAngleGapCalcandDynamixelRad;
P2.fill(0.5);
P2 -= gvdAngleGapCalcandDynamixelRad;
P1.fill, P2.fill input every joint’s position(rad) individually. Differences between DH Configuration’s point of origin and actual point of origin are taken into consideration so P1 and P2 are to be adjusted accordingly.
ArmComm.Arm_Set_Position_PID_Gain(64, 0, 0);
Joint’s Position P, I, and D gain values.respectively.
ArmComm.Arm_Set_JointVelocity(0);
Joint’s velocity value .0 denotes max velocity.
ArmComm.Arm_Set_JointAcceleration(0);
Joint’s acceleration value .0 denotes max velocity.
ArmTrajectory.ClearMF();
MotionProfile clears the set space..
ArmTrajectory.Set_P2P(P1, P2, 10.0, 0.5);
Sets P1, P2(Start, EndPose). In this case P1 is 0.0 rad and P2 is 0.5 rad. Trajectory is from P1 to P2
ArmTrajectory.Set_P2P(P2, P1, 10.0, 0.5);
Sets P1, P2(Start, EndPose). In this case P1 is 0.0 rad and P2 is 0.5 rad. Trajectory is from P2 to P1
MotionPlayer.All_Info_Reload();
MotionProfile calls Info(Robot, Kinematics, Trajectory).
MoionPlayer.Initialize();
MotionProfile, Step, are initialized.
MotionPlayer.Set_Time_Period(DEFAULT_Ctrl_TIME_PERIOD);
Sets time period. For value lesser than 0 then a default value (=8) gets inputted.
Simple IK
WARNING : Use of this example may pose safety risks. When testing the example keep a safe distance while able to cut power off in case of undesired operation.
-
Allows operation of end effector’s pose via position(X, Y, Z) and orientation(Roll, Pitch, Yaw). The keys for Simple IK are q, w, e, r, t, y and a, s ,d ,f, g, h.
-
EndEffector Pose table
| Control EndEffector | Position -> +5mm orientation -> +(3π/180)rad |
Position -> -5mm orientation -> -(3π/180)rad |
|---|---|---|
| Position X | q | a |
| Position Y | w | s |
| Position Z | e | d |
| Orientation Roll | r | f |
| Orientation Pitch | t | g |
| Orientation Yaw | y | h |
How to Use Simple IK
To start Simple IK start a new project just like SimplePtoP. Then press the Ctrl + F5 ekys to begin.

In Simple IK you will be asked for COM port and baud rate numbers. If succeeded you will see a ‘Succeed to open USB2DYNAMIXEL’ followed by ‘Press any key to move first pose.’ Press a key to begin. The arm moves to its initial pose as shown below.
This windows pops up after the arms moves to its initial pose. The values printed are the joints’ angles(rad). Press the keys(ex : q, w….) to move the end effector.
Simple IK q key control the 3rd value.
Q controls the end effector position (X) by increasing delta(5mm)amounts.
Visually verify arm movement every time when changing position.
Press the q and r keys 3 times each. The r key controls the end effector’s roll. The orientation (Roll, Pitch, Yaw) change by (3π/180)rad per keystroke.
Visually verify arm movement every time when changing position.
Simple IK Source Description
if(temp == 'q')
{
DesiredPose = CurrentPose;
DesiredPose.x += delta;
ArmKinematics.ComputeIK(DesiredPose, &angle_rad, angle_rad, &ErrorStatus);
if(ErrorStatus == ARMSDK_NO_ERROR)
{
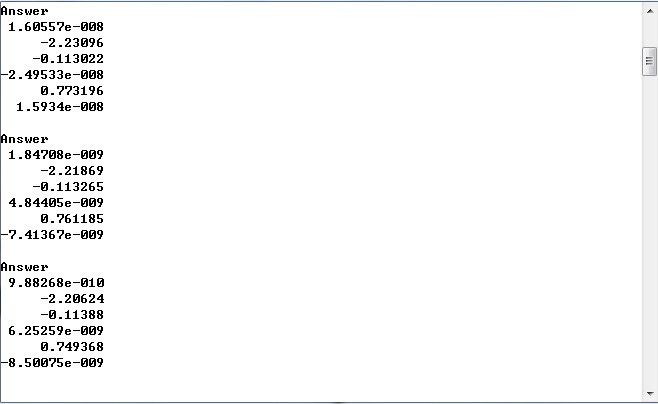
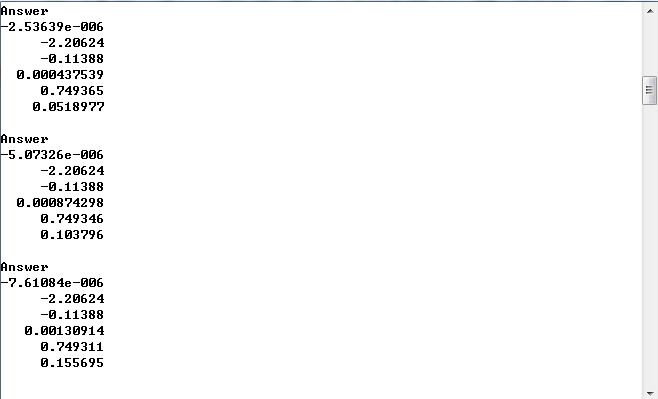
cout<<"Answer"<<endl;
cout<<angle_rad<<endl<<endl;
ArmComm.Arm_Set_JointPosition(RobotisArm.Rad2Value(angle_rad + gvdAngleGapCalcandDynamixelRad));
}
else if(ErrorStatus & ARMSDK_ACCEPTABLE_ERROR)
{
cout<< "No IK solution" <<endl;
cout<< "But the calcuation result is acceptable" <<endl;
char answer;
while(true)
{
cout<< "Do you want make the Robot move? (Y/N)";
cin >> answer;
if((answer == 'y') || (answer == 'n') || (answer == 'Y') || (answer == 'N'))
break;
else
cout<< "Invaild Answer"<<endl;
}
if((answer == 'y') || (answer == 'Y') )
ArmComm.Arm_Set_JointPosition(RobotisArm.Rad2Value(angle_rad + gvdAngleGapCalcandDynamixelRad));
else
continue;
}
else
{
cout<< "No IK Solution" <<endl;
continue;
}
ArmKinematics.Forward(angle_rad, &CurrentPose);
}
The code shows that by pressing the q key the program runs. A press of q moves the end effector pose in the (X) coordinate by delta (5mm).
If there are no errors the end effector will move according to keystroke. All joints are in radians. Press the ‘q‘ key to to goal pose by X position in delta incrememts.
Despite having errors and not being able to get the IK moving can be allowed. If ‘Do you want make the Robot move? (Y/N)’ appears onscreen press the y key to move the end effector in the X coordinate by +5mm. Then the joints pose(rad) are displayed.
WARNING : Product may go to pose fast after pressing the Y key posing a safety risk. When testing the example keep a safe distance while able to cut power off in case of undesired operation.
When error is too large and IK is unrealizable ‘No IK Solution‘ will be displayed the end effector will remain as is. The sample code from above is broken down below.
ArmKinematics.ComputeIK(DesiredPose, &angle_rad, angle_rad, &ErrorStatus);
All joints set to a desired pose by taking input from DesiredPose and angle_rad. Once DesiredPose values go to CurrentPose then the arm moves in X coordinate and DesirePose gets set again. angle_rad is CurrentPose’s consistent joints angles. IK’s solution for desired pose joint angles and &angle_rad get set. &ErrorStatus is the error sent to DYNAMIXEL.
ArmComm.Arm_Set_JointPosition(RobotisArm.Rad2Value(angle_rad + gvdAngleGapCalcandDynamixelRad));
The ComputeIK function sets an array for joint position in &angle_rad.
ArmKinematics.Forward(angle_rad, &CurrentPose);
Once moved to desired pose angle_rad(array) gets the end effector’s pose and runs forward kinematics; then CurrentPose sets the pose. This function returns the end effectors transform matric (4x4).
else if(temp == 'r')
{
  DesiredPose = CurrentPose;
  matd DesiredRotation = Algebra::GetOrientationMatrix(delta_angle_rad, 0.0, 0.0) *
      Algebra::GetOrientationMatrix(CurrentPose.Roll, CurrentPose.Pitch, CurrentPose.Yaw);
  vecd DesiredRPY = Algebra::GetEulerRollPitchYaw(DesiredRotation);
  DesiredPose.Roll = DesiredRPY(0);
  DesiredPose.Pitch = DesiredRPY(1);
  DesiredPose.Yaw = DesiredRPY(2);
  ArmKinematics.ComputeIK(DesiredPose, &angle_rad, angle_rad, &ErrorStatus);
  if(ErrorStatus == ARMSDK_NO_ERROR)
  {
    cout<<"Answer"<<endl;
    cout<<angle_rad<<endl<<endl;
    ArmComm.Arm_Set_JointPosition(RobotisArm.Rad2Value(angle_rad + gvdAngleGapCalcandDynamixelRad));
  }
  else if(ErrorStatus & ARMSDK_ACCEPTABLE_ERROR)
  {
    cout<< "No IK solution" <<endl;
    cout<< "But the caluation result is acceptable" <<endl;
    char answer;
    while(true)
    {
      cout<< "Do you want make the Robot move? (Y/N)";
      cin >> answer;
      if((answer == 'y') || (answer == 'n') || (answer == 'Y') || (answer == 'N'))
        break;
      else
        cout<< "Invaild Answer" <<endl;
    }
    if((answer == 'y') || (answer == 'Y') )
      ArmComm.Arm_Set_JointPosition(RobotisArm.Rad2Value(angle_rad + gvdAngleGapCalcandDynamixelRad));
    else
      continue;
  }
  else
  {
    cout<< "No IK Solution"<<endl;
    continue;
  }
  ArmKinematics.Forward(angle_rad, &CurrentPose);
}
The goal pose runs IK my moving the roll gets increased by delta(rad). The end effector moves to whatever the IK has solved and displays the joint poses(rad). Despite having errors and not being able to get the IK moving can be allowed. If ‘Do you want make the Robot move? (Y/N)’ appears onscreen press the y key to turn the end effector in the roll axis by delta_angle_rad. Then the joints pose(rad) are displayed.
A roll (roll-only) delta is ( delta_angle_rad = (3π/180)rad)
When error is too large and IK is unrealizable ‘No IK Solution‘ will be displayed the end effector will remain as is.
The sample code from above is broken down below. Press the r key to move the roll by delta_angle_rad.
The desired rotation matrix can then be obtain with the following

Where the code is shown below.
matd DesiredRotation = Algebra::GetOrientationMatrix(delta_angle_rad, 0.0, 0.0)
  *Algebra::GetOrientationMatrix(CurrentPose.Roll, CurrentPose.Pitch, CurrentPose.Yaw);
The CurrentPose’s Orientation roll increase by delta_angle_rad GoalPose(DesiredRotation).
vecd DesiredRPY = Algebra::GetEulerRollPitchYaw(DesiredRotation);
DesiredRotation’s roll, pitch, and yaw.
Simple Torque FK
Turns the Manipulator joints’ torque on/off. When torque goes off→on Forward Kinematics runs and putputs all joints pose(rad) and end effector’s position and orientation.
How to Use SimpleTorqueOnOffandFK
To start SimpleTorqueOnOffandFK start a new project just like SimplePtoP. Then press the Ctrl+F5 keys to begin.SimpleTorqueOnOffandFK.

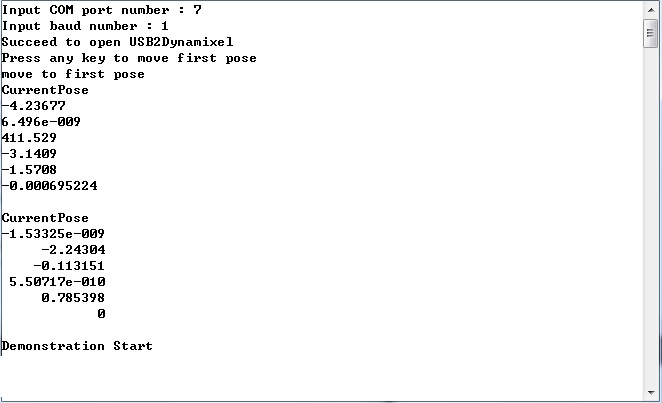
Input the COM port and baud rate numbers. If succeeded you will see a ‘Succeed to open USB2DYNAMIXEL;’ then torque gets turned off. Press the Enter key turn torque on and the arm’s joints pose(rad) and end effector’s pose(rad) will be displayed (joints 1 through 6).
Press Enter again to turn torque off and it will display ‘Torque Off.’
Press the Enter key once again to turn torque on and the values be displayed again.
SimpleTorqueOnOffandFK Source Description
while(true)
{
char temp = _getch();
if(temp == 27)
break;
else if(temp == 13)
{
if(gbArmTorque)
{
ArmComm.Arm_Torque_Off();
std::cout<<"Torque Off"<<std::endl;
gbArmTorque = false;
}
else
{
ArmComm.Arm_Torque_On();
cout<<"Torque On"<<endl;
if(ArmComm.Arm_Get_JointPosition(&angle_unit) != COMM_RXSUCCESS)
{
printf("Communication Error Occurred\n");
}
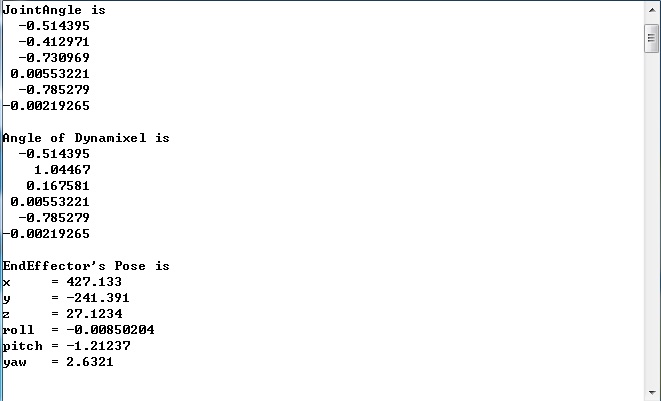
cout<<"JointAngle is"<<endl;
angle_rad = RobotisArm.Value2Rad(angle_unit);
cout<< angle_rad - gvdAngleGapCalcandDynamixelRad <<endl<<endl;
cout<<"Angle of Dynamixel is"<<endl;
angle_rad = RobotisArm.Value2Rad(angle_unit);
cout<< angle_rad <<endl<<endl;
cout<<"EndEffector's Pose is"<<endl;
Pose3D CurrentPose;
ArmKinematics.Forward(angle_rad - gvdAngleGapCalcandDynamixelRad, &CurrentPose);
cout<<"x = "<<CurrentPose.x <<endl;
cout<<"y = "<<CurrentPose.y <<endl;
cout<<"z = "<<CurrentPose.z <<endl;
cout<<"roll = "<<CurrentPose.Roll <<endl;
cout<<"pitch = "<<CurrentPose.Pitch <<endl;
cout<<"yaw = "<<CurrentPose.Yaw <<endl<<endl;
gbArmTorque = true;
}
}
else
continue;
}
The program aborts without starting by pressing the Esc key.
While the program is running press the Enter key to toggle torque between on and off. When torque gets turned on the joints and end effector pose get outputted onscreen. This happens with every “on” state.
Press the Esc key then Enter key and the arm remains as is.
The sample code from above is broken down below. The joint angles and DYNAMIXEL angles may not be the same so it must be taken into consideration. Angle of DYNAMIXEL is the output of the actual angle of DYNAMIXEL.