Quick Start
App Installation
![]()
- Download R+ Task 3.0 for Windows (PC).
- Download R+ Task 3.0 for Mac OS (PC).
- Download R+ Task 3.0 For Android device (Google Play).
- For ios device, the app will be available on App Store in the near future. Please use PC before the app is released.
![]()
NOTE: R+Task 3.0 does not support Python Code Download on smart devices. Please download your code using R+Task 3.0 on a PC.
Download Examples
NOTE: Before downloading the example files for ENGINEER KIT 2, the firmware of the CM-550 controller must be updated. Instructions to Update CM-550 firmware using R+ Manager 2.0 software
To control ENGINEER KIT2 with the R+ ENGINEER App, the CM-550 controller needs to be programmed with the Python (.py) and Motion (.mtn3) example files that match the assembled robot figure.
- The CM-550 controller is initially programmed with example files for the ENGINEER KIT1 (
MAX-E1,Dr. R,SPI). - To download examples file to the controller using a PC, see the Download from PC section below.
- To download example files to the controller using a smart device, see the Download from Smart Device section below.
| Examples | Python (.py) | Motion (.mtn) |
|---|---|---|
| MAX-E2 | 01_ENG2_Max_E2_PY.py | 01_ENG2_Max_E2_MO.mtn3 |
| Commando | 02_ENG2_Commando_PY.py | Only Python file is used |
| Scorpi | 03_ENG2_Scorpi_PY.py | 03_ENG2_Scorpi_MO.mtn3 |
| AutoBot (Additional Examples) | 04_ENG2_Autobot_PY.py | 04_ENG2_Autobot_MO.mtn3 |
| Strider (Additional Examples) | 05_ENG2_Strider_PY.py | Only Python file is used |
Download from PC
- How to Connect CM-550 Controller to PC
- How to Download Python Example Source Code
- How to Download Motion Example via PC
- How to Download Task Example via PC
Download from Smart Device
NOTE : Connect CM-550 with your smart device via bluetooth. See Pairing Bluetooth.
- How to Connect CM-550 Controller to Mobile
- How to Download Task Example via Mobile
- How to Download Motion Example via Mobile
Run Examples
Launch the R+ ENGINEER app and select the assembled robot example to operate the robot.
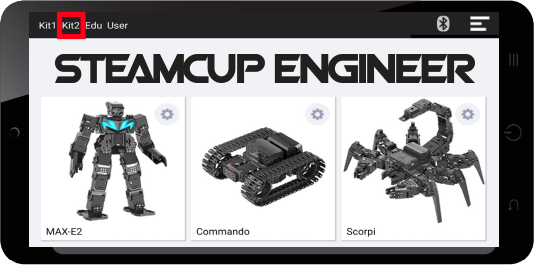
CAUTION : Selecting wrong example may result in malfunction of the robot.
Select the menu button on the top right corner of the app for app configuration.
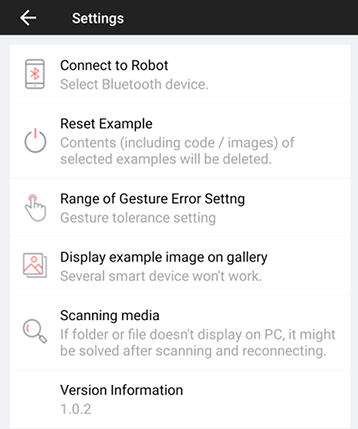
Connect to Robot : Select Bluetooth device to connect.
Reset Example : Modified contents (including code / images) of selected examples will be deleted.
Range of Gesture Error Setting : Set the sensitivity level of the gesture command.
Display Example Image on Gallery : Some smart devices may not support this feature.
Scanning Media : Update files and folders that are not recognized from the PC. Reconnect PC after the scan.
Version Information : Display the current app version.
Pairing Bluetooth
In order to control the robot remotely, connect your smart device via bluetooth to CM-550 controller. See Pairing Bluetooth of ENGINEER Kit 1.
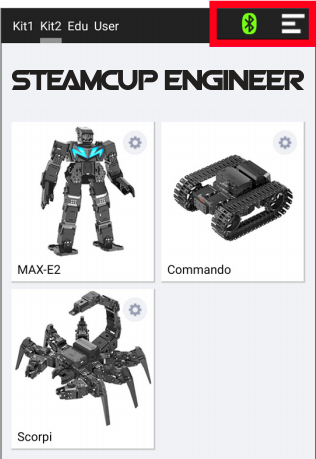
MAX-E2
Run ROBOTIS ENGINEER Kit2 App and select MAX-E2.
Remote Controller Screen
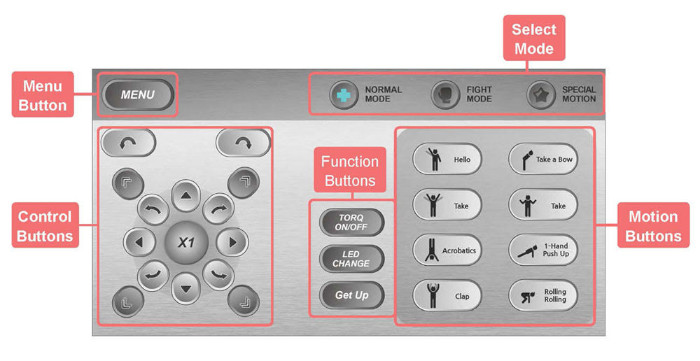
Menu button: Control/ Streaming/ Facial Detection/ Robot Inspection Mode.
Control Buttons: Control and change the speed of motions of MAX-E2.
Mode button: NORMAL/ FIGHT/ SPECIAL modes.
Motion buttons: Each relevant motions are set up to each control modes.
Function button: All Torque set up/ Led board color change/ Robot stand-up/ etc.
NOTE:
- Pressing TORQ ON/ OFF for an amount of time will reset and reboot all DYNAMIXEL
- For more details how to use Streaming feature, see Setting Video Streaming on ROBOTIS ENGINEER App.
MAX-E2 Mode Menu
| Icon | Description |
|---|---|
| REMOTE Control and change MAX-E2 to various modes as FIGHT/ SOCCER/ etc. |
|
| STREAMING Control the robot by watching videos taken from Raspberry Pi camera on your smart device and selecting buttons. |
|
| FACE Certain motions as greetings is available by face detection using Raspberry PI camera. |
MAX-E2 Options
| Icon | Description |
|---|---|
| MOTOR Check the motor operation of the robot. |
|
| OFFSET Alter the DYNAMIXEL’s position value, posture of robots, etc. |
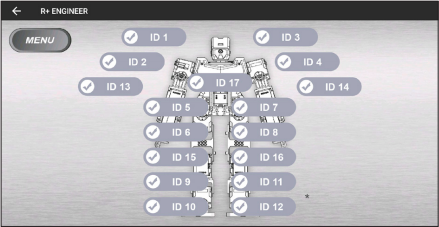
MOTOR Inspection
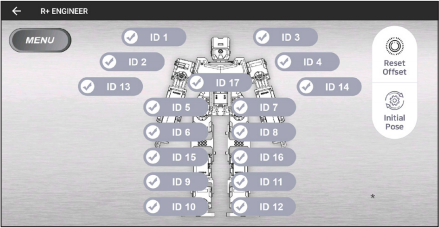
OFFSET Adjustment
NOTE : See Setting Up the Robot to change configuration data of motors and its offset.
Commando
Run ROBOTIS ENGINEER Kit2 App and select Commando.
Commando Demo Screen
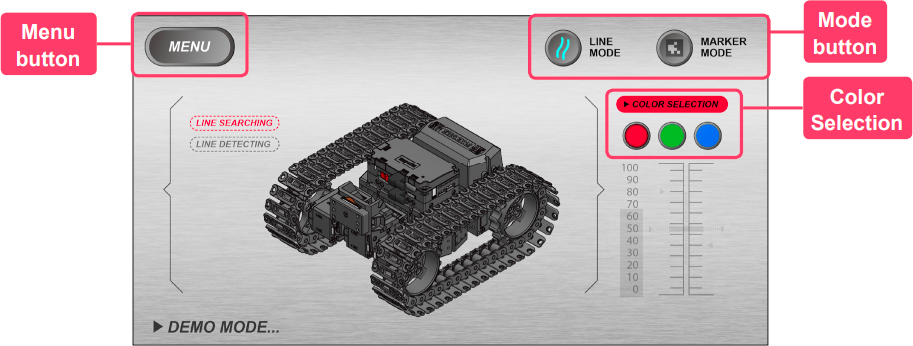
Menu Button : Selecting Demo/ Control/ Streaming/ Robot inspection modes.
Mode Button : See the description below.
LINE MODEidentifies the colors of the lines by Raspberry Pi Camera and moves accordingly. Line colors can be choosen fromCOLOR SELECTION.MARKER MODEuses Raspberry Pi Camera to identify markers in order then bySTART MARKERthe robot moves accordingly.DEBUGGING MODEidentifies motions by loading time andRUN MODEconnects motions without loading time.
NOTE:
- For more details how to use Streaming feature, see Setting Video Streaming on ROBOTIS ENGINEER App.
- Marker should be 30 cm away from the camera to be identified.
Commando Mode Menu
![]()
REMOTE: Controlling and ordering motions, directions, cameras, etc. Selecting WHEEL SPEED is to change the speed of the robot on the REMOTE mode.
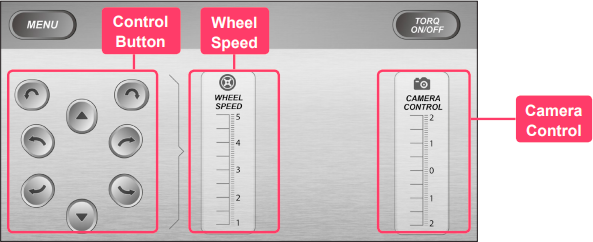
Commando REMOTE Mode Screen
Scorpi
Run ROBOTIS ENGINEER Kit2 App and select Scorpi.
Scorpi Demo Screen
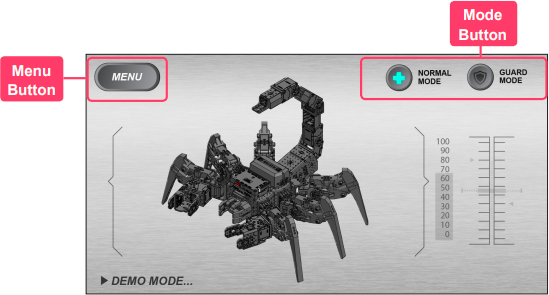
Menu Button : Control/ Gesture/ Deme/ Robot inspection mode.
Mode Button : See the description below.
NORMAL MODEScorpi Robot stands up and moves, and when DMS-80 detects objects, it attacks with it’s tail.GUARD MODEScorpi robot is on guard pose, and when DMS-80 detects objects, it attacks with it’s tail.
Scorpi Mode Menu
| 아이콘 | 메뉴 설명 |
|---|---|
| REMOTE Control Scorpi’s moves, directions, speed, and various motions with the tail and the claws. |
|
| GESTURE After running the gesture mode, hold the screen of the smart device upwards. In this state, tilt the device to move the robot. If you shake the device strongly, the robot attacks by moving its tail. |

Scorpi REMOTE Mode Screen
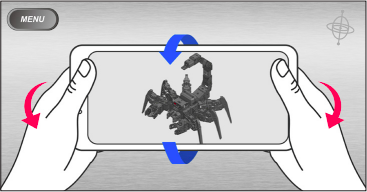
GESTURE Mode Screen


