
Navigation
WARNING: While following these instructions, your TurtleBot3 may move and rotate unexpectedly. Please place the robot in safe location on the ground.
NOTE
Navigation is used move the robot from one location to a specified destination in a given environment. For this purpose, a map that contains geometry information describing furniture, objects, and walls of the given environment is required. As described in the previous SLAM section, a map was created with the distance information obtained by the sensor and the pose information of the robot itself.
Run Navigation Nodes
- If
Bringupis not running on the TurtleBot3 SBC, launch Bringup.- Open a new terminal from Remote PC with
Ctrl+Alt+Tand connect to Raspberry Pi with its IP address. The default password is ubuntu.
[Remote PC]$ ssh ubuntu@{IP_ADDRESS_OF_RASPBERRY_PI} $ export TURTLEBOT3_MODEL=${TB3_MODEL} $ ros2 launch turtlebot3_bringup robot.launch.py
- Open a new terminal from Remote PC with
- Open a new terminal from Remote PC with
Ctrl+Alt+Tand launch the Navigation node. ROS 2 uses Navigation2. Specify your TurtleBot3 model (burger,waffle,waffle_pi) using theTURTLEBOT3_MODELparameter.
[Remote PC]$ export TURTLEBOT3_MODEL=burger $ ros2 launch turtlebot3_navigation2 navigation2.launch.py map:=$HOME/map.yaml
 How to save the TURTLEBOT3_MODEL parameter?
The $ export TURTLEBOT3_MODEL=${TB3_MODEL} command can be omitted if the TURTLEBOT3_MODEL parameter is predefined in your .bashrc file.
The .bashrc file is automatically loaded when a terminal window is created.
- Example defining
TurtlBot3 Burgeras the default model.
[Remote PC]$ echo 'export TURTLEBOT3_MODEL=burger' >> ~/.bashrc $ source ~/.bashrc - Example defining
TurtlBot3 Waffle Pias the default model.
[Remote PC]$ echo 'export TURTLEBOT3_MODEL=waffle_pi' >> ~/.bashrc $ source ~/.bashrc
From the Jazzy version, the cmd_vel topic uses the TwistStamped type.
If you want to use the Twist type, set the enable_stamped_cmd_vel parameter to false in both the turtlebot3_bringup and turtlebot3_navigation2 packages.
- If
Bringupis not running on the TurtleBot3 SBC, launch Bringup.- Open a new terminal from Remote PC with
Ctrl+Alt+Tand connect to Raspberry Pi with its IP address. The default password is ubuntu.
[Remote PC]$ ssh ubuntu@{IP_ADDRESS_OF_RASPBERRY_PI} $ export TURTLEBOT3_MODEL=${TB3_MODEL} $ ros2 launch turtlebot3_bringup robot.launch.py
- Open a new terminal from Remote PC with
- Open a new terminal from Remote PC with
Ctrl+Alt+Tand launch the Navigation node. ROS 2 uses Navigation2. Specify your TurtleBot3 model (burger,waffle,waffle_pi) using theTURTLEBOT3_MODELparameter.
[Remote PC]$ export TURTLEBOT3_MODEL=burger $ ros2 launch turtlebot3_navigation2 navigation2.launch.py map:=$HOME/map.yaml
How to save the TURTLEBOT3_MODEL parameter?
The $ export TURTLEBOT3_MODEL=${TB3_MODEL} command can be omitted if the TURTLEBOT3_MODEL parameter is predefined in your .bashrc file.
The .bashrc file is automatically loaded when a terminal window is created.
- Example defining
TurtlBot3 Burgeras the default model.
[Remote PC]$ echo 'export TURTLEBOT3_MODEL=burger' >> ~/.bashrc $ source ~/.bashrc - Example defining
TurtlBot3 Waffle Pias the default model.
[Remote PC]$ echo 'export TURTLEBOT3_MODEL=waffle_pi' >> ~/.bashrc $ source ~/.bashrc
- Run
roscoreon the remote PC. Skip this step if roscore is already running.
[Remote PC]$ roscore - Run
Bringupon the TurtleBot3 SBC. Skip this step if bringup is already running.- Open a new terminal from Remote PC with
Ctrl+Alt+Tand connect to the Raspberry Pi with its IP address. The default password is turtlebot, and you will be required to specify your TurtleBot3 model (burger,waffle,waffle_pi) using theTURTLEBOT3_MODELparameter.
[Remote PC]$ ssh ubuntu@{IP_ADDRESS_OF_RASPBERRY_PI} $ export TURTLEBOT3_MODEL=${TB3_MODEL} $ roslaunch turtlebot3_bringup turtlebot3_robot.launch
- Open a new terminal from Remote PC with
- Launch Navigation.
[Remote PC]$ roslaunch turtlebot3_navigation turtlebot3_navigation.launch map_file:=$HOME/map.yaml
How to save the TURTLEBOT3_MODEL parameter?
The $ export TURTLEBOT3_MODEL=${TB3_MODEL} command can be omitted if the TURTLEBOT3_MODEL parameter is predefined in your .bashrc file.
The .bashrc file is automatically loaded when a terminal window is created.
- Example defining
TurtlBot3 Burgeras the default model.$ echo 'export TURTLEBOT3_MODEL=burger' >> ~/.bashrc $ source ~/.bashrc - Example defining
TurtlBot3 Waffle Pias the default model.$ echo 'export TURTLEBOT3_MODEL=waffle_pi' >> ~/.bashrc $ source ~/.bashrc
Estimate Initial Pose
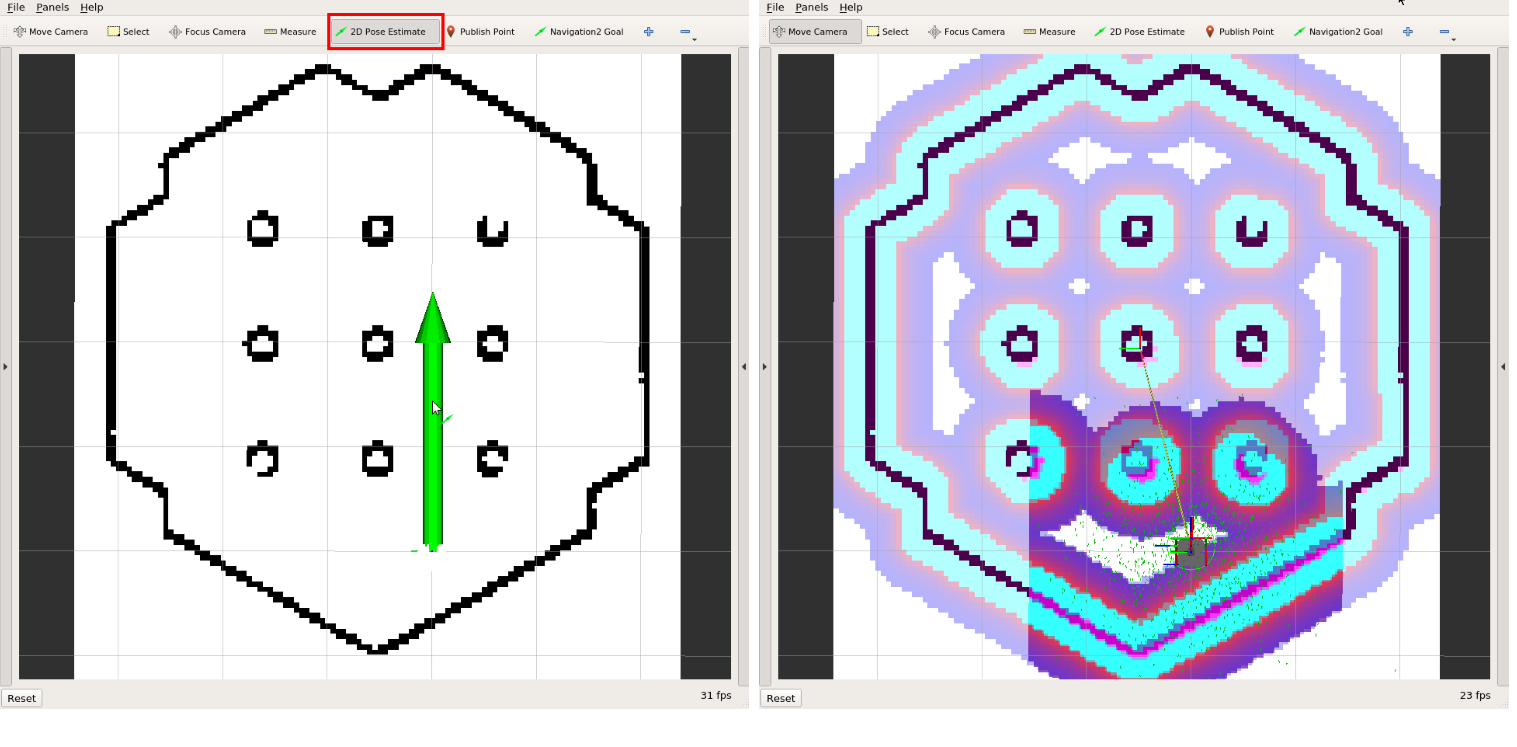
Initial Pose Estimation must be performed before running Navigation as this process initializes the AMCL parameters that are critical for Navigation. The TurtleBot3 has to be correctly located on the map with LDS sensor data that overlaps the displayed map.
- Click the
2D Pose Estimatebutton in the RViz2 menu. - Click on the map where the actual robot is located and drag the large green arrow toward the direction where the robot is facing.
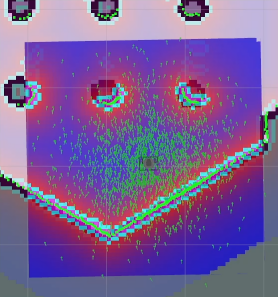
- Repeat step 1 and 2 until the LDS sensor data is overlayed on the saved map.
- Launch the keyboard teleoperation node to precisely locate the robot on the map.
[Remote PC]$ ros2 run turtlebot3_teleop teleop_keyboard - Move the robot back and forth a bit to collect the surrounding environment information and narrow down the estimated location of the TurtleBot3 on the map (displayed with tiny green arrows).
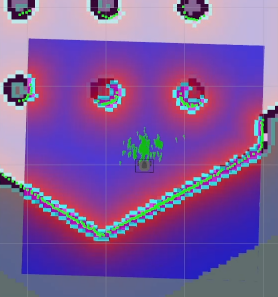
- Terminate the keyboard teleoperation node with
Ctrl+Cto prevent different cmd_vel values from being published from multiple nodes during Navigation.
Initial Pose Estimation must be performed before running Navigation as this process initializes the AMCL parameters that are critical for Navigation. The TurtleBot3 has to be correctly located on the map with LDS sensor data that overlaps the displayed map.
- Click the
2D Pose Estimatebutton in the RViz2 menu. - Click on the map where the actual robot is located and drag the large green arrow toward the direction where the robot is facing.
- Repeat step 1 and 2 until the LDS sensor data is overlayed on the saved map.
- Launch the keyboard teleoperation node to precisely locate the robot on the map.
[Remote PC]$ ros2 run turtlebot3_teleop teleop_keyboard - Move the robot back and forth a bit to collect the surrounding environment information and narrow down the estimated location of the TurtleBot3 on the map (displayed with tiny green arrows).
- Terminate the keyboard teleoperation node with
Ctrl+Cto prevent different cmd_vel values from being published from multiple nodes during Navigation.
Initial Pose Estimation must be performed before running Navigation as this process initializes the AMCL parameters that are critical for successful Navigation. The TurtleBot3 has to be correctly located on the map with the LDS sensor data overlapping the displayed map.
- Click the
2D Pose Estimatebutton in the RViz menu.

- Click on the map where the actual robot is located and drag the large green arrow toward the direction where the robot is facing.
- Repeat step 1 and 2 until the LDS sensor data is overlayed on the saved map.
- Launch keyboard teleoperation node to precisely locate the robot on the map.
[Remote PC]$ roslaunch turtlebot3_teleop turtlebot3_teleop_key.launch - Move the robot back and forth a bit to collect the surrounding environment information and narrow down the estimated location of the TurtleBot3 on the map (displayed with tiny green arrows).
- Terminate the keyboard teleoperation node with
Ctrl+Cin order to prevent different cmd_vel values being published from multiple nodes during Navigation.
Set Navigation Goal
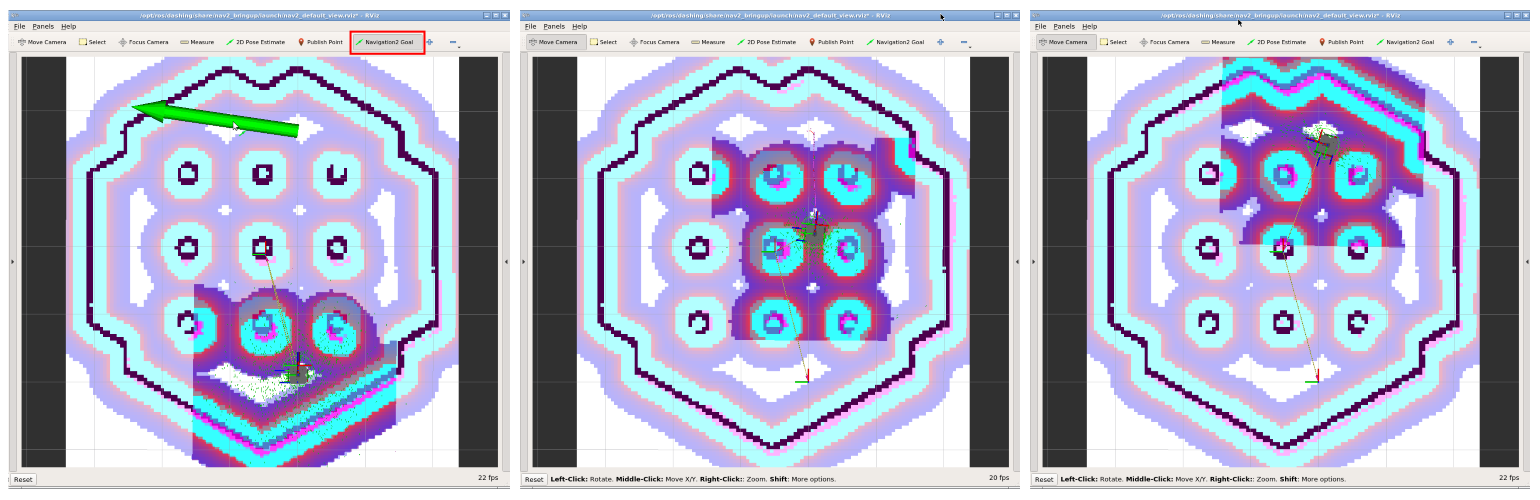
- Click the
Navigation2 Goalbutton in the RViz2 menu. - Click on the map to set the destination of the robot and drag the green arrow toward the direction where the robot will be facing.
- This green arrow is a marker to can specify the destination of the robot.
- The root of the arrow is the
x,ycoordinate of the destination, and the angleθis determined by the orientation of the arrow. - As soon as x, y, θ are set, the TurtleBot3 will start moving to the destination immediately.
Read more about Navigation2
-
The robot will create a path to reach the Navigation2 Goal based on the global path planner. Then, the robot moves along the path. If an obstacle is placed in the path, Navigation2 will use local path planner to avoid the obstacle.
-
Setting a Navigation2 Goal might fail if the path to the Navigation2 Goal cannot be created. If you wish to stop the robot before it reaches to the goal position, set the current position of TurtleBot3 as a Navigation2 Goal.
- Click the
2D Nav Goalbutton in the RViz menu.

- Click on the map to set the destination of the robot and drag the green arrow toward the direction where the robot will be facing.
- This green arrow is a marker to specify the destination of the robot.
- The root of the arrow is the
x,ycoordinate of the destination, and the angleθis determined by the orientation of the arrow. - As soon as x, y, θ are set, the TurtleBot3 will start moving to the destination immediately.
Read more about Navigation
-
The robot will create a path to reach to the Navigation Goal based on the global path planner. Then, the robot will move along the path. If an obstacle is placed in the path, the Navigation will use a local path planner to avoid the obstacle.
-
Setting a Navigation Goal might fail if the path to the Navigation Goal cannot be created. If you wish to stop the robot before it reaches to the goal position, set the current position of TurtleBot3 as a Navigation Goal.
-
[Official ROS Navigation Wiki][navigation]
Tuning Guide
The Navigation2 stack has many parameters to change performances for different robots. Although it’s similar to ROS1 Navigation, please refer to the Configuration Guide of Navigation2 or ROS Navigation Tuning Guide by Kaiyu Zheng for more details.
Costmap Parameters
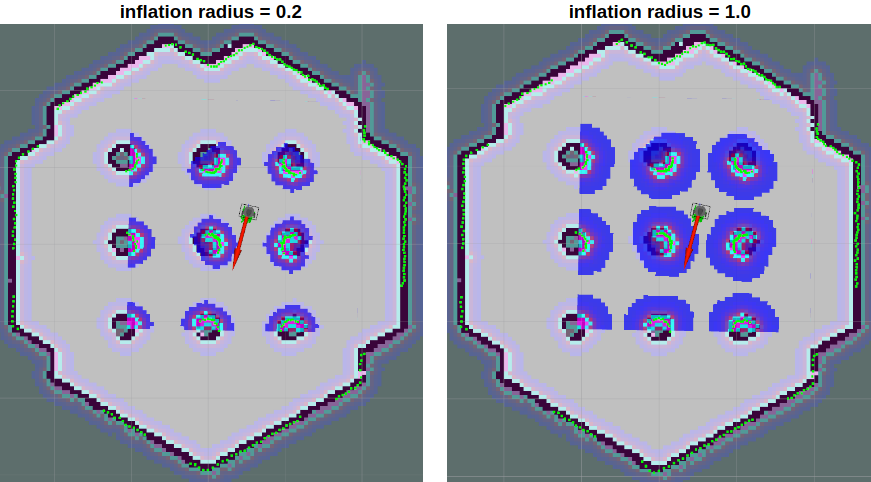
inflation_layer.inflation_radius
- Defined in
turtlebot3_navigation2/param/${TB3_MODEL}.yaml - This parameter defines an inflation area of inaccesability around detected obstacles. Generated paths will be planned not to cross this area. It is safe to set this value to be slightly bigger than robot radius. For more information, please refer to costmap_2d wiki.
inflation_layer.cost_scaling_factor
- Defined in
turtlebot3_navigation2/param/${TB3_MODEL}.yaml - This is an inverse proportional factor that is multiplied by the value of the costmap. If this parameter is increased, the value of the costmap is decreased.
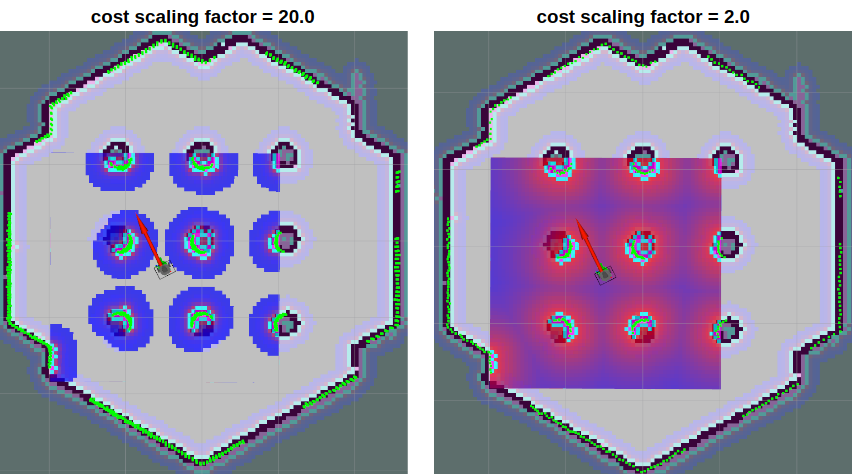
The optimal path for the robot to pass through obstacles is to take a median path between them. Setting a smaller value for this parameter will create a farther path from the obstacles.
dwb_controller
max_vel_x
- Defined in
turtlebot3_navigation2/param/${TB3_MODEL}.yaml - This factor sets the maximum value for translational velocity.
min_vel_x
- Defined in
turtlebot3_navigation2/param/${TB3_MODEL}.yaml - This factor sets the minimum value for translational velocity. If set this negative, the robot can move backwards.
max_vel_y
- Defined in
turtlebot3_navigation2/param/${TB3_MODEL}.yaml - The maximum y velocity for the robot in m/s.
min_vel_y
- Defined in
turtlebot3_navigation2/param/${TB3_MODEL}.yaml - The minimum y velocity for the robot in m/s.
max_vel_theta
- Defined in
turtlebot3_navigation2/param/${TB3_MODEL}.yaml - Value setting the maximum rotational velocity. The robot can not spin faster than this.
min_speed_theta
- Defined in
turtlebot3_navigation2/param/${TB3_MODEL}.yaml - Value setting the minimum rotational velocity. The robot can not spin slower than this.
max_speed_xy
- Defined in
turtlebot3_navigation2/param/${TB3_MODEL}.yaml - The absolute value of the maximum translational velocity for the robot in m/s.
min_speed_xy
- Defined in
turtlebot3_navigation2/param/${TB3_MODEL}.yaml - The absolute value of the minimum translational velocity for the robot in m/s.
acc_lim_x
- Defined in
turtlebot3_navigation2/param/${TB3_MODEL}.yaml - The x acceleration limit of the robot in meters/sec^2.
acc_lim_y
- Defined in
turtlebot3_navigation2/param/${TB3_MODEL}.yaml - The y acceleration limit of the robot in meters/sec^2.
acc_lim_theta
- Defined in
turtlebot3_navigation2/param/${TB3_MODEL}.yaml - The rotational acceleration limit of the robot in radians/sec^2.
decel_lim_x
- Defined in
turtlebot3_navigation2/param/${TB3_MODEL}.yaml - The deceleration limit of the robot in the x direction in m/s^2.
decel_lim_y
- Defined in
turtlebot3_navigation2/param/${TB3_MODEL}.yaml - The deceleration limit of the robot in the y direction in m/s^2.
decel_lim_theta
- Defined in
turtlebot3_navigation2/param/${TB3_MODEL}.yaml - The deceleration limit of the robot in the theta direction in rad/s^2.
xy_goal_tolerance
- Defined in
turtlebot3_navigation2/param/${TB3_MODEL}.yaml - The x,y distance allowed when the robot reaches its goal pose.
yaw_goal_tolerance
- Defined in
turtlebot3_navigation2/param/${TB3_MODEL}.yaml - The yaw angle allowed when the robot reaches its goal pose.
transform_tolerance
- Defined in
turtlebot3_navigation2/param/${TB3_MODEL}.yaml - The allowance for latency for tf messages.
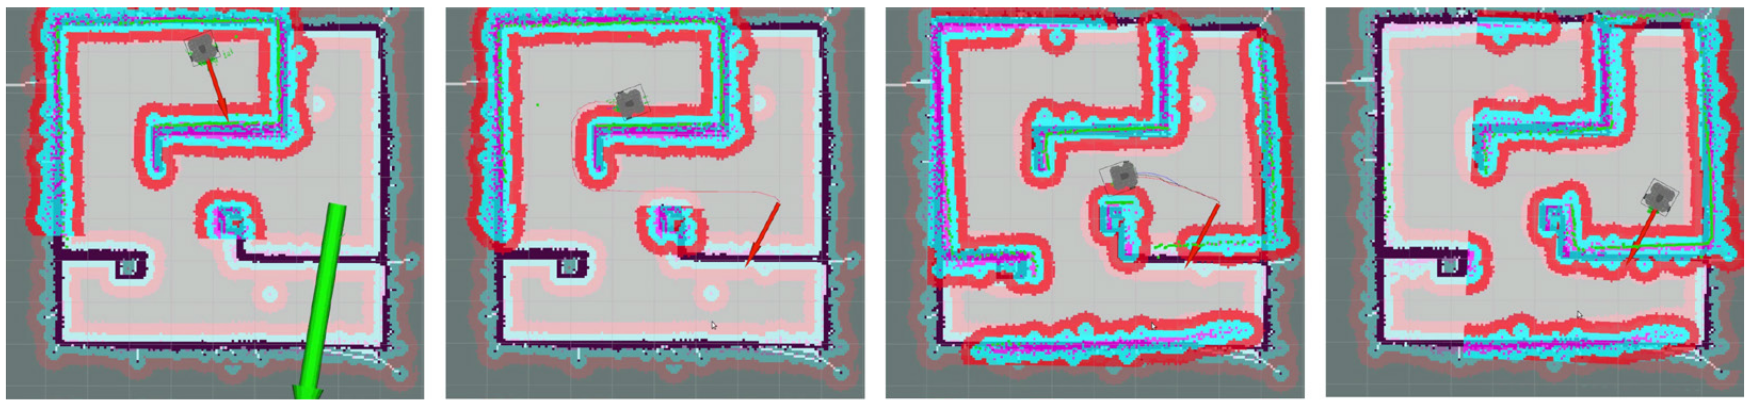
sim_time
- Defined in
turtlebot3_navigation2/param/${TB3_MODEL}.yaml - This factor sets forward simulation time in seconds. Setting this too small makes it difficult for the robot to pass through narrow spaces while large values limit dynamic turns. You can observe the differences in length of the yellow line in the below image that representing the simulation path.

The Navigation2 stack has many parameters to change performances for different robots. Although it’s similar to ROS1 Navigation, please refer to the Configuration Guide of Navigation2 or ROS Navigation Tuning Guide by Kaiyu Zheng for more details.
Costmap Parameters
inflation_layer.inflation_radius
- Defined in
turtlebot3_navigation2/param/${TB3_MODEL}.yaml - This parameter defines an inflation area of inaccesability around detected obstacles. Generated paths will be planned not to cross this area. It is safe to set this value to be slightly bigger than robot radius. For more information, please refer to costmap_2d wiki.
inflation_layer.cost_scaling_factor
- Defined in
turtlebot3_navigation2/param/${TB3_MODEL}.yaml - This is an inverse proportional factor that is multiplied by the value of the costmap. If this parameter is increased, the value of the costmap is decreased.
The optimal path for the robot to pass through obstacles is to take a median path between them. Setting a smaller value for this parameter will create a farther path from the obstacles.
dwb_controller
max_vel_x
- Defined in
turtlebot3_navigation2/param/${TB3_MODEL}.yaml - This factor sets the maximum value for translational velocity.
min_vel_x
- Defined in
turtlebot3_navigation2/param/${TB3_MODEL}.yaml - This factor sets the minimum value for translational velocity. If set this negative, the robot can move backwards.
max_vel_y
- Defined in
turtlebot3_navigation2/param/${TB3_MODEL}.yaml - The maximum y velocity for the robot in m/s.
min_vel_y
- Defined in
turtlebot3_navigation2/param/${TB3_MODEL}.yaml - The minimum y velocity for the robot in m/s.
max_vel_theta
- Defined in
turtlebot3_navigation2/param/${TB3_MODEL}.yaml - Value setting the maximum rotational velocity. The robot can not spin faster than this.
min_speed_theta
- Defined in
turtlebot3_navigation2/param/${TB3_MODEL}.yaml - Value setting the minimum rotational velocity. The robot can not spin slower than this.
max_speed_xy
- Defined in
turtlebot3_navigation2/param/${TB3_MODEL}.yaml - The absolute value of the maximum translational velocity for the robot in m/s.
min_speed_xy
- Defined in
turtlebot3_navigation2/param/${TB3_MODEL}.yaml - The absolute value of the minimum translational velocity for the robot in m/s.
acc_lim_x
- Defined in
turtlebot3_navigation2/param/${TB3_MODEL}.yaml - The x acceleration limit of the robot in meters/sec^2.
acc_lim_y
- Defined in
turtlebot3_navigation2/param/${TB3_MODEL}.yaml - The y acceleration limit of the robot in meters/sec^2.
acc_lim_theta
- Defined in
turtlebot3_navigation2/param/${TB3_MODEL}.yaml - The rotational acceleration limit of the robot in radians/sec^2.
decel_lim_x
- Defined in
turtlebot3_navigation2/param/${TB3_MODEL}.yaml - The deceleration limit of the robot in the x direction in m/s^2.
decel_lim_y
- Defined in
turtlebot3_navigation2/param/${TB3_MODEL}.yaml - The deceleration limit of the robot in the y direction in m/s^2.
decel_lim_theta
- Defined in
turtlebot3_navigation2/param/${TB3_MODEL}.yaml - The deceleration limit of the robot in the theta direction in rad/s^2.
xy_goal_tolerance
- Defined in
turtlebot3_navigation2/param/${TB3_MODEL}.yaml - The x,y distance allowed when the robot reaches its goal pose.
yaw_goal_tolerance
- Defined in
turtlebot3_navigation2/param/${TB3_MODEL}.yaml - The yaw angle allowed when the robot reaches its goal pose.
transform_tolerance
- Defined in
turtlebot3_navigation2/param/${TB3_MODEL}.yaml - The allowance for latency for tf messages.
sim_time
- Defined in
turtlebot3_navigation2/param/${TB3_MODEL}.yaml - This factor sets forward simulation time in seconds. Setting this too small makes it difficult for the robot to pass through narrow spaces while large values limit dynamic turns. You can observe the differences in length of the yellow line in the below image that representing the simulation path.
Navigation stack has many parameters to change performance for different robots.
You can get more information about Navigation tuning from Basic Navigation Tuning Guide, ROS Navigation Tuning Guide by Kaiyu Zheng, and chapter 11 of ROS Robot Programming book.
inflation_radius
- Defined in
turtlebot3_navigation/param/costmap_common_param_${TB3_MODEL}.yaml - This parameter makes inflation area from the obstacle. Path would be planned in order that it don’t across this area. It is safe that to set this to be bigger than robot radius. For more information, please refer to the costmap_2d wiki.
cost_scaling_factor
- Defined in
turtlebot3_navigation/param/costmap_common_param_${TB3_MODEL}.yaml - This factor is a reciprical proportional parameter used to multiply the cost values. When this parameter is increased, the cost generated decreases.
The best path is for the robot to pass through a central point between obstacles. Set this factor to be smaller in order to pass farther from obstacles.
max_vel_x
- Defined in
turtlebot3_navigation/param/dwa_local_planner_params_${TB3_MODEL}.yaml - This factor sets the maximum value for translational velocity.
min_vel_x
- Defined in
turtlebot3_navigation/param/dwa_local_planner_params_${TB3_MODEL}.yaml - This factor sets the minimum value for translational velocity. If set to a negative value, the robot can move backwards.
max_trans_vel
- Defined in
turtlebot3_navigation/param/dwa_local_planner_params_${TB3_MODEL}.yaml - Value of the maximum allowable translational velocity. The robot can not move faster than this.
min_trans_vel
- Defined in
turtlebot3_navigation/param/dwa_local_planner_params_${TB3_MODEL}.yaml - Value of the minimum allowable translational velocity. The robot can not move slower than this.
max_rot_vel
- Defined in
turtlebot3_navigation/param/dwa_local_planner_params_${TB3_MODEL}.yaml - Value of the maximum allowable rotational velocity. The robot can not rotate faster than this.
min_rot_vel
- Defined in
turtlebot3_navigation/param/dwa_local_planner_params_${TB3_MODEL}.yaml - Value of the minimum allowable rotational velocity. The robot can not rotate slower than this.
acc_lim_x
- Defined in
turtlebot3_navigation/param/dwa_local_planner_params_${TB3_MODEL}.yaml - Value of the translational acceleration limit.
acc_lim_theta
- Defined in
turtlebot3_navigation/param/dwa_local_planner_params_${TB3_MODEL}.yaml - Value of the rotational acceleration limit.
xy_goal_tolerance
- Defined in
turtlebot3_navigation/param/dwa_local_planner_params_${TB3_MODEL}.yaml - The x,y tolerance allowed when the robot reaches its goal pose.
yaw_goal_tolerance
- Defined in
turtlebot3_navigation/param/dwa_local_planner_params_${TB3_MODEL}.yaml - The yaw angle allowed when the robot reaches its goal pose.
sim_time
- Defined in
turtlebot3_navigation/param/dwa_local_planner_params_${TB3_MODEL}.yaml - This factor sets forward simulation time in seconds. Setting this too small makes it difficult for the robot to pass through narrow spaces while large values limit dynamic turns. You can observe the differences in length of the yellow line in the below image that representing the simulation path.