
Overview
The Raspberry Pi Camera Module v2 replaced the original Camera Module in April 2016. The v2 Camera Module has a Sony IMX219 8-megapixel sensor (compared to the 5-megapixel OmniVision OV5647 sensor of the original camera). The Camera Module can be used to take high-definition video, as well as stills photographs. It’s easy to use for beginners, but has plenty to offer advanced users if you’re looking to expand your knowledge. There are lots of examples online of people using it for time-lapse, slow-motion, and other video cleverness. You can also use the libraries we bundle with the camera to create effects.
Introduction Video
The TurtleBot3 uses Raspberry Pi Camera Module v2 as a default vision sensor. Check this video out that shows how Raspberry Pi Camera Module v2 can be used in TurtleBot3.
Specifications
Hardware Specifications
| Items | Specifications |
|---|---|
| Net price | $25 |
| Size | Around 25 × 24 × 9 mm |
| Weight | 3g |
| Still resolution | 8 Megapixels |
| Video modes | 1080p30, 720p60 and 640 × 480p60/90 |
| Linux integration | V4L2 driver available |
| C programming API | OpenMAX IL and others available |
| Sensor | Sony IMX219 |
| Sensor | 3280 × 2464 pixels |
| Sensor | 3.68 x 2.76 mm (4.6 mm diagonal) |
| Pixel size | 1.12 µm x 1.12 µm |
| Optical size | 1/4” |
| Full-frame SLR lens equivalent | 35 mm |
| S/N ratio | 36 dB |
| Dynamic range | 67 dB @ 8x gain |
| Sensitivity | 680 mV/lux-sec |
| Dark current | 16 mV/sec @ 60 C |
| Well capacity | 4.3 Ke- |
| Fixed focus | 1 m to infinity |
| Focal length | 3.04 mm |
| Horizontal field of view | 62.2 degrees |
| Vertical field of view | 48.8 degrees |
| Focal ratio (F-Stop) | 2.0 |
Hardware features
| Available | Implemented |
|---|---|
| Chief ray angle correction | Yes |
| Global and rolling shutter | Rolling shutter |
| Automatic exposure control (AEC) | No - done by ISP instead |
| Automatic white balance (AWB) | No - done by ISP instead |
| Automatic black level calibration (ABLC) | No - done by ISP instead |
| Automatic 50/60 Hz luminance detection | No - done by ISP instead |
| Frame rate up to 120 fps | Max 90fps. Limitations on frame size for the higher frame rates (VGA only for above 47fps) |
| AEC/AGC 16-zone size/position/weight control | No - done by ISP instead |
| Mirror and flip | Yes |
| Cropping | No - done by ISP instead (except 1080p mode) |
| Lens correction | No - done by ISP instead |
| Defective pixel cancelling | No - done by ISP instead |
| 10-bit RAW RGB data | Yes - format conversions available via GPU |
| Support for LED and flash strobe mode | LED flash |
| Support for internal and external frame synchronisation for frame exposure mode | No |
| Support for 2 × 2 binning for better SNR in low light conditions | Anything output res below 1296 x 976 will use the 2 x 2 binned mode |
| Support for horizontal and vertical sub-sampling | Yes, via binning and skipping |
| On-chip phase lock loop (PLL) | Yes |
| Standard serial SCCB interface | Yes |
| Digital video port (DVP) parallel output interface | No |
| MIPI interface (two lanes) | Yes |
| 32 bytes of embedded one-time programmable (OTP) memory | No |
| Embedded 1.5V regulator for core power | Yes |
Software features
| Software features | |
|---|---|
| Picture formats | JPEG (accelerated), JPEG + RAW, GIF, BMP, PNG, YUV420, RGB888 |
| Video formats | raw h.264 (accelerated) |
| Effects | negative, solarise, posterize, whiteboard, blackboard, sketch, denoise, emboss, oilpaint, hatch, gpen, pastel, watercolour, film, blur, saturation |
| Exposure modes | auto, night, nightpreview, backlight, spotlight, sports, snow, beach, verylong, fixedfps, antishake, fireworks |
| Metering modes | average, spot, backlit, matrix |
| Automatic white balance modes | off, auto, sun, cloud, shade, tungsten, fluorescent, incandescent, flash, horizon |
| Triggers | Keypress, UNIX signal, timeout |
| Extra modes | demo, burst/timelapse, circular buffer, video with motion vectors, segmented video, live preview on 3D models |
Mechanical Drawing
- Camera Module v2 PDF
Here is the detail specification document: Raspberry Pi Camera Module v2 Datasheet
Camera calibration
-
Prepare the Checkerboard pattern
Use a black and white Checkerboard, usually 7×6 or 8×6 in size, print it out and attach it to a solid surface, and measure the squares of your checkerboard accurately.
- Install the ROS 2 Camera Calibration Package
[Remote PC]$ sudo apt update $ sudo apt install ros-${ROS_DISTRO}-camera-calibration $ source /opt/ros/${ROS_DISTRO}/setup.bash - Run the Camera node
Run the camera node based on the camera package you installed.- For
camera-ros
[TurtleBot3 SBC]$ ros2 run camera_ros camera_node --ros-args -p format:='RGB888' - For
v4l2-camera
Adding-r __ns:=/cameraorganizes all topics published by the node under the/cameranamespace.
[TurtleBot3 SBC]$ ros2 run v4l2_camera v4l2_camera_node --ros-args -r __ns:=/camera
- For
- Run calibration node
Specify the size of the checkerboard and the size of the squares as execution arguments. The size of the checkerboard is the number of intersections.
[Remote PC]$ ros2 run camera_calibration cameracalibrator \ --size 8x6 --square 0.023 \ image:=/camera/image_raw camera:=/camera -
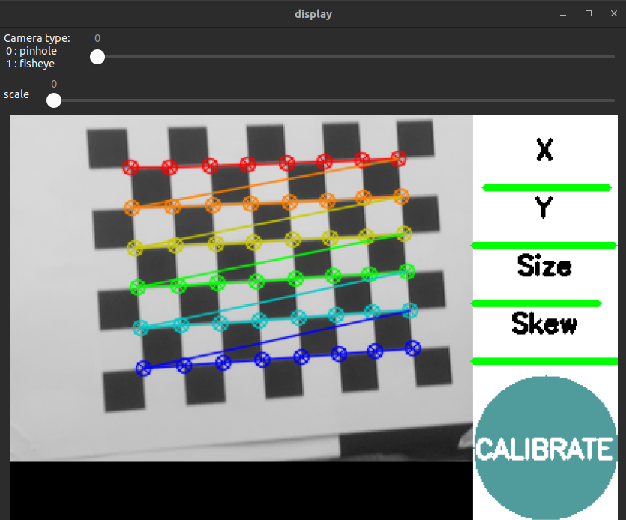
Proceed with the calibration
When a checkerboard is detected, each intersection is connected. Modify the position of the checkerboard until the green bar on the right is filled to activate the button.
- Apply calibration
Use the results to modify the format of the calibration yaml file you created when you installed the camera package.
[Result]**** Calibrating **** mono pinhole calibration... D = [0.03044862133677453, 1.051149543007478, -0.010043417242237722, -0.004408001911603297, 0.0] K = [630.410302346659, 0.0, 153.7660597801437, 0.0, 630.2122426630051, 112.97681709327331, 0.0, 0.0, 1.0] R = [1.0, 0.0, 0.0, 0.0, 1.0, 0.0, 0.0, 0.0, 1.0] P = [638.0872192382812, 0.0, 152.86851810362077, 0.0, 0.0, 636.0022583007812, 111.61012624808154, 0.0, 0.0, 0.0, 1.0, 0.0] None # oST version 5.0 parameters [image] width 320 height 240 [narrow_stereo] camera matrix 630.410302 0.000000 153.766060 0.000000 630.212243 112.976817 0.000000 0.000000 1.000000 distortion 0.030449 1.051150 -0.010043 -0.004408 0.000000 rectification 1.000000 0.000000 0.000000 0.000000 1.000000 0.000000 0.000000 0.000000 1.000000 projection 638.087219 0.000000 152.868518 0.000000 0.000000 636.002258 111.610126 0.000000 0.000000 0.000000 1.000000 0.000000
Trouble Shooting
The error message Unable to open camera calibration file [/home/ubuntu/.ros/camera_info/<camera_name>.yaml] appears when the camera calibration file is missing.
- Create the calibration directory (if it doesn’t exist)
[TurtleBot3 SBC]$ mkdir -p /home/ubuntu/.ros/camera_info/ - Create the calibration file
[TurtleBot3 SBC]$ sudo nano /home/ubuntu/.ros/camera_info/<camera_name>.yamlCalibration yaml file example
Make sure to update theimage_width,image_heightvalues andcamera_nameto match your actual camera settings. Ensure thecamera_namein the.yamlfile matches the actual camera name.image_width: 320 # Update to your camera's actual resolution image_height: 240 # Update to your camera's actual resolution camera_name: imx219__base_soc_i2c0mux_i2c_1_imx219_10_320x240 # Replace with the actual camera name frame_id: camera camera_matrix: rows: 3 cols: 3 data: [161.0352, 0, 99.6340, 0, 160.4337, 77.6267, 0, 0, 1] distortion_model: plumb_bob distortion_coefficients: rows: 1 cols: 5 data: [0.1639958, -0.2718400, 0.0010558, -0.0016656, 0] rectification_matrix: rows: 3 cols: 3 data: [1, 0, 0, 0, 1, 0, 0, 0, 1] projection_matrix: rows: 3 cols: 4 data: [164.6242, 0, 99.2051, 0, 0, 164.5522, 77.7529, 0, 0, 0, 1, 0]