
OpenCR Setup
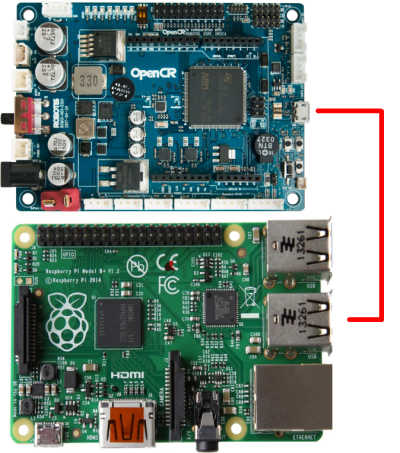
- Connect the OpenCR to the Rasbperry Pi using a micro USB cable.
- Install the required packages on the Raspberry Pi in order to upload the OpenCR firmware.
[TurtleBot3 SBC]$ sudo dpkg --add-architecture armhf $ sudo apt-get update $ sudo apt-get install libc6:armhf - Depending on your specific model, specify either
burgerorwafflefor the OPENCR_MODEL name.
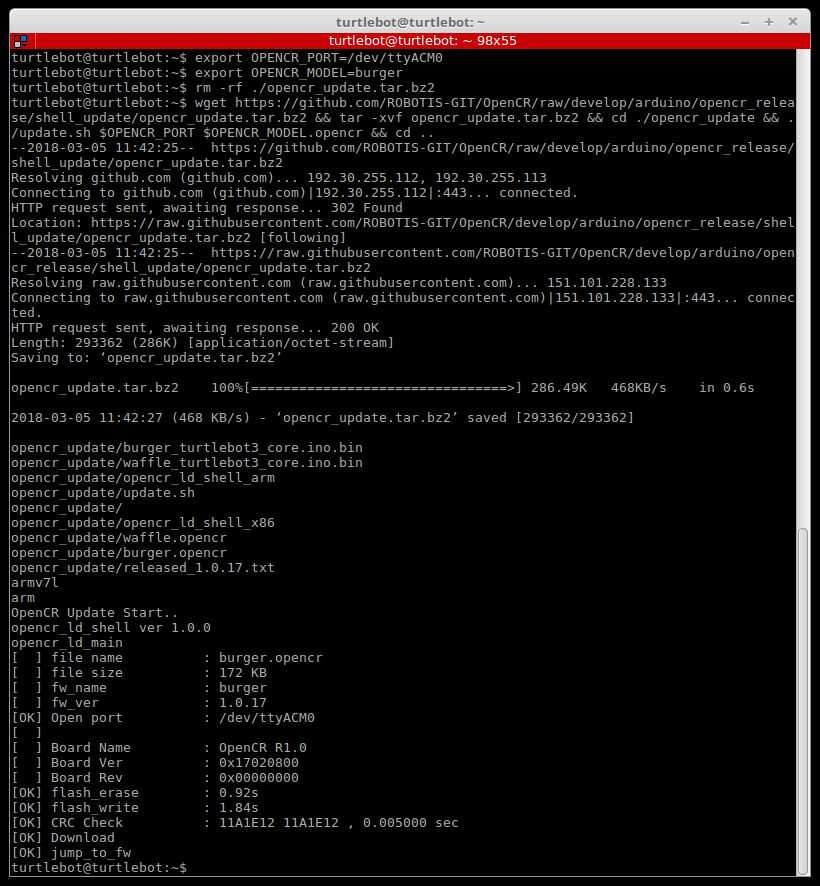
[TurtleBot3 SBC]$ export OPENCR_PORT=/dev/ttyACM0 $ export OPENCR_MODEL=burger $ rm -rf ./opencr_update.tar.bz2 - Download the firmware and required loader, then extract the file to prepare for upload.
[TurtleBot3 SBC]
$ wget https://github.com/ROBOTIS-GIT/OpenCR-Binaries/raw/master/turtlebot3/ROS2/latest/opencr_update.tar.bz2 $ tar -xvf opencr_update.tar.bz2 - Upload firmware to the OpenCR.
[TurtleBot3 SBC]$ cd ./opencr_update $ ./update.sh $OPENCR_PORT $OPENCR_MODEL.opencr -
A successful firmware upload for the TurtleBot3 Burger will look like this:
- If the firmware upload fails, try uploading again through recovery mode according to the following instructions. While in recovery mode, the
STATUSled of the OpenCR will blink periodically.- Hold down the
PUSH SW2button. - Press the
Resetbutton. - Release the
Resetbutton. - Release the
PUSH SW2button.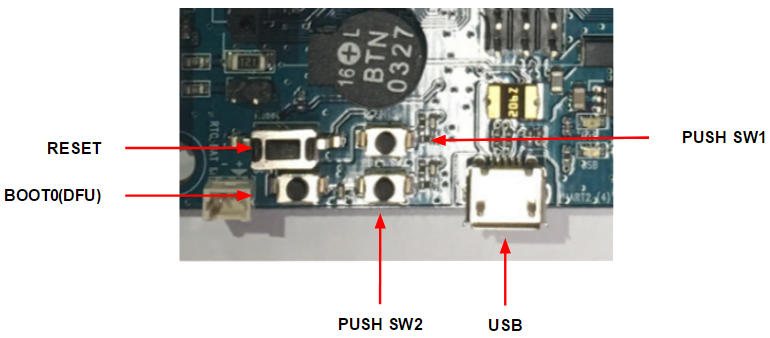
- Hold down the
 Click here to expand more details about firmware uploads using the Arduino IDE
Please be aware that the OpenCR board manager does not support Arduino IDE on ARM based SBCs such as Raspberry Pi or NVidia Jetson.
In order to upload the OpenCR firmware using the Arduino IDE, please follow the below instructions on your PC.
- If you are using Linux, please configure the USB ports for OpenCR use. For other operating systems (OSX or Windows), you can skip this step.
$ wget https://raw.githubusercontent.com/ROBOTIS-GIT/OpenCR/master/99-opencr-cdc.rules $ sudo cp ./99-opencr-cdc.rules /etc/udev/rules.d/ $ sudo udevadm control --reload-rules $ sudo udevadm trigger $ sudo apt install libncurses5-dev:i386 - Install Arduino IDE.
-
After completing installation, run the Arduino IDE.
-
Press
Ctrl+,to open the Preferences menu - Enter the below address in the
Additional Boards Manager URLs.https://raw.githubusercontent.com/ROBOTIS-GIT/OpenCR/master/arduino/opencr_release/package_opencr_index.json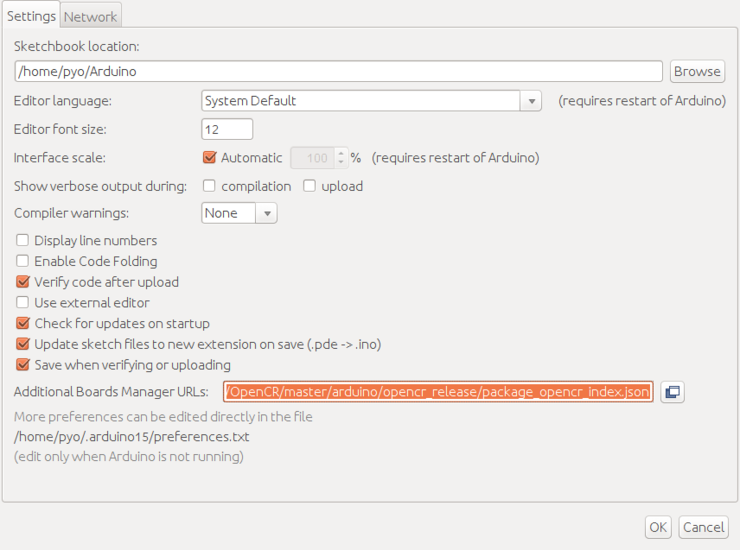
- Open the TurtleBot3 firmware. Please select the correct firmware, depending on your specific model .
- Burger : File > Examples > Turtlebot3 ROS2 > turtlebot3_burger
- Waffle/Waffle Pi : File > Examples > Turtlebot3 ROS2 > turtlebot3_waffle
-
Connect the OpenCR to the PC and Select OpenCR > OpenCR Board from the Tools > Board menu.
-
Select the USB port with the OpenCR connected from the Tools > Port menu.
-
Upload the TurtleBot3 firmware sketch with
Ctrl+Uor the upload icon.
- If the firmware upload fails, try uploading again through recovery mode according to the following instructions. While in recovery mode, the
STATUSled of the OpenCR will blink periodically.- Hold down the
PUSH SW2button. - Press the
Resetbutton. - Release the
Resetbutton. - Release the
PUSH SW2button.
- Hold down the
OpenCR Test
NOTE: If the wheels do not move while performing the OpenCR Test, refer to the”TurtleBot3 DYNAMIXEL setup instructions” to update the DYNAMIXEL’s configuration.
You can use PUSH SW 1 and PUSH SW 2 buttons to see whether your robot has been properly assembled. This process tests the left and right DYNAMIXEL configurations and the OpenCR board firmware.
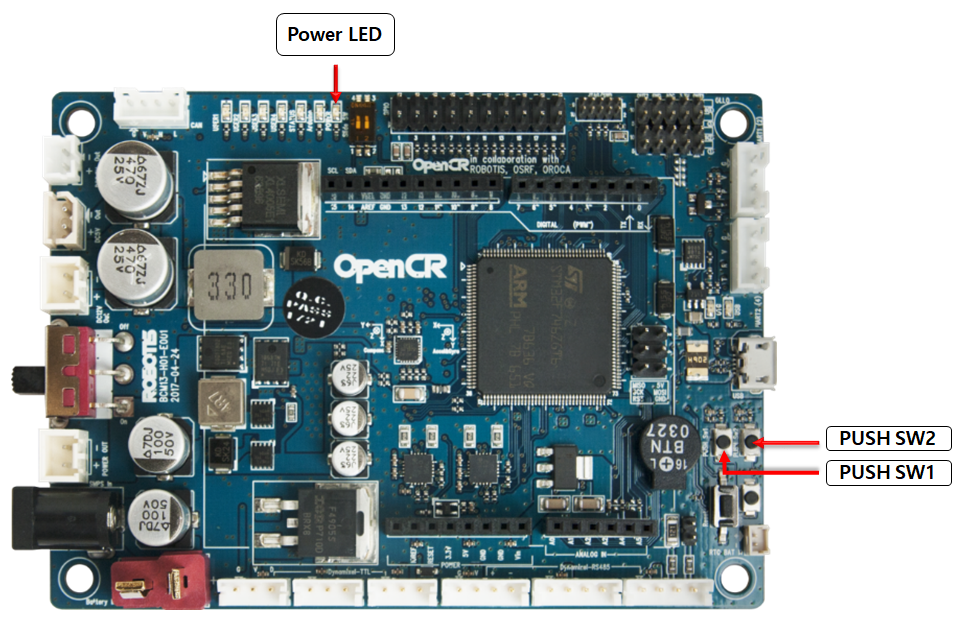
- After assembling the TurtleBot3, connect power to the OpenCR and turn on the power switch. The red
Power LEDwill be turned on. - Place the robot on flat ground in a wide open area. For the test, a safety radius of 1 meter (40 inches) is recommended.
- Press and hold
PUSH SW 1for a few seconds to command the robot to move 30 centimeters (about 12 inches) forward. - Press and hold
PUSH SW 2for a few seconds to command the robot to rotate 180 degrees in place.
OpenCR Setup
- Connect the OpenCR to the Rasbperry Pi using a micro USB cable.
- Install the required packages on the Raspberry Pi in order to upload the OpenCR firmware.
[TurtleBot3 SBC]$ sudo dpkg --add-architecture armhf $ sudo apt-get update $ sudo apt-get install libc6:armhf - Depending on your specific model, specify either
burgerorwafflefor the OPENCR_MODEL name.
[TurtleBot3 SBC]$ export OPENCR_PORT=/dev/ttyACM0 $ export OPENCR_MODEL=burger $ rm -rf ./opencr_update.tar.bz2 - Download the firmware and required loader, then extract the file to prepare for upload.
[TurtleBot3 SBC]
$ wget https://github.com/ROBOTIS-GIT/OpenCR-Binaries/raw/master/turtlebot3/ROS2/latest/opencr_update.tar.bz2 $ tar -xvf opencr_update.tar.bz2 - Upload firmware to the OpenCR.
[TurtleBot3 SBC]$ cd ./opencr_update $ ./update.sh $OPENCR_PORT $OPENCR_MODEL.opencr -
A successful firmware upload for the TurtleBot3 Burger will look like this:
- If the firmware upload fails, try uploading again through recovery mode according to the following instructions. While in recovery mode, the
STATUSled of the OpenCR will blink periodically.- Hold down the
PUSH SW2button. - Press the
Resetbutton. - Release the
Resetbutton. - Release the
PUSH SW2button.
- Hold down the
Click here to expand more details about firmware uploads using the Arduino IDE
Please be aware that the OpenCR board manager does not support Arduino IDE on ARM based SBCs such as Raspberry Pi or NVidia Jetson.
In order to upload the OpenCR firmware using the Arduino IDE, please follow the below instructions on your PC.
- If you are using Linux, please configure the USB ports for OpenCR use. For other operating systems (OSX or Windows), you can skip this step.
$ wget https://raw.githubusercontent.com/ROBOTIS-GIT/OpenCR/master/99-opencr-cdc.rules $ sudo cp ./99-opencr-cdc.rules /etc/udev/rules.d/ $ sudo udevadm control --reload-rules $ sudo udevadm trigger $ sudo apt install libncurses5-dev:i386 - Install Arduino IDE.
-
After completing installation, run the Arduino IDE.
-
Press
Ctrl+,to open the Preferences menu - Enter the below address in the
Additional Boards Manager URLs.https://raw.githubusercontent.com/ROBOTIS-GIT/OpenCR/master/arduino/opencr_release/package_opencr_index.json - Open the TurtleBot3 firmware. Please select the correct firmware, depending on your specific model .
- Burger : File > Examples > Turtlebot3 ROS2 > turtlebot3_burger
- Waffle/Waffle Pi : File > Examples > Turtlebot3 ROS2 > turtlebot3_waffle
-
Connect the OpenCR to the PC and Select OpenCR > OpenCR Board from the Tools > Board menu.
-
Select the USB port with the OpenCR connected from the Tools > Port menu.
-
Upload the TurtleBot3 firmware sketch with
Ctrl+Uor the upload icon.
- If the firmware upload fails, try uploading again through recovery mode according to the following instructions. While in recovery mode, the
STATUSled of the OpenCR will blink periodically.- Hold down the
PUSH SW2button. - Press the
Resetbutton. - Release the
Resetbutton. - Release the
PUSH SW2button.
- Hold down the
OpenCR Test
NOTE: If the wheels do not move while performing the OpenCR Test, refer to the”TurtleBot3 DYNAMIXEL setup instructions” to update the DYNAMIXEL’s configuration.
You can use PUSH SW 1 and PUSH SW 2 buttons to see whether your robot has been properly assembled. This process tests the left and right DYNAMIXEL configurations and the OpenCR board firmware.
- After assembling the TurtleBot3, connect power to the OpenCR and turn on the power switch. The red
Power LEDwill be turned on. - Place the robot on flat ground in a wide open area. For the test, a safety radius of 1 meter (40 inches) is recommended.
- Press and hold
PUSH SW 1for a few seconds to command the robot to move 30 centimeters (about 12 inches) forward. - Press and hold
PUSH SW 2for a few seconds to command the robot to rotate 180 degrees in place.
OpenCR Setup
- Connect the OpenCR to the Rasbperry Pi using a micro USB cable.
- Install the required packages on the Raspberry Pi in order to upload the OpenCR firmware.
[TurtleBot3 SBC]$ sudo dpkg --add-architecture armhf $ sudo apt-get update $ sudo apt-get install libc6:armhf - Depending on your specific model, specify either
burgerorwafflefor the OPENCR_MODEL name.
[TurtleBot3 SBC]$ export OPENCR_PORT=/dev/ttyACM0 $ export OPENCR_MODEL=burger_noetic $ rm -rf ./opencr_update.tar.bz2 - Download the firmware and required loader, then extract the file to prepare for upload.
[TurtleBot3 SBC]
$ wget https://github.com/ROBOTIS-GIT/OpenCR-Binaries/raw/master/turtlebot3/ROS1/latest/opencr_update.tar.bz2 $ tar -xvf opencr_update.tar.bz2 - Upload firmware to the OpenCR.
[TurtleBot3 SBC]$ cd ./opencr_update $ ./update.sh $OPENCR_PORT $OPENCR_MODEL.opencr -
A successful firmware upload for the TurtleBot3 Burger will look like this:
- If the firmware upload fails, try uploading again through recovery mode according to the following instructions. While in recovery mode, the
STATUSled of the OpenCR will blink periodically.- Hold down the
PUSH SW2button. - Press the
Resetbutton. - Release the
Resetbutton. - Release the
PUSH SW2button.
- Hold down the
Click here to expand more details about firmware uploads using the Arduino IDE
Please be aware that the OpenCR board manager does not support Arduino IDE on ARM based SBCs such as Raspberry Pi or NVidia Jetson.
In order to upload the OpenCR firmware using the Arduino IDE, please follow the below instructions on your PC.
- If you are using Linux, please configure the USB ports for OpenCR use. For other operating systems (OSX or Windows), you can skip this step.
$ wget https://raw.githubusercontent.com/ROBOTIS-GIT/OpenCR/master/99-opencr-cdc.rules $ sudo cp ./99-opencr-cdc.rules /etc/udev/rules.d/ $ sudo udevadm control --reload-rules $ sudo udevadm trigger $ sudo apt install libncurses5-dev:i386 - Install Arduino IDE.
-
After completing installation, run the Arduino IDE.
-
Press
Ctrl+,to open the Preferences menu - Enter the below address in the
Additional Boards Manager URLs.https://raw.githubusercontent.com/ROBOTIS-GIT/OpenCR/master/arduino/opencr_release/package_opencr_index.json - Open the TurtleBot3 firmware. Please select the correct firmware, depending on your specific model .
- Burger : File > Examples > turtlebot3 > turtlebot3_burger > turtlebot3_core
- Waffle/Waffle Pi : File > Examples > turtlebot3 > turtlebot3_waffle > turtlebot3_core
-
Open the
turtlebot3_core_config.hand uncomment the NOETIC_SUPPORT definition on line 21. -
Connect the OpenCR to the PC and Select OpenCR > OpenCR Board from the Tools > Board menu.
-
Select the USB port with the OpenCR connected from the Tools > Port menu.
-
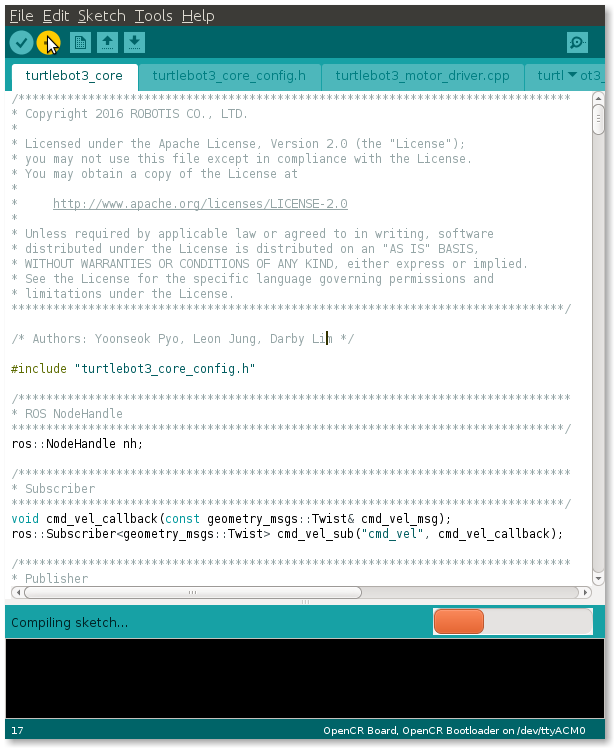
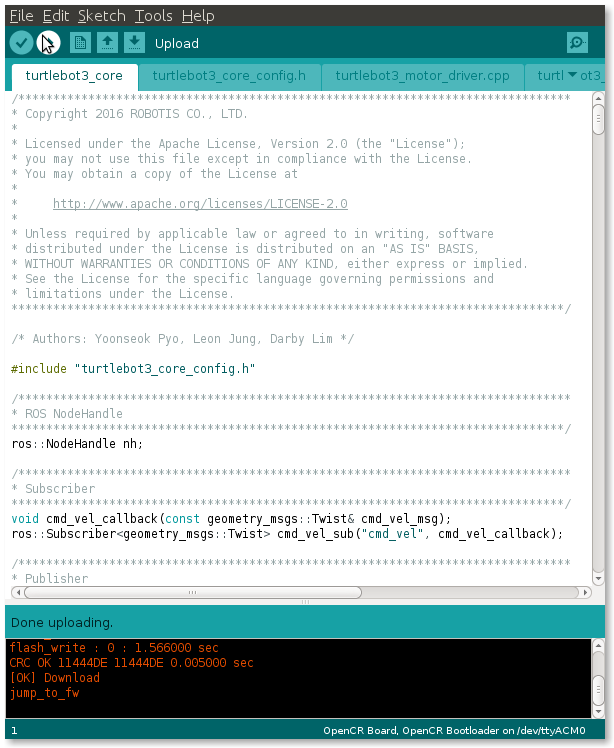
Upload the TurtleBot3 firmware sketch with
Ctrl+Uor the upload icon.
- If the firmware upload fails, try uploading again through recovery mode according to the following instructions. While in recovery mode, the
STATUSled of the OpenCR will blink periodically.- Hold down the
PUSH SW2button. - Press the
Resetbutton. - Release the
Resetbutton. - Release the
PUSH SW2button.
- Hold down the
OpenCR Test
NOTE: If the wheels do not move while performing the OpenCR Test, refer to the”TurtleBot3 DYNAMIXEL setup instructions” to update the DYNAMIXEL’s configuration.
You can use PUSH SW 1 and PUSH SW 2 buttons to see whether your robot has been properly assembled. This process tests the left and right DYNAMIXEL configurations and the OpenCR board firmware.
- After assembling the TurtleBot3, connect power to the OpenCR and turn on the power switch. The red
Power LEDwill be turned on. - Place the robot on flat ground in a wide open area. For the test, a safety radius of 1 meter (40 inches) is recommended.
- Press and hold
PUSH SW 1for a few seconds to command the robot to move 30 centimeters (about 12 inches) forward. - Press and hold
PUSH SW 2for a few seconds to command the robot to rotate 180 degrees in place.