
Manipulation
NOTE:
- These instructions were tested on
Ubuntu 22.04andROS2 Humble Hawksbill. - If you want more specific information about OpenMANIPULATOR-X operation, please refer to the OpenMANIPULATOR-X eManual page.
The contents in e-Manual are subject to change without prior notice. Some included video instructions may differ from the contents in the e-Manual.
NOTE:
- These instructions were tested on
Ubuntu 20.04andROS Noetic Ninjemys. - If you want more specific information about OpenMANIPULATOR-X operation, please refer to the OpenMANIPULATOR-X eManual page.
The contents in e-Manual are subject to change without prior notice. Some included video instructions may differ from the contents in the e-Manual.
TurtleBot3 with OpenMANIPULATOR
![]()
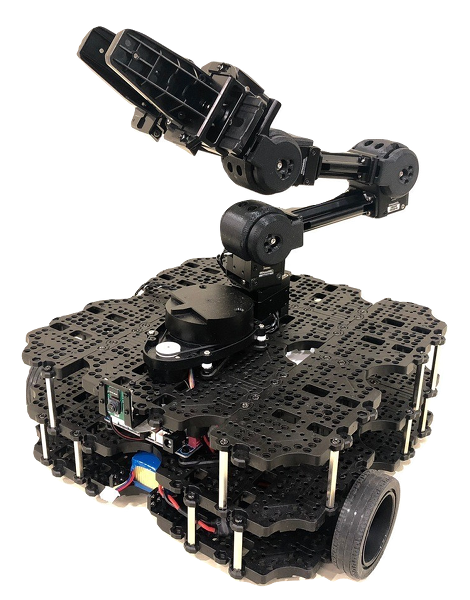
The OpenMANIPULATOR-X from ROBOTIS is a low cost manipulator using DYNAMIXEL actuators with 3D printable parts and support for ROS.
The OpenMANIPULATOR-X is compatible with the TurtleBot3 Waffle as a mobile manipulator with the SLAM and Navigation capabilities integral to the TurtleBot3 platform.
The contents in e-Manual are subject to change without notice. Some video content may differ from the contents in the eManual.
![]()
The OpenMANIPULATOR-X from ROBOTIS is a low cost manipulator using DYNAMIXEL actuators with 3D printable parts and support for ROS.
The OpenMANIPULATOR-X is compatible with the TurtleBot3 Waffle as a mobile manipulator with the SLAM and Navigation capabilities integral to the TurtleBot3 platform.
The contents in e-Manual are subject to change without notice. Some video content may differ from the contents in the eManual.
Software Setup
NOTE: TurtleBot3 Manipulation for ROS2 Humble requires the turtlebot3_manipulation package. Follow the instructions below to install the required package and its dependencies.
The TurtleBot3 Simulation Package requires the turtlebot3 and turtlebot3_msgs packages. Without these prerequisite packages, the TurtleBot3 Manipulator cannot be launched. Please follow Quick Start Guide instructions if you did not install required packages and dependent packages.
- Connect to the TurtleBot3 SBC using the ssh command below.
[Remote PC]$ ssh ubuntu@{IP_ADDRESS_OF_TURTLEBOT3} - Install the packages for TurtleBot3 Manipulation.
[TurtleBot3 SBC]$ sudo apt install ros-humble-hardware-interface ros-humble-xacro ros-humble-ros2-control ros-humble-ros2-controllers ros-humble-gripper-controllers $ cd ~/turtlebot3_ws/src/ $ git clone -b humble https://github.com/ROBOTIS-GIT/turtlebot3_manipulation.git $ cd ~/turtlebot3_ws && colcon build --symlink-install - Open a terminal on the Remote PC and install the required packages using the following commands.
[Remote PC]$ sudo apt install ros-humble-dynamixel-sdk ros-humble-ros2-control ros-humble-ros2-controllers ros-humble-gripper-controllers ros-humble-moveit* $ cd ~/turtlebot3_ws/src/ $ git clone -b humble https://github.com/ROBOTIS-GIT/turtlebot3_manipulation.git $ cd ~/turtlebot3_ws && colcon build --symlink-install
NOTE: Before installing the turtlebot3_manipulation package, ensure that the turtlebot3 and open_manipulator packages are installed on the Remote PC.
- Download and build the package using the following commands.
[Remote PC]
$ cd ~/catkin_ws/src/
$ git clone -b noetic https://github.com/ROBOTIS-GIT/turtlebot3_manipulation.git
$ git clone -b noetic https://github.com/ROBOTIS-GIT/turtlebot3_manipulation_simulations.git
$ git clone -b noetic https://github.com/ROBOTIS-GIT/open_manipulator_dependencies.git
$ sudo apt install ros-noetic-ros-control* ros-noetic-control* ros-noetic-moveit* ros-noetic-dwa-local-planner
$ cd ~/catkin_ws && catkin_make
- If
catkin_makecompletes without any errors, the OpenMANIPULATOR package has successfully been installed. You can then load a TurtleBot3 Waffle or Waffle Pi with an attached OpenMANIPULATOR in RViz. –> <!–$ cd ~/catkin_ws && catkin_make $ cd ~/catkin_ws/src/ $ git clone https://github.com/ROBOTIS-GIT/open_manipulator_with_tb3.git $ git clone https://github.com/ROBOTIS-GIT/open_manipulator_with_tb3_msgs.git $ git clone https://github.com/ROBOTIS-GIT/open_manipulator_with_tb3_simulations.git $ git clone https://github.com/ROBOTIS-GIT/open_manipulator_perceptions.git $ sudo apt-get install ros-melodic-smach* ros-melodic-ar-track-alvar ros-melodic-ar-track-alvar-msgs $ cd ~/catkin_ws && catkin_make
Hardware Assembly
- CAD files (TurtleBot3 Waffle Pi + OpenMANIPULATOR)
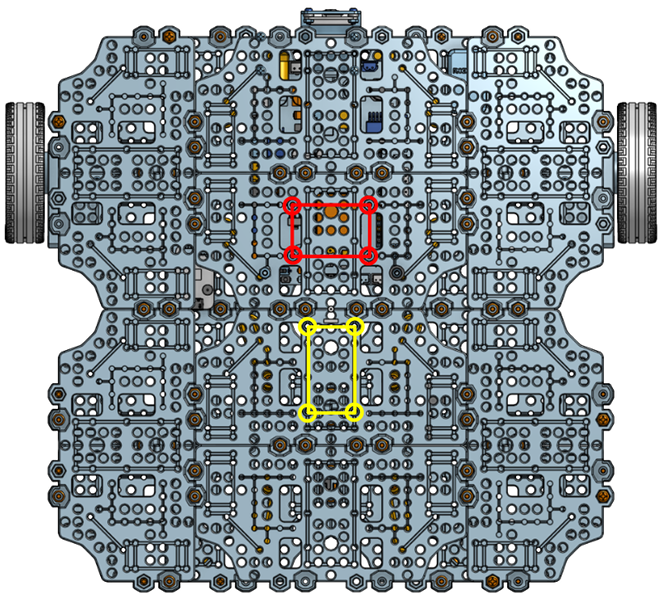
- Remove the
LDS-01orLDS-02LiDAR sensor and install it on the front of TurtleBot3.
Red circles indicate recommended bolt holes. - Install the
OpenMANIPULATOR-Xon the TurtleBot3.
Yellow circles indicate recommended bolt holes.
OpenCR Setup
NOTE: To use the OpenMANIPULATOR-X, you need to upload specific firmware to the OpenCR by using either a shell script or the Arduino IDE.
- The Shell script is recommended to upload the firmware as it uses a pre-built binary file
- The Arduino IDE builds from the provided source code and uploads the generated binary file. The OpenCR Arduino board manager does not support ARM based processors such as Raspberry Pi or Jetson Nano.
WARNING
Please connect all DYNAMIXEL motors to the OpenCR before uploading the OpenCR firmware.
After the OpenMANIPULATOR-X is properly mounted on TurtleBot3, the OpenCR firmware needs to be updated to control the connected DYNAMIXELs. Please follow the firmware update instructions below.
- Download the OpenCR firmware file on the Raspberry Pi (SBC) and upload the correct firmware with the following commands.
[TurtleBot3 SBC]$ export OPENCR_PORT=/dev/ttyACM0 $ export OPENCR_MODEL=turtlebot3_manipulation $ rm -rf ./opencr_update.tar.bz2 $ wget https://github.com/ROBOTIS-GIT/OpenCR-Binaries/raw/master/turtlebot3/ROS2/latest/opencr_update.tar.bz2 $ tar -xvf opencr_update.tar.bz2 $ cd ./opencr_update $ ./update.sh $OPENCR_PORT $OPENCR_MODEL.opencr - When the firmware is successfully uploaded to the OpenCR, jump_to_fw will be printed to the terminal used to upload the firmware.
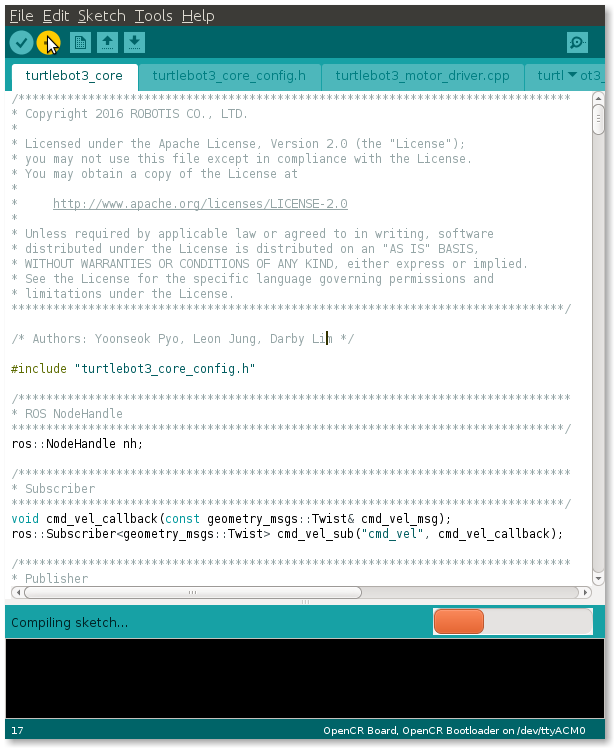
Arduino IDE
Please be aware that OpenCR board manager does not support Arduino IDE on ARM based SBC such as Raspberry Pi or NVidia Jetson.
In order to upload the OpenCR firmware using Arduino IDE, please follow the below instructions on your PC.
 Click here to expand more details about the firmware upload using Arduino IDE
- If you are using Linux, please configure the USB port for the OpenCR. For other OS(OSX or Windows), you can skip to the step 2 “Install Arduino IDE”.
$ wget https://raw.githubusercontent.com/ROBOTIS-GIT/OpenCR/master/99-opencr-cdc.rules $ sudo cp ./99-opencr-cdc.rules /etc/udev/rules.d/ $ sudo udevadm control --reload-rules $ sudo udevadm trigger $ sudo apt install libncurses5-dev:i386 - Install Arduino IDE.
-
After completing the installation, run Arduino IDE.
-
Press
Ctrl+,to open the Preferences menu - Enter below addresses in the
Additional Boards Manager URLs.https://raw.githubusercontent.com/ROBOTIS-GIT/OpenCR/master/arduino/opencr_release/package_opencr_index.json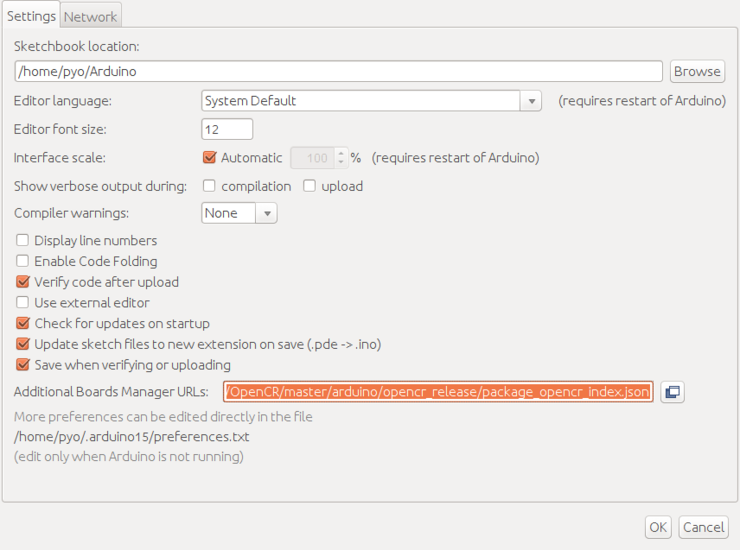
-
Select
Sketch > Include Library > Manage Libraries...to install the DYNAMIXEL2Arduino library.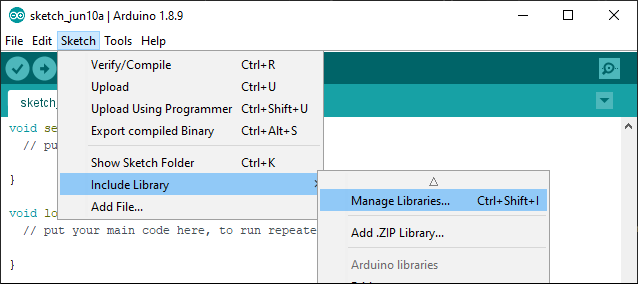
-
Search for
DYNAMIXEL2Arduinofrom the Library Manager and install the library.
- Open the
TurtleBot3 Manipulationexample.- File > Examples > turtlebot3 > turtlebot3_manipulation > turtlebot3_manipulation
-
Connect the micro USB of the OpenCR to the PC and select Tools > Board > OpenCR > OpenCR Board in the Arduino IDE.
-
Select the port connected to the OpenCR from the Tools > Port menu.
-
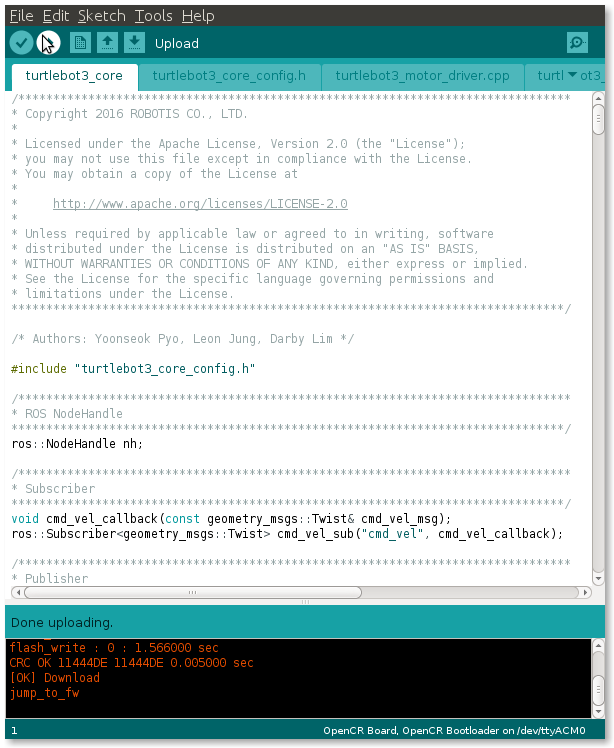
Upload the TurtleBot3 firmware sketch with
Ctrl+Uor the upload icon.
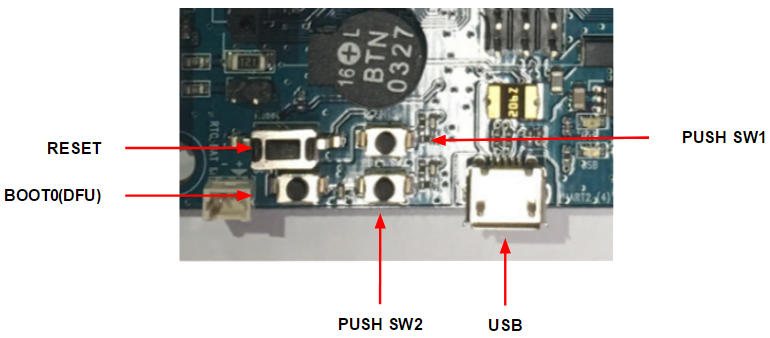
- If firmware upload fails, try uploading the firmware in recovery mode. the following sequence activates the recovery mode of the OpenCR. When in recovery mode, the
STATUSled of the OpenCR will blink periodically.- Hold down the
PUSH SW2button. - Press the
Resetbutton. - Release the
Resetbutton. - Release the
PUSH SW2button.
- Hold down the
NOTE: To use the OpenMANIPULATOR-X, you will need to upload dedicated firmware to the OpenCR by using either a shell script or the Arduino IDE.
- The Shell script is recommended as it uses a pre-built binary file.
- The Arduino IDE builds from the provided source code and uploads the generated binary file. The OpenCR Arduino board manager does not support ARM based processors such as Raspberry Pi or Jetson Nano.
WARNING
Please connect all DYNAMIXEL servos to the OpenCR before uploading the OpenCR firmware.
After the OpenMANIPULATOR is properly mounted on the TurtleBot3, the OpenCR firmware needs to be updated to control the connected DYNAMIXELs. Please follow the firmware update instructions below.
- Download the OpenCR firmware file to the Raspberry Pi (SBC) and upload the correct firmware with the following commands.
[TurtleBot3 SBC]$ export OPENCR_PORT=/dev/ttyACM0 $ export OPENCR_MODEL=om_with_tb3_noetic $ rm -rf ./opencr_update.tar.bz2 $ wget https://github.com/ROBOTIS-GIT/OpenCR-Binaries/raw/master/turtlebot3/ROS1/latest/opencr_update.tar.bz2 $ tar -xvf opencr_update.tar.bz2 $ cd ./opencr_update $ ./update.sh $OPENCR_PORT $OPENCR_MODEL.opencr - When the firmware is completely uploaded, you will see a text string on the terminal: jump_to_fw
DANGER
Please be aware of pinch hazards between the OpenMANIPULATOR joints!!!
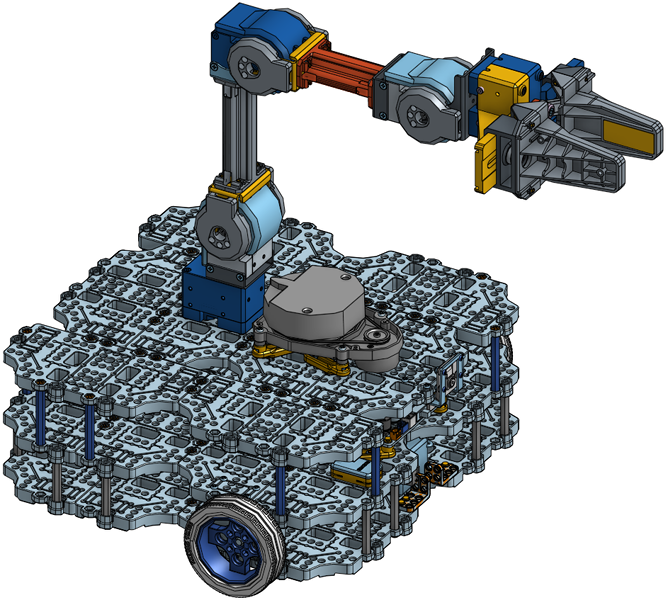
When the firmware is successfully uploaded, the OpenCR board will reboot and the OpenMANIPULATOR-X will move to it’s initial pose.
It is recommended to put the OpenMANIPULATOR-X in a similar pose as the below image to avoid any physical damage during the initial movement.
Arduino IDE
Please be aware that OpenCR board manager does not support Arduino IDE on ARM based SBC such as Raspberry Pi or NVidia Jetson.
In order to upload the OpenCR firmware using Arduino IDE, please follow the below instructions on your PC.
Click here to expand more details about the firmware upload using Arduino IDE
- If you are using Linux, please configure the USB port for OpenCR. For other OS(OSX or Windows), you can skip this step.
$ wget https://raw.githubusercontent.com/ROBOTIS-GIT/OpenCR/master/99-opencr-cdc.rules $ sudo cp ./99-opencr-cdc.rules /etc/udev/rules.d/ $ sudo udevadm control --reload-rules $ sudo udevadm trigger $ sudo apt install libncurses5-dev:i386 - Install Arduino IDE.
-
After completing the installation, run Arduino IDE.
-
Press
Ctrl+,to open the Preferences menu - Enter the below address in the
Additional Boards Manager URLs.https://raw.githubusercontent.com/ROBOTIS-GIT/OpenCR/master/arduino/opencr_release/package_opencr_index.json - Open the TurtleBot3 with OpenMANIPULATOR firmware.
- TurtleBot3 with OpenMANIPULATOR : File > Examples > turtlebot3 > turtlebot3_with_open_manipulator > turtlebot3_with_open_manipulator_core
-
Uncomment
#define NOETIC_SUPPORTonturtlebot3_with_open_manipulator_core.h, and save it. -
Connect OpenCR to the PC and Select OpenCR > OpenCR Board from Tools > Board menu.
-
Select the OpenCR’s USB port from Tools > Port menu.
-
Upload the TurtleBot3 firmware sketch with
Ctrl+Uor the upload icon.
- If firmware upload fails, try uploading through recovery mode. The following sequence activates the recovery mode of OpenCR. When in recovery mode, the
STATUSled of the OpenCR will blink periodically.- Hold down the
PUSH SW2button. - Press the
Resetbutton. - Release the
Resetbutton. - Release the
PUSH SW2button.
- Hold down the
Bringup
In order to run a TurtleBot3 Manipulation simulation using Gazebo, please skip to the Simulation section. The following command will bringup the actual TurtleBot3 hardware with OpenMANIPULATOR-X on it.
- Open a terminal from the TurtleBot3 SBC.
- Bring up the TurtleBot3 Manipulation using the following command.
[TurtleBot3 SBC]
$ ros2 launch turtlebot3_manipulation_bringup hardware.launch.py
DANGER
Please be aware of pinch danger between the robot joints!!!
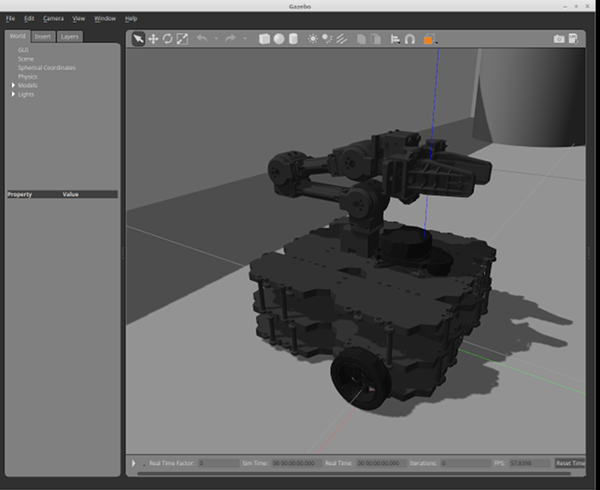
When the Turtlebot3 Manipulation bringup launches, the OpenMANIPULATOR-X will move to the initial pose.
It is recommended to put the OpenMANIPULATOR-X in a similar pose to the below image to avoid any physical damage during the initial movement.
NOTE: Be sure that the OpenCR port is properly assigned in the turtlebot3_core.launch bringup file.
Run roscore
Run roscore to start ROS.
[Remote PC]
$ roscore
Define TurtleBot3 Model
Export your TurtleBot3 model (waffle or waffle_pi) if the TURTLEBOT3_MODEL is not defined in your .bashrc file.
[TurtleBot3 SBC]
$ export TURTLEBOT3_MODEL=waffle_pi
Run Bringup
Run the Bringup node for TurtleBot3, and start rosserial and LDS sensor using the following command.
[TurtleBot3 SBC]
$ roslaunch turtlebot3_bringup turtlebot3_robot.launch
Simulation
Simulate the TurtleBot3 Manipulation using Gazebo by following the instructions below.
Install Simulation Package
Install the packages for TurtleBot3 Manipulation Gazebo simulation.
[Remote PC]
$ cd ~/turtlebot3_ws/src/
$ git clone -b humble https://github.com/ROBOTIS-GIT/turtlebot3_simulations.git
$ cd ~/turtlebot3_ws && colcon build --symlink-install
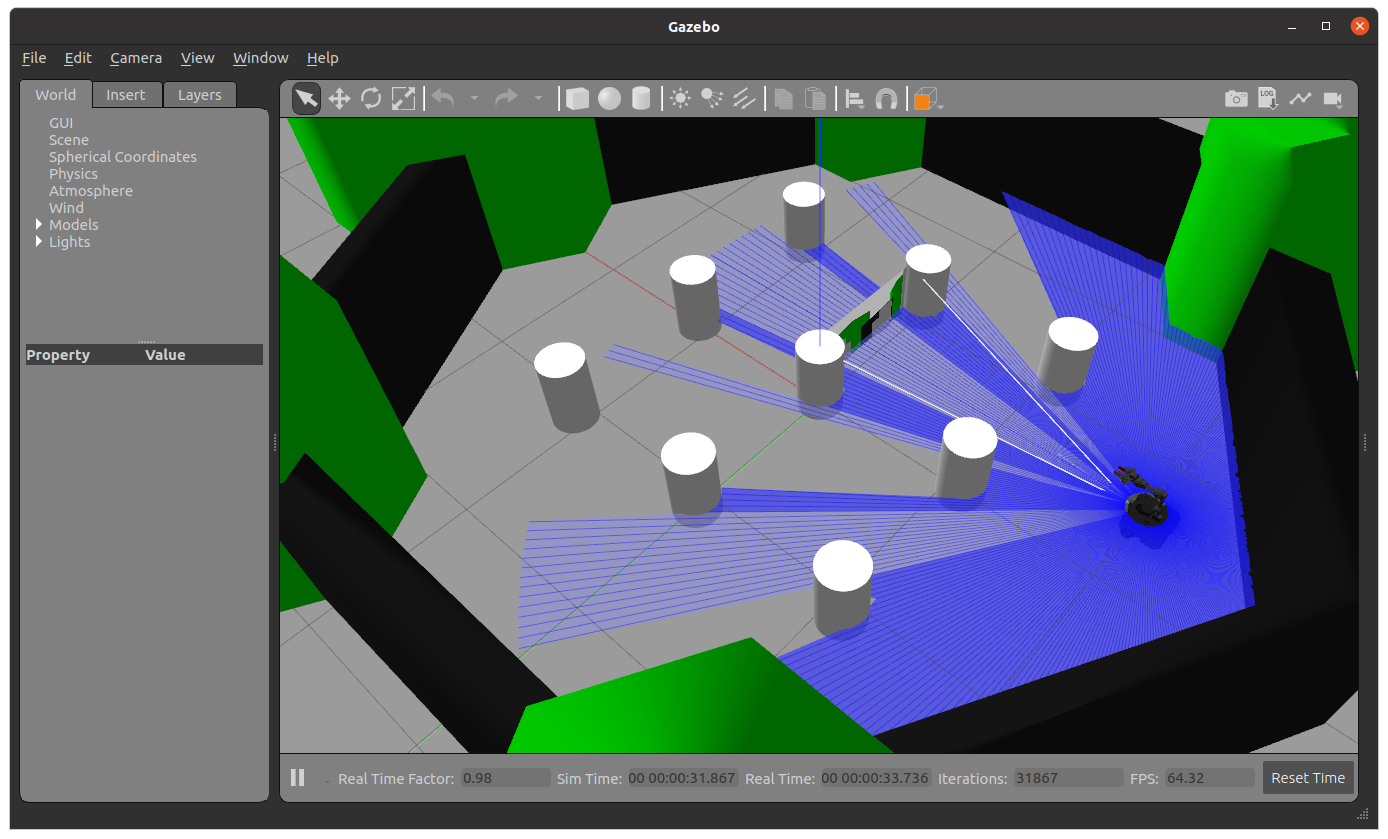
How to Run Gazebo
Bringup the TurtleBot3 with OpenMANIPULATOR-X in Gazebo world with the following command.
[Remote PC]
$ ros2 launch turtlebot3_manipulation_gazebo gazebo.launch.py
TIP
In order to run with RViz, append the start_rviz parameter as below.
[Remote PC]
$ ros2 launch turtlebot3_manipulation_gazebo gazebo.launch.py start_rviz:=true
To control the TurtleBot3 in the Gazebo simulation, the servo server node of MoveIt must be launched first.
[Remote PC]
$ ros2 launch turtlebot3_manipulation_moveit_config servo.launch.py
Launch the keyboard teleoperation node.
[Remote PC]
$ ros2 run turtlebot3_manipulation_teleop turtlebot3_manipulation_teleop
TIP
Following keys are used to control the TurtleBot3.
Use o|k|l|; keys to move turtlebot base and use 'space' key to stop the base
Use s|x|z|c|a|d|f|v keys to Cartesian jog
Use 1|2|3|4|q|w|e|r keys to joint jog.
'ESC' to quit.
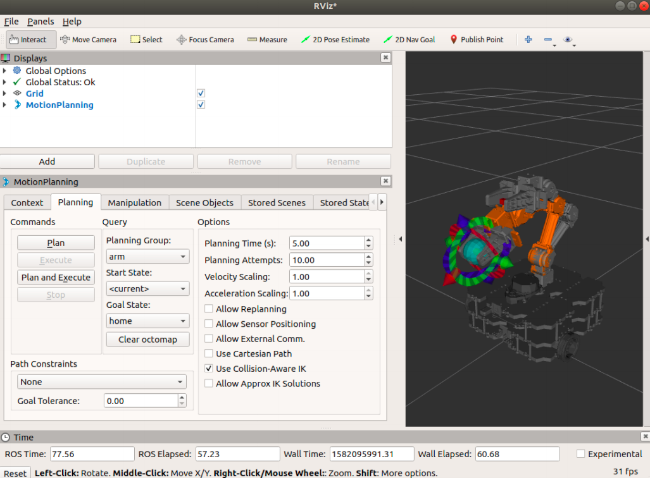
Simulation with MoveIt
In order to use MoveIt to operate the OpenMANIPULATOR-X in Gazebo, terminate other Gazebo and RViz tools first.
Enter the below command to launch RViz with MoveIt configuration.
[Remote PC]
$ ros2 launch turtlebot3_manipulation_moveit_config moveit_gazebo.launch.py
The MoveIt Interface on RViz will be launched along with the Gazebo simulator.

Simulate TurtleBot3 Manipulation using Gazebo by following this section.
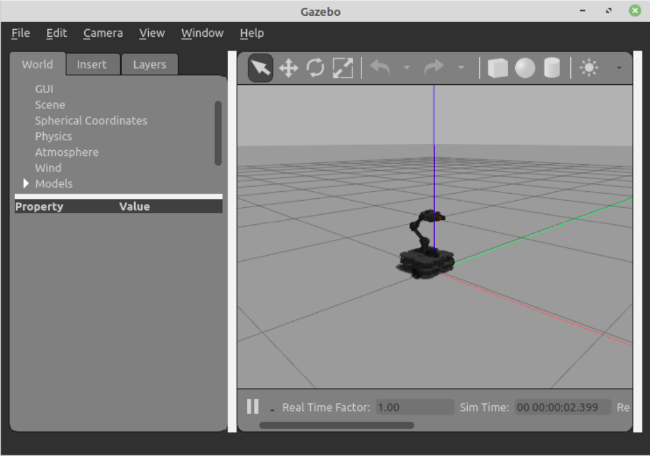
Run Gazebo
Load the TurtleBot3 with OpenMANIPULATOR-X into Gazebo world with the following command.
[Remote PC]
$ roslaunch turtlebot3_manipulation_gazebo turtlebot3_manipulation_gazebo.launch
Run move_group Node
In order to use the MoveIt feature, launch the move_group node.
With a successful launch, “You can start planning now!” message will be printed on the terminal.
[Remote PC]
$ roslaunch turtlebot3_manipulation_moveit_config move_group.launch
Run RViz
Use MoveIt in RViz by reading a moveit.rviz file where MoveIt environment data is configured.
You can control the mounted manipulator using an interactive marker, and simulate the motion to a goal position, which helps preventing possible physical contact by simulating the motion in advance.
[Remote PC]
$ roslaunch turtlebot3_manipulation_moveit_config moveit_rviz.launch
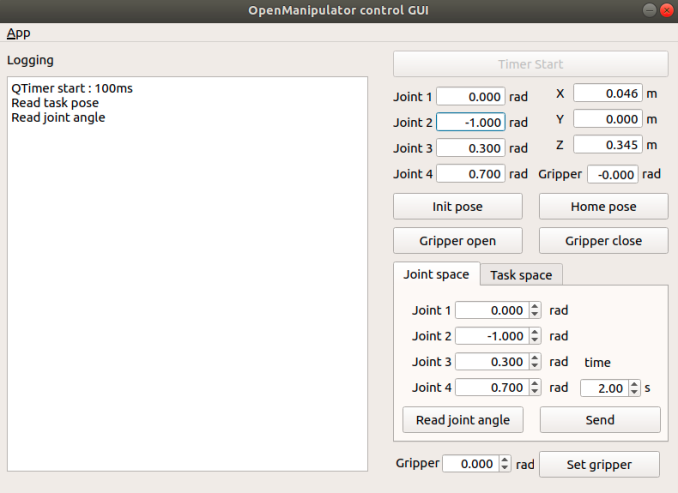
Run ROBOTIS GUI Controller
You can also use a GUI to control the OpenMANIPULATOR-X in Gazebo. The GUI supports Task Space and Joint Space controls.
Task Space Control: Control based on valid gripping positions (represented as a small red cube between the grippers) of the end-effector of the OpenMANIPULATOR-X.Joint Space Control: Control based on each joint angle.
[Remote PC]$ roslaunch turtlebot3_manipulation_gui turtlebot3_manipulation_gui.launch
Operate the Actual OpenMANIPULATOR
Please be aware that the actual hardware operation requires Bringup from the TurtleBot3 SBC.
Bring up the TurtleBot3 Manipulation using the following command.
[TurtleBot3 SBC]
$ ros2 launch turtlebot3_manipulation_bringup hardware.launch.py
Enter the command below to launch the MoveIt on RViz.
[Remote PC]
$ ros2 launch turtlebot3_manipulation_moveit_config moveit_core.launch.py
To operate the robot with the keyboard teleoperation node, the RViz must be terminated.
Then launch the servo server node and teleoperation nodes on a separate terminal window.
[Remote PC]
$ ros2 launch turtlebot3_manipulation_moveit_config servo.launch.py
[Remote PC]
$ ros2 run turtlebot3_manipulation_teleop turtlebot3_manipulation_teleop
Follow the given instruction to operate your robot.
Run roscore
Run roscore to use ROS 1.
[Remote PC]
$ roscore
Run Bringup
- Run Bringup node for TurtleBot3, and start rosserial and LDS sensor using following command.
[TurtleBot3 SBC]$ roslaunch turtlebot3_bringup turtlebot3_robot.launch - Run Bringup node for OpenMANIPULATOR on TurtleBot3
[Remote PC]$ roslaunch turtlebot3_manipulation_bringup turtlebot3_manipulation_bringup.launch
Run move_group Node
[Remote PC]
$ roslaunch turtlebot3_manipulation_moveit_config move_group.launch
Run RViz
Run RViz to visualize data and to use the interactive marker.
[Remote PC]
$ roslaunch turtlebot3_manipulation_moveit_config moveit_rviz.launch
Run ROBOTIS GUI Controller
OpenMANIPULATOR can be controlled with using ROBOTIS GUI controller instead of RViz tool.
[Remote PC]
$ roslaunch turtlebot3_manipulation_gui turtlebot3_manipulation_gui.launch
SLAM
Be sure to read SLAM manual before use of the following instruction.
TurtleBot3 Bringup
Bring up the TurtleBot3 Manipulation Actual or Simulation using the following command.
Actual [TurtleBot3 SBC]
$ ros2 launch turtlebot3_manipulation_bringup hardware.launch.py
OR
Simulation [Remote PC]
$ ros2 launch turtlebot3_manipulation_gazebo gazebo.launch.py
Run SLAM Nodes
Launch slam node using the following command.
[Remote PC]
$ ros2 launch turtlebot3_manipulation_cartographer cartographer.launch.py
Run Teleoperation Nodes
- Launch the servo server node.
[Remote PC]$ ros2 launch turtlebot3_manipulation_moveit_config servo.launch.py - Launch teleop node using the following command.
[Remote PC]$ ros2 run turtlebot3_manipulation_teleop turtlebot3_manipulation_teleop - Use
O,K,L,;keys to drive the TurtleBot3 platform.
Save the Map
- Open a terminal on Remote PC.
- Run the nav2_map_server to save the current map on RViz.
[Remote PC]$ ros2 run nav2_map_server map_saver_cli -f ~/map
Be sure to read SLAM manual before use of the following instruction.
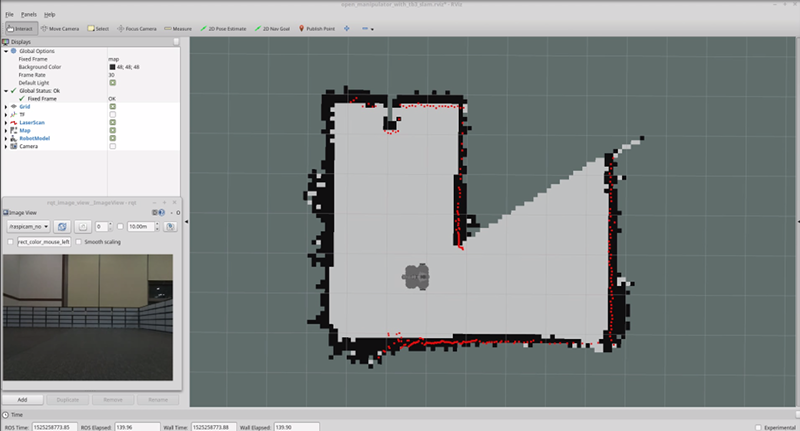
Use SLAM feature to update an unknown map with TurtleBot3 and OpenMANIPULATOR
;
Run roscore
Run roscore to use ROS 1.
[Remote PC]
$ roscore
Run Bringup
Run Bringup node for TurtleBot3, and start rosserial and LDS sensor using following command.
[TurtleBot3 SBC]
roslaunch turtlebot3_bringup turtlebot3_robot.launch
NOTE: As OpenMANIPULATOR on TurtleBot3 is not neccessory for SLAM, move_group and bringup nodes, which are the parameters to control OpenMANIPULATOR, are not important to use
Run SLAM Node
Run SLAM node for updating an unknown map with TurtleBot3. This node utilizes gmapping package.
[Remote PC]
$ roslaunch turtlebot3_manipulation_slam slam.launch
Run turtlebot3_teleop_key Node
- Update the map where TurtleBot3 will navigate using turtlebot3_teleop_key node.
[Remote PC]$ roslaunch turtlebot3_teleop turtlebot3_teleop_key.launch - Once the map is completely updated, run the map_saver node to save the updated map.
[Remote PC]$ rosrun map_server map_saver -f ~/map
Navigation
Be sure to read Navigation manual before use of the following instruction.
TurtleBot3 Bringup
Bring up the TurtleBot3 Manipulation Actual or Simulation using the following command.
Actual [TurtleBot3 SBC]
$ ros2 launch turtlebot3_manipulation_bringup hardware.launch.py
OR
Simulation [Remote PC]
$ ros2 launch turtlebot3_manipulation_gazebo gazebo.launch.py
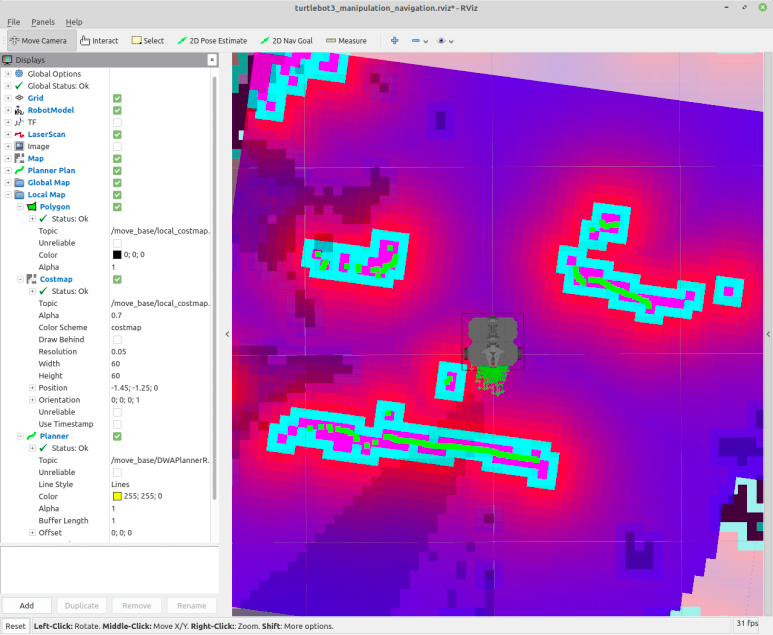
Run Navigation Nodes
[Remote PC]
- Open a terminal on Remote PC.
- Launch the navigation file using the following command.
$ ros2 launch turtlebot3_manipulation_navigation2 navigation2.launch.py map_yaml_file:=$HOME/map.yaml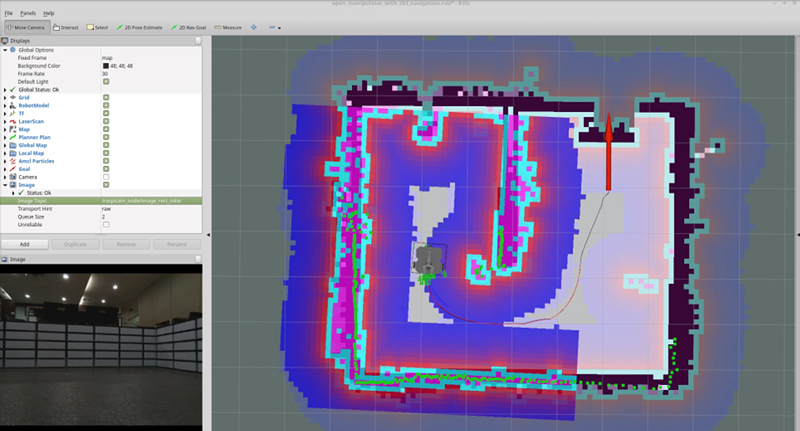
Be sure to read Navigation manual before use of the following instruction.
Send TurtleBot3 with OpenMANIPULATOR to the desired position in the map using Navigation node.
Run roscore
Run roscore to use ROS 1.
[Remote PC]
$ roscore
Run Bringup
Run Bringup node for TurtleBot3, and start rosserial and LDS sensor using following command.
[TurtleBot3 SBC]
$ roslaunch turtlebot3_bringup turtlebot3_robot.launch
Run Navigation Node
Run Navigation node with the following command, which will call Unified Robot Description Format (urdf) and configuration data of RViz to set GUI enviroment, parmeters for Navigation and updated map.
[Remote PC]
$ roslaunch turtlebot3_manipulation_navigation navigation.launch map_file:=$HOME/map.yaml
How to Control OpenMANIPULATOR with Navigation
You can run this node to control OpenMANIPULATOR on TurtleBot3 when TurtleBot3 is approaching to a goal position when Navigation node is running. However, when TurtleBot3 is in motion, the movement of OpenMANIPULATOR will be unstable by external influences, such as center of gravity, or vibration; so that it is recommended for the manipulator to be used when TurtleBot3 is not driving.
Run Bringup node for OpenMANIPULATOR
Run turtlebot3_manipulation_bringup node just as use of single OpenMANIPULATOR. This node contains arm_controller and gripper_controller.
[Remote PC]
$ roslaunch turtlebot3_manipulation_bringup turtlebot3_manipulation_bringup.launch
Run move_group Node
move_group node supports two interfaces to control OpenMANIPULATOR; MoveIt! and ROBOTIS GUI. Choose either of them according to your preference. In this section, GUI Controller is introduced only.
[Remote PC]
$ roslaunch turtlebot3_manipulation_moveit_config move_group.launch
NOTE: Please refer to MoveIt! for more details.
Run GUI Controller
Using this interface, you can control OpenMANIPULATOR on TurtleBot3
[Remote PC]
$ roslaunch turtlebot3_manipulation_gui turtlebot3_manipulation_gui.launch