
[ROS 1] Applications
NOTE:
- This instructions were tested on
Ubuntu 16.04andROS Kinetic Kame. - This instructions are supposed to be running on the remote PC. Please run the instructions below on your Remote PC. However, the part marked [TurtleBot] is the content that runs on SBC of TurtleBot3.
- Make sure to run the Bringup instructions before use of the instruction
This chapter shows some demos using TurtleBot3. In order to implement these demos, you have to install the turtlebot3_applications and turtlebot3_applications_msgs packages.
[Remote PC] Go to catkin workspace directory (/home/(user_name)/catkin_ws/src) and clone the turtlebot3_applications and turtlebot3_applications_msgs repository. Then run the catkin_make to build the new packages.
$ sudo apt-get install ros-kinetic-ar-track-alvar
$ sudo apt-get install ros-kinetic-ar-track-alvar-msgs
$ cd ~/catkin_ws/src
$ git clone https://github.com/ROBOTIS-GIT/turtlebot3_applications.git
$ git clone https://github.com/ROBOTIS-GIT/turtlebot3_applications_msgs.git
$ cd ~/catkin_ws && catkin_make
TurtleBot Follower Demo
NOTE:
- The follower demo was implemented only using a 360 Laser Distance Sensor LDS-01. A classification algorithm is used based on previous fitting with samples of person and obstacles positions to take actions. It follows someone in front of the robot within a 50 centimeter range and 140 degrees.
- Running the follower demo in an area with obstacles may not work well. Therefore, it is recommended to run the demo in an open area without obstacles.
- [Remote PC] Install
scikit-learn,NumPyandScyPypackages.
$ sudo apt-get install python-pip
$ sudo pip install -U scikit-learn numpy scipy
$ sudo pip install --upgrade pip
- [Remote PC] When installation is completed, run roscore on the remote pc.
$ roscore
- [TurtleBot] Launch the Bringup package.
$ roslaunch turtlebot3_bringup turtlebot3_robot.launch
- [Remote PC] Set the enviroment variable for the TurtleBot3 Burger and launch
turtlebot3_follow_filter.
$ export TURTLEBOT3_MODEL=burger
$ roslaunch turtlebot3_follow_filter turtlebot3_follow_filter.launch
- [Remote PC] Launch
turtlebot3_follower.
$ roslaunch turtlebot3_follower turtlebot3_follower.launch
TurtleBot Panorama Demo
NOTE:
- The
turtlebot3_panoramademo usespano_rosfor taking snapshots and stitching them together to create panoramic image. - Panorama demo requires to install
raspicam_nodepackage. Instructions for installing this package can be found at Gihub Link - Panorama demo requires to install OpenCV and cvbridge packages. Instructions for installing OpenCV can be found at OpenCV Tutorial Link
- [TurtleBot] Launch the
turtlebot3_rpicamerafile
$ roslaunch turtlebot3_bringup turtlebot3_rpicamera.launch
- [Remote PC] Launch
panorama.
$ roslaunch turtlebot3_panorama panorama.launch
- [Remote PC] To start the panorama demo, enter the following command.
$ rosservice call turtlebot3_panorama/take_pano 0 360.0 30.0 0.3
Parameters that can be sent to the rosservice to get a panoramic image are:

- Mode for taking the pictures.

    - 0 : snap&rotate (i.e. rotate, stop, snapshot, rotate, stop, snapshot, ...)
    - 1 : continuous (i.e. keep rotating while taking snapshots)
    - 2 : stop taking pictures and create panoramic image

- Total angle of panoramic image, in degrees
- Angle interval (in degrees) when creating the panoramic image in snap&rotate mode, time interval (in seconds) otherwise
- Rotating velocity (in radians/s)
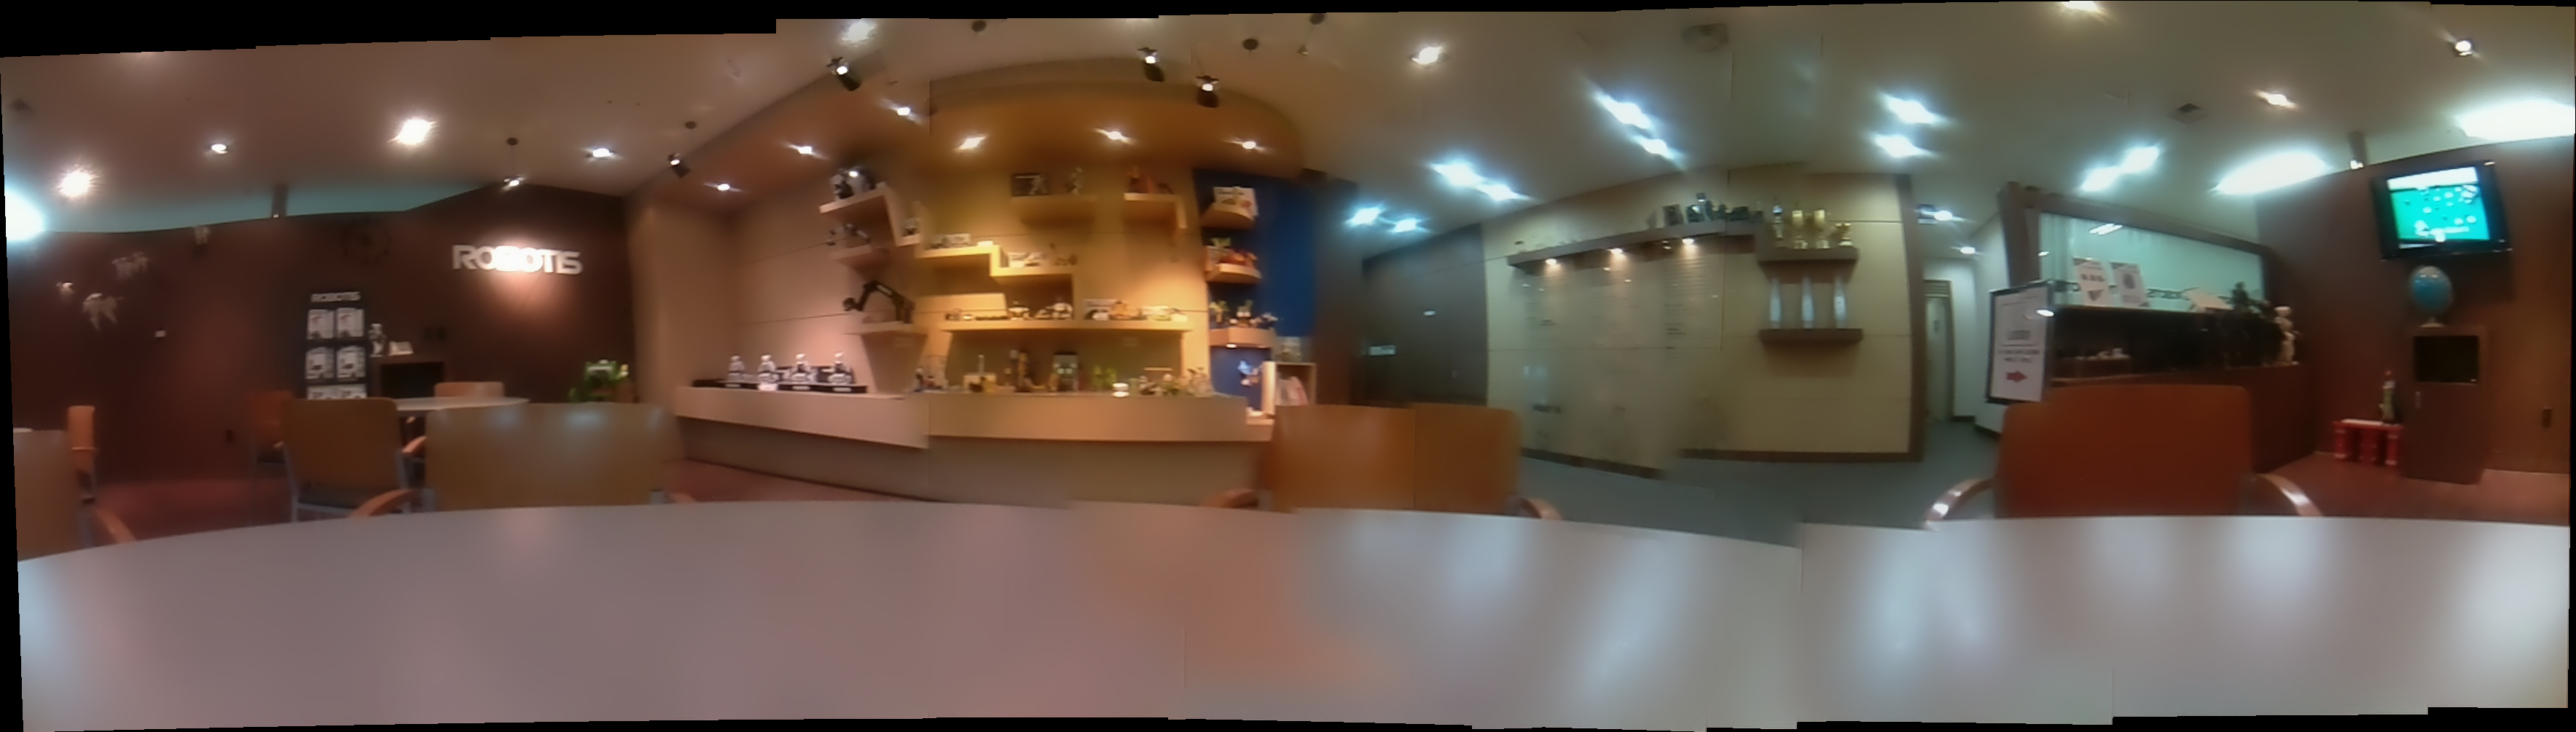
- [Remote PC] To view the result image, enter the following command.
$ rqt_image_view image:=/turtlebot3_panorama/panorama
Automatic Parking
NOTE:
- The
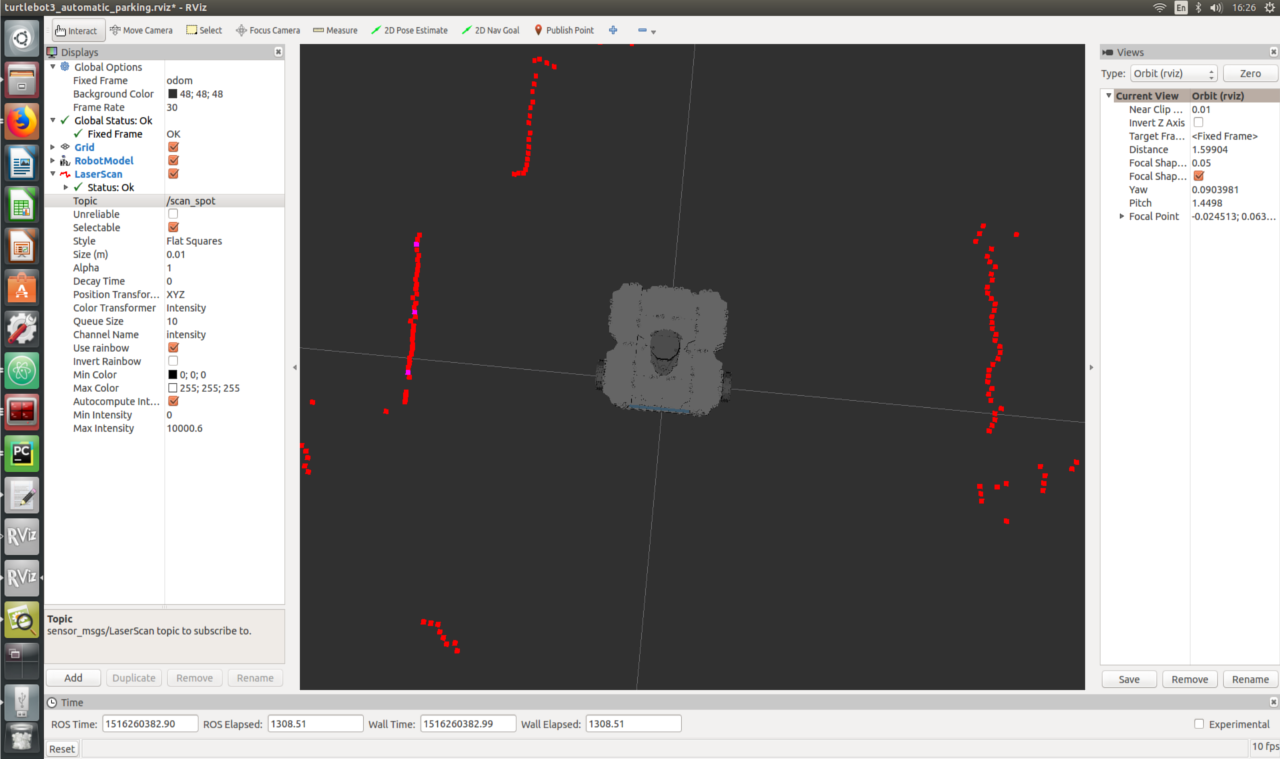
turtlebot3_automatic_parkingdemo was using a 360 laser Distance Sensor LDS-01 and a reflective tape. The LaserScan topic has intensity and distance data from LDS. The TurtleBot3 uses this to locate the reflective tape. - The
turtlebot3_automatic_parkingdemo requiresNumPypackage.
- [Remote PC] Install
NumPypackage with below commands. If you already installed numpy, you can skip below commands.
$ sudo apt-get install python-pip
$ sudo pip install -U numpy
$ sudo pip install --upgrade pip
- [Remote PC] Run roscore.
$ roscore
- [TurtleBot] Bring up basic packages to start TurtleBot3 applications.
$ roslaunch turtlebot3_bringup turtlebot3_robot.launch
- [Remote PC] If you use TurtleBot3 Burger, set the model of TurtleBot3 like command below.
$ export TURTLEBOT3_MODEL=burger
**NOTE**: Specify `${TB3_MODEL}`: `burger`, `waffle`, `waffle_pi` before excuting the command. Set the permanent export setting by following [Export TURTLEBOT3_MODEL](/docs/en/platform/turtlebot3/export_turtlebot3_model){: .popup} instruction.
{: .notice--info}
- [Remote PC] Run RViz.
$ roslaunch turtlebot3_bringup turtlebot3_remote.launch
$ rosrun rviz rviz -d `rospack find turtlebot3_automatic_parking`/rviz/turtlebot3_automatic_parking.rviz
- [Remote PC] Launch the automatic parking file.
$ roslaunch turtlebot3_automatic_parking turtlebot3_automatic_parking.launch
- You can select LaserScan topic in RViz.
- `/scan`
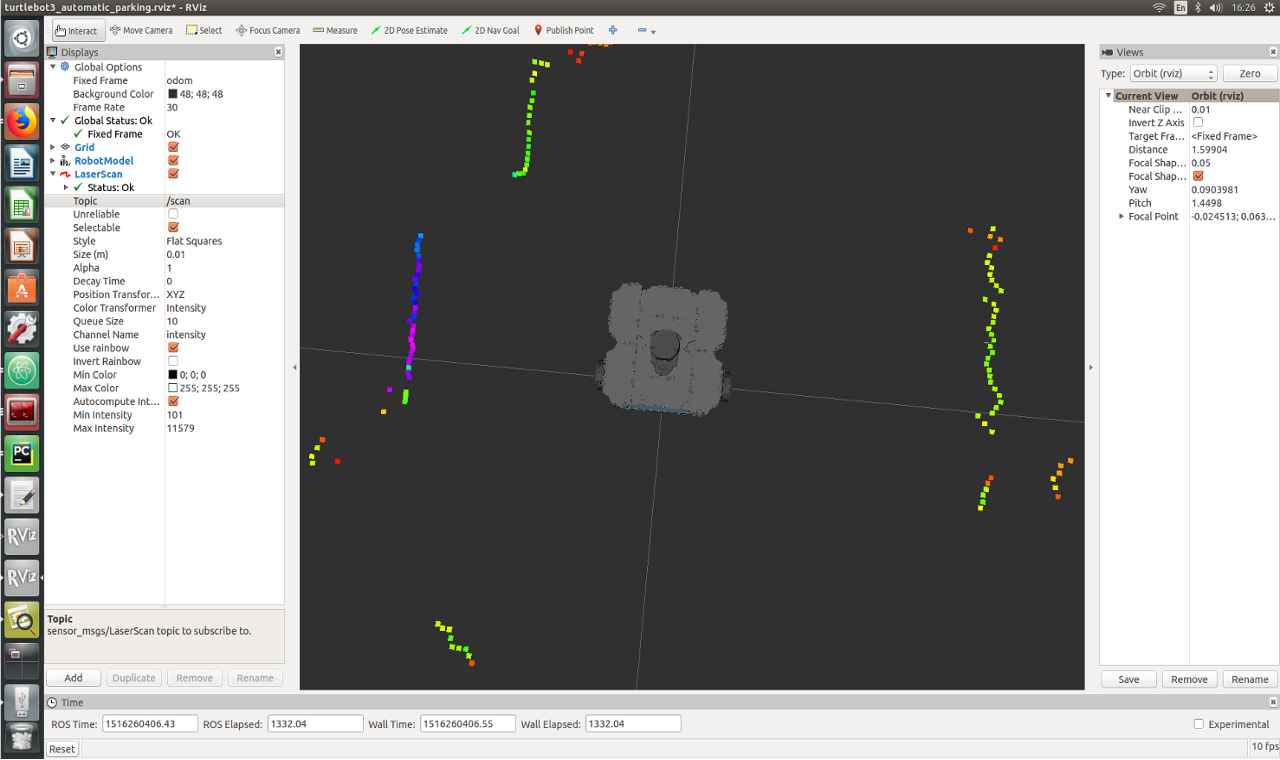
- `/scan_spot`
Automatic Parking Vision
NOTE:
- The
turtlebot3_automatic_parking_visionuses raspberry pi camera and so the robot which is a default platform used for this demo is TurtleBot3 Waffle Pi. Since it parks from finding out AR marker on some wall, printed AR marker should be prepared. Whole process uses the image get from the camera, so if the process is not well being done, configure the parameters, such as brightness, contrast, etc. - The
turtlebot3_automatic_parking_visionuses rectified image based onimage_procnodes. To get rectified image, the robot should get optic calibration data for raspberry pi camera. (Every downloaded turtlebot3 packages already have the camera calibration data as raspberry pi camera v2 default.) - The
turtlebot3_automatic_parking_visionpackage requiresar_track_alvarpackage.
- [Remote PC] Run roscore.
$ roscore
- [TurtleBot] Bring up basic packages to start TurtleBot3 applications.
$ roslaunch turtlebot3_bringup turtlebot3_robot.launch
- [TurtleBot] Start the raspberry pi camera nodes.
$ roslaunch turtlebot3_bringup turtlebot3_rpicamera.launch
- [Remote PC] Raspberry pi package will publish compressed type image for fast communication. However, what will be needed in image rectification in
image_procnode is raw type image. Hence, compressed image should be transform to raw image.
$ rosrun image_transport republish compressed in:=raspicam_node/image raw out:=raspicam_node/image
- [Remote PC] Then, the image rectification should be carried out.
$ ROS_NAMESPACE=raspicam_node rosrun image_proc image_proc image_raw:=image _approximate_s=true _queue_size:=20
- [Remote PC] Now should start the AR marker detection. Before running related launch file, the model of what will be used by this example code should be exported. After running the launch file, RViz will be automatically run under preset environments.
$ export TURTLEBOT3_MODEL=waffle_pi
$ roslaunch turtlebot3_automatic_parking_vision turtlebot3_automatic_parking_vision.launch
<iframe width="560" height="315" src="https://www.youtube.com/embed/dvpWdrD3bVs" frameborder="0" allow="autoplay; encrypted-media" allowfullscreen></iframe>
> TurtleBot3 Automatic Parking Vision
Load Multiple TurtleBot3s
NOTE: This application must be set firmware version 1.2.1 or higher.
- [Remote PC] Run roscore.
$ roscore
-
Bringup multiple turtlebot3s with different namespace. We recommend the namespace includes common words such as
tb3_0,tb3_1ormy_robot_0,my_robot_1- [TurtleBot(tb3_0)] Bring up basic packages with
ROS NAMESPACEfor nodes,multi_robot_namefor tf prefix andset_lidar_frame_idfor lidar frame id. This parameters must be the same.
$ ROS_NAMESPACE=tb3_0 roslaunch turtlebot3_bringup turtlebot3_robot.launch multi_robot_name:="tb3_0" set_lidar_frame_id:="tb3_0/base_scan"- [TurtleBot(tb3_1)] Bring up basic packages with
ROS NAMESPACEfor nodes,multi_robot_namefor tf prefix andset_lidar_frame_idfor lidar frame id. This parameters must be the same but different other robots.
$ ROS_NAMESPACE=tb3_1 roslaunch turtlebot3_bringup turtlebot3_robot.launch multi_robot_name:="tb3_1" set_lidar_frame_id:="tb3_1/base_scan" - [TurtleBot(tb3_0)] Bring up basic packages with
-
Then the terminal you launched
tb3_0will represents below messages. You can watch TF messages have prefixtb3_0SUMMARY ======== PARAMETERS * /rosdistro: kinetic * /rosversion: 1.12.13 * /tb3_0/turtlebot3_core/baud: 115200 * /tb3_0/turtlebot3_core/port: /dev/ttyACM0 * /tb3_0/turtlebot3_core/tf_prefix: tb3_0 * /tb3_0/turtlebot3_lds/frame_id: tb3_0/base_scan * /tb3_0/turtlebot3_lds/port: /dev/ttyUSB0 NODES /tb3_0/ turtlebot3_core (rosserial_python/serial_node.py) turtlebot3_diagnostics (turtlebot3_bringup/turtlebot3_diagnostics) turtlebot3_lds (hls_lfcd_lds_driver/hlds_laser_publisher) ROS_MASTER_URI=http://192.168.1.2:11311 process[tb3_0/turtlebot3_core-1]: started with pid [1903] process[tb3_0/turtlebot3_lds-2]: started with pid [1904] process[tb3_0/turtlebot3_diagnostics-3]: started with pid [1905] [INFO] [1531356275.722408]: ROS Serial Python Node [INFO] [1531356275.796070]: Connecting to /dev/ttyACM0 at 115200 baud [INFO] [1531356278.300310]: Note: publish buffer size is 1024 bytes [INFO] [1531356278.303516]: Setup publisher on sensor_state [turtlebot3_msgs/SensorState] [INFO] [1531356278.323360]: Setup publisher on version_info [turtlebot3_msgs/VersionInfo] [INFO] [1531356278.392212]: Setup publisher on imu [sensor_msgs/Imu] [INFO] [1531356278.414980]: Setup publisher on cmd_vel_rc100 [geometry_msgs/Twist] [INFO] [1531356278.449703]: Setup publisher on odom [nav_msgs/Odometry] [INFO] [1531356278.466352]: Setup publisher on joint_states [sensor_msgs/JointState] [INFO] [1531356278.485605]: Setup publisher on battery_state [sensor_msgs/BatteryState] [INFO] [1531356278.500973]: Setup publisher on magnetic_field [sensor_msgs/MagneticField] [INFO] [1531356280.545840]: Setup publisher on /tf [tf/tfMessage] [INFO] [1531356280.582609]: Note: subscribe buffer size is 1024 bytes [INFO] [1531356280.584645]: Setup subscriber on cmd_vel [geometry_msgs/Twist] [INFO] [1531356280.620330]: Setup subscriber on sound [turtlebot3_msgs/Sound] [INFO] [1531356280.649508]: Setup subscriber on motor_power [std_msgs/Bool] [INFO] [1531356280.688276]: Setup subscriber on reset [std_msgs/Empty] [INFO] [1531356282.022709]: Setup TF on Odometry [tb3_0/odom] [INFO] [1531356282.026863]: Setup TF on IMU [tb3_0/imu_link] [INFO] [1531356282.030138]: Setup TF on MagneticField [tb3_0/mag_link] [INFO] [1531356282.033628]: Setup TF on JointState [tb3_0/base_link] [INFO] [1531356282.041117]: -------------------------- [INFO] [1531356282.044421]: Connected to OpenCR board! [INFO] [1531356282.047700]: This core(v1.2.1) is compatible with TB3 Burger [INFO] [1531356282.051355]: -------------------------- [INFO] [1531356282.054785]: Start Calibration of Gyro [INFO] [1531356284.585490]: Calibration End -
[Remote PC] Launch robot state publisher with same namespace.
- [TurtleBot(tb3_0)]
$ ROS_NAMESPACE=tb3_0 roslaunch turtlebot3_bringup turtlebot3_remote.launch multi_robot_name:=tb3_0 - [TurtleBot(tb3_1)]
$ ROS_NAMESPACE=tb3_1 roslaunch turtlebot3_bringup turtlebot3_remote.launch multi_robot_name:=tb3_1
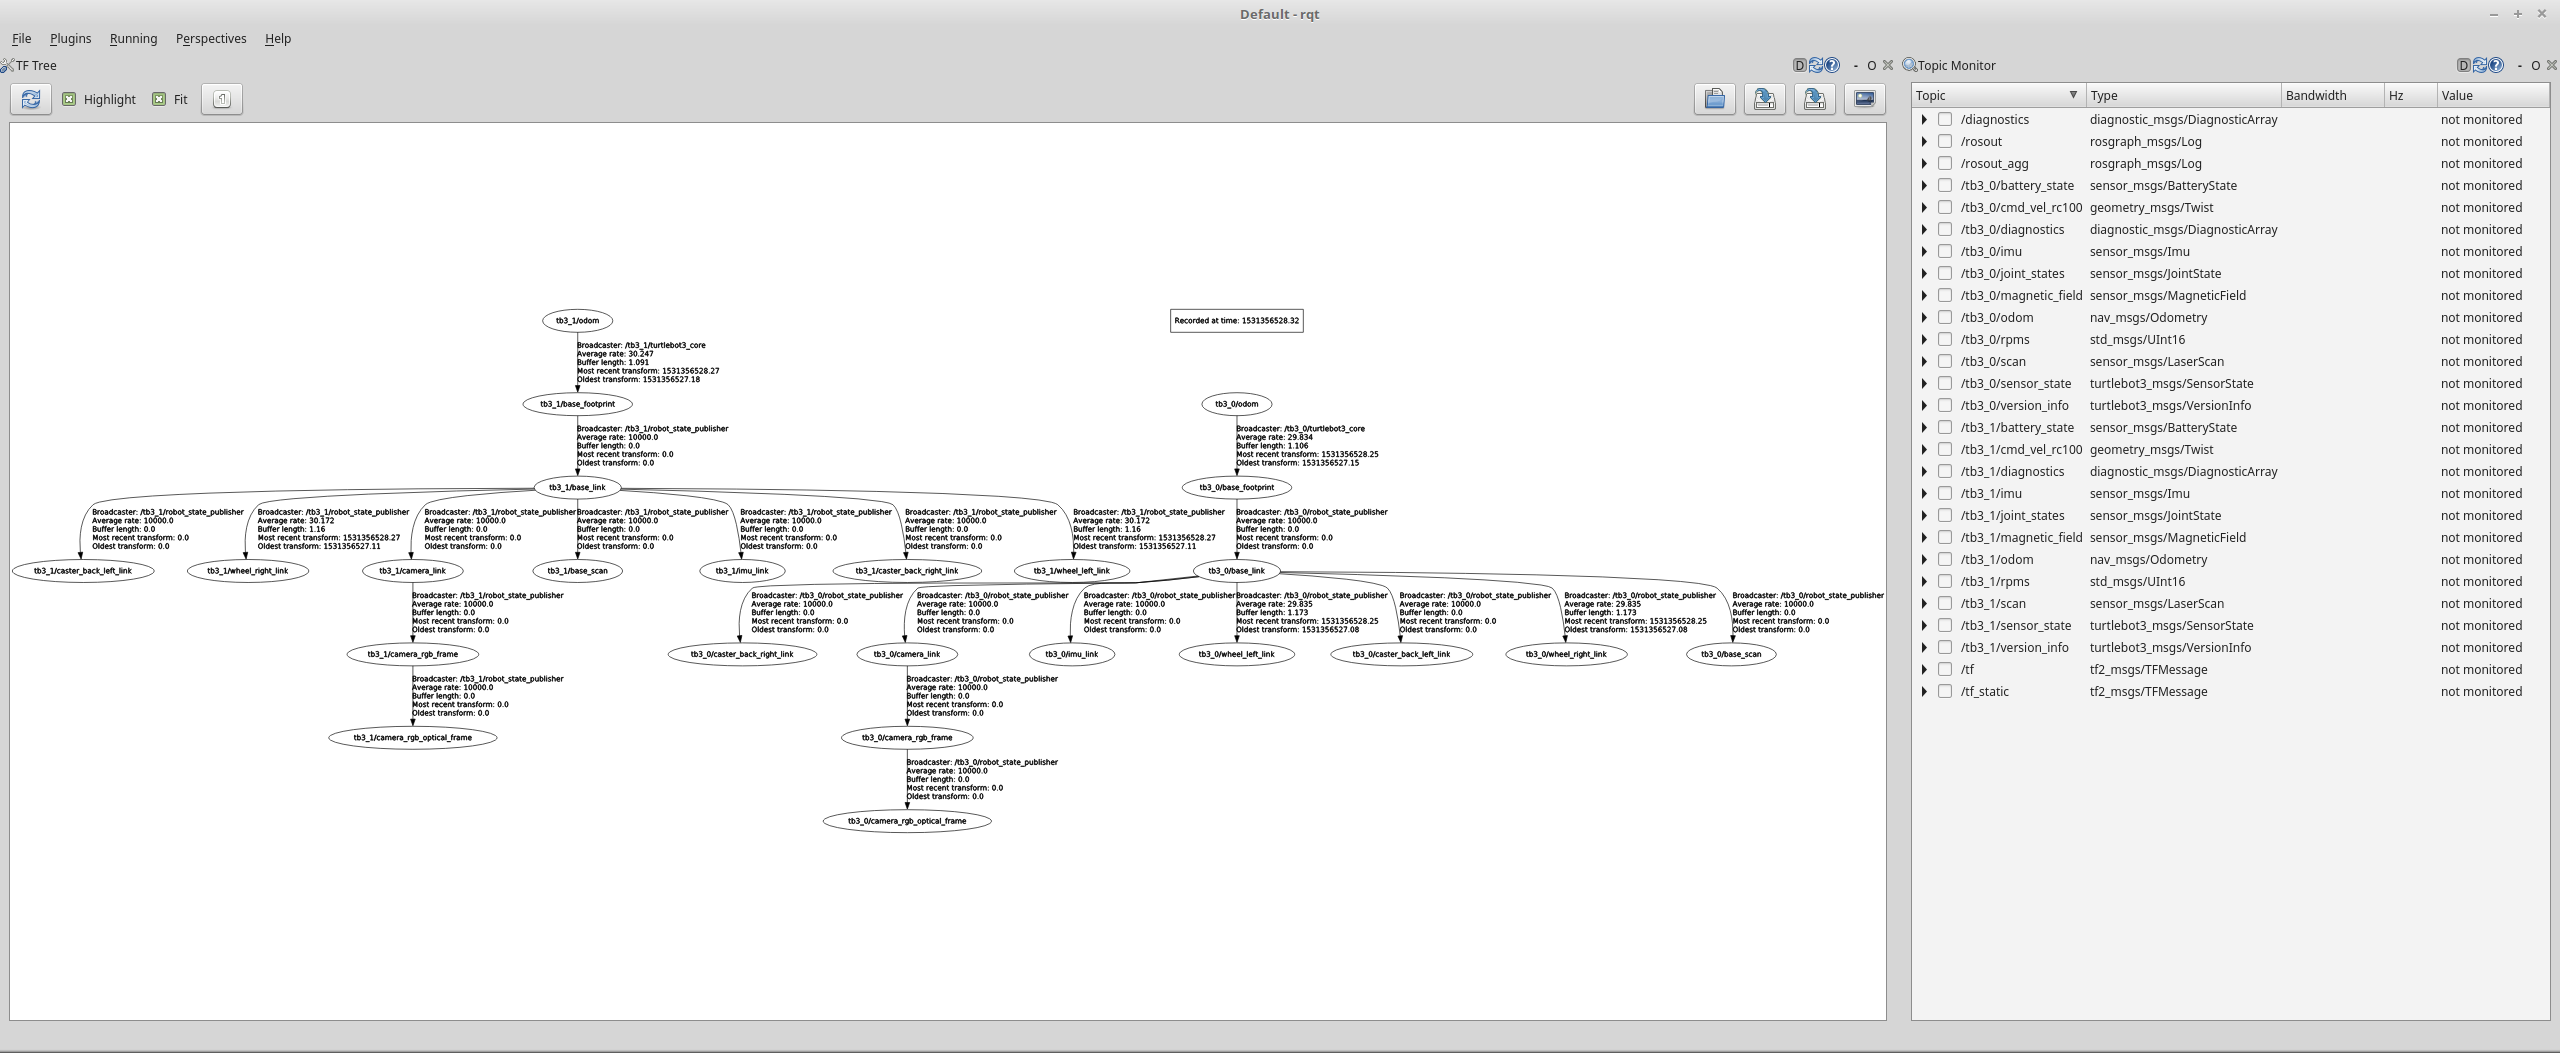
- Before start another application, check topics and TF tree to open rqt
$ rqt
To use this setup, each turtlebot3 makes map using SLAM and these maps are merged simutaneously by multi_map_merge packages. You can get more information about this to visit Virtual SLAM by Multiple TurtleBot3s sections