
SBC Setup
WARNING
- This process may take long time. Do not attempt to complete setup on battery power, connect your SBC to a wall power supply.
- An HDMI monitor and input devices such as a keyboard and a mouse will be required to complete this setup.
- In order to use the webOS Robotics Platform, please refer to webOS Robotics Platform for further instructions. Packages will be cross-compiled using OpenEmbedded on a higher performance PC and an image file created for installation on the SBC.
Prepare microSD Card and Reader
If your PC does not have a microSD slot, please use a microSD card reader to burn the recovery image.

The microSD card reader is not included in the TurtleBot3 package.
Install Raspberry Pi Imager
Download the Raspberry Pi Imager to install Ubuntu Server 22.04 for Raspberry Pi.
If the Raspberry Pi Imager is already installed, update to the latest version.
Please refer to this article to find more information about Raspberry Pi Imager.
 Click here to expand more details about How to install Raspberry Pi Imager.
Install either the deb or apt rpi-imager release.
deb
Download deb file
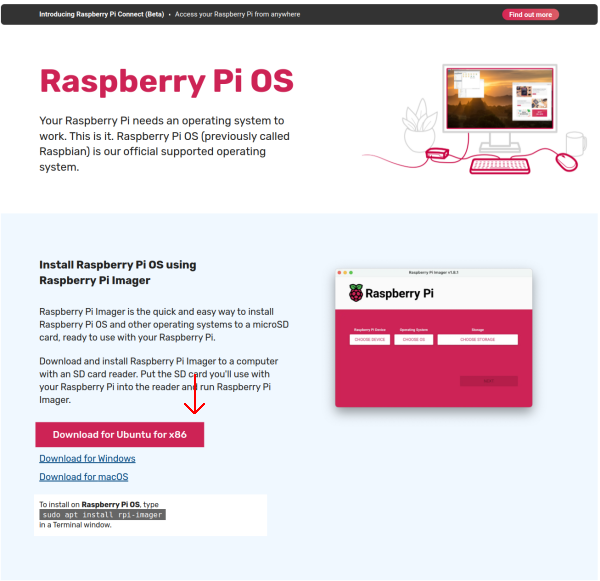
$ cd Downloads
$ sudo dpkg -i imager_[you_rversion]_amd64.deb #check the file name downloaded
If you have any dependency errors, use the following command to force the install.
$ sudo apt-get install -f
$ rpi-imager
apt
$ sudo apt install rpi-imager
$ rpi-imager
Install Ubuntu 22.04
- Run Raspberry Pi Imager
- Click
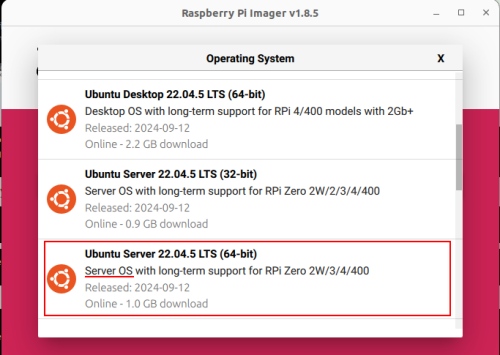
CHOOSE OS. - Select
Other gerneral-purpose OS. - Select
Ubuntu. - Select
Ubuntu Server 22.04.5 LTS (64-bit)that support RPi 3/4/400.
(Choose Server OS, not desktop OS)
- Click
CHOOSE STORAGEand select the micro SD card. - Click
Nextto install Ubuntu. - Click
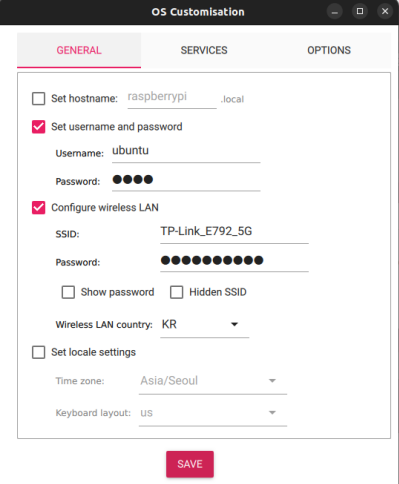
Edit Settingfor wifi and ssh setting.

- Set
username and password,Configure wireless LAN,Wireless LAN country. And activateEnable SSHwithUse password authenicationin SERVIES tab.

- By completing this configuring setup process, the following Wi-Fi configuration steps (up to step 4) can be skipped.
Configure the Raspberry Pi
The HDMI cable must be connected before powering on the Raspberry Pi, or the HDMI port of the Raspberry Pi will be disabled.
-
Boot Up the Raspberry Pi
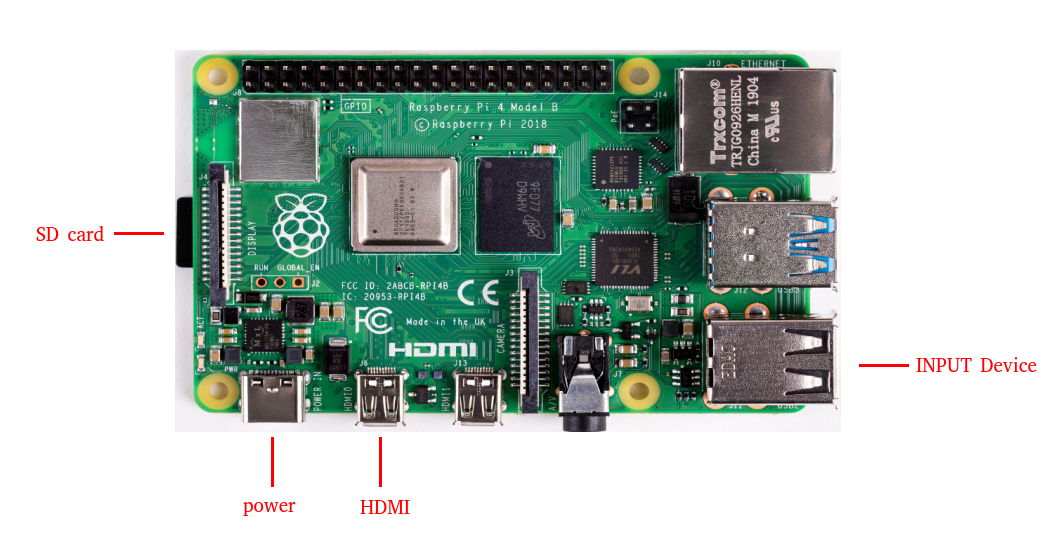
* More information about where to connect HDMI, power and input devices is available here
a. Connect the HDMI cable to the HDMI port of Raspberry Pi.
b. Connect input devices (generally keyboard) to the USB port of the Raspberry Pi.
c. Insert the microSD card into Raspberry Pi.
d. Connect the power (either USB or OpenCR) to turn on the Raspberry Pi.
e. Login with IDubuntuand PASSWORDubuntu. Once logged in, you’ll be asked to change the password.
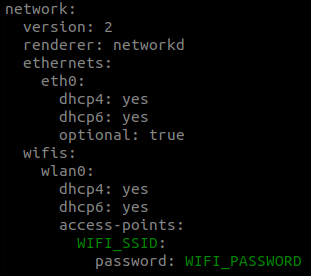
- Open the network configuration file with the command below.
[TurtleBot3 SBC]$ sudo nano /etc/netplan/50-cloud-init.yaml -
Edit the content to match the image below while replacing
WIFI_SSIDandWIFI_PASSWORDwith your actual wifi SSID and password.
-
Save the file with
Ctrl+Sand exit withCtrl+X. - Enter the command below to edit the automatic update settings file.
[TurtleBot3 SBC]$ sudo nano /etc/apt/apt.conf.d/20auto-upgrades - Change the update settings to match those below.
[TurtleBot3 SBC]APT::Periodic::Update-Package-Lists "0"; APT::Periodic::Unattended-Upgrade "0"; -
Save the file with
Ctrl+Sand exit withCtrl+X. - Set
systemdto prevent boot-up delay even if there is no network at startup. Run the command below to set mask for thesystemdprocess using the following command.
[TurtleBot3 SBC]$ systemctl mask systemd-networkd-wait-online.service - Disable Suspend and Hibernation
[TurtleBot3 SBC]$ sudo systemctl mask sleep.target suspend.target hibernate.target hybrid-sleep.target - Reboot the Raspberry Pi.
[TurtleBot3 SBC]$ sudo reboot - After rebooting the Raspberry Pi, if you wish to work from a Remote PC using SSH, use the command below from the remote PC terminal. Make sure to use the password you set in
Step 1.
[Remote PC]$ ssh ubuntu@{IP Address of Raspberry PI}
Click here to expand more details about how to connect through ssh
- Edit the SSH configuration files
[TurtleBot3 SBC]$ sudo nano /etc/ssh/sshd_config.d/50-cloud-init.conf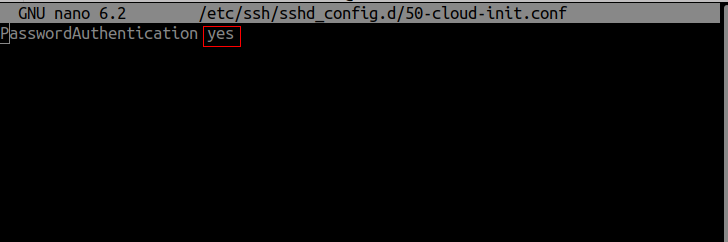
- Install net-tools and check your ip.
[TurtleBot3 SBC]$ reboot $ sudo apt update $ sudo apt install net-tools $ ifconfig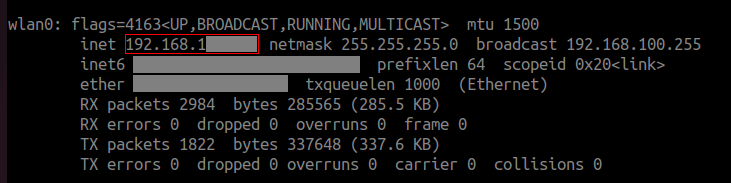
- Enter the command below on the
remote PCand use yourpasswordfor the Ubuntu system.
[Remote PC]$ ssh ubuntu@{IP Address of Raspberry PI}
Install packages on Raspberry PI
If you are using the TurtleBot3 2GB, make sure to create swap memory for building packages. Otherwise, you may run out of memory and package building may fail.
- Create 2GB swap memory.
[TurtleBot3 SBC]
$ sudo fallocate -l 2G /swapfile $ sudo chmod 600 /swapfile $ sudo mkswap /swapfile $ sudo swapon /swapfile - The following command ensures that the swap file is automatically activated when the system is rebooted.
$ echo '/swapfile none swap sw 0 0' | sudo tee -a /etc/fstab - Check swap memory.
$ free -h
-
Install ROS2 Humble Hawksbill
[TurtleBot3 SBC]
Follow the instructions from the official ROS2 Humble installation guide. Installing ROS-Base(Bare Bones) is recommended. - Install and Build ROS Packages.
Building theturtlebot3package may take longer than an hour. Please use a wall plug power supply to ensure the system is always powered.
[TurtleBot3 SBC]$ sudo apt install python3-argcomplete python3-colcon-common-extensions libboost-system-dev build-essential $ sudo apt install ros-humble-hls-lfcd-lds-driver $ sudo apt install ros-humble-turtlebot3-msgs $ sudo apt install ros-humble-dynamixel-sdk $ sudo apt install ros-humble-xacro $ sudo apt install libudev-dev $ mkdir -p ~/turtlebot3_ws/src && cd ~/turtlebot3_ws/src $ git clone -b humble https://github.com/ROBOTIS-GIT/turtlebot3.git $ git clone -b humble https://github.com/ROBOTIS-GIT/ld08_driver.git $ git clone -b humble https://github.com/ROBOTIS-GIT/coin_d4_driver $ cd ~/turtlebot3_ws/src/turtlebot3 $ rm -r turtlebot3_cartographer turtlebot3_navigation2 $ cd ~/turtlebot3_ws/ $ echo 'source /opt/ros/humble/setup.bash' >> ~/.bashrc $ source ~/.bashrc $ colcon build --symlink-install --parallel-workers 1 $ echo 'source ~/turtlebot3_ws/install/setup.bash' >> ~/.bashrc $ source ~/.bashrc - USB Port Settings for OpenCR
[TurtleBot3 SBC]$ sudo cp `ros2 pkg prefix turtlebot3_bringup`/share/turtlebot3_bringup/script/99-turtlebot3-cdc.rules /etc/udev/rules.d/ $ sudo udevadm control --reload-rules $ sudo udevadm trigger - ROS Domain ID Setting
In ROS2 DDS communication,
ROS_DOMAIN_IDmust match between the Remote PC and TurtleBot3 for communication in the same network environment.The following commands show how to assign aROS_DOMAIN_IDto the SBC of the TurtleBot3.- The default ID of the TurtleBot3 is
30. - Configuring the
ROS_DOMAIN_IDfor the Remote PC and SBC of the TurtleBot3 to30is recommended.
[TurtleBot3 SBC]$ echo 'export ROS_DOMAIN_ID=30 #TURTLEBOT3' >> ~/.bashrc $ source ~/.bashrc
- The default ID of the TurtleBot3 is
WARNING : Do not use an identical ROS_DOMAIN_ID to others in the same network. It will cause a conflict of communication between users under the same network environment.
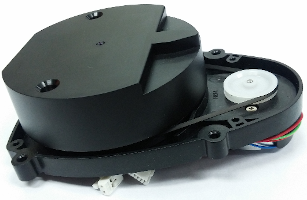
LDS Configuration
| LDS-01 | LDS-02 | LDS-03 |
|---|---|---|
 |
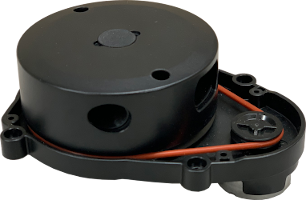 |
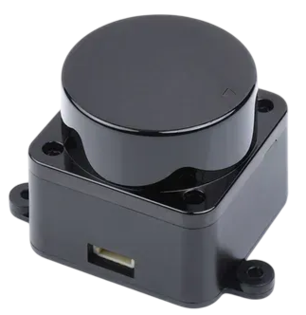 |
Depending on your LDS model, use the appropriate model: LDS-01, LDS-02, or LDS-03.
[TurtleBot3 SBC]
$ echo 'export LDS_MODEL=LDS-01' >> ~/.bashrc # If you are using LDS-01
$ echo 'export LDS_MODEL=LDS-02' >> ~/.bashrc # If you are using LDS-02
$ echo 'export LDS_MODEL=LDS-03' >> ~/.bashrc # If you are using LDS-03
Apply changes with the command below.
[TurtleBot3 SBC]
$ source ~/.bashrc
Raspberry Pi Camera
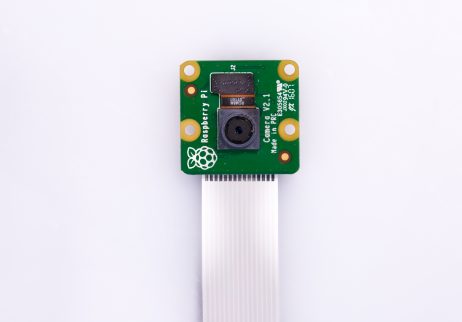
Introducing how to use the RPi camera with TurtleBot3 running Ubuntu 22.04 on a Raspberry Pi. There are various ways to publish the output of a RPi camera as a topic.
One method is to use the camera-ros package, and another method is to use the v4l2-camera package.
Method 1. Using the camera-ros package
This method is suitable for Raspberry Pi cameras using the libcamera stack. It is ideal for projects that demand high-quality imaging and fine-tuned control over camera settings. For more information about camera_ros, see the camera_ros website.
1. Install Required Tools
[TurtleBot3 SBC]
$ sudo apt update
$ sudo apt install -y python3-pip git python3-jinja2 \
libboost-dev libgnutls28-dev openssl libtiff-dev pybind11-dev \
qtbase5-dev libqt5core5a libqt5widgets5 meson cmake \
python3-yaml python3-ply \
libglib2.0-dev libgstreamer-plugins-base1.0-dev
$ sudo apt install ros-humble-camera-ros
python3-colcon-meson: Enables colcon to build Meson-based packages like libcamerapython3-ply: Required by libcamera’s code generation toolsros-humble-camera-ros: Installs the camera_ros node that uses libcamera
2. Clone libcamera Source
This step clones the official Raspberry Pi fork of libcamera, which provides full compatibility and optimized support for Raspberry Pi camera modules.
[TurtleBot3 SBC]
$ git clone -b v0.5.2 https://github.com/raspberrypi/libcamera.git
3. Build and Install libcamera
This installs libcamera to /usr/local and makes it available system-wide.
[TurtleBot3 SBC]
$ cd libcamera
$ meson setup build --buildtype=release -Dpipelines=rpi/vc4,rpi/pisp -Dipas=rpi/vc4,rpi/pisp -Dv4l2=true -Dgstreamer=enabled -Dtest=false -Dlc-compliance=disabled -Dcam=disabled -Dqcam=disabled -Ddocumentation=disabled -Dpycamera=enabled
$ ninja -C build -j 1
$ sudo ninja -C build install -j 1
$ sudo ldconfig
After installation, add the installation path of the built libcamera to LD_LIBRARY_PATH so that it is used.
$ export LD_LIBRARY_PATH=/usr/local/lib/aarch64-linux-gnu:$LD_LIBRARY_PATH
4. Launch the Camera Node
You can now launch the camera node using the provided launch file.
[TurtleBot3 SBC]
$ ros2 launch turtlebot3_bringup camera.launch.py
5. View Camera Input
You can verify that the camera node is publishing image data correctly using rqt_image_view, a GUI tool for displaying ROS 2 image topics.
[Remote PC]
$ rqt_image_view
Method 2. Using the v4l2-camera package
This method is better suited for USB cameras and legacy Raspberry Pi camera setups. It relies on the V4L2 (Video4Linux2) framework, making it simpler to set up and compatible with a broader range of devices. For more information about v4l2_camera, see the v4l2_camera website.
NOTE: These instructions are specifically for Raspberry Pi devices running Ubuntu 22.04.
1. Install ros-humble-v4l2-camera, raspi-config, ros-humble-image-transport-plugins, v4l-utils.
[TurtleBot3 SBC]
$ sudo apt-get install ros-humble-v4l2-camera raspi-config ros-humble-image-transport-plugins v4l-utils
ros-humble-v4l2-camera: A package that publishes camera output as a topic.raspi-config: A tool for configuring camera device connections on Raspberry Pi.ros-humble-image-transport-plugins: Converts image_raw to compressed images for smoother transmission.v4l-utils: A utility that assists with connection.
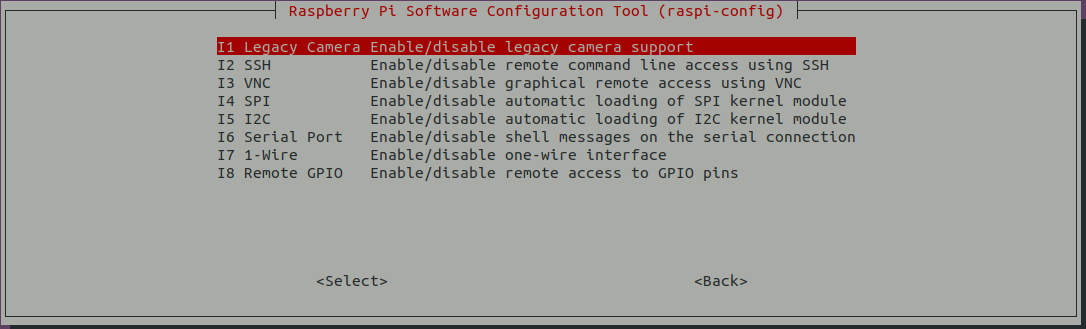
2. Run raspi-config
v4l2-camera package uses the legacy driver. So we must configure the use of the legacy driver. If this step is completed, the camera node of the camera-ros package will no longer be able to detect the camera. To use the camera-ros package after this step, you must disable the legacy driver again.
[TurtleBot3 SBC]
$ sudo raspi-config
Select Interface Options.
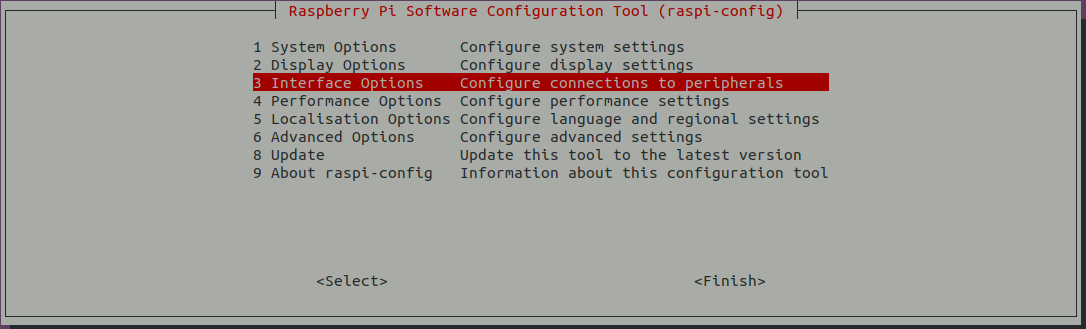
Select I1 and set enable legacy camera support. This allows the use of the legacy driver, bcm2835 MMAL.
3. Enable Legacy Camera Stack
Open the configuration file /boot/firmware/config.txt.
[TurtleBot3 SBC]
$ sudo nano /boot/firmware/config.txt
4. Modify or add the following lines
# Disable libcamera auto detect
camera_auto_detect=0
# Enable legacy camera stack for bcm2835-v4l2
start_x=1
If you plan to use the camera-ros package after this step, make sure to remove or comment out the lines camera_auto_detect=0, start_x=1, dtoverlay=imx219 in your configuration file.
5. Reboot the System
[TurtleBot3 SBC]
$ sudo reboot
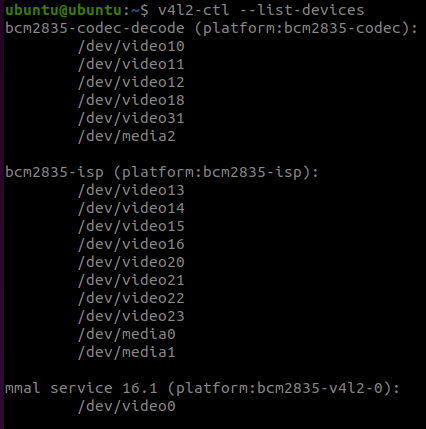
6. You can check camera_name by this command.
[TurtleBot3 SBC]
$ v4l2-ctl --list-devices
In this case, camera name is mmal_service_16.1.
7. Run v4l2_camera_node
[TurtleBot3 SBC]
$ ros2 run v4l2_camera v4l2_camera_node
8. View Camera Input
You can verify that the camera node is publishing image data correctly using rqt_image_view, a GUI tool for displaying ROS 2 image topics.
[Remote PC]
$ rqt_image_view
NOTE
To optimize camera data transmission speed, try the following methods.
-
Use
/camera/image_raw/compressed
Subscribing directly to the/camera/image_rawtopic can cause significant latency if the network is slow or bandwidth is limited. You can select/camera/image_raw/compressedin rqt_image_view. -
Adjust Resolution
Higher resolutions require more bandwidth, which can cause lag. So, lowering the resolution can reduce latency and improve performance. A recommended resolution is 320x240, which strikes a good balance between image quality and transmission speed and can be adjusted via command.
More Info
For detailed specifications and advanced settings, please check the 13.More Info - 13.1.Appendixes - Raspberry Pi Camera for a comprehensive guide on hardware capabilities and software features.
Camera Calibration
If you plan to use advanced vision features like camera calibration, you can find the detailed instructions here.
Trouble Shooting
If the error messageUnable to open camera calibration fileappears, check the solution here.
Please refer to the Ubuntu Blog posts below for more useful information.
This is it! Now you are done with SBC setup :)
Next Step : OpenCR Setup
SBC Setup
WARNING
- This process may take long time. Do not attempt to complete setup on battery power, connect your SBC to a wall power supply.
- An HDMI monitor and input devices such as a keyboard and a mouse will be required to complete this setup.
- In order to use the webOS Robotics Platform, please refer to webOS Robotics Platform for further instructions. Packages will be cross-compiled using OpenEmbedded on a higher performance PC and an image file created for installation on the SBC.
Prepare microSD Card and Reader
If your PC does not have a microSD slot, please use a microSD card reader to burn the recovery image.

The microSD card reader is not included in the TurtleBot3 package.
Install Raspberry Pi Imager
Download the Raspberry Pi Imager to install Ubuntu Server 24.04 for Raspberry Pi.
If the Raspberry Pi Imager is already installed, update to the latest version.
Please refer to this article to find more information about Raspberry Pi Imager.
Click here to expand more details about How to install Raspberry Pi Imager.
Install either the deb or apt rpi-imager release.
deb
Download deb file
$ cd Downloads $ sudo dpkg -i imager_[you_rversion]_amd64.deb #check the file name downloadedIf you have any dependency errors, use the following command to force the install.
$ sudo apt-get install -f $ rpi-imagerapt
$ sudo apt install rpi-imager
$ rpi-imager
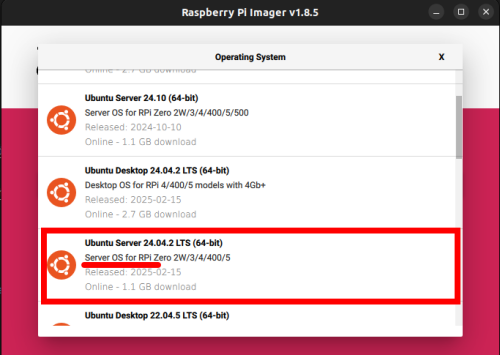
Install Ubuntu 24.04
- Run Raspberry Pi Imager
- Click
CHOOSE OS. - Select
Other gerneral-purpose OS. - Select
Ubuntu. - Select
Ubuntu Server 24.04.2 LTS (64-bit)that support RPi 3/4/400.
(Choose Server OS, not desktop OS)
- Click
CHOOSE STORAGEand select the micro SD card. - Click
Nextto install Ubuntu. - Click
Edit Settingfor wifi and ssh setting.
- Set
username and password,Configure wireless LAN,Wireless LAN country. And activateEnable SSHwithUse password authenicationin SERVIES tab.
- By completing this configuring setup process, the following Wi-Fi configuration steps (up to step 4) can be skipped.
Configure the Raspberry Pi
The HDMI cable must be connected before powering on the Raspberry Pi, or the HDMI port of the Raspberry Pi will be disabled.
-
Boot Up the Raspberry Pi
* More information about where to connect HDMI, power and input devices is available here
a. Connect the HDMI cable to the HDMI port of Raspberry Pi.
b. Connect input devices (generally keyboard) to the USB port of the Raspberry Pi.
c. Insert the microSD card into Raspberry Pi.
d. Connect the power (either USB or OpenCR) to turn on the Raspberry Pi.
e. Login with IDubuntuand PASSWORDubuntu. Once logged in, you’ll be asked to change the password.
- Open the network configuration file with the command below.
[TurtleBot3 SBC]$ sudo nano /etc/netplan/50-cloud-init.yaml -
Edit the content to match the image below while replacing
WIFI_SSIDandWIFI_PASSWORDwith your actual wifi SSID and password.

-
Save the file with
Ctrl+Sand exit withCtrl+X. - Enter the command below to edit the automatic update settings file.
[TurtleBot3 SBC]$ sudo nano /etc/apt/apt.conf.d/20auto-upgrades - Change the update settings to match those below.
[TurtleBot3 SBC]APT::Periodic::Update-Package-Lists "0"; APT::Periodic::Unattended-Upgrade "0"; -
Save the file with
Ctrl+Sand exit withCtrl+X. - Set
systemdto prevent boot-up delay even if there is no network at startup. Run the command below to set mask for thesystemdprocess using the following command.
[TurtleBot3 SBC]$ systemctl mask systemd-networkd-wait-online.service - Disable Suspend and Hibernation
[TurtleBot3 SBC]$ sudo systemctl mask sleep.target suspend.target hibernate.target hybrid-sleep.target - Reboot the Raspberry Pi.
[TurtleBot3 SBC]$ sudo reboot - After rebooting the Raspberry Pi, if you wish to work from a Remote PC using SSH, use the command below from the remote PC terminal. Make sure to use the password you set in
Step 1.
[Remote PC]$ ssh ubuntu@{IP Address of Raspberry PI}
Click here to expand more details about how to connect through ssh
- Edit the SSH configuration files
[TurtleBot3 SBC]$ sudo nano /etc/ssh/sshd_config.d/50-cloud-init.conf - Install net-tools and check your ip.
[TurtleBot3 SBC]$ reboot $ sudo apt update $ sudo apt install net-tools $ ifconfig - Enter the command below on the
remote PCand use yourpasswordfor the Ubuntu system.
[Remote PC]$ ssh ubuntu@{IP Address of Raspberry PI}
Install packages on Raspberry PI
If you are using the TurtleBot3 2GB, make sure to create swap memory for building packages. Otherwise, you may run out of memory and package building may fail.
- Create 2GB swap memory.
[TurtleBot3 SBC]
$ sudo fallocate -l 2G /swapfile $ sudo chmod 600 /swapfile $ sudo mkswap /swapfile $ sudo swapon /swapfile - The following command ensures that the swap file is automatically activated when the system is rebooted.
$ echo '/swapfile none swap sw 0 0' | sudo tee -a /etc/fstab - Check swap memory.
$ free -h
-
Install ROS 2 Jazzy Jalisco
[TurtleBot3 SBC]
Follow the instructions from the official ROS 2 Jazzy installation guide. Installing ROS-Base(Bare Bones) is recommended. - Install and Build ROS Packages.
Building theturtlebot3package may take longer than an hour. Please use a wall plug power supply to ensure the system is always powered.
[TurtleBot3 SBC]$ sudo apt install python3-argcomplete python3-colcon-common-extensions libboost-system-dev build-essential $ sudo apt install ros-jazzy-hls-lfcd-lds-driver $ sudo apt install ros-jazzy-turtlebot3-msgs $ sudo apt install ros-jazzy-dynamixel-sdk $ sudo apt install ros-jazzy-xacro $ sudo apt install libudev-dev $ mkdir -p ~/turtlebot3_ws/src && cd ~/turtlebot3_ws/src $ git clone -b jazzy https://github.com/ROBOTIS-GIT/turtlebot3.git $ git clone -b jazzy https://github.com/ROBOTIS-GIT/ld08_driver.git $ git clone -b jazzy https://github.com/ROBOTIS-GIT/coin_d4_driver $ cd ~/turtlebot3_ws/src/turtlebot3 $ rm -r turtlebot3_cartographer turtlebot3_navigation2 $ cd ~/turtlebot3_ws/ $ echo 'source /opt/ros/jazzy/setup.bash' >> ~/.bashrc $ source ~/.bashrc $ colcon build --symlink-install --parallel-workers 1 $ echo 'source ~/turtlebot3_ws/install/setup.bash' >> ~/.bashrc $ source ~/.bashrc - USB Port Settings for OpenCR
[TurtleBot3 SBC]$ sudo cp `ros2 pkg prefix turtlebot3_bringup`/share/turtlebot3_bringup/script/99-turtlebot3-cdc.rules /etc/udev/rules.d/ $ sudo udevadm control --reload-rules $ sudo udevadm trigger - ROS Domain ID Setting
In ROS 2 DDS communication,
ROS_DOMAIN_IDmust match between the Remote PC and TurtleBot3 for communication in the same network environment.The following commands show how to assign aROS_DOMAIN_IDto the SBC of the TurtleBot3.- The default ID of the TurtleBot3 is
30. - Configuring the
ROS_DOMAIN_IDfor the Remote PC and SBC of the TurtleBot3 to30is recommended.
[TurtleBot3 SBC]$ echo 'export ROS_DOMAIN_ID=30 #TURTLEBOT3' >> ~/.bashrc $ source ~/.bashrc
- The default ID of the TurtleBot3 is
WARNING : Do not use an identical ROS_DOMAIN_ID to others in the same network. It will cause a conflict of communication between users under the same network environment.
LDS Configuration
| LDS-01 | LDS-02 | LDS-03 |
|---|---|---|
|
|
|
Depending on your LDS model, use the appropriate model: LDS-01, LDS-02, or LDS-03.
[TurtleBot3 SBC]
$ echo 'export LDS_MODEL=LDS-01' >> ~/.bashrc # If you are using LDS-01
$ echo 'export LDS_MODEL=LDS-02' >> ~/.bashrc # If you are using LDS-02
$ echo 'export LDS_MODEL=LDS-03' >> ~/.bashrc # If you are using LDS-03
Apply changes with the command below.
[TurtleBot3 SBC]
$ source ~/.bashrc
Raspberry Pi Camera
Introducing how to use the RPi camera with TurtleBot3 running Ubuntu 24.04 on a Raspberry Pi. There are various ways to publish the output of a RPi camera as a topic.
One method is to use the camera-ros package, which relies on the libcamera stack, and another method is to use the v4l2-camera package, which uses the V4L2 (Video4Linux2) framework. In Ubuntu 24.04, and using libcamera for camera management is highly recommended. The shift away from V4L2 is in line with the overall trend to use libcamera for better performance and compatibility with modern hardware.
Method 1. Using the camera-ros package
This method is suitable for Raspberry Pi cameras using the libcamera stack. It is ideal for projects that demand high-quality imaging and fine-tuned control over camera settings. For more information about camera_ros, see the camera_ros documentation.
1. Install Required Tools
[TurtleBot3 SBC]
$ sudo apt update
$ sudo apt install -y python3-pip git python3-jinja2 \
libboost-dev libgnutls28-dev openssl libtiff-dev pybind11-dev \
qtbase5-dev libqt5core5a libqt5widgets5 meson cmake \
python3-yaml python3-ply \
libglib2.0-dev libgstreamer-plugins-base1.0-dev
$ sudo apt install ros-jazzy-camera-ros
python3-colcon-meson: Enables colcon to build Meson-based packages like libcamerapython3-ply: Required by libcamera’s code generation toolsros-jazzy-camera-ros: Installs the camera_ros node that uses libcamera
2. Clone libcamera Source
This step clones the official Raspberry Pi fork of libcamera, which provides full compatibility and optimized support for Raspberry Pi camera modules.
[TurtleBot3 SBC]
$ git clone -b v0.5.2 https://github.com/raspberrypi/libcamera.git
3. Build and Install libcamera
This installs libcamera to /usr/local and makes it available system-wide.
[TurtleBot3 SBC]
$ cd libcamera
$ meson setup build --buildtype=release -Dpipelines=rpi/vc4,rpi/pisp -Dipas=rpi/vc4,rpi/pisp -Dv4l2=true -Dgstreamer=enabled -Dtest=false -Dlc-compliance=disabled -Dcam=disabled -Dqcam=disabled -Ddocumentation=disabled -Dpycamera=enabled
$ ninja -C build -j 1
$ sudo ninja -C build install -j 1
$ sudo ldconfig
After installation, add the installation path of the built libcamera to LD_LIBRARY_PATH so that it is used.
$ export LD_LIBRARY_PATH=/usr/local/lib/aarch64-linux-gnu:$LD_LIBRARY_PATH
4. Launch the Camera Node
You can now launch the camera node using the provided launch file.
[TurtleBot3 SBC]
$ ros2 launch turtlebot3_bringup camera.launch.py
5. View Camera Input
You can verify that the camera node is publishing image data correctly using rqt_image_view, a GUI tool for displaying ROS 2 image topics.
[Remote PC]
$ rqt_image_view
Method 2. Using the v4l2-camera package
This method is better suited for USB cameras and legacy Raspberry Pi camera setups. It relies on the V4L2 (Video4Linux2) framework, making it simpler to set up and compatible with a broader range of devices. For more information about v4l2_camera, see the v4l2_camera documentation.
1. Install ros-jazzy-v4l2-camera, raspi-config, ros-jazzy-image-transport-plugins, v4l-utils
[TurtleBot3 SBC]
$ sudo apt-get install ros-jazzy-v4l2-camera raspi-config ros-jazzy-image-transport-plugins v4l-utils
ros-jazzy-v4l2-camera: A package that publishes camera output as a topic.raspi-config: A tool for configuring camera device connections on Raspberry Pi.ros-jazzy-image-transport-plugins: Converts image_raw to compressed images for smoother transmission.v4l-utils: A utility that assists with connection.
2. Run raspi-config
v4l2-camera package uses the legacy driver. So we must configure the use of the legacy driver. If this step is completed, the camera node of the camera-ros package will no longer be able to detect the camera. To use the camera-ros package after this step, you must disable the legacy driver again.
[TurtleBot3 SBC]
$ sudo raspi-config
Select Interface Options.
Select I1 and set enable legacy camera support. This allows the use of the legacy driver, bcm2835 MMAL. Then, reboot the system to apply the changes.
3. You can check camera_name by this command.
[TurtleBot3 SBC]
$ v4l2-ctl --list-devices
In this case, camera name is mmal_service_16.1.
4. Run v4l2_camera_node
[TurtleBot3 SBC]
$ ros2 run v4l2_camera v4l2_camera_node
5. View Camera Input
You can verify that the camera node is publishing image data correctly using rqt_image_view, a GUI tool for displaying ROS 2 image topics.
[Remote PC]
$ rqt_image_view
NOTE
To optimize camera data transmission speed, try the following methods.
-
Use
/camera/image_raw/compressed
Subscribing directly to the/camera/image_rawtopic can cause significant latency if the network is slow or bandwidth is limited. You can select/camera/image_raw/compressedin rqt_image_view. -
Adjust Resolution
Higher resolutions require more bandwidth, which can cause lag. So, lowering the resolution can reduce latency and improve performance. A recommended resolution is 320x240, which strikes a good balance between image quality and transmission speed and can be adjusted via command.
More Info
For detailed specifications and advanced settings, please check the 13.More Info - 13.1.Appendixes - Raspberry Pi Camera for a comprehensive guide on hardware capabilities and software features.
Camera Calibration
If you plan to use advanced vision features like camera calibration, you can find the detailed instructions here.
Trouble Shooting
If the error messageUnable to open camera calibration fileappears, check the solution here.
Please refer to the Ubuntu Blog posts below for more useful information.
This is it! Now you are done with SBC setup :)
Next Step : OpenCR Setup
SBC Setup
WARNING
- This process may take long time. Do not use battery power while following this section, plug your PC into a DC wall power supply.
- An HDMI monitor and input devices such as a keyboard and a mouse will be required to complete this setup.
Prepare microSD Card and Reader
If your PC do not have a microSD slot, use a microSD card reader to burn the required recovery image to the SD card.
Download TurtleBot3 SBC Image
Download the correct image file for your hardware and ROS version.
Noetic version images are created based on Ubuntu 20.04.
![]() Download
Download Raspberry Pi 3B+ ROS Noetic image
SHA256 : a7c57e20f2ee4204c95315866f4a274886094f7c63ed390b6d06d95074830309
![]() Download
Download Raspberry Pi 4B (2GB or 4GB) ROS Noetic image
SHA256 : 9d48925a78381885916a6f3bb77891adbfae2b271b05fe2ae9a9b7ebd12c46cc
- Please note that this image may not compatible with the Raspberry Pi 4B with 8GB RAM.
Recovery image files may be modified without any prior notice.
Unzip the downloaded image file
Extract the .img file and save it to your local disk.
Burn the image file
Choose your preferred tool to burn the image to the microSD card.
For example, the Raspberry Pi Imager or Linux Disks utility can be used.
Raspberry Pi Imager
Please refer to this article to find more information about Raspberry Pi Imager.
If you have a dependency error for the .deb installation of the imager, use snap install. (This version of imager is not the latest, so it may be a little different from the picture below)
[Remote PC]
$ sudo snap install rpi-imager
$ rpi-imager
- Click
CHOOSE OS. - Click
Use customand select the extracted.imgfile from local disk. - Click
CHOOSE STORAGEand select the microSD card. - Click
WRITEto start burning the image.
Disks Utility
Disks utility is included in the recent Ubuntu Desktop. Search for “Disks” and launch the app.
- Select the microSD card in the left panel.
- Select
Restore Disk Imageoption. - Open the
.imgfile from local disk. - Click
Start Restoring...>Restorebutton.
Resize the Partition
In order to reduce the size of recovery image file and to decrease the time to burn the image onto microSD, the recovery partition is minimized.
Please resize the partition to use any available unallocated space.
Be careful not to select an incorrect disk or partition. Partitioning a system disk of your PC may cause serious system malfunctions.
![]() Download or install GParted GUI tool
Download or install GParted GUI tool
- Select the microSD card from the menu (mounted location may vary by system).
- Right click on the yellow partition.
- Select
Resize/Moveoption. - Drag the right edge of the partition to all the way to the right end.
- Click
Resize/Movebutton. - Click the
Apply All Operationsgreen check button at the top.
Configure the WiFi Network Setting
- Open a terminal window with
Alt+Ctrl+Tand go to the netplan directory on the microSD card.
Start editing the50-cloud-init.yamlfile with superuser permissions.
[Remote PC]$ cd /media/$USER/writable/etc/netplan $ sudoedit 50-cloud-init.yamlReplace the
WIFI_SSIDandWIFI_PASSWORDwith your wifi SSID and password.
Save the file withCtrl+Sand exit withCtrl+X.

If “No such file or directory” is returned, make sure the microSD is mounted correctly
- Boot Up the Raspberry Pi
a. Connect the HDMI cable of the monitor to the HDMI port of the Raspberry Pi.
b. Connect the input devices to the USB port of Raspberry Pi. c. Insert the microSD card.
d. Connect power (either with USB or the OpenCR) to turn on the Raspberry Pi.
e. Login with IDubuntuand PASSWORDturtlebot.`
The HDMI cable has to be connected before powering on the Raspberry Pi, or else the HDMI port of the Raspberry Pi will be disabled.
ROS Network Configuration
NOTE : If you encounter apt failures related to the ROS GPG key (due to the existing GPG expiration), you may need to update your GPG key. Please see ROS GPG Key Expiration Incident, and proceed to the given solution.
Please follow the instructions below on the SBC (Raspberry Pi).
- Confirm the WiFi IP address.
[Turtlebot3 SBC]$ ifconfig - Edit the
.bashrcfile.
[Turtlebot3 SBC]$ nano ~/.bashrc - Find the
ROS_MASTER_URIandROS_HOSTNAMEsetting section, then modify the IP addresses to the correct addresses for your devices. [Turtlebot3 SBC]export ROS_MASTER_URI=http://{IP_ADDRESS_OF_REMOTE_PC}:11311 export ROS_HOSTNAME={IP_ADDRESS_OF_RASPBERRY_PI_3} -
Save the file with
Ctrl+Sand exit the nano editor withCtrl+X. - Apply changes with the command below.
[Turtlebot3 SBC]$ source ~/.bashrc
NEW LDS-02 Configuration
| LDS-01 | LDS-02 |
|---|---|
|
|
The TurtleBot3 LDS has been updated to LDS-02 since 2022 models.
Please follow the instructions below on the SBC (Raspberry Pi) of TurtleBot3.
- Install the LDS-02 driver and update TurtleBot3 package
[Turtlebot3 SBC]$ sudo apt update $ sudo apt install libudev-dev $ cd ~/catkin_ws/src $ git clone -b noetic https://github.com/ROBOTIS-GIT/ld08_driver.git $ cd ~/catkin_ws/src/turtlebot3 && git pull $ rm -r turtlebot3_description/ turtlebot3_teleop/ turtlebot3_navigation/ turtlebot3_slam/ turtlebot3_example/ $ cd ~/catkin_ws && catkin_make - Export the LDS_MODEL to the bashrc file. Depending on your LDS model, use
LDS-01orLDS-02.
[Turtlebot3 SBC]$ echo 'export LDS_MODEL=LDS-02' >> ~/.bashrc $ source ~/.bashrc
This is it! Now you are done with the SBC setup :)
Next Step : OpenCR Setup
Click to expand : Manual SBC Setup Instructions
Please be aware that this manual setup takes a lot more time than burning the recovery image file, but allows flexible choice of package installation. This instruction is not recommended for beginners.
 Download the proper
 Ubuntu 20.04.1(Focal) Preinstalled Serverimage on your PC.-
Extract the downloaded file.
-
Burn the
.imgfile to the microSD card. -
Boot Up the Raspberry Pi
a. Connect the HDMI cable of the monitor to the HDMI port of Raspberry Pi.
b. Connect input devices to the USB port of Raspberry Pi.
c. Insert the microSD card.
d. Connect the power (either with USB or OpenCR) to turn on the Raspberry Pi. - Configure the Raspberry Pi
a. Log in with the default username (ubuntu) and password (ubuntu). After logging in, system will ask you to change the password.
b. Open the automatic update settings file.$ sudo nano /etc/apt/apt.conf.d/20auto-upgrades - Change the update settings as below.
APT::Periodic::Update-Package-Lists "0"; APT::Periodic::Unattended-Upgrade "0";a. Save the file with
Ctrl+Sand exit withCtrl+X. - Configure the WiFi network settings.
$ sudoedit /etc/netplan/50-cloud-init.yaml -
When the editor is opened, append below contents at the end of the file.
Replace theWIFI_SSIDandWIFI_PASSWORDwith your wifi SSID and password.
Save the file withCtrl+Sand exit withCtrl+X. - Reboot the Raspberry Pi.
$ sudo reboot - Set
systemdto prevent boot-up delay even if there is no network at startup. Run the command below to mask thesystemdprocess using the following command.$ systemctl mask systemd-networkd-wait-online.service - Disable Suspend and Hibernation
$ sudo systemctl mask sleep.target suspend.target hibernate.target hybrid-sleep.target - After rebooting the Raspberry Pi, if you wish to work from the Remote PC using SSH, use the below command to log in from the remote PC terminal. The default password is ubuntu.
$ ssh ubuntu@{IP Address of Raspberry PI} - Install ROS Noetic Ninjemys
Enter the below commands to the terminal one at a time.
In order to check the details of the easy installation script, please refer to the script file.$ sudo apt-get update $ sudo apt-get upgrade $ wget https://raw.githubusercontent.com/ROBOTIS-GIT/robotis_tools/master/install_ros_noetic_rpi.sh $ chmod 755 ./install_ros_noetic_rpi.sh $ bash ./install_ros_noetic_rpi.shIf the above installation fails, please refer to the official ROS Noetic installation guide.
- Install and Build ROS Packages.
$ sudo apt install ros-noetic-rosserial-python ros-noetic-tf $ sudo apt install ros-noetic-hls-lfcd-lds-driver $ sudo apt install ros-noetic-turtlebot3-msgs $ sudo apt install ros-noetic-dynamixel-sdk $ cd ~/catkin_ws/src $ git clone -b noetic https://github.com/ROBOTIS-GIT/turtlebot3.git $ cd ~/catkin_ws/src/turtlebot3 $ rm -r turtlebot3_description/ turtlebot3_teleop/ turtlebot3_navigation/ turtlebot3_slam/ turtlebot3_example/ $ cd ~/catkin_ws/ $ catkin_make -j1 $ source ~/.bashrc - USB Port Settings
$ rosrun turtlebot3_bringup create_udev_rules - ROS Network Configuration
Confirm the WiFi IP address and edit the
.bashrcfile$ nano ~/.bashrc - Modify the IP addresses of
ROS_MASTER_URIandROS_HOSTNAME.export ROS_MASTER_URI=http://{IP_ADDRESS_OF_REMOTE_PC}:11311 export ROS_HOSTNAME={IP_ADDRESS_OF_RASPBERRY_PI_3} -
Save the file and exit the nano editor.
- LDS Configuration
The TurtleBot3 LDS has been updated include the LDS-02 since 2022.
Please follow the instructions below on the SBC (Raspberry Pi) of the TurtleBot3 to configure the LDS.$ sudo apt update $ sudo apt install libudev-dev $ cd ~/catkin_ws/src $ git clone -b noetic https://github.com/ROBOTIS-GIT/ld08_driver.git $ cd ~/catkin_ws && catkin_make - Export the LDS_MODEL in the bashrc file. Depending on your LDS model, use
LDS-01orLDS-02.$ echo 'export LDS_MODEL=LDS-01' >> ~/.bashrc $ source ~/.bashrc - Apply changes with the command below.
$ source ~/.bashrc
Please refer to the Ubuntu Blog below for more useful information.