
SLAM
NOTE
- SLAM should be run on the Remote PC.
- Make sure to launch Bringup on the TurtleBot3 before executing any operations.
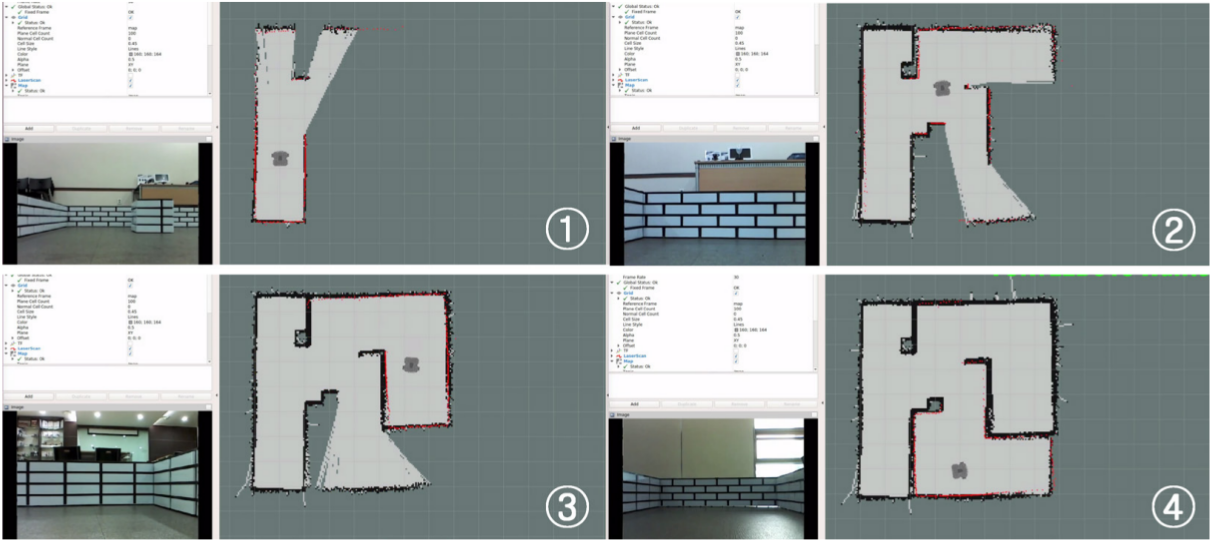
SLAM (Simultaneous Localization and Mapping) is a technique to draw a map by estimating current location in an arbitrary space. The video here shows you how accurately TurtleBot3 can draw a map using SLAM techniques.
NOTE
- SLAM should be run on the Remote PC.
- Make sure to launch Bringup on the TurtleBot3 before executing any operations.
SLAM (Simultaneous Localization and Mapping) is a technique to draw a map by estimating current location in an arbitrary space. The video here shows you how accurately TurtleBot3 can draw a map using SLAM techniques.
Run SLAM Node
- If the
Bringupis not running on the TurtleBot3 SBC, launch the Bringup first. Skip this step if you have launched bringup previously.- Open a new terminal from Remote PC with
Ctrl+Alt+Tand connect to Raspberry Pi with its IP address. The default password is ubuntu.$ ssh ubuntu@{IP_ADDRESS_OF_RASPBERRY_PI}Please use the proper keyword among
burger,waffle,waffle_pifor theTURTLEBOT3_MODELparameter.
[TurtleBot3 SBC]$ export TURTLEBOT3_MODEL=burger $ ros2 launch turtlebot3_bringup robot.launch.py
- Open a new terminal from Remote PC with
- Open a new terminal from Remote PC with
Ctrl+Alt+Tand launch the SLAM node. The Cartographer is used as a default SLAM method.
[Remote PC]$ export TURTLEBOT3_MODEL=burger $ ros2 launch turtlebot3_cartographer cartographer.launch.py
 How to save the TURTLEBOT3_MODEL parameter?
The $ export TURTLEBOT3_MODEL=${TB3_MODEL} command can be omitted if the TURTLEBOT3_MODEL parameter is predefined in the .bashrc file.
The .bashrc file is automatically loaded when a terminal window is created.
- Example of defining
TurtlBot3 Burgeras a default model.
[Remote PC]$ echo 'export TURTLEBOT3_MODEL=burger' >> ~/.bashrc $ source ~/.bashrc - Example of defining
TurtlBot3 Waffle Pias a default model.
[Remote PC]$ echo 'export TURTLEBOT3_MODEL=waffle_pi' >> ~/.bashrc $ source ~/.bashrc
- If the
Bringupis not running on the TurtleBot3 SBC, launch the Bringup first. Skip this step if you have launched bringup previously.- Open a new terminal from Remote PC with
Ctrl+Alt+Tand connect to Raspberry Pi with its IP address. The default password is ubuntu.$ ssh ubuntu@{IP_ADDRESS_OF_RASPBERRY_PI}Please use the proper keyword among
burger,waffle,waffle_pifor theTURTLEBOT3_MODELparameter.
[TurtleBot3 SBC]$ export TURTLEBOT3_MODEL=burger $ ros2 launch turtlebot3_bringup robot.launch.py
- Open a new terminal from Remote PC with
- Open a new terminal from Remote PC with
Ctrl+Alt+Tand launch the SLAM node. The Cartographer is used as a default SLAM method.
[Remote PC]$ export TURTLEBOT3_MODEL=burger $ ros2 launch turtlebot3_cartographer cartographer.launch.py
How to save the TURTLEBOT3_MODEL parameter?
The $ export TURTLEBOT3_MODEL=${TB3_MODEL} command can be omitted if the TURTLEBOT3_MODEL parameter is predefined in the .bashrc file.
The .bashrc file is automatically loaded when a terminal window is created.
- Example of defining
TurtlBot3 Burgeras a default model.
[Remote PC]$ echo 'export TURTLEBOT3_MODEL=burger' >> ~/.bashrc $ source ~/.bashrc - Example of defining
TurtlBot3 Waffle Pias a default model.
[Remote PC]$ echo 'export TURTLEBOT3_MODEL=waffle_pi' >> ~/.bashrc $ source ~/.bashrc
- Run roscore on the Remote PC.
[Remote PC]$ roscore - If
Bringupis not running on the TurtleBot3 SBC, launch Bringup. Skip this step if bringup is already running.- Open a new terminal on the Remote PC with
Ctrl+Alt+Tand connect to Raspberry Pi with its IP address. The default password is turtlebot. Specify your TurtleBot3 model (burger,waffle,waffle_pi) using theTURTLEBOT3_MODELparameter. [Remote PC]$ ssh pi@{IP_ADDRESS_OF_RASPBERRY_PI} $ export TURTLEBOT3_MODEL=${TB3_MODEL} $ roslaunch turtlebot3_bringup turtlebot3_robot.launch
- Open a new terminal on the Remote PC with
- Open a new terminal on the Remote PC with
Ctrl+Alt+Tand launch the SLAM node. The Gmapping is used as the default SLAM method. Specify your TurtleBot3 model (burger,waffle,waffle_pi) using theTURTLEBOT3_MODELparameter. [Remote PC]$ export TURTLEBOT3_MODEL=burger $ roslaunch turtlebot3_slam turtlebot3_slam.launch
How to save the TURTLEBOT3_MODEL parameter?
The $ export TURTLEBOT3_MODEL=${TB3_MODEL} command can be omitted if the TURTLEBOT3_MODEL parameter is predefined in your system’s .bashrc file.
The .bashrc file is automatically loaded when a terminal window is created.
- Example defining
TurtlBot3 Burgeras the default model.
[Remote PC]$ echo 'export TURTLEBOT3_MODEL=burger' >> ~/.bashrc $ source ~/.bashrc - Example defining
TurtlBot3 Waffle Pias the default model.
[Remote PC]$ echo 'export TURTLEBOT3_MODEL=waffle_pi' >> ~/.bashrc $ source ~/.bashrc
Read more about other SLAM methods
- Gmapping (ROS WIKI, Github)
- Install required packages on the remote PC.
Packages related to Gmapping have already been installed on PC Setup section. - Launch the Gmapping SLAM node.
[Remote PC]$ roslaunch turtlebot3_slam turtlebot3_slam.launch slam_methods:=gmapping
- Install required packages on the remote PC.
- Cartographer (ROS WIKI, Github)
- Download and build required packages on the remote PC.
The Cartographer currently does not provide a binary installation method for ROS1 Noetic. Please download and build the source code as follows. Please refer to the official wiki page for more details.
[Remote PC]
$ sudo apt update $ sudo apt install -y python3-wstool python3-rosdep ninja-build stow $ cd ~/catkin_ws/src $ wstool init src $ wstool merge -t src https://raw.githubusercontent.com/cartographer-project/cartographer_ros/master/cartographer_ros.rosinstall $ wstool update -t src $ sudo rosdep init $ rosdep update $ rosdep install --from-paths src --ignore-src --rosdistro=noetic -y $ src/cartographer/scripts/install_abseil.sh $ sudo apt remove ros-noetic-abseil-cpp $ catkin_make_isolated --install --use-ninja- Launch the Cartographer SLAM node.
[Remote PC]$ source ~/catkin_ws/install_isolated/setup.bash $ roslaunch turtlebot3_slam turtlebot3_slam.launch slam_methods:=cartographer
- Download and build required packages on the remote PC.
- Karto (ROS WIKI, Github)
- Install dependent packages on PC.
[Remote PC]$ sudo apt install ros-noetic-slam-karto - Launch the Karto SLAM node.
[Remote PC]$ roslaunch turtlebot3_slam turtlebot3_slam.launch slam_methods:=karto
- Install dependent packages on PC.
Run Teleoperation Node
Once SLAM node is successfully up and running, TurtleBot3 will be exploring unknown area of the map using teleoperation. It is important to avoid vigorous movements such as changing the linear and angular speed too quickly. When building a map using the TurtleBot3, it is a good practice to scan every corner of the map.
- Open a new terminal and run the teleoperation node from the Remote PC.
Please use the proper keyword amongburger,waffle,waffle_pifor theTURTLEBOT3_MODELparameter.
[Remote PC]$ export TURTLEBOT3_MODEL=burger $ ros2 run turtlebot3_teleop teleop_keyboard Control Your TurtleBot3! --------------------------- Moving around: w a s d x w/x : increase/decrease linear velocity a/d : increase/decrease angular velocity space key, s : force stop CTRL-C to quit - Start exploring and drawing the map.
Once the SLAM node is successfully up and running, the TurtleBot3 will be capable of exploring unknown areas of the map using teleoperation. It is important to avoid sudden movements such as changing the linear and angular speed too quickly. When building a map using the TurtleBot3, it is a good practice to scan every corner of the map.
- Open a new terminal and run the teleoperation node from the Remote PC.
Please use the proper keyword amongburger,waffle,waffle_pifor theTURTLEBOT3_MODELparameter.
[Remote PC]$ export TURTLEBOT3_MODEL=burger $ roslaunch turtlebot3_teleop turtlebot3_teleop_key.launch Control Your TurtleBot3! --------------------------- Moving around: w a s d x w/x : increase/decrease linear velocity a/d : increase/decrease angular velocity space key, s : force stop CTRL-C to quit - Start exploring and drawing the map.
Tuning Guide
The SLAM in ROS2 uses Cartographer ROS which provides configuration options via Lua file.
Below options are defined in turtlebot3_cartographer/config/turtlebot3_lds_2d.lua file.
For more details about each options, please refer to the Cartographer ROS official documentation.
MAP_BUILDER.use_trajectory_builder_2d
This option sets the type of SLAM.
TRAJECTORY_BUILDER_2D.min_range
This option sets the minimum usable range of the lidar sensor.
TRAJECTORY_BUILDER_2D.max_range
This option sets the maximum usable range of the lidar sensor.
TRAJECTORY_BUILDER_2D.missing_data_ray_length
In 2D, Cartographer replaces ranges further than max_range with TRAJECTORY_BUILDER_2D.missing_data_ray_length.
TRAJECTORY_BUILDER_2D.use_imu_data
If you use 2D SLAM, range data can be handled in real-time without an additional source of information so you can choose whether you’d like Cartographer to use an IMU or not.
TRAJECTORY_BUILDER_2D.use_online_correlative_scan_matching
Local SLAM : The RealTimeCorrelativeScanMatcher can be toggled depending on the reliability of the sensor.
TRAJECTORY_BUILDER_2D.motion_filter.max_angle_radians
Local SLAM : To avoid inserting too many scans per submaps, A scan is dropped if the motion does not exceed a certain angle.
POSE_GRAPH.optimize_every_n_nodes
Global SLAM : Setting POSE_GRAPH.optimize_every_n_nodes to 0 is a handy way to disable global SLAM and concentrate on the behavior of local SLAM.
POSE_GRAPH.constraint_builder.min_score
Global SLAM : Threshold for the scan match score below which a match is not considered. Low scores indicate that the scan and map do not look similar.
POSE_GRAPH.constraint_builder.global_localization_min_score
Global SLAM : Threshold below which global localizations are not trusted.
NOTE: Constraints can be visualized in RViz, it is very handy to tune global SLAM. One can also toggle POSE_GRAPH.constraint_builder.log_matches to get regular reports of the constraints builder formatted as histograms.
Gmapping has many parameters to change performances for different environments. You can get information about specific parameters from the ROS WiKi or referring to Chapter 11 of ROS Robot Programming. This tuning guide provides tips when configuring gmapping parameters. If you want to optimize SLAM performance for your environment, this section might be helpful.
The below parameters are defined in the turtlebot3_slam/config/gmapping_params.yaml file.
maxUrange
This parameter sets the maximum usable range of the lidar sensor.
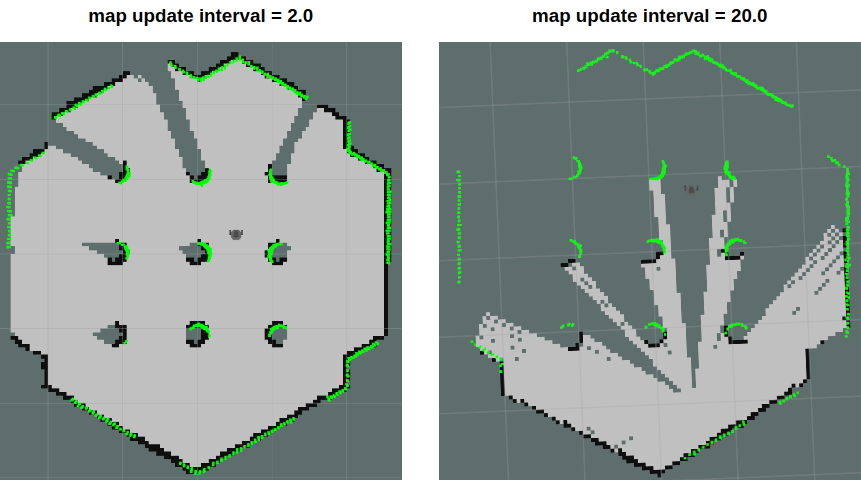
map_update_interval
This parameter defines time period between map updates.
The smaller the value, the more frequently the map is updated.
However, setting this too small will be require more processing power for map calculation.
minimumScore
This parameter sets the minimum score value that determines the success or failure of the sensor’s scan data matching test. This can reduce errors in the expected position of the robot in a large area. If the parameter is set properly, you will see information similar to the output shown below.
Average Scan Matching Score=278.965
neff= 100
Registering Scans:Done
update frame 6
update ld=2.95935e-05 ad=0.000302522
Laser Pose= -0.0320253 -5.36882e-06 -3.14142
If set too high, you might see the warnings below.
Scan Matching Failed, using odometry. Likelihood=0
lp:-0.0306155 5.75314e-06 -3.14151
op:-0.0306156 5.90277e-06 -3.14151
linearUpdate
When the robot translates a larger distance than this value, it will run the scanning process.
angularUpdate
When the robot rotates more than this value, it will run the scanning process. It is recommended to set this value lower than linearUpdate.
Save Map
The map is drawn based on the robot’s odometry, tf and scan information. These map data is drawn in the RViz window as the TurtleBot3 was traveling. After creating a complete map of desired area, save the map data to the local drive for the later use.
- Launch the map_saver_cli node in the nav2_map_server package to create map files.
The map file is saved in the directory where the map_saver_cli node is launched at.
Unless a specific file name is provided,mapwill be used as a default file name and createmap.pgmandmap.yaml.
[Remote PC]$ ros2 run nav2_map_server map_saver_cli -f ~/map
The -f option specifies a folder location and a file name where files to be saved.
With the above command, map.pgm and map.yaml will be saved in the home folder ~/(/home/${username}).
The map is drawn based on the robot’s odometry, tf and scan information. This map data is drawn in the RViz window as the TurtleBot3 is traveling. After creating a complete map of desired area, save the map data to the local drive for later use.
- Launch the map_saver node in the map_server package to create map files.
The map file is saved in the directory where the map_saver node is launched. Unless a specific file name is provided,mapwill be used as a default file name and themap.pgmandmap.yamlfiles will be saved.
[Remote PC]$ rosrun map_server map_saver -f ~/map
The -f option specifies a folder location and a file name where files are to be saved.
With the above command, map.pgm and map.yaml will be saved in the home folder ~/(/home/${username}).
Map
The map uses two-dimensional Occupancy Grid Map (OGM), which is commonly used in ROS. The saved map will look like the figure below, where white area is collision free area while black area is occupied and inaccessible area, and gray area represents the unknown area. This map is used for the Navigation.
The figure below shows the result of creating a large map using TurtleBot3. It took about an hour to create a map with a travel distance of about 350 meters.
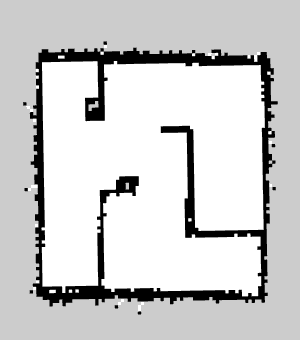
The map uses a two-dimensional Occupancy Grid Map (OGM), which is commonly used in ROS. The saved map will look like the figure below, where the white area is collision free area while the black area is occupied and inaccessible, and the gray area represents the unknown. This map is used for Navigation.
The figure below shows the result of creating a large map using TurtleBot3. It took about an hour to create a map with a travel distance of about 350 meters.